Page is loading ...

Important! For safety reasons, this mount must be
secured to a wood stud and the stud must be capable of
supporting the combined weight of the mount and display.
1. Usingahighqualitystudnder,locateandmarkone
stud for securing the mount.
2. With the help of another person, place the mount
againstthewalloverthemarkedstud.Makesurethe
mount is level.
3. Whileanotherpersonholdsthemountinplace,mark
two locations on the wall where the mount is to be
installed. Be sure to use the center of the stud.
4. Set the mount aside and drill a 1/4” (6 mm) pilot hole at
eachmarkedlocation.
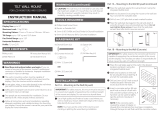
5. Placethemountbackagainstthewallandsecure
it using the Lag Bolts (Q) and Lag Bolt Washers (R)
provided (see Fig. 1). Do not over-tighten these bolts
and do not release the mount until all bolts are in place
Part 1b – Mounting to the
Wall (Concrete)
Part 2 - Attaching the Arms
to the Display
Warnings
1.
Makesuretheseinstructionsarereadandthoroughly
understood before attempting installation. If you
are unsure of any part of this installation, contact a
professional installer for assistance.
2. The wall or mounting surface must be capable of
supporting the combined weight of the mount and the
display; otherwise the structure must be reinforced.
3. Safety gear and proper tools must be used. Failure to
do so can result in property damage and/or serious
injury.
4. A minimum of two people are required for this
installation. Do not attempt to install this mount alone
under any circumstance.
5. Follow all instructions and recommendations
regarding adequate ventilation and suitable locations
for mounting your display. Consult the owner‘s manual
for your display for more information
Hardware Kit
(Ref) Item (Qty)Bag#
1
2
3
4
5
6
(A)M4x12Bolt(x4)
(B)M4x30Bolt(x4)
(C)M4LockWasher(x4)
(D)M5x12Bolt(x4)
(E)M5x30Bolt(x4)
(F)M5LockWasher(x4)
(G)M6x12Bolt(x4)
(H)M6x35Bolt(x4)
(I)M6LockWasher(x4)
(J)M8x16Bolt(x4)
(K)M8x40Bolt(x4)
(L)M8LockWasher(x4)
(M)SmallSpacer(x4)
(N)LargeSpacer(x4)
(O)M6Washer(x4)
(P) Concrete
Anchor(x4)
(Q)M8x63
LagBolt(x4)
(R)M6LagBolt
Washer(x4)
Important! For safety reasons, the concrete wall must be
capable of supporting the combined weight of the mount
and display.
1. With the help of another person, place the mount
againstthewallinthedesiredlocationandmakesure
it is level.
2. Whileanotherpersonholdsthemountinplace,mark
at least two locations on the wall where the mount is to
be installed.
3. Set the mount aside and drill a 7/16” (11 mm) pilot hole
ateachmarkedlocation.Removeanyexcessdustfrom
the holes.
4. Insert a Concrete Anchor (P) into each hole so that it is
ushwiththeconcretesurface.Ahammercanbeused
to lightly tap the anchors into place if necessary.
NOTE: If the concrete wall is covered by a layer of plaster
or drywall, the concrete anchor must pass completely
throughthelayertorestushwiththeconcrete
surface.
5. Placethemountbackagainstthewallandsecure
it using the Lag Bolts (Q) and Lag Bolt Washers (R)
provided (see Fig. 1). Do not over-tighten these bolts
and do not release the mount until all bolts are in
place.
Fig.1 Attach the wall
plate to the wall.
Important! Useextracareduringthepartofthe
installation. If possible, avoid placing your display
facedown as it may damage the viewing surface.
Note: Your mount comes with a selection of bolt
diameters and lengths to accommodate a wide
variety of display models. Not all of the hardware
inthekitwillbeused.
1. Determine the correct length of bolt to use with your
displaybyrstexaminingthebackofyourdisplay.
A.Ifyourdisplayhasaatback,youwilluseoneofthe
shorterbolts(A,D,G,orJ)fromthehardwarekit.
B.Ifyourdisplayhasacurvedorrecessedback,youwill
use one of the longer bolts (B, E, H, or K) along with a
spacer(MorN).
Fordisplayswithatbacks...
For displays with curved or
recessedbacks
Fig.3-Usealongerboltandspacerfordisplayswith
curvedorrecessedbacks.DonotusetheM6Washer
(O)ifyouareusingtheM8Bolts(JorK).
Part 3 - Final Installation and
Adjustment
Tools Required
Phillips Head Screw Driver
RatchetorDriverwith1/2”(13mm)Socket
Electric Drill
1/4” (6 mm) Drill Bit and Stud Finder for Drywall
Installation
7/16”(11mm)MasonryBitforConcreteInstallation
1. With the help of another person, carefully lift your
display and place it on mount (see Fig. 4). Place the
display in the middle of the mount, and do not release
the display until the mounting arms have securely
hookedontothecrossbars.
2. Important!Movethesafetytablocatedoneacharm
into position to avoid having the display accidentally
liftedfromthemount.Apadlockcanbeinsertedinto
one of the tabs to help prevent theft of your display
(seeFig.5).
3. Usethecablemanagementhookstohelpkeepyour
power cord and other cables in order.
4. Side-to-sideandfront-to-backadjustmentscanbe
madebyrmlygraspingyourdisplayandcarefully
moving it to the desired position.
5. If any of the arms become too lose to hold their
position, they can be tightened using the Alley Key
providedinyourhardwarekit(seeFig.6).
6. Toadjustthetiltpositionofyourdisplay,haveone
person hold the display in place while another person
loosensthetwotiltadjustmentknobslocatedoneither
sideofthemount(seeFig.7).Oncetheknobsareloose,
move the display to the desired angle. Tighten the
knobssecurelybeforereleasingthedisplay.NOTE:
Thetiltadjustmentknobshavearatchetfeature.If
youneedtochangethepositionoftheknobwithout
tightening or loosening the screw, simply pull the
knoboutbeforemovingit.
2. Determine the correct diameter of
bolt to use by carefully trying one
bolt each from Bags 1 - 4 of the
hardwarekit.Donotforceanyof
the bolts – if you feel resistance
stop immediately and try a
smaller diameter bolt.
3. Attachthearmstothebackof
your display using the bolts
identiedinSteps1and2along
withthecorrespondingLock
Washer(C,F,I,orL)(seeFig.2
and3).
A.IfyouareusingtheM4,M5,
orM6bolts(Bags1,2,and3
respectively), you will also need
tousetheM6Washers(O).
B. If you are using one of the longer
bolts on a display with a curved
orrecessedback,youwillalso
useaSpacer(MorN).Usethe
SmallerSpacer(M)forM4andM5
bolts and the Large Spacer (N) for
M6andM8bolts.
4. Makesureallscrewsaresecure,butdonotover-
tighten them.
Fig.2-Attachthearms
tothebackofyour
display
Fig.4-Carefullyhookthe
display onto the wall
plate.
Fig.5-Asmallpadlock
can be used to help
prevent theft of your
di splay.
Fig. 6 - Use the Alley
Key to tighten the
arms and prevent
unwanted movement.
Fig. 7 - Loosen the
adjustmentknobs
to change the tilt
angle. There is one
knoboneachside
of the mount.
AudiovoxElectronicsCorporation(the“Company”)warrantstoyouthe
original retail purchaser of this product that should it, under normal use
andconditions,beprovendefectiveinmaterialorworkmanshipduring
its lifetime while you own it, such defect(s) will be repaired or replaced
(at the Company’s option) without charge for parts and repair labor.
To obtain repair or replacement within the terms of this Warranty, the
product is to be delivered with proof of warranty coverage (e.g. dated bill
ofsale),specicationofdefect(s),transportationprepaid,totheCompany
at the address shown below. Do not return this product to the Retailer.
This Warranty does not cover product purchased, serviced or used
outside the United States or Canada.
ThisWarrantyisnottransferableanddoesnotextendtocostsincurred
for installation, removal or reinstallation of the product. This Warranty
does not apply if in the Company’s opinion, the product has been
damaged through alteration, improper installation, mishandling,
misuse,neglect,oraccident.THEEXTENTOFTHECOMPANY’S
LIABILITYUNDERTHISWARRANTYISLIMITEDTOTHEREPAIR
ORREPLACEMENTPROVIDEDABOVEAND,INNOEVENT,SHALL
THECOMPANY’SLIABILITYEXCEEDTHEPURCHASEPRICEPAID
BY PURCHASER FOR THE PRODUCT.
ThisWarrantyisinlieuofallotherexpresswarrantiesorliabilities.ANY
IMPLIEDWARRANTIES,INCLUDINGANYIMPLIEDWARRANTY
OFMERCHANTABILITYORFITNESSFORAPARTICULAR
PURPOSESHALLBELIMITEDTODURATIONOFTHISWARRANTY.
INNOCASESHALLTHECOMPANYBELIABLEFORANY
CONSEQUENTIALORINCIDENTALDAMAGESWHATSOEVER.No
person or representative is authorized to assume for the Company any
liabilityotherthanexpressedhereininconnectionwiththesaleofthis
product. Some states/provinces do not allow limitations on how long
animpliedwarrantylastsortheexclusionorlimitationofincidentalor
consequentialdamagesotheabovelimitationsorexclusionsmaynot
applytoyou.ThisWarrantygivesyouspeciclegalrightsandyoumay
also have other rights which vary from state/province to state/province.
U.S.A.:AudiovoxElectronicsCorporation,150MarcusBlvd.,
Hauppauge,NewYork11788
CANADA:AudiovoxReturnCenter,c/oGenco,6685KennedyRoad,
Unit3,Door16,Mississauga,OntarioL5T3A5
Trademark(s)RegisteredMarcasRegistradas.
Allotherbrandsandproductnamesaretrademarksorregistered
trademarksoftheirrespectiveowners.
©2008AudiovoxAccessoriesCorporation
111CongressionalBlvd.,Suite350
Carmel,IN46032
www.rca.com MAF120BK_US_IB_ 0 0
Limited Lifetime Warranty
Part 1a - Mounting the Wall
Plate (Drywall)
Keep your sales receipt to obtain warranty parts and
service and for proof of purchase. Attach it here and record
the serial and model numbers. These numbers are located
on the product.
ModelNo. __________________________________________
Serial No. ___________________________________________
PurchaseDate: ______________________________________
Dealer/Address/Phone ______________________________
LCD TV Wall Mount
Installation Manual
/