Page is loading ...

4
/Table of contents/Table des matières/Inhalt/
Indice/Indice/
Overview ................................................................... 5
Components ....................................................... 5
Assembly................................................................... 8
English
Übersicht ................................................................... 5
Bauteile............................................................... 5
Montage .................................................................... 8
Présentation .............................................................. 5
Composants ....................................................... 5
Montage .................................................................... 8
Français
Deutsch
Descripción general .................................................. 5
Componentes ..................................................... 5
Montaje ..................................................................... 8
Italiano
Presentazione ........................................................... 5
Componenti ........................................................ 5
Assemblaggio............................................................ 8
Español
.....................................................................................
5
......................................................................
5
..............................................................................
8

5
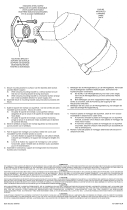
The SLR-104 is a slide rail for mounting a Sony PVM-L series 20-inch monitor in an EIA standard 19-inch rack.
Le SLR-104 est un rail-glissière conçu pour le montage d’un moniteur Sony 20 pouces de la série PVM-L dans un bâti 19 pouces
aux normes EIA.
Die Gleitschienen SLR-104 dienen zum Montieren eines 20-Zoll-Monitors der PVM-L-Serie von Sony in einem 19-Zoll-EIA-
Standardgestell.
SLR-104 es un riel deslizable para montar un monitor Sony serie PVM-L de 20 pulgadas en un soporte estándar EIA de 19 pulgadas.
SLR-104 è una guida a scorrimento per il montaggio di un monitor Sony serie PVM-L da 20 pollici in un rack standard EIA da 19
pollici.
/Monitors that can be used with the rack:/Moniteurs pouvant être montés sur l’étagère :/Folgende
Monitore können in dem Gestell montiert werden:/Monitores que pueden utilizarse con el soporte:/Monitor utilizzabili
con il rack:/
/Components/Composants/Bauteile/Componentes/Componenti/
1 qd 1 qd
The SLR-104 consists of the following components. Check to make sure that you have all the components before beginning
assembly.
The circled letters 1 to qd in the table below correspond with 1 to qd in the illustrations of the installation.
Le SLR-104 comprend les composants suivants. Vérifiez la présence de tous les composants avant de commencer le montage.
Les lettres 1 à qd encerclées dans le tableau ci-dessous correspondent aux étapes 1 à qd dans les illustrations de la procédure
d’installation.
Der SLR-104 besteht aus folgenden Komponenten. Überprüfen Sie, ob alle Komponenten vorhanden sind, bevor Sie mit der
Montage beginnen.
Die eingekreisten Buchstaben 1 bis qd in der Tabelle unten entsprechen den Buchstaben 1 bis qd in den Abbildungen zur
Montage.
El SLR-104 consta de los siguientes componentes. Antes de iniciar el montaje, asegúrese de que dispone de todos los componentes.
Las letras de la 1 a la qd incluidas en un círculo de la tabla siguiente corresponden a las mismas letras de las ilustraciones de
instalación.
Il kit SLR-104 include i componenti seguenti. Prima di procedere all’assemblaggio, verificare la presenza di tutti i componenti
elencati.
Le lettere nei cerchietti da 1 a qd della tabella sottostante rimandano alle lettere 1 a qd delle figure del montaggio.
1 qd 1 qd
(2)
Slide rails (2)
Rails-glissières (2)
Gleitschienen (2)
Rieles deslizables (2)
Guide a scorrimento (2)
1
/Overview/Présentation/Übersicht/Descripción
general/Presentazione/

6
/Overview/Présentation/Übersicht/Descripción general/
Presentazione/
2
3
4
5
1
Front brackets (left, right, one each)
Supports avant (gauche, droit, un de chaque)
Vorderer Montagewinkel (je eine für links und rechts)
Abrazaderas frontales (izquierda, derecha, una de cada)
Staffe anteriori (sinistra, destra, una per parte)
2
Rear brackets (2)
Supports arrière (2)
Hinterer Montagewinkel (2)
Abrazaderas posteriores (2)
Staffe posteriori (2)
1
Brackets (left, right, one each)
Supports (gauche, droit, un de chaque)
Halterungen (je eine für links und rechts)
Abrazaderas (izquierda, derecha, una de cada)
Staffe (sinistra, destra, una per lato)
A 4 10 mm 16
Screws A (4 × 10 mm, silver) (16)
Vis A (4 × 10 mm, chromées) (16)
Schrauben A (4 × 10 mm, silberfarben) (16)
Tornillos A (4 × 10 mm, plateados) (16)
Viti A (4 × 10 mm, colore argento) (16)
×
/
Right/Droit/Rechts/
Derecha/Destra/
/
Top/Haut/Oben/
Parte superior/Lato
superiore/
/
left/Gauche/Links/
Izquierda/Sinistra/
/
Long/
Long/Lang/
Largo/Distanza
superiore/
/
Short/
Court/Kurz/
Corto/Distanza
inferiore/
/
Judge, from the position of the screw holes (as
shown in the left figure), which side is the top./
Selon la position des trous de vis (tels qu’indiqués
ci-contre), c’est à vous de décider quel côté doit
être placé en haut./
Anhand der Position der Bohrungen (siehe
Abbildung links) können Sie sehen, welches die
Oberseite ist./
Juzgue, a partir de la posición de los orificios para
los tornillos (como se muestra en la figura situada
a la izquierda), cuál es el lado superior./
Osservando la posizione dei fori per le viti (come
mostrato nella figura di sinistra), individuare il lato
superiore./
/
Bottom/Bas/Unten/
Parte inferior/Lato
inferiore/
B 4 8 mm 4
Screws B (4 × 8 mm, black) (4)
Vis B (4 × 8 mm, noires) (4)
Schrauben B (4 × 8 mm, schwarz) (4)
Tornillos B (4 × 8 mm, negros) (4)
Viti B (4 × 8 mm, colore nero) (4)
×
6

7
7
9
q;
qs
C 4 16 mm 8
Screws C (4 × 16 mm, silver) (8)
Vis C (4 × 16 mm, chromées) (8)
Schrauben C (4 × 16 mm, silberfarben) (8)
Tornillos C (4 × 16 mm, plateados) (8)
Viti C (4 × 16 mm, colore argento) (8)
×
4
Plate nuts (4)
Ecrous en plaque (4)
Annietmuttern (4)
Tuercas de la placa (4)
Dadi a piastra (4)
φ
4 16
Plain washers (φ4) (16)
Rondelles plates (φ4) (16)
Einfache Unterlegscheiben (φ4) (16)
Arandelas planas (φ4) (16)
Rondelle piane (φ4) (16)
φ
D 5 40 mm 4
Screws D (5 × 40 mm, black) (4)
Vis D (5 × 40 mm, noires) (4)
Schrauben D (5 × 40 mm, schwarz) (4)
Tornillos D (5 × 40 mm, negros) (4)
Viti D (5 × 40 mm, colore nero) (4)
×
/
Judge, from the position of the screw holes (as shown in the
figure), which side is the top./
Selon la position des trous de vis (tels qu’indiqués ci-contre),
c’est à vous de décider quel côté doit être placé en haut./
Anhand der Position der Bohrungen (siehe Abbildung) können
Sie sehen, welches die Oberseite ist./
Juzgue, a partir de la posición de los orificios para los tornillos
(como se muestra en la figura), cuál es el lado superior./
Osservando la posizione dei fori per le viti (come mostrato
nella figura), individuare il lato superiore./
/
Short/Court/
Kurz/Corto/Distanza
inferiore/
/
Long/Long/
Lang/Largo/
Distanza superiore/
/
Bottom/Bas/Unten/Parte
inferior/Lato inferiore/
/
Top/Haut/Oben/Largo/Parte
superior/Lato superiore/
8
Nuts (8)
Ecrous (8)
Muttern (8)
Tuercas (8)
Dadi (8)
8
φ
4 12
Spring washers (φ4) (12)
Rondelles de ressort (φ4) (12)
Federscheiben (φ4) (12)
Arandelas elásticas (φ4) (12)
Rondelle elastiche (φ4) (12)
φ
qa
E 6 40 mm 4
Screws E (6 × 40 mm, black) (4)
Vis E (6 × 40 mm, noires) (4)
Schrauben E (6 × 40 mm, schwarz) (4)
Tornillos E (6 × 40 mm, negros) (4)
Viti E (6 × 40 mm, colore nero) (4)
×
qd

8
English
1 Remove the four feet from the bottom of the
monitor.
2 Separate the inner rail of the slide rail from the outer
rail.
Note
Take care not to get your fingers caugt in the sllide
rail.
3 Attach the inner rail to the monitor using four screws
A (4 × 10 mm) 5.
1
2
3 5
1
2
3
/Assembly/Montage/Montage/Montaje/
Assemblaggio/
Feet
Pieds
Unterlagen
Tacos
Piedini antiscivolo
Plate spring
Ressort à lames
Blattfeder
Muelle de la placa
Molla della piastra
/
Hold the plate spring with your finger and pull out./
Maintenez le ressort à lames avec le doigt et tirez./
Drücken Sie mit einem Finger auf die Blattfeder, und
ziehen Sie die Schienen auseinander./
Sujete el muelle de la placa con los dedos y tire de él./
Trattenere la molla della piastra con un dito e tirare
verso l’esterno./
/
Outer rail/
Rail extérieur/Außenschiene/
Riel exterior/Guida esterna/
/
Inner rail/Rail intérieur/
Innenschiene/Riel interior/Giuda interna/
Monitor
Moniteur
Monitor
Monitor
Monitor
Inner rail
Rail intérieur
Innenschiene
Riel interior
Giuda interna
5

10
4 2
5 φ q;
φ qa 8
English
4 Attach the front bracket 2 to the outer rail using
two screws A (4 × 10 mm) 5, two plain washers
(φ4) q;, two spring washers (φ4) qa, and two nuts
8.
4
Outer rail
Rail extérieur
Außenschiene
Riel exterior
Guida esterna
( )
Stopper (If the rail dose not move, lift it up.)
Butée (si le rail ne bouge pas, soulevez-la.)
Stopper (Wenn sich die Schiene nicht bewegt, heben Sie ihn an.)
Tope (si el riel no se mueve, levántelo).
Fermo (se la guida non si muove, sollevarlo).
Retainer
Dispositif de retenue
Halter
Fijador
Staffa
/
Slide the retainer until you can see the screw holes./
Faites glisser le dispositif de retenue jusqu’à ce que les
trous de vis soient apparents./
Verschieben Sie den Halter, bis Sie die Bohrungen sehen
können./
Deslice el fijador hasta que vea los orificios para los
tornillos./
Fare scorrere la staffa fino a quando non si vedono i fori./
2
q;
5
qa
8
/Assembly/Montage/Montage/Montaje/Assemblaggio/

12
5 3 5
6
7
English
5 Attach the rear bracket 3 to the outer rail using two
screws A (4 × 10 mm) 5.
6 Attach the outer rails to the rack using four screws C
(4 × 16 mm) 7 for each rail.
5
6
Outer rail
Rail extérieur
Außenschiene
Riel exterior
Guida esterna
5
q;
8
qa
3
qa
q;
q;
q;
9
9
q;
qa
7
7
/
Rack/Bâti/Gestell/
Soporte/Rack/
Outer rail
Rails extérieurs
Außenschienen
Rieles exteriores
Guide esterne
Rear
Arrière
Rückseite
Posterior
Parte posteriore
Front
Avant
Vorderseite
Frontal
Parte anteriore
9
9
/Assembly/Montage/Montage/Montaje/Assemblaggio/
/
Rack/Bâti/Gestell/
Soporte/Rack/

14
/Assembly/Montage/Montage/Montaje/Assemblaggio/
7 4 6
8
English
7 Attach the brackets 4 to the monitor using two
screws B (4 × 8 mm) 6 for each bracket.
8 Attach the monitor to the rack.
Note
Push the monitor all the way into the rack, without
releasing your grip until you hear an audible click as
the plate springs of the slide rails are fixed in place.
Unless they are fixed in place, there is a danger that
the monitor might fall out of the rack.
7
8
6
64
/
Outer rails/Rails extérieurs/Außenschienen/
Rieles exteriores/Guide esterne/
/
Rack/Bâti/Gestell/
Soporte/Rack/
Inner rail
Rail intérieur
Innenschiene
Riel interior
Guida interna
Monitor
Moniteur
Monitor
Monitor
Monitor

16
9 4
qs qd
English
9 Screw the monitor to the rack with the four screws D
(5 × 40 mm) qs or screws E (6 × 40 mm) qd by
using the four oval holes in the brackets 4. Select
the proper screws that match the screw holes on the
rack. (If the screw holes don't match these screws D
qs or E qd , use commercially available screws of
40 mm or more in length.)
Note
Make sure that two persons perform this task. One
should hold the monitor with both hands while the
other tightens screws.
9
qs qd
Screws
Vis
Schrauben
Tornillos
Viti
Rack
Bâti
Gestell
Soporte
Rack
/
Hold the plate spring with your finger and pull out./
Maintenez le ressort à lames avec le doigt et tirez./
Drücken Sie mit einem Finger auf die Blattfeder, und ziehen Sie die
Schienen auseinander./
Sujete el muelle de la placa con los dedos y tire de él./
Trattenere la molla della piastra con un dito e tirare verso l’esterno./
Plate spring
Ressort à lames
Blattfeder
Muelle de la placa
Molla della piastra
/Assembly/Montage/Montage/Montaje/Assemblaggio/
/
Removing the Monitor From the Rack/Dépose du moniteur du bâti/
Herausnehmen des Monitors aus dem Gestell/Extracción del monitor del soporte/Rimozione del monitor
dal rack/
4

Sony Corporation Printed in Japan
/