
Mantel Assembly Instructions
Model # G8600
Silverton Fireplace
Lot:___________
G8600-Rev1-101911-JW

Dust the mantel periodically as you would with any piece of furniture.
Using a soft cloth and a wood cleaner, wipe the mantel clean in the direction of the grain to minimize the
appearance of scratches and scus in the nish.
Do not use water to clean mantel. Water may cause swelling, warping or stains if allowed to penetrate the
nish of the mantel. Use protective pads or cloths whenever possible.
Avoid placing mantel in rooms with lots of humidity or where humidity could be a problem. This may cause
warping to the mantel.
Using your Fireplace
Fireplace is designed to be used indoors, there is no need for ventilation.
Use extreme caution while burning. Some surfaces become extremely hot during use.
Before using replace, be sure you have read and understand the step-by-step instructions and warnings
included with your gel fuel or electric rebox.
Care and Cleaning
Helpful Tips for Assembly
IF ANY PARTS ARE DAMAGED OR MISSING PLEASE CALL US DIRECTLY AT:
1-800-654-1704
Prep, plan and clear your space. In order to minimize damage while assembling make sure unpacking and
assembly takes place on a carpeted surface.
We recommend to use a power screwdriver for assembly it will greatly reduce your time for assembly. BE SURE
NOT TO OVERTIGHTEN SCREWS. The wood can easily be stripped out if too much force is used.
Use two people for assembly of the mantel. Another set of hands will help tremendously with the assembly
process and will reduce the amount of time spent on assembly. If you do not have a helper, that is ok too, just
take your time and follow the instructions.
Make sure that your mantel has been properly assembled prior to use. Once you have completed assembly
you should not have any extra mantel parts. The piece will be quite sturdy and all pieces will t together
nic
ely. If you did not achieve ideal results by following the instructions, please contact our customer service
team at 1-800-654-1704 and they will help answer any questions or concerns about the assembly process.
Avoid direct sunlight if possible to reduce the possibility of fading the nish.
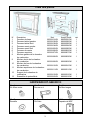
Before assembly carefully unpack and check for each replace piece and necessary hardware
2

3
PARTS LIST
Number Description Quantity
1 Base Panel 1
2 Left Side Panel 1
3 Right Side Panel 1
4 Left Front Panel 1
5 Right Front Panel 1
6 Center Panel 1
7 Top Panel 1
8 Left Firebox Trim 1
9 Right Firebox Trim 1
10 Lower Firebox Trim 1
11 Upper Firebox Trim 1
12 Firebox Support 1
13 Hardware Kit 1
HARDWARE KIT-G86000013
A x 24
Short Allen Screw
B x 12
L-Bracket
C x 22
Long Allen Screw
D x 22
Washer
E x 1
Allen Wrench
F x 2
MDF Board
1
2
3
4
5
6
7
8
9
10
12
11
Black
86000101JW
86000102JW
86000103JW
86000104JW
86000105JW
86000106JW
86000107JW
86000108JW
86000109JW
86000110JW
86000111JW
86000112JW
86000013JW
Dark Mahogany
86000501JW
86000502JW
86000503JW
86000504JW
86000505JW
86000506JW
86000507JW
86000508JW
86000509JW
86000510JW
86000511JW
86000512JW
86000013JW

4
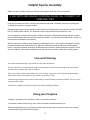
Step One
-Join left side panel (2) with left front panel (4) by securing 6 short allen screws (A) through
3 L-brackets (B).
-Repeat with right side panel (3) and right front panel (5).
Step Two
-Set base panel (1) on a flat surface as shown.
-Join panel (2) & (4), (3) & (5) by securing 8 short allen screws (A) through 4 L-brackets (B).
2
4 5
3
A
A
B
2
4 5
3
1
A
A
B

5
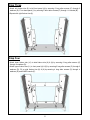
Step Three
-Attach left firebox trim (8) to left front panel (4) by securing 2 long allen screws (C) through 2
washers (D). Fit on base panel (1) by securing 2 short allen screws (C) through 1 L-bracket (B).
-Repeat with right firebox trim (9).
Step Four
-Attach lower firebox trim (10) to side firebox trim (8) & (9) by securing 2 long allen screws (C)
through 2 washers (D).
-Attach upper firebox trim (11) to front panel (4) & (5) by securing 2 long allen screws (C) through 2
washers (D). Fit on side firebox trim (8) & (9) by securing 4 long allen screws (C) through 4
washers (D) and 2 MDF boards (F).
8
C
8
9
4
5
C
D
C
D
9
1
D
A
A
B
4
5
11
C
D
F
10

6
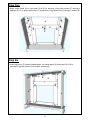
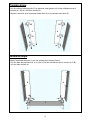
Step Five
-Attach center panel (6) to front panel (4) & (5) by securing 4 long allen screws (C) through 4
washers (D). Fit on upper firebox trim (11) by securing 1 long allen screw (C) through 1 washer (D).
Step Six
-Locate top panel (7) to above finished parts. Join center panel (6), side panel (2) & (3) by
securing 5 long allen screws (C) through 5 washers (D).
11
4
5
C
D
C
D
6
7
6
2
3
C
D
C
D
D

7
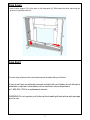
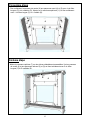
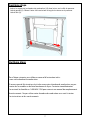
Step Seven
-Insert firebox support (12) to the hole on left side panel (2). Slide down the other side along the
groove on right side panel (3).
Step Eight
For next step reference the instruction manual included with your firebox.
If you do not have an instruction manual included with your firebox do not attempt to
assemble or operate. Immediately call our customer service department
at 1-800-654-1704 for a replacement manual.
WARNING: Do not operate your firebox without reading all instructions and warnings
prior to use.
12
2
3

8
Ninety-Day Warranty: Jensen Metal Products Inc. D/B/A Real Flame® warrants Real Flame vent-less
fireplaces and accessories to be free from defects in parts and workmanship under normal use and
service for a period of 90 days from date of shipment. In the event of such defect in parts or
workmanship, Jensen will, at its option, replace the defective product or refund the purchase price to
the extent of the defective product’s replacement cost. The foregoing is the exclusive remedy and
Real Flame disclaims all other warranties, including any implied warranty of merchantability or fitness
for a particular purpose. In addition, Real Flame will not be responsible for consequential damages in
excess of the purchase price of the product on which such liability is based.
Replacement Parts: Replacement parts are available for most units. Occasionally, parts may arrive
damaged due to mishandling during shipping. If you are in need of a replacement part, please
contact our customer service department with the fireplace model number and part number needed.
We will ship out a replacement part due to shipping damage at no charge.
Returns: Please inspect all items immediately after receiving. We hope you will be completely happy
with your purchase. If you find within 15 days of receipt of your product that you do not wish to keep
it, you may return it unused by following our return procedure. Shipping charges are not refundable
unless the return is a result of our error. Return freight charges are the responsibility of the buyer.
Items must be returned in their original packaging.
All returns must be authorized. Product that has been used may not be returned. A 15% restocking
fee will be assessed on returned merchandise to compensate for repackaging, warehousing and
administrative labor. The return procedure is listed below. For specific questions relating to returns or
warranty, please contact Customer Service department toll-free at 1-800-654-1704 or at
custserv@realflame.com.
Step 1: Contact Customer Service department by phone or e-mail to receive your Return
Merchandise Authorization number (RMA#). The RMA# is necessary for all returns. A reason code
must be indicated on the return form included with your packing slip.
Step 2: Note your RMA# on the packing slip and repack the item in the original packaging. Be sure to
include your packing slip with the returned product.
Step 3: Include your RMA# on the outside of the box and ship the package back to us via common
carrier. Please provide us with the tracking number for your shipment.
Step 4: We will contact you when the package has been received and inspected. Provided a
satisfactory return, we will credit your account for the returned merchandise less the applicable
restocking charges.
Customer Service: 1-800-654-1704 in USA
Service à la clientèle: 1-800-363-6443 in Canada
custserv@realflame.com
Warranty & Return Policies
Real Flame®
7800 Northwestern Ave.
Racine, WI 53403
Page is loading ...
Page is loading ...
Page is loading ...
Page is loading ...
Page is loading ...
Page is loading ...
Page is loading ...
Page is loading ...
-
 1
1
-
 2
2
-
 3
3
-
 4
4
-
 5
5
-
 6
6
-
 7
7
-
 8
8
-
 9
9
-
 10
10
-
 11
11
-
 12
12
-
 13
13
-
 14
14
-
 15
15
-
 16
16


Real Flame G8600-W Installation guide
- Category
- Fireplaces
- Type
- Installation guide
Ask a question and I''ll find the answer in the document
Finding information in a document is now easier with AI
in other languages
- français: Real Flame G8600-W Guide d'installation
Related papers
-
Real Flame Chateau 5950 User manual
-
-
Real Flame 7330E-W Installation guide
-
-
-
-
-
-
-


