Page is loading ...

Fireplace Model #7100
Instruction Manual

Rev. 05/12/11
Using your Fireplace
- Follow all instructions included with gel fuel before use.
- Before using Fireplace make sure you have read and understand the step-by-step instructions.
- During the initial burn you may experience a slight odor. This odor is temporary and will be absent on following burns.
Instructions and warnings for use
Welcome to the Real Flame® family of gel fuel products. If you have any questions
please call customer service at
1-800-654-1704 or log on to www.REALFLAME.com.
WARNINGS
!!
NOTICE: Buyer assumes all responsibility for safety and use that is not
in accordance with instructions and warnings.
1. Fireplace is designed to be used with Real Flame® gel fuel only. Do not use with any other gel fuel or any other flammable
liquid or gel.
2. Read entire label and instructions before using Real Flame gel fuel.
3. Make sure fireplace is set on a flat, level and stable surface. Keep fireplace stable at all times.
4. Make sure fireplace and gel fuel are burned on a flat and level surface.
5. Never leave a burning fire unattended, especially around children or pets.
6. Fireplace is not to be operated by children. Keep away from children and pets.
7. Exercise the same precautions as you would with any open fire.
8. When in use some surfaces will be hot, use caution.
9. Never touch logs, gel fuel cans or any other metal surfaces during or immediately after burning gel fuel. They will be extremely
HOT. Allow them to cool for 60 minutes before touching.
10. Do not burn more than three cans of fuel at once.
11. Do not place more than 15 lbs. of weight on the top of the fireplace at anytime.
12. Do not alter fireplace, metal firebox or log set in any manner.
13. Keep fireplace and gel fuel cans away from flammable materials at all times.
14. Do not store or use gasoline or any other flammable vapors, liquids, or materials in the vicinity of fireplace and gel fuel.
15. Do not wear flammable or loose clothing when operating the fireplace.
16. Do not move fireplace while in use. Do not attempt to move or store the fireplace until 60 minutes after gel fuel cans have
been extinguished.
17. Do not burn trash, paper, or wood in the fireplace. Burn only Real Flame® gel fuel in the fireplace.
18. Do not burn gel fuel outside designated burn areas on the metal grate.
19. Do not put fireplace in an area with lots of traffic, such as a hallway or entryway.
20. In case of an emergency use a CO2 extinguisher to extinguish the fire.
21. Death, serious injury or damage to property may occur if the warnings above are not followed.
22. If for any reason you cannot follow these warnings please call us at 1-800-654-1704.
STOP!
If parts are missing or damaged, call 1-800-654-1704 for assistance

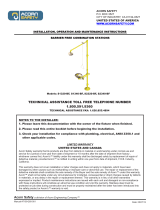
Step One
Figure 1
- Set Base (1) on a flat surface.
- Place Left Side Panel (2) upright on the outer
side of mounting block on base.
- Align Side Panel flush with the back of the
unit. Attach with a 1” phillips screw through
the mounting block.
- Repeat process using Right Side Panel (3).
- Align the Right Trim Panel (5) with the Right
Side Panel (3) using the tongue and groove.
Attach panel together through each of the three
mounting blocks on Right Side Panel followed
by the one mounting block on the Base using
three 1” phillips screws.
- Repeat process using Left Trim panel (4)
(not pictured).
Parts List
Number Description Part Number Quantity
1 Base 7101-G 1
2 Left Side Panel 7102-G 1
3 Right Side Panel 7103-G 1
4 Left Trim Panel 7104-G 1
5 Right Trim Panel 7105-G 1
6 Center Panel 7106-G 1
7 Mantel Top 7107-G 1
8 Left Firebox Trim 7108-G 1
9 Right Firebox Trim 7109-G 1
10 Top Firebox Trim 7110-G 1
11 Bottom Firebox Trim 7111-G 1
12 Firebox Support 7112-G 1
Not shown
1” Phillips Screws 9713 Bag
1
2
3
5
Figure 1
7100-G Rev. 2 5/16/11
Before assembly, locate instructions and
hardware. Take out all parts and compare them
to the photograph and the assembly
illustrations. Be sure you have all parts
identified.
Check for screws that are wrapped in the
packaging to be sure you don't discard them.
You may have extra screws.
A helping hand is always good. Assemble
fireplace with an adult assistant if possible.
The cement log is heavy. Put the fireplace in
the desired location before inserting cement
log.
Use caution not to over tighten screws.
7100 Ashley Instructions

Step Two
Figure 2
- Turn unit so you are looking at the back of it.
- Place the Left Firebox Trim (8) against the two
mounting blocks located on the back of the Left Trim
Panel. Attach trim through three holes in trim using 1”
phillips screws.
- Repeat with Right Firebox Trim(9).
- From the top of unit slide Center Panel (6) between the
Left and Right Trim panels. Align the top of the Center
Panel so it is flush with Tops of the Left and Right Trim
Panels. Attach through four holes in mounting strips on
both sides using 1” phillips screws.
Step Three
Figure 3
- Place the Top Firebox Trim(10) so mounting blocks
on trim overhang the backs of the Left and Right Side
Firebox Trim. Fasten Trim through holes on each end
of the trim, then fasten through mounting blocks on
each end of the trim using 1” phillips screws.
- Repeat with Bottom Firebox Trim (11) by placing
on the base between the Left (8) and Right (9) Trim
Panels and attaching with 1” phillips screws.
- Insert Firebox Support (12) into slot in Left side
panel (2) then into the long slot on the Right
panel (3) making sure it rests at it’s lowest position.
- Set Mantel Top (7) onto top of unit so trim on Top
overhangs front and Sides.
- First attach top through two holes in the center panel,
then proceed to attach through the holes on each side
of the trim panels using 1” phillips screws.
6
7
10
9
8
Figure 3
Figure 2
You are now ready for the firebox
installation. Please refer to the instructions
that are included with your firebox.
7100-G Rev. 2 5/16/11
11
12
/