Page is loading ...
Page is loading ...
Page is loading ...

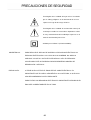
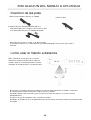
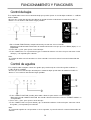
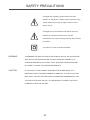
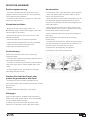
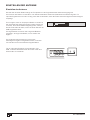
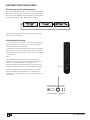
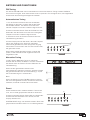
Un triángulo con el símbolo del rayo avisa al usuario de
que el "voltaje peligroso" sin aislamiento de la carcasa
supone un riesgo de descarga eléctrica.
Un triángulo con el símbolo de exclamación aconseja al
usuario que estudie las instrucciones importantes sobre
el uso y mantenimiento de la unidad que aparecen en el
manual suministrado junto a ésta.
Símbolo para CLASS II (aislamiento doble)
ADVERTENCIA: PARA REDUCIR EL RIESGO DE INCENDIO O DESCARGA ELÉCTRICA, NO
EXPONGA ESTE EQUIPO A LA LLUVIA NI A LA HUMEDAD. NO ABRA LA
CARCASA YA QUE SU VOLTAJE ES PELIGROSO. SÓLO EL PERSONAL
CUALIFICADO ESTÁ AUTORIZADO PARA DESEMPEÑAR LABORES DE
REPARACIÓN Y SERVICIO.
PRECAUCIÓN: SI TIENE QUE SUSTITUIR EL ENCHUFE DEL CABLE ELÉCTRICO, ES
IMPORTANTE QUE EL NUEVO SEA IDÉNTICO AL SUSTITUIDO, O QUE HAYA
SIDO RECOMENDADO POR EL FABRICANTE.
PARA EVITAR UNA DESCARGA ELÉCTRICA ES IMPORTANTE INTRODUCIR EL
ENCHUFE CORRECTAMENTE EN LA TOMA.
03
PRECAUCIONES DE SEGURIDAD
Page is loading ...
Page is loading ...
Page is loading ...
Page is loading ...
Page is loading ...
Page is loading ...
Page is loading ...
Page is loading ...
Page is loading ...
Page is loading ...
Page is loading ...
Page is loading ...
Page is loading ...
Page is loading ...
Page is loading ...
Page is loading ...
Page is loading ...
Page is loading ...
Page is loading ...

02
CONTENTS
Contents
SAFETY PRECAUTIONS
Safety precautions
IMPORTANT INFORMATION
important information
CONNECTION
Connection to the mains
REMOTE CONTROL INSTALLATION
Installation of batteries
Using the remote control
REMOTE CONTROL OPERATIONS
Remote Control Functions
FRONT PANEL AND CONNECTIONS
Front panel
Connections
CONNECTION
Audio connection layout
ADJUSTING THE ANTENNA
Adjusting the antenna
OPERATION AND FUNCTIONS
ON, OFF and Standby
Selecting the input source
Using the function menu
Volume control
Bass control
Treble control
Balance control
Info and function
DAB tuning
Saving and selecting channels
FM tuning
Reset
TROUBLESHOOTING
Troubleshooting
TECHNICAL DATA
Technical data
02
03
04
05
06
06
07
08
09
10
12
13
13
14
14
15
15
18
18
19
20
17
16
12
11

03
TO MINIMISE THE RISK OF FIRE OR ELECTRICAL SHOCK, DO NOT EXPOSE
THE UNIT TO RAIN OR MOISTURE. DO NOT OPEN THE CABINET AS IT
CONTAINS DANGEROUS VOLTAGE. ONLY QUALIFIED TECHNICIANS ARE
ALLOWED TO CARRY OUT REPAIR AND SERVICE.
IF THE PLUG OF THE POWER CORD NEEDS TO BE REPLACED, IT IS
IMPORTANT THAT THE REPLACEMENT IS IDENTICAL TO THE PLUG TO BE
REPLACED, OR THAT THE NEW PLUG HAS BEEN RECOMMENDED BY THE
A triangle with a lightning symbol draws the user's
attention to "dangerous voltage" without insulation in the
cabinet which may be high enough to entail a risk of
electric shock.
A triangle with an exclamation mark draws the user's
attention to important instructions for use and
maintenance in the accompanying manual, which should
be studied.
TO AVOID ELECTRICAL SHOCK, IT IS IMPORTANT TO INSERT THE PLUG
CORRECTLY INTO THE SOCKET.
SAFETY PRECAUTIONS
A symbol for CLASS II (double insulation)
WARNING:
CAUTION:

04
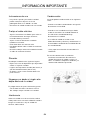
IMPORTANT INFORMATION
Handling instructions
- The top and back panel of the unit may become
warm after prolonged use. This is not due to a
defect.
- Turn off the power when the unit is not used.
Protect the power cord
- Follow the instructions below to prevent
abnormal operation, electrical shock, fire or
personal injury:
- Hold the plug firmly when inserting it into the
socket.
- Avoid heat-producing devices.
- Do not place objects on the power cord.
- Do not carry out service work on or change the
power cord.
Positioning
Do not place the unit in any of the fol. places:
- In sunlight, close to heat-producing devices or in
an enclosed rack.
- In places with high temperatures (40C or more)
or high relative humidity (90% or more).
- In dirty places as some internal parts may be
damaged.
Do not put your fingers or any
other objects into the unit
- Touching the internal parts is dangerous and
may cause injury or damage. Do not open the
cabinet.
- Do not place any foreign matter in the unit.
Interference
Placing the unit near a television set, radio or video
player may cause poor picture and sound quality.
In that case, move the unit further away from the
television set, radio or video player.
Condensation
Condensation may occur in the following cases:
- When the unit is moved directly from a cold to a
warm place.
- When the unit is used in a room where the
radiator has just been switched on or a place
where the cold air from the air-conditioning
system is directed at the unit.
- If the unit is used in the summer in a warm and
humid room just after it has been moved from an
air-conditioned room.
- If there is steam or a high level of humidity in the
room.
In case of condensation, the unit will not work
properly. Turn off the unit. Unplug the unit and
leave it for 2-3 hours. The unit will then have
adapted to the environment and any
condensation will have disappeared.

05
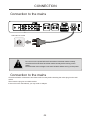
220-240V AC~50Hz
++
DV DCD PH O N O
AU X
FM A n t enna D A B
3.5mm
AUX IN
SU B OUT
88
- -
HRE7 5B
+
USE O NLY WIT H 250V FU SE
USE O NLY WIT H 250V FU SE
DV DCD PH O N O
AU X
FM A n t enna D A B
3.5mm
AUX IN
SU B OUT
88
- -
HRE7 5B
+
USE O NLY WIT H 250V FU SE
USE O NLY WIT H 250V FU SE
Do not turn on the power before all connections have been made correctly.
Check that all connections have been made correctly before turning on the
power.
Check that the mains voltage is 220-240V AC50Hz before turning on the power.
Connection to the mains
Check that all other connections have been made correctly before inserting the mains plug into the wall
socket.
Then insert the plug into a suitable socket.
If the unit is to be used abroad, you may need an adapter.
Connection to the mains
CONNECTION

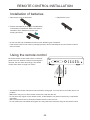
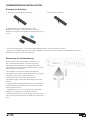
REMOTE CONTROL INSTALLATION
Installation of batteries
1 Remove the cover as illustrated.
2 Position two batteries of the type AAA/R03/UM4
in the battery compartment. Make sure that the
orientation of the batteries is correct (see
drawing at bottom).
3 Replace the cover.
- Do not mix new and old batteries and do not use different types of batteries.
- If the remote control is not used for prolonged periods, remove the batteries from the remote control to
avoid corrosion.
Using the remote control
Direct the remote control at the sensor on the front
panel of the unit. When the remote control signal is
received, the unit reacts accordingly. The remote
control works within a range of 6 metres.
- Sometimes the remote control does not work well in strong light. You may have to move the unit if it is a
problem.
- Malfunction may occur if other remote controls are used near the unit.
- Do not place any objects on the remote control, as the batteries may become flat if a key is depressed
constantly.
- Make sure that there are no obstacles between remote control and unit.
- Do not position the unit behind tinted glass as it may reduce the maximum range of the remote control.
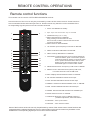
06
HRE7 5B
INFO
ENTE R BROW SE SAVE
- VOLU ME +

Some of the functions of the unit can only be performed by means of the remote control. Some functions are
connected with the selected signal input source. Some buttons on the remote control may therefore not be
available if the corresponding signal input source has not been selected.
REMOTE CONTROL OPERATIONS
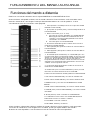
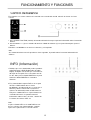
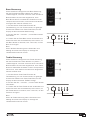
Remote control functions
1. Power: Set HRE75B into standby.
3. Number buttons (0,1,2...9 ~+10):
a. Selects stored stations on .
Keep pressing a numeric button for more
than 2 seconds, a station is stored under the number
concerned on .
b. Selects tracks on VIETA HCD30B.
. UP:
5. PREV: Scrolls down DAB stations on HRE75B.
6. NEXT: Scrolls up DAB stations on HRE75B.
7. AUTOTUNE: In DAB mode press once to perform Quick Scan
search for stations, press 2-3 seconds to perform
a Full Scan search for stations. In FM mode, press
once to perform automatic station search, when
station is found, then save the station or press
AUTOTUNE again to continue station search.
8. DOWN: Searches down in frequency in FM mode on HRE75B.
9. ENTER: Press to select Mono/Auto (stereo) in FM mode,
or to select Auto Enter on/off in DAB mode.
10. INFO: Displays RDS and DAB information on HRE75B.
11. CD: Activates HRE75B and selects the CD input.
12. AUX: Activates HRE75B and selects the AUX input.
13. DAB/FM: Activates and Selects DAB/FM mode on HRE75B.
14. DVD: Activates HRE75B and selects the DVD input.
15. PHONO: Activates HRE75B and selects the PHONO input.
16. MUTE: Mutes the sound on HRE75B.
17. FUNCTION: Enters the menu on HRE75B, where it is
possible to adjust bass, treble and balance.
18. VOLUME +: Turns up the volume.
19. VOLUME - : Turns down the volume.
2. Eject: Open and close the disc tray on HCD30B.
HRE75B
HRE75B
4 Searches up the frequency in FM mode on HRE75B.
2
6
10
12
14
16
19
17
1
3
4
5
7
9
11
13
15
18
8
This remote can be used for VIETA HRE75B DAB/FM receiver.
Some functions of the unit can only be performed by means of the remote control. Some functions
are connected with the selected input source. Some buttons may therefore not be available if the
corresponding signal input source has not been selected.
07

08
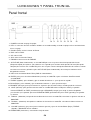
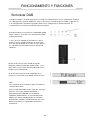
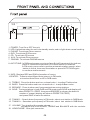
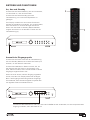
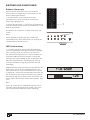
1. POWER: Turn On or OFF the unit;
2. LED: Lights blue when the unit into standby mode; and no light when normal working.
3. PHONO: To activate Phono source.
4. DVD: To activate DVD source.
5. CD: To activate CD source
6. AUX: To activate Phono source.
7. FM/DAB: To activate FM/DAB source
.
8. AUTOTUNE: In DAB mode press once to perform Quick Scan search for stations,
press 2-3 seconds to perform a Full Scan search for stations.
In FM mode, press once to perform automatic station search, when
station is found, then save the station or press AUTOTUNE again
to continue station search.
9. INFO: Displays RDS and DAB information of tuners;
10.ENTER: Press to select Mono/Auto (stereo) in FM mode,
or to select Auto Enter on/off in DAB mode.
11. TREBLE: Press the button and turn volume knob +/- to adjust Treble value.
12. BASS: Press the button and turn volume knob +/- to adjust Bass value.
13. BROWSE: Press to show next free presets when saving stations.
14. SAVE: To store stations in both DAB and FM mode press SAVE and display will
show PRESET 01 FREE, then press BROWSE to choose the desired
number of preset (display will show is PRESET 05 FREE)
and press SAVE to save the station.
15. TUNING - : Search down frequency in FM mode, select next station in DAB Mode.
16. TUNING + : Searches up frequency in FM mode, select last station in DAB Mode.
17. VOLUME: Turn to adjust the master volume,
and adjust the level of BASS, TREBLE and BALANCE with the controls.
18. HEADPHONE: 6mm jack connector.
HRE7 5B
IN FO
EN TER BR OWS E SAV E
- VO LU ME +
1 2 3
4
6
5
10
17 18161514131211
9
8
7

DV DCD PH O N O
AU X
FM A n t enn a D A B
3.5m m
AUX IN
SU B OU T
88
- -
USE O NLY WIT H 250V FU SE
USE O NLY WIT H 250V FU SE
HRE7 5B
+
1 3
11
7
109865
42
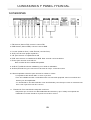
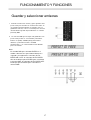
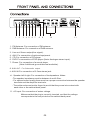
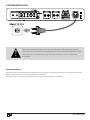
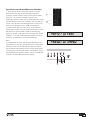
1. FM Antenna: For connection of FM antenna.
2. DAB Antenna: For connection of DAB antenna.
3. Line out: Stereo output(line signal).
4. AUX: For connection of optional equipment.
5. CD: For connection of CD player
6. DVD: For connection of DVD player (Note: Analogue stereo input).
7. Phono: For connection of a record player
(Note: Additional ground terminal available).
8.
AUX IN: For connection of 3.5mm stereo jack.
. Speaker left & right: For connection of loudspeakers. Notes:
-The speaker impedance must be between 4 and 8 Ohm.
- For optimal sound quality there must be a proper connection between the speaker
terminals and the amplifier terminals.
- The cable ends must not be frayed to avoid that they come into contact with
each other or the cabinet back panel.
11. AC input: For connection of mains voltage.
Make sure that the plug is correctly inserted, and that the voltage
corresponds to the text printed on the cabinet back panel.
SUB OUT: For Subwoofer output.
9.
10
09

CONNECTION
Subwoofer
Right Left
Connect to antenna,
Please see the next
page.
DV DCD PH O N O
AU X
FM A n t enn a D A B
3.5m m
AUX IN
SU B OU T
88
- -
HRE7 5B
+
USE O NLY WIT H 250V FU SE
USE O NLY WIT H 250V FU SE
DV DCD PH O N O
AU X
FM A n t enn a D A B
3.5m m
AUX IN
SU B OU T
88
- -
HRE7 5B
+
USE O NLY WIT H 250V FU SE
USE O NLY WIT H 250V FU SE
10

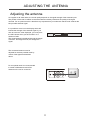
For an optimal result it is recommended
to install a DAB antenna and a FM
antenna on the roof or on the loft.
The connected antenna must be
adjusted for the best possible result by
means of the signal bar described
above.
As it applies to all other radios, the sound quality depends on the signal strength of the antenna inputs.
The position of the radio in relation to the transmitter thus directly influences the quality of the signal
received. For an optimal result it is therefore very important that you make sure that the radio receives the
best possible antenna signal.
It is possible to see a bar in the display which will
indicate the strength of the antenna signal. If you
wish to have such a bar displayed, you must press
the INFO button when you have tuned in to a
station on DAB.
The signal strength is displayed through the length
of the bar. The longer the bar, the stronger the
signal.
ADJUSTING THE ANTENNA
Adjusting the antenna
11

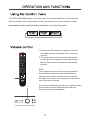
Press the Power button on the remote control into Standby mode you must press the input button
to activate this unit
;
.
Press DAB FM to listen to the radio press CD to choose CD player input
and DVD Phono and AUX if units have been connected to these inputs
/ , ,
, .
3
2
HRE 75B
IN FO
EN TE R BR OW SE SAV E
- VOL UME +
1
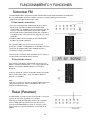
Press the power button(1) on the front panel to turn on/off the unit;
Press the standby button(2) on the remote control to switch into standby mode.
The display will turn off and all functions will be reduced to a minimum to make sure
that the unit uses minimal power. When in standby mode, the unit reacts only to
INPUT buttons on the remote control(3).
If you do not know which input has been selected, the LCD display will clearly indicate it.
Note: AII inputs are analogue stereo inputs. It means that you cannot connect a digital sound source
through a digital cable
HRE 75B
IN FO
EN TE R BR OW SE SAV E
- VOL UME +
Press the Phono, DVD, CD, AUX or DAB/FM button on the front panel
to choose the corresponding input source when the unit is in ON mode.
12

The VIETA HRE75B features a "function menu" that allows adjustment of the following
when accessed via the remote: Bass, treble, and balance (see menu structure below).
A description of the individual functions will follow on the next few pages.
1.Press the VOL+button on remote control to
increase volume and press VOL- to reduce
volume.
2.Turn the volume control on the front panel
to the right to increase the volume and turn
the volume control to the left to reduce the
volume.
Note:
The volume control on the front panel can be
turned both clockwise and anticlockwise to
change the volume, volume control includes
64 steps, from level 0 for minimum volume and
up to maximum volume.
If you have a distorted signal you must turn down
the volume to avoid damaging the unit and
the connected loudspeakers.
EN TE R
- VOL UME +
EN TE R
- VOL UME +
1
2
13

This amplifier features bass control that allows adjustment of the bass level by +/- 14dB,
from 45Hz to 260Hz.
Please note that the high bass boost level offered by the bass control may lead to permanent damage
to your loudspeakers if the high volume is used for longer periods.
1.Press the FUNCTION button on the remote control to enter the function menu.
Keep pressing the FUNCTION button on the remote until the display on the amplifier shows BASS
2.Press VOL+ and VOL- to adjust the bass level.
3.Press the Bass button on the front panel and then turn the volume knob to the right to increase
the bass level and to the left to reduce the bass level.
Note:
If the bass control is not operated within five seconds, the display will return to the volume
information display
This amplifier features treble control that allows adjustment of the treble level by +/-14 dB,
from 2KHz to 20KHz.
Please note that the high treble boost level offered by the treble control may lead to permanent
damage to your loudspeakers if the high volume is used for prolonged periods.
1.Press the FUNCTION button on the remote control to enter the function menu.
Keep pressing the FUNCTION button on the remote until the display on the amplifier shows TREBLE
2.Press VOL+ and VOL- to adjust the bass level.
3.Press the Treble button on the front panel and then turn the volume knob to the right
to increase the treble level and to the left to reduce the treble level.
Note:
If the treble control is not operated within five seconds, the display will return to the volume
information display.
EN T ER BR O WS E
- VO LU M E +
EN T ER BR O WS E
- VO LU M E +
EN T ER BR O WS E
- VO LU M E +
EN T ER BR O WS E
- VO LU M E +
14

15
INFO (Information)
1 As this tuner can receive both normal FM radio
and DAB (Digital Audio Broadcasting), it features
a function that can switch between the two
reception types. To switch between DAB and
FM, you must either press the DAB/FM button on
the front panel or the DAB/FM button on the
remote control.
2 This tuner features RDS on the FM receiver.
DAB also offers some information possibilities
that resemble RDS as we know it from FM. To
activate this information from both DAB and FM,
you must press the INFO button either on the
front panel or on the remote control. The display
will show information about for instance time and
date, name of station, name of artist, title, etc.
Note:
If the INFO button is pressed in DAB mode after
channels have been saved, the strength of the
antenna signal will also be displayed.
1 2
1
2
1 . Press the FUNCTION button on the remote until information on balance control is displayed.
2. Turn the +/- buttons (2) on the remote control or the volume button (2) on the front panel to adjust the balance.
The balance is divided in 14 steps right and left.
Note
If the balance control is not operated within five seconds, the display will return to the volume information display
»
This function is used to compensate for a non-centred listening position, and makes it possible to
adjust the stereo perspective.
EN T ER BR O WS E
- VO LU M E +
EN T ER BR O WS E
- VO LU M E +
IN F O
EN T ER BR O WS E SA VE
IN F O
EN T ER BR O WS E SA VE

OPERATION AND FUNCTIONS
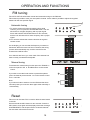
DAB tuning
When the unit is turned on for the first time, all settings will be default settings. The settings can be changed
according to your preference. When the unit is turned off the next time, these settings will automatically be
saved as the new default settings. This also applies if you unplug the unit.
When the unit has been turned on in DAB mode,
channels can be searched. This is done by means of
the AUTOTUNE function.
1. Press the AUTOTUNE button on the frontpanel (1)
or on the remote control (2) once to perform a Quick
Scan search for stations or press 2-3 seconds for a
Full Scan search.
2
1
16
Note:
In order to tune on the L band manual tuning must be
selected.
Press the INFO button for two seconds, until the
message Manual tune appears, and then press ENTER.
Use the TUNING-/+ buttons on the front panel or UP and
DOWN buttons on the remote to tune. When a frequency
white signal is reached the tuner will start to play.
Full scan
12c
The message FULL SCAN or QUICK SCAN will be
shown on the display, and you will see a bar on the
display that grows longer indicating how far the tuning
process has come.
If no channels are found, you must check if the antenna
has been correctly connected and adjusted.
IN F O
BR O WS E SA VE
IN F O
BR O WS E SA VE

OPERATION AND FUNCTIONS
1. When you have found the station and want to
save a channel under one of the presets you must
press the button with the desired number 1-10 on
the remote control for 2 seconds. When the channel
has been saved and you wish to listen to that
channel then press the button again that you saved
the channel under. The procedure is the same for
both FM and DAB.
2. DAB channels that has not been saved to preset
can be selected by pressing UP or DOWN buttons
on the remote control, or by pressing the TUNING
+/- buttons on the front panel and press ENTER to
select.
Note:
In DAB mode press ENTER button on remote or
front panel for 2-3 seconds then select AUTO
ENTER ON or OFF. If AUTO ENTER ON is
selected you don’t have to press ENTER to select
the DAB station. If AUTO ENTER OFF is selected
you need to press ENTER to select the DAB
station.
Saving and selecting channels
17
IN F O
BR O WS E SA VE
IN F O
BR O WS E SA VE
2
1
2
1

OPERATION AND FUNCTIONS
1 To use the autotune function through the front panel
controls, you must press the AUTOTUNE button. The unit
will search for a higher frequency with a proper signal.
Press and hold the AUTOTUNE button for two seconds,
and the unit will search for a lower frequency with a proper
signal.
2 You can also activate the autotune function through the
remote control.
On the display you can see that the frequency increases or
decreases. When the tuner has found a channel, the tuning
process will automatically stop, and the sound from the
channel found will be heard.
If no channels are found, you must check if the antenna has
been correctly connected and adjusted.
To activate the manual tuning function press the TUNING +/-
on the front panel or UP or DOWN buttons on the remote
control.
If you wish to save the found station to preset then please
press the desired preset number 1-10 on the remote control
for 2-3 seconds.
Note:
If you want to listen to stations from the FM band that have
not been preset you must tune them again either manually or
Automatically.
Automatic tuning
Manual tuning
Reset
This tuner can be reset. This is used to delete channel stored
in the unit.
Press and hold the INFO button for two seconds. Press the
INFO button once again until the display shows the message
SYSTEM RESET, and the press Enter. All stored channels
has now been removed from the unit.
1
18
FM tuning
The offers both manual and automatic tuning on the FM band.
This makes it possible to save just one specific channel. It also makes it possible to adjust the supplied
antenna for the best possible signal.
VIETA HRE75B
1
IN F O
BR O WS E SA VE
IN F O
BR O WS E SA VE
2
2
1
IN F O
EN T ER BR O WS E SA VE
IN F O
EN T ER BR O WS E SA VE

19
No power when the
amplifier is turned on.
No sound.
High buzzing.
Distortion of sound
The LCD display does
not display any
information
ERROR is displayed
on the LCD display
The unit does not
switch between input
modes
The display does not
show DAB information.
I can hear tick/blob
sounds at some of
the stations.
-Some of the conductor wires of the speaker cable are in contact with
each other which causes distortion.
-Bass and treble controls are set too high in relation to speaker
specifications.
-The volume is set too high.
-The amplifier is defective and should be serviced by a qualified
technician.
-The amplifier is defective and should be serviced by a qualified
technician.
-The amplifier is defective and should be serviced by a qualified
technician.
-The VIETA HRE75B has not found any stations on DAB.
-The selected station does not broadcast any information.
-The antenna signal is too poor. See the section on adjusting the
antenna.
- Like all other digital media DAB is reproduced in a very high sound
quality. But if the antenna signal is too weak, you will not hear any
whistling but instead you will hear blackouts or "tick/blob" sounds.
You must therefore check if the antenna signal is strong enough.
See the section on adjusting the antenna.
Weak bass and poor
stereo perspective
-The speaker connection is out of phase. Check that the positive and
negative poles have been correctly connected, both at the back of the
amplifier and at the back of the speaker
-The audio input cables have been incorrectly connected or damaged.
-The ground cable for the record player has not been connected.
-The record player pick-up is defective.
There is sound in one
channel only.
-The balance control is not correctly adjusted (see page 15).
-The audio input cables have been incorrectly connected or damaged.
-The input source is defective.
-The speaker cables have been incorrectly connected or damaged.
-The speakers are defective.
-The amplifier has not been turned on.
-The volume control is set at a minimum (see page 13).
-The speaker cables have not been correctly connected.
-A wrong input source has been selected.
-No input source has been connected
-Switch on the electric current at the socket.
-Check that the plug has been correctly inserted into the socket.
-The internal fuse has blown and must be replaced by a qualified
service technician.
-The power cord has been damaged and must be replaced
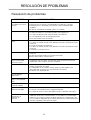
TROUBLESHOOTING
Troubleshooting
PROBLEM CAUSE/ REMEDY

RF section:
Tuner bands DAB Band III, Band L and DAB+
FM 87.5-108.0MHz
Sensitivity -96dBm type
Display: 1 line of 16 characters
LED backlight
Presets 10
Audio outputs Stereo, 2.5Vpp
48kHz sample rate
16 bit sample resolution
20
Page is loading ...
Page is loading ...
Page is loading ...
Page is loading ...
Page is loading ...
Page is loading ...
Page is loading ...
Page is loading ...
Page is loading ...
Page is loading ...
Page is loading ...
Page is loading ...
Page is loading ...
Page is loading ...
Page is loading ...
Page is loading ...
Page is loading ...
Page is loading ...
Page is loading ...
Page is loading ...
Page is loading ...
Page is loading ...
Page is loading ...
Page is loading ...
-
 1
1
-
 2
2
-
 3
3
-
 4
4
-
 5
5
-
 6
6
-
 7
7
-
 8
8
-
 9
9
-
 10
10
-
 11
11
-
 12
12
-
 13
13
-
 14
14
-
 15
15
-
 16
16
-
 17
17
-
 18
18
-
 19
19
-
 20
20
-
 21
21
-
 22
22
-
 23
23
-
 24
24
-
 25
25
-
 26
26
-
 27
27
-
 28
28
-
 29
29
-
 30
30
-
 31
31
-
 32
32
-
 33
33
-
 34
34
-
 35
35
-
 36
36
-
 37
37
-
 38
38
-
 39
39
-
 40
40
-
 41
41
-
 42
42
-
 43
43
-
 44
44
-
 45
45
-
 46
46
-
 47
47
-
 48
48
-
 49
49
-
 50
50
-
 51
51
-
 52
52
-
 53
53
-
 54
54
-
 55
55
-
 56
56
-
 57
57
-
 58
58
-
 59
59
-
 60
60
-
 61
61
-
 62
62
-
 63
63
-
 64
64
-
 65
65
-
 66
66


Ask a question and I''ll find the answer in the document
Finding information in a document is now easier with AI
in other languages
- español: VIETA HRE75B El manual del propietario
- Deutsch: VIETA HRE75B Bedienungsanleitung
