
s
Alaris® CC Guardrails®
Syringe Pump
Models: 80033UND1-G
Directions For Use
en

1000DF00333 Issue 6
1/38
Contents
Page
Introduction ..............................................................................................2
About This Manual ........................................................................................2
Creating a Data Set .......................................................................................3
Features of the Alaris® CC Guardrails® Syringe Pump ........................................................4
Controls & Indicators ......................................................................................5
Symbol Denitions ........................................................................................6
Main Display Features .....................................................................................7
Operating Precautions ....................................................................................8
Getting Started ..........................................................................................10
Syringe Loading ..........................................................................................12
Starting the pump .......................................................................................15
Basic Features ............................................................................................17
Alarms and Warnings .....................................................................................21
Prompts .................................................................................................22
Congured Options ......................................................................................23
Specications ............................................................................................26
Recognised Syringes .....................................................................................27
Associated Products ......................................................................................28
Compatible Extension Sets ...............................................................................29
Maintenance .............................................................................................31
Occlusion Pressure Limits .................................................................................33
IrDA, RS232 and Nurse call Specication ..................................................................34
Trumpet Curves and Start-up Curves ......................................................................35
Products and Spare Parts .................................................................................36
Service Contacts .........................................................................................37

1000DF00333 Issue 6
2/38
Introduction
The Alaris® CC Guardrails® Syringe Pump (herein after referred to as "pump") is a fully featured high end variable pressure syringe pump
suitable for critical care applications.
The Alaris® CC Guardrails® Syringe Pump functions with a wide range of standard, single-use, disposable Luer lock syringes together with
extension sets. It accepts syringe sizes from 5ml to 50ml. A full list of compatible syringes can be found in the Compatible Syringes section.
A list of recommended extension sets can be found in the Compatible Extension Sets section.
The Guardrails® Safety Software for the Alaris® CC Guardrails® Syringe Pump brings a new level of medication error prevention to the point
of patient care. The Guardrails® Safety Software allows the hospital to develop a best-practice Data Set of IV medication dosing guidelines for
patient-specic care areas, referred to as proles. Each prole contains a specic library of drugs, as well as pump congurations appropriate
for the care area. A prole also contains either Guardrails® Hard Limits that cannot be overridden during infusion programming, or Guardrails®
Soft Alerts that can be overridden, based on clinical requirements.
The hospital dened Data Set is developed and approved through pharmacy and clinical input, and then congured into the Alaris® CC
Guardrails® Syringe Pump by qualied technical personnel.
The Alaris® CC Guardrails® Syringe Pump, with a Data Set loaded, provides automatic alerts when a dosing limit, bolus limit, concentration
limit, or weight limit has been exceeded. These safety alerts are provided without the need for the pump to be connected to a PC or network.
Intended Purpose
The Alaris® CC Guardrails® Syringe Pump is intended for use by medical sta for purposes of controlling infusion rate and
volume.
Conditions of Use
The Alaris® CC Guardrails® Syringe Pump should only be operated by a clinician competent in use of automated syringe
pumps and post-placement management of intravenous catheters.
w
CareFusion cannot guarantee the continued system accuracy with other manufacturer’s syringes as identified in the
‘Compatible Syringes’ table. Manufacturers may change syringe specification significant to system accuracy without
prior notification.
Indications
The Alaris® CC Guardrails® Syringe Pump is indicated for infusion of therapeutics including:
• analgesics
• antimicrobials
• blood products
• chemotherapy
• nutrition
• subcutaneous
• epidural
Contraindications
The Alaris® CC Guardrails® Syringe Pumps is contraindicated for:
• enteral therapies
About This Manual
The user must be thoroughly familiar with the Alaris® CC Guardrails® Syringe Pump described in this manual prior to use.
All illustrations used in this manual show typical settings and values which may be used in setting up the functions of the pump. These
settings and values are for illustrative use only. Where stated, a minimum infusion rate refers to a nominal rate of 1.0ml/h, and an
intermediate infusion rate refers to a nominal rate of 5.0ml/h. The complete range of infusion rates, settings and values are shown in the
Specifications section.
w
It is important to ensure that you only refer to the most recent version of the Directions for Use and Technical Service
Manual for your CareFusion products. These documents are referenced on www.carefusion.com. Copies can be
obtained by contacting your local CareFusion representative.

1000DF00333 Issue 6
3/38
To use the Alaris® CC Guardrails® Syringe Pump a Data Set will need to be developed, reviewed, approved, released, uploaded and verified
according to the following process. Refer to the Guardrails® Editor Directions For Use (1000PB01398) for further details and operating
precautions.
Creating a Data Set
1. Create Master Lists (Using Guardrails® Editor)
Master Drugs* A list of drug names and standard concentrations. The Software can store an
unlimited number of entries depending on disk space. Note: When using a
combination of two or more drugs, the dose rate can only be configured for one
drug. Up to 19 characters are available to name the drug or the combination.
Syringe Library Configure syringes enabled for use.
2. Create Care Area Profiles (Using Guardrails® Editor)
Drug Library* Drugs and concentrations for a Profile with minimum & maximum limits and
occlusion alarm level. Up to 100 drug set-ups can be entered for each of the
available 10 Profiles.
Configuration** Pump configuration settings, General Options and Units for Dosing Only.
3. Review, Approve and Release Data Set (Using Guardrails® Editor)
Review and Approve Entire Data Set Report to be printed, reviewed and signed as proof of approval by
an authorised person, according to Hospital protocol. Signed printout to be kept
safe by hospital for use during verification procedure.
Release Data Set status to be promoted to Released (Password is required).
4. Upload Data Set to Alaris® CC Guardrails® Syringe Pump enabled (Using Guardrails® Editor Transfer Tool)
Data Set transfers should only be performed by qualified technical personnel.
5. Verify Data Set Upload
First or Individual Pump Verification On completion of upload, record CRC (Cyclic Redundancy Check) number shown
on the Alaris® CC Guardrails® Syringe Pump. Download the Data Set from the
pump using the Verification Tool. Compare Data Set downloaded with approved
signed Data Set printout. Reviewer should sign the printout and also record the
CRC number on the printout as a record.
Subsequent Pumps Verification On subsequent uploads of the Data Set compare CRC number on pump with CRC
number recorded in First Pump Verification.
* Note: Drug parameters have to be in accordance to local regulation and prescribed information.
** See important note in Configured Options section.

1000DF00333 Issue 6
4/38
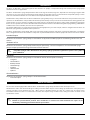
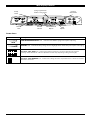
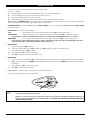
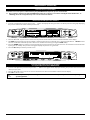
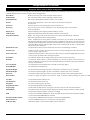
Features of the Alaris® CC Guardrails® Syringe Pump
High visibility
Alarm Indicator
Release lever for
MDI
Shelf for chevron
keys and softkeys
Positive Plunger
Grippers
Display
Syringe Clamp
ON/OFF
RUN
HOLD
PURGE/
BOLUS
MUTE
PRESSURE
OPTION
Extension set
hook
Pressure
transducer
Finger
Grips
Extension set
hook
Release
lever for
Rotating
Cam
Carrying
Handle
IR Communications
port
RS232
Connector
Folded Pole
Clamp
Potential
Equalisation
(PE) connector
Rating Plate (see Symbol Definitions for
an explanation of the symbols used)
Pressure
transducer
Rotating Cam to
lock on to horizontal
rectangular bars
M
e
d
i
c
a
l
D
e
v
i
c
e
I
n
t
e
r
f
a
c
e
(
M
D
I
)

1000DF00333 Issue 6
5/38
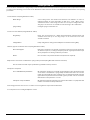
Controls & Indicators
Controls:
Symbol Description
a
ON/OFF button - Press once to switch the pump ON. Press and hold down for 3
seconds to switch the pump OFF.
b
RUN button - Press to start the infusion. The green LED will flash during infusion.
h
HOLD button - Press to put the infusion on hold. The amber LED will be lit while on
hold.
c
MUTE button - Press to silence alarm for 2 minutes (configurable). Press and hold
until 3 beeps are heard for 15 minutes silence.
i
PURGE/BOLUS button - Press to access PURGE or BOLUS soft keys. Press and hold
down soft key to operate.
PURGE the extension set during set up.
l Pump is on hold
l Extension set is not connected to the patient
l Volume Infused (VI) is not added
BOLUS - fluid or drug delivered at an accelerated rate.
l Pump is infusing
l Extension set is connected to the patient
l VI is added
d
OPTION button - Press to access optional features (see Basic Features).
e
PRESSURE button - Use this button to display the pumping pressure trend display and
alarm level.
f
CHEVRON keys - Double or single for faster/slower increase or decrease of values
shown on display.
g
BLANK SOFTKEYS - Use in conjunction with the prompts shown on the display.
Indicators:
Symbol Description
j
BATTERY indicator - When illuminated the pump is running on the internal battery.
When flashing the battery power is low with less than 30 minutes of use remaining.
S
AC POWER indicator - When illuminated the pump is connected to an AC power
supply and the battery is being charged.

1000DF00333 Issue 6
6/38
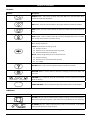
Symbol Definitions
Labelling Symbols:
Symbol Description
w
Attention (Consult accompanying documents)
x
Potential Equalisation (PE) Connector
y
RS232/Nurse call Connector (Optional)
l
Defibrillation-proof type CF applied part (Degree of protection against electrical
shock)
O
Protected against vertically falling drops of water
r
Alternating Current
s
Device complies with the requirements of Council Directive 93/42/EEC as amended
by 2007/47/EC.
T
Date of Manufacture
t
Manufacturer
U
Not for Municipal Waste
W
Fuse Rating
EC REP Authorised representative in the European Community

1000DF00333 Issue 6
7/38
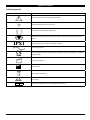
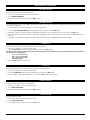
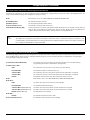
Main Display Features
Screen Icons:
Symbol Description
l
TIME REMAINING DISPLAY icon - Indicates time before syringe will require replacing.
N
BATTERY icon - Indicates battery charge level to highlight when the battery will require recharging.
Guardrails® SOFT ALERT icon - Indicates the pump is running at a rate above (pointing up) or below
(pointing down) a Guardrails® Soft Alert. (Number of arrows vary depending on drug name length)
Guardrails® LIMIT WARNING icon - Indicates the setting entered is not permitted as it is under or exceeds a
Guardrails® Hard Limit.
Pump
Status
Syringe type fitted /
Profile / Drug name
Pressure
Information
Infusion
Rate
Volume
Infused
Volume Infused
Option
VTBI
Option

1000DF00333 Issue 6
8/38
Operating Precautions
Disposable Syringes and Extension Sets
• Always clamp or otherwise isolate the patient line before unclamping or removing a syringe from the
pump. Failure to do so may result in unintended administration.
• This Alaris® CC Guardrails® Syringe Pump has been calibrated for use with single-use disposable syringes.
To ensure correct and accurate operation, only use 3 piece Luer lock versions of the syringe make specified
on the pump or described in this manual. Use of non-specified syringes or extension sets may impair the
operation of the pump and the accuracy of the infusion.
• Uncontrolled flow or syphoning may result if the syringe is located incorrectly in the pump, or if it is
removed from the pump before the extension set is properly isolated from the patient. Isolation may
include closing a tap in the patient line or activating a flow stop clamp.
• Secure the extension set to the pump using the extension set hook at the rear of the pump. This provides
protection against accidental dislodging of the syringe from the pump.
G
• When combining several apparatus and/or instruments with extension sets and other tubing, for example
via a 3-way tap, the performance of the pump may be impacted and should be monitored closely.
Mounting the Pump
• When more than one pump is being used on a patient, those containing high risk, critical medications
must be positioned as close to the patient's heart level as possible to avoid the risk of variations in flow or
siphoning.
• Raising a Pump whilst infusing may result in a bolus of the infusate, whereas lowering a Pump whilst
infusing may result in a delay in the infusion (an underinfusion).
I
• Do not mount the pump in a vertical position with the syringe pointing upwards as this could lead to
an infusion of air which may be in the syringe. To protect against the introduction of air the user should
regularly monitor the progress of the infusion, syringe, extension line and patient connections and follow
the priming procedure specified herein.
Operating Environment
• When using any infusion pump in conjunction with other pumps or devices requiring vascular access,
extra care is advised. Adverse delivery of medication or fluids can be caused by the substantial variation in
pressures created within the local vascular system by such pumps. Typical examples of those pumps are
used during dialysis, bypass or cardiac assist applications.
• This pump is suitable for use in Hospital and clinical environments other than domestic establishments
and those directly connected to the public single phase AC mains power supply network that supplies
buildings used for domestic purposes. However, it may be used in domestic establishments under the
supervision of Medical professionals with additional necessary appropriate measures. (Consult Technical
Service Manual, appropriately trained technical personnel or CareFusion for further information).
• This pump is not intended to be used in the presence of a flammable anaesthetic mixture with air or
oxygen or nitrous oxide.
Operating Pressure
• This is a positive pressure pump designed to achieve very accurate fluid administration by automatically
compensating for resistance encountered in the infusion system.
• The pumping pressure alarm system is not designed to provide protection against, or detection of, IV
complications which can occur.
Alarm Conditions
J
• Several alarm conditions detected by this pump will stop the infusion and generate visual and audible
alarms. Users must perform regular checks to ensure that the infusion is progressing correctly and no
alarms are operating.
Guardrails® Safety Software
• The Guardrails® Safety Software incorporates dosing limits and pump configuration parameters based on
hospital protocol. The software adds a test of reasonableness to drug programming based on the limits
defined by the hospital. Qualified personnel must ensure the appropriateness of the drug dosing limits,
the compatibility of the drugs, and the performance of each pump, as part of the overall infusion. Potential
hazards include drug interactions, and inappropriate delivery rates and pressure alarms.
• When loading a Data Set with the Guardrails® Safety Software, ensure the correct profile is selected prior
to starting an infusion. Failure to use the appropriate profile could cause serious consequences.

1000DF00333 Issue 6
9/38
Operating Precautions (continued)
Electromagnetic Compatibility & Interference
M
• This pump is protected against the effects of external interference, including high energy radio frequency
emissions, magnetic fields and electrostatic discharge (for example, as generated by electrosurgical and
cauterising equipment, large motors, portable radios, cellular telephones etc.) and is designed to remain
safe when unreasonable levels of interference are encountered.
• Therapeutic Radiation Equipment: Do not use the pump in the vicinity of any Therapeutic Radiation
Equipment. Levels of radiation generated by the radiation therapy equipment such as Linear Accelerator,
may severely affect functioning of the pump. Please consult manufacturer’s recommendations for
safe distance and other precautionary requirements. For further information, please contact your local
CareFusion representative.
• Magnetic Resonance Imaging (MRI): The pump contains ferromagnetic materials which are susceptible
to interference with magnetic field generated by the MRI devices. Therefore, the pump is not considered
an MRI compatible pump as such. If use of the pump within an MRI environment is unavoidable, then
CareFusion highly recommends securing the pump at a safe distance from the magnetic field outside
the identified ‘Controlled Access Area’ in order to evade any magnetic interference to the pump; or
MRI image distortion. This safe distance should be established in accordance with the manufacturers’
recommendations regarding electromagnetic interference (EMI). For further information, please refer to
the product technical service manual (TSM). Alternatively, contact your local CareFusion representative for
further guidance.
• Accessories: Do not use any non-recommended accessory with the pump. The pump is tested and
compliant with the relevant EMC claims only with the recommended accessories. Use of any accessory,
transducer or cable other than those specified by CareFusion may result in increased emissions or
decreased pump immunity.
• This pump is a CISPR 11 Group 1 Class A device and uses RF energy only for its internal function in the normal
product offering. Therefore, its RF emissions are very low and are not likely to cause any interference with
the nearby electronic equipment. However, this pump emits a certain level of electromagnetic radiation
which is within the levels specified by IEC/EN60601-1-2 and IEC/EN60601-2-24. If the pump interacts with
other equipment, measures should be taken to minimise the effects, for instance by repositioning or
relocation.
K
• In some circumstances the pump may be affected by an electrostatic discharge through air at levels close
to or above 15kv; or by radio frequency radiation close to or above 10v/m. If the pump is affected by
this external interference the pump will remain in a safe mode; the pump will duly stop the infusion and
alert the user by generating a combination of visual and audible alarms. Should any encountered alarm
condition persist even after user intervention, it is recommended to replace that particular pump and
quarantine the pump for the attention of appropriately trained technical personnel. (Consult Technical
Service Manual for further information).
Hazards
• An explosion hazard exists if the pump is used in the presence of flammable anaesthetics. Exercise care to
locate the pump away from any such hazardous sources.
A
• Dangerous Voltage: An electrical shock hazard exists if the pump’s casing is opened or removed. Refer all
servicing to qualified service personnel.
• When connected to an external power source, a three-wire (Live, Neutral, Earth) supply must be used. If the
integrity of the external protective conductor in the installation or its arrangement is in doubt, the pump
should be operated from the battery.
V
• Do not open the RS232/Nurse Call protective covering when not in use. Electrostatic discharge
(ESD) precautions are required when connecting RS232/Nurse Call. Touching the pins of the
connectors may result in ESD protection failure. It is recommended that all actions must be taken by
appropriately trained personnel.
L
• If this pump is dropped, subjected to excessive moisture, fluid spillage, humidity or high temperature, or
otherwise suspected to have been damaged, remove it from service for inspection by a qualified service
engineer. When transporting or storing the pump, use original packaging where possible, and adhere
to temperature, humidity and pressure ranges stated in the Specifications section and on the outer
packaging.

1000DF00333 Issue 6
10/38
Getting Started
w
Before operating the pump read this Directions For Use manual carefully.
1. Check that the pump is complete, undamaged and that the voltage rating specified on the label is compatible with your AC power
supply.
2. Items supplied are:
l Alaris® CC Guardrails® Syringe Pump
l User Support CD (Directions For Use)
l AC Power Cable (as requested)
l Protective Packaging
3. Connect the pump to the AC power supply for at least 2½ hours to ensure that the internal battery is charged (verify that the S is
lit).
Language Selection
1. On initial start-up the pump will display the Select Language screen.
2. Select the required language from the list displayed using the
f keys.
3. Press the OK softkey to confirm your selection.
w
An approved Guardrails® Safety Software Data Set must be uploaded to the Alaris® CC Guardrails® Syringe Pump
prior to use. Guardrails® Editor PC Software is available separately.
The pump will automatically operate from its internal battery if the pump is switched on without being connected
to the AC power supply.
Should the pump fail to perform correctly, replace in its original protective packaging, where possible and contact a
qualified service engineer for investigation.
Initial Set-up

1000DF00333 Issue 6
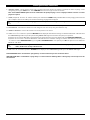
11/38
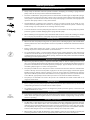
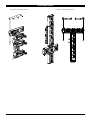
The pole clamp is fitted to the rear of the pump and will provide secure fixing to vertical I.V. poles of a diameter between 15 and 40 mm.
*
*
Pole Clamp Installation
The rotating cam can be fitted to the rectangular bar on the Docking Station/Workstation* or the equipment rail measuring 10 by 25 mm.
1. Align the rotating cam on the rear of the pump with the rectangular bar on the Docking Station/Workstation* or the equipment rail.
2. Hold the pump horizontally, push the pump firmly onto the rectangular bar or equipment rail.
Ensure that the pump 'clicks' securely into position onto the bar.
3. To release, push the release lever and pull the pump forwards.
*Alaris® DS Docking Station and Alaris® Gateway Workstation.
Docking Station/Workstation* or Equipment Rail Installation
Rectangular bar
Rotating cam
Release lever (push to release)
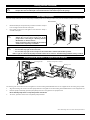
Getting Started (continued)
1. Pull the folded pole clamp towards you and unscrew the clamp to
leave enough room for the size of the pole.
2. Place pump around pole and tighten screw until the clamp is
secured to the pole.
w
Ensure the pole clamp is folded away and stored
within the recessed area at the rear of the
pump before connecting to a Docking Station/
Workstation* or when not in use.
Never mount the pump such that the IV infusion
stand becomes top heavy or unstable.
Recessed area
w
Do not mount the pump with the AC power inlet or the syringe pointing upwards. This could affect the electrical
safety in the event of a fluid spill or lead to the infusion of air which may be in the syringe.
w
Prior to each use, check the pole clamp:
• does not show any signs of excessive wear,
• does not show any signs of excessively loose movement in the extended, mountable position.
If these signs are observed, the pumps should be taken out of service for examination by qualified service personnel.

1000DF00333 Issue 6
12/38
To decrease potential start-up delays, delivery inaccuracies and delayed generation of occlusion alarms each time a new
syringe is loaded:
• Use smallest syringe size possible, for example, if delivering 9 ml of uid, use a 10 ml syringe.
• Use the PURGE SYRINGE or PURGE option on the Pump to decrease the delay in the start of the infusion , see Starting
the Pump section.
w
Warning: Use the smallest compatible syringe size necessary to deliver the fluid or medication; this is especially
important when infusing high risk or life-sustaining medications at low infusion rates, especially flow rates < 0.5 ml/h.
w
Warning: Purge the Pump system before starting an infusion or after replacing a near-empty syringe with a replacement
syringe. When Purging ensure that the extension set is not connected to the patient.
Syringe Loading
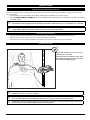
Prepare Syringe and Administration Set
Practice Recommendations
Ensure that the Pump is as close to level of
patient’s heart as possible.
Patient’s heart level should be in line with
the middle of the Pump or the pressure disc
for the Alaris CC Syringe Pumps.
w
Warning: Adjusting the Alaris Enteral Plus Syringe Pump's height relative to the patient's stomach level can lead to
temporary increases or decreases in delivery
w
Caution: If using multiple syringe pumps and it is not clinically feasible to have all Pumps level with the patient’s
heart, place the high risk or life-sustaining medications as close to the patient’s heart level as possible.
w
Caution: When delivering multiple high risk or life-sustaining medications, consider placing the Pumps delivering at
the lowest rates as close to the level of the patient’s heart as possible.
Positioning of Pump
• Tubing internal diameter: Smallbore or microbore tubing is recommended when dinfusing at low rates
• Filters: Internal volume, dead space, of in-line lters should be minimized
• Connection sites: Critical drugs should be connected as close to the vascular access site as possible

1000DF00333 Issue 6
13/38
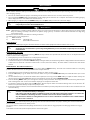
Syringe Loading (continued)
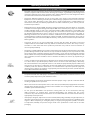
Loading and confirming a Syringe
w
Warning: To securely load and confirm a syringe carefully follow the steps below. An incorrect loading of a syringe
may result in misidentification of the syringe type and size. If then confirmed, this may lead to significant inaccuracy
of the infusion rate and may also affect pump performance.
Only use a syringe of the type stated on the pump or in this manual. Using an incorrect syringe could adversely affect
the accuracy of the infusion rate and may also affect pump performance.
When drawing fluid into the syringe, draw enough to compensate for any 'dead space' volume in the extension set and
syringe at the end of infusion as this cannot be fully infused.
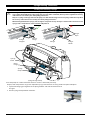
Syringe Flange Clamp
Syringe
Clamp
Barrel
Flange
Plunger
Grippers
Plunger
Flange
Plunger
Holder
Plunger
Finger
Grips
Syringe
Barrel
Place the pump on a stable horizontal surface or secure as described previously.
Prepare, load and prime the single-use disposable syringe and extension set using standard aseptic techniques.
1. Squeeze the nger grips together on the plunger holder and slide the mechanism to
the right.
2. Pull the syringe clamp forward and down.

1000DF00333 Issue 6
14/38
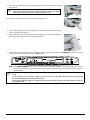
3. Insert the syringe ensuring that the barrel ange is located in the slots on the syringe
ange clamp.
w
To ensure the syringe is loaded correctly, place the barrel flange in the space
between the syringe clamp and the syringe flange clamp. This is correct if the
syringe remains in position before the syringe clamp is closed.
4. Lift the syringe clamp until it locks against the syringe barrel.
5. Squeeze the nger grips on the plunger holder and slide the mechanism to the left
until it reaches the plunger end.
6. Release the nger grips. Ensure that the plunger grippers are securing the plunger in
place and the nger grip returns to its original position.
7. Ensure that the syringe type and size match those displayed on the pump then press CONFIRM. If required, the make
of syringe can be changed by pressing the TYPE softkey.
CONFIRM
TYPE
IVAC 50
ON HOLD
Note: If the PURGE SYRINGE option has been enabled then the prompt to purge screen is displayed and the exten-
sion set can be purged as required, however ensure that the extension set is not connected to the patient dur-
ing this process.
w
CareFusion recommends limiting the number of configured syringe types and sizes available for selection on the
pump.
Secure the extension set using the extension set hook at the rear of the pump. This provides protection against
accidental dislodging of the syringe from the pump.
Ensure that both plunger grippers are fully locked onto the plunger flange and the upper finger grip has returned to
its original position.

1000DF00333 Issue 6
15/38
1. Connect the pump to an AC power supply using the AC power cable.
Press the
a button.
l The pump will run a short self-test. Ensure that two beeps are activated during this test.
l Check the display test pattern and ensure that no rows are missing.
l Check that the displayed time and date are correct.
l Finally check display shows the Data Set name, Version number and Released date and time.
Note: A warning - REPAIRING LOGS, may be displayed if event log information was not completely stored at the previous power down.
This is for information only, the pump will continue to power up as normal.
2. CONFIRM PROFILE? - Answering NO will display SELECT PROFILE screen, select profile and OK. YES will display DRUG SELECT
screen. Go to step 3.
3. DRUG SELECT? - Select one of the following:
ml/h - allows infusions to be given in ml/h only, after selecting OK to confirm. Go to step 6.
DOSING ONLY - enables the pump to be set-up with a dosing protocol, after selecting OK to confirm. Go to step 4.
Important Note: No drug-specific Guardrails® Limits are used when ml/h or DOSING ONLY modes are selected.
DRUG NAME - select a drug name from Guardrails® Data Set profile, after selecting OK to confirm. Go to step 5.
Note: Drugs are listed in alphabetical groups as follows: A-F, G-M, N-S and T-Z. Select group containing the drug name
required and then the required drug and all other drugs can be seen.
4. DOSING ONLY -
a) Select Dosing unit and OK to confirm.
b) Select Concentration Amount and OK to confirm. (Use Units softkey to change concentration units)
c) Select Diluent Volume and OK to confirm.
d) Adjust Weight and OK to confirm. (If required)
e) Press OK to confirm dosing information. Go to step 6.
5. DRUG NAME -
a) Select Concentration required and OK to confirm. (Only required if more than one concentration for Drug selected is available.)
b) OK to confirm Concentration or MODIFY to change Drug amount and diluent volume. (MODIFY only available if concentration
limits allow.)
c) Adjust Weight and OK to confirm. (If required)
d) Press OK to confirm setup. Go to step 6.
6. LOAD SYRINGE - Load the syringe according to the procedure in this manual.
7. Insert the pressure disc into the pressure transducer.
w
PRESSURE TRANSDUCER - Detects if an infusion line with a pressure disc is fitted. The pressure transducer will
measure positive infusion line pressures.
Warning - To remove or insert pressure disc from or into pressure transducer assembly, insert finger into the recess
in the pressure disc and pull forward or push back with care. DO NOT PULL THE INFUSION LINE TO REMOVE OR TO
INSERT THE PRESSURE DISC.
Starting the pump

1000DF00333 Issue 6
16/38
8. CONFIRM SYRINGE - Check that the syringe type and size being used matches the display. If required, the make of syringe can be
changed by pressing the TYPE button. Press CONFIRM when the correct type and size are shown.
Note: If the PURGE SYRINGE option has been enabled then the prompt to purge screen is displayed and the extension set can be
purged as required.
9. PURGE (if required) - Press the
i button and then press and hold the PURGE softkey until fluid flows and the purging of the extension
set is complete. Release the softkey. The volume used during purging will be displayed.
w
Purge extension set, massaging pressure disc to prevent ballooning and ensuring all air removal.
10. INFUSION RATE - Check the rate shown if set and change the rate if necessary using the
f keys.
11. CONNECT TO PATIENT - Connect the extension set to the patient access device.
12. START - Press
b to commence operation. INFUSING will be displayed. If the infusion settings are within the Guardrails® Soft Alerts then
the AMBER STOP light will be replaced by the flashing GREEN START light to indicate that the pump is in operation.
If infusion rate exceeds the Guardrails® Hard Limit then the pump will not start and the display will show DOSE NOT PERMITTED.
If infusion rate exceeds or is under the Guardrails® Soft Alerts then check infusion setting, to continue with infusion at set rate press
b and then confirm OVERRIDE LIMIT by pressing YES. If OVERRIDE LIMIT is not required press NO and adjust rate to be within the
Guardrails® Soft Alerts.
w
If infusion rate running exceeds or is under the Guardrails® Soft Alerts then the display will cycle between Drug
Name, Profile name and Up or Down arrows.
13. STOP - Press
h to halt the operation. ON HOLD will be displayed. The AMBER STOP light will replace the GREEN START light.
FULLY DEDICATED Alaris® CC Guardrails® Syringe Pump - to start an infusion a pressure disc must be fitted.
SEMI DEDICATED Alaris® CC Guardrails® Syringe Pump - to start an infusion with Drug Name or Dosing Only selected a pressure disc
must be fitted.
Starting the Pump (Continued)

1000DF00333 Issue 6
17/38
Basic Features
The i button allows the delivery of a limited volume of fluid in order to purge the extension set prior to being connected to a patient or
after changing a syringe.
1. Press the
i button when the pump is not infusing. Ensure that the extension set is not connected to the patient.
2. Press and hold the PURGE softkey until fluid flows and the purging of the extension set is complete. The volume used during purging
will be displayed, but it is not added to the volume infused.
3. When purging is complete release the PURGE softkey. Press the QUIT softkey to exit back to the main display.
w
The pump will not purge if the "RATE LOCK" has been enabled. During PURGE the pressure limit alarms are
temporarily increased to their maximum level.
Bolus Infusion
Purge
Bolus - Administering a controlled volume of uid or drug at an increased rate for diagnostic or therapeutic purposes. The pump should
always be infusing and always attached to the patient. (Drugs given by an IV bolus could achieve immediate and high drug
concentration levels.)
Bolus can be used at the start of an infusion or during an infusion.
The bolus feature can be congured to:
a) BOLUS Disabled
b) BOLUS Enabled i) Hands On only
ii) Hands On and Hands Free
BOLUS Disabled
If congured to Disabled, pressing the
i button will have no eect and the pump will continue to infuse at the set rate.
w
A "Hands On" bolus and "Hands Free" bolus cannot be administered if the "RATE LOCK" is active or if the feature is
disabled for the selected Profile or specific drug. During BOLUS the pressure limit alarm is temporarily increased to the
maximum level.
BOLUS Enabled - Hands On
In "Hands on" Bolus, press and hold the (ashing) BOLUS soft key to deliver the required bolus. The bolus rate can be adjusted. The bolus
volume is limited in the conguration.
1. During infusion press the
i button once to display the bolus screen.
2. Use the
f keys to adjust the bolus rate if required.
3. To deliver the bolus press and hold the BOLUS softkey. During the bolus, the volume being infused is displayed. When the desired bolus
volume has been delivered or the bolus volume limit is reached, release the softkey. The bolus volume is added to the total volume
infused.
BOLUS Enabled - Hands On and Hands Free
The "Hands Free" Bolus is delivered with a single press of the (ashing) BOLUS soft key. The bolus rate and bolus volume are set by drug
prole in the Data Set and can be changed within limits set by the Data Set.
1. During infusion press the
i button to display the "Hands Free" bolus selection screen.
2. Press the YES softkey to go to "Hands Free" selection bolus screen, press the HANDS ON softkey for "Hands On" bolus (see section
above).
3. Use the
f keys to set the bolus volume/dose required; If necessary press the RATE softkey to adjust the bolus delivery rate
(150/300/600/900/1200ml/h). Note: Rate may be restricted by the syringe size and the CAP BOLUS RATE.
4. Press the ashing BOLUS softkey once to begin the delivery of the preset bolus. The display will show the bolus being delivered, the
bolus counting down and revert to main infusion display upon completion of the bolus.
5. To terminate a bolus being delivered press STOP softkey. This will stop the bolus and continue infusing at the set rate. Press the
h
button to stop the bolus delivery and place the pump on hold.
6. If the bolus volume reaches the set bolus volume limit the bolus will stop and the pump will revert to infuse at the set infusion rate and
continue infusing.
w
If the "Hands Free" bolus option is active, then this feature will be cancelled following any interruption in delivery, e.g.
occlusion, even if the bolus delivery is incomplete.
If the volume to be infused (VTBI) is reached during a bolus, the VTBI complete alarm will sound. Press c to silence the
alarm or CANCEL to acknowledge the alarm. See VTBI section for more details on VTBI operation.
Any "Hands Free" Bolus dose setting which exceeds or is under a Guardrails® Soft Alert must be confirmed before
operation can be continued.
Manual Bolus
The "Manual Bolus" is delivered by moving the plunger drive mechanism forward while the pump is infusing. This method of delivering a
bolus is not recommended as best clinical practice.
The syringe must be conrmed and the plunger mechanism has to move from an engaged position to disengage and then re-engage
position.
A minimum travel of 1mm (leadscrew pitch) must be detected to register.

1000DF00333 Issue 6
18/38
This option allows you to set a specific volume to be infused. Rate at the end of this VTBI can also be set, selecting from stop, KVO, or
continuous infusion at the set rate.
1. Press the VTBI softkey to select the volume to be infused option.
2. Enter the volume to be infused using the
f keys and press the OK softkey.
3. Select the rate at the end of the VTBI using the
f keys to scroll through the on-screen choices. The default is stop.
4. Press the OK softkey to enter the rate and exit the VTBI menu.
Volume to be Infused (VTBI)
Clear Volume
This option enables the volume infused to be cleared.
1. Press the VOLUME softkey to display the CLEAR VOLUME option.
2. Press the YES softkey to clear the volume. Press the NO softkey to retain the volume.
Selecting YES resets the volume infused in the 24H LOG option.
Rate Lock
If Rate Lock is enabled, when the infusion rate has been set and the infusion started (or following a bolus infusion) the rate lock prompt
will appear on the main display.
To select the rate lock function press the YES softkey. Press the NO softkey if the rate lock is not required.
When rate lock is enabled, the following are unavailable:
l Changing the infusion rate / titration
l Bolus / purge
l Switching the pump off
l VTBI over time infusions.
To disable the rate lock if selected:
1. Press the
d button to access the options menu.
2. Select the UNLOCK RATE option using the
f keys and press the OK softkey.
To enable the rate lock if not selected:
1. Press the
d button to access the options menu.
2. Select RATE LOCK and press the OK softkey.
Basic Features (Continued)
If Rate Titration is enabled the rate can be adjusted while infusing:
1. Select the new rate using the
f keys.
The message < START TO CONFIRM > will flash on screen and pump continues to infuse at the original rate.
2. Press the
b button to confirm the new infusion rate and start infusing at the new rate. If the new infusion rate setting exceeds or is
under a Guardrails® Soft Alert confirmation is required before infusion can start infusing at the new rate.
If Rate Titration is disabled the rate can only be adjusted whilst on hold:
1. Press the
h
button to put the pump on hold.
2. Select the new rate using the
f keys.
3. Press the
b button to start infusing at the new rate.
Rate Titration

1000DF00333 Issue 6
19/38
If the Auto Set Pressure Option is enabled then the pump AUTOMATICALLY adjusts the pressure occlusion limit.
l After 15 minutes of infusion the pump AUTOMATICALLY adjusts the occlusion pressure limit to X mmHg (the AUTO OFFSET value, 15-
100mmHg), above the average infusion pressure since the start of the infusion.
Auto Set Pressure (If enabled)
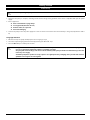
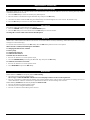
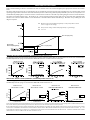
Basic Features (Continued)
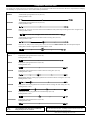
Pressure Level with pressure set fitted
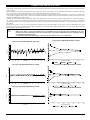
1. To check and adjust the pressure level press the e button. The display will change to show a 20 minute pressure trend graph displaying
the pressure alarm level and the current pressure level.
2. Press the f keys to increase or decrease the pressure alarm level. The new level will be indicated on the display.
3. The AUTO Pressure feature may be used when a stable pressure has been achieved over a short period of infusion. If AUTO Pressure
has been enabled the automatic pressure alarm level is calculated and set by pressing the AUTO softkey.
4. Press the TREND softkey to view the pressure trend of the previous 12 hours. The pressure trend can be viewed at 15 minute intervals
by using the +/- softkeys. The pressure trend graph displays the pressure at a given time.
5. Press the OK softkey to exit the pressure screen.
_
+
OK
20mmHg
07:45
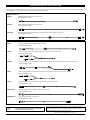
Pressure Level without pressure set fitted
(not applicable when FULLY DEDICATED)
1. To check and adjust the pressure level press the e button. A bar graph will be displayed showing the pressure alarm level and the
current pressure level.
2. Press the
f keys to increase or decrease the alarm level. The new level will be indicated on the display.
3. Press OK to exit the screen.
w
The interpretation of pressure readings and occlusion alarms are the responsibility of the clinician depending on the
specific application.
Page is loading ...
Page is loading ...
Page is loading ...
Page is loading ...
Page is loading ...
Page is loading ...
Page is loading ...
Page is loading ...
Page is loading ...
Page is loading ...
Page is loading ...
Page is loading ...
Page is loading ...
Page is loading ...
Page is loading ...
Page is loading ...
Page is loading ...
Page is loading ...
Page is loading ...
Page is loading ...
-
 1
1
-
 2
2
-
 3
3
-
 4
4
-
 5
5
-
 6
6
-
 7
7
-
 8
8
-
 9
9
-
 10
10
-
 11
11
-
 12
12
-
 13
13
-
 14
14
-
 15
15
-
 16
16
-
 17
17
-
 18
18
-
 19
19
-
 20
20
-
 21
21
-
 22
22
-
 23
23
-
 24
24
-
 25
25
-
 26
26
-
 27
27
-
 28
28
-
 29
29
-
 30
30
-
 31
31
-
 32
32
-
 33
33
-
 34
34
-
 35
35
-
 36
36
-
 37
37
-
 38
38
-
 39
39
-
 40
40


CareFusion Alaris CC Guardrails 80033UND1-G Operating instructions
- Type
- Operating instructions
- This manual is also suitable for
Ask a question and I''ll find the answer in the document
Finding information in a document is now easier with AI
Related papers
-
BD Alaris™ GP (Guardrails™) Volumetric Pump Operating instructions
-
-
-
BD Alaris VP Plus Guardrails Operating instructions
-
-
-
Other documents
-
-
-
-
-
-
-
Midmark Fluid Management User manual
-
-
-