Page is loading ...

WTT-1011 Solar Spotlight Instructions & Features
Parts List
Quantity Part
1
2
2
Solar Spotlight
Wood Screws
Drywall Anchors
Distributed by Flipo Group Limited
613 1st Street, La Salle, IL 61301
Questions or Comments? Please contact us at
(815) 223-9942 or info@flipo.com
Figure 1
Figure 2
Revised: 4/24/2018

Specifications
Trouble Shooting
• Charging Power Source: 5V4W0.8 (7¼” x 7¼”) Solar Cell
• Rated Power: 8W
• Internal Battery: 2 x 18650 3.7V Li-ion 4000mAh
• LED: 100 x 0.2W2835
• LED Color Temperature: 6000K-6500K
• Charging time: 8-10 Hours
• Running Time: >1 Hour
• Sensor distance: Up to 30’ Maximum (Adjustable)
• Sensor Detection Angel: 110°
• Sensor delay time: 10-60 Seconds (Adjustable)
• Size: 9¾” x 9” x 7¼”
Thermal infrared induction distance will be reduced in high temperatures or if other strong interference occurs.
In order to achieve best results, 6’ is the optimum distance from your spotlight to the ground.
Should your spotlight not turn on or function properly, make sure it is not located in a shaded area or near another
source of light during evening hours
Fine Tuning Your
Spotlight
Each spotlight has two independent LED light panels that can be pointed in numerous directions based on your needs.
Each light also has 3 small knobs located underneath the PIR sensor. These knobs control the distance and range
of the PIR sensor, (SENS), the duration the light will remain lit after activation, (TIME), and the sensitivity to ambient
brightness, (LUX). To increase the distance at which the PIR sensor will detect motion, (up to 30’), turn the SENS knob
clockwise. To increase the amount of time the light will remain illuminated after detecting motion, (10-60 seconds),
turn the TIME knob clockwise. To increase the ambient brightness at which the light will respond to motion, turn the LUX
knob clockwise. If set to the maximum level, the light will turn on in most situations ranging from dusk to daylight. If set
to minimum the light will only activate when dark, the ideal position for evening and night operation.
Distributed by Flipo Group Limited
613 1st Street, La Salle, IL 61301
Revised: 4/24/2018
Questions or Comments? Please contact us at
(815) 223-9942 or info@flipo.com
Installation
Activation
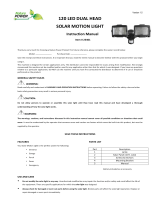
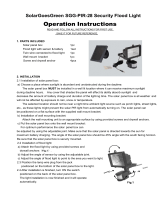
Install the light on a wall or other flat surface at least 6’ above the ground. Remove the screw that attaches the bracket
to the spotlight, and slide the bracket out of the light, (Figure 1). Use the wood screws included with your product to
attach the bracket to a wall or other flat portion of your exterior, (Figure 2). Be sure the bracket is attached to a stud or
other weight bearing surface. If a stud is not available, use the dry wall anchors included with your product. Slide the
spotlight back on the bracket, and replace the screw. Be certain to set your spotlight up in a location that allows its
solar panel to receive direct sunlight during the day. The batteries in your spotlight are charged using solar power; if it
is set up in a shaded location, the batteries will not recharge on a daily basis. Your spotlight should not be set up near
other light sources. Your light will not turn on automatically if exposed to illumination from another source such as a
street lamp.
An ON/OFF switch is located underneath the spotlights main body; push it to the ON position. When dark, (brightness
levels less than 10 LUX), the light will turn on automatically when movement is sensed within range of the passive
infrared sensor, (PIR). When movement ends, the light will turn off automatically after 10–60 seconds. The light will
always turn on if movement is sensed in the darkness.
Operating Instructions
/