Educational Insights GeoSculpt 3-D Guide Product Instructions
- Type
- Product Instructions

EI-3169
Ages 8+
Grades 3+
Enter the exciting world of map-making!
Cartography is an exciting and creative way to
learn about a place. Using reference information,
you’ll create a foam-and-plaster state, province,
country, or other landform model complete with
mountains, hills, lakes, rivers, and other details
unique to your location. Roll up your sleeves
and get ready for some cartography fun!
Be sure to read all the directions before getting
started. Allow at least 3 days to complete this
project so that it has time to dry. Don’t wait to start
the night before it’s due!
Materials Included
• 12" x 12" foam board
• Magic Plaster Gauze
• paint
• paint brush
WARNING!
FOR USE BY CHILDREN OVER 5 YEARS OLD.
ONLY FOR USE UNDER THE SUPERVISION OF AN ADULT.
CAUTION!
READ THE INSTRUCTIONS BEFORE USE. FOLLOW THEM AND KEEP FOR REFERENCE.
DO NOT INHALE OR SWALLOW POWDER ON MAGIC PLASTER GAUZE.
Advice for Supervising Adults
• Read and follow these instructions, the safety rules, and the rst aid information. Keep these instructions for
reference.
• The incorrect use of chemicals can cause injury. Only carry out those activities which are listed in the instructions.
• This chemical toy is for use only by children over the age of 5 years.
• Because children’s abilities vary so much even within age groups, supervising adults should exercise discretion as to
which activities are suitable and safe for them. Supervising adults should assess any activity in order to establish its
suitability for a particular child.
• The supervising adult should discuss the warnings and safety information with the child or children before beginning
the activities. Particular attention should be paid to the safe handling of acids, alkalis, and ammable liquids.
• The area surrounding the activity should be kept clear of any obstructions and away from the storage of food. The
area should be well lit, ventilated, and close to a water supply. A solid table with a heat-resistant top should be
provided.
Safety Rules
• Read these instructions before use. Follow them and keep them for reference.
• Keep young children and animals away from the activity area.
• Store chemical toys out of reach of young children.
• Clean all equipment after use.
• Wash hands after carrying out activities.
• Do not use any equipment which has not been supplied with the set or recommended in the instructions for this use.
• Do not eat, drink, or smoke in the activity area.
• Do not allow chemicals to come into contact with the eyes or mouth.
Chemicals included: There is gypsum in the Magic Plaster Gauze. The chemical name for gypsum is Calcium sulfate
hemihydrate.
General First Aid Information
• In case of eye contact: wash out eye with plenty of water, holding eye open if necessary. If burning, redness, itching,
pain or other symptoms persist or develop, consult a physician.
• If swallowed, rinse out mouth with water. Drink some fresh water. Seek immediate medical advice.
• The powder in the Magic Plaster Gauze may cause drying of the nose and throat after prolonged exposure. In case of
inhalation, leave the area to breathe fresh air. If respiratory symptoms persist, consult a physician.
• The powder in the Magic Plaster Gauze may cause drying of the skin. In case of skin contact resulting in irritation or
burns, wash aected area with plenty of water for 5 minutes.
• In case of doubt, seek immediate medical advice. Take the chemical, together with the container and this information,
with you.
• In case of injury, always seek medical advice.
Materials Needed
paper map of your state (maximum
of 12 inches long or wide); for maps
and reference materials look online
or in the library or consult an atlas
or globe.
physical, relief, or topographic map
of your state or landform
reference materials about
the location
Optional:
• plastic (to protect workspace)
• ruler
• toothpick
newspaper
aluminum foil
bowl of water
scissors
dull (butter) knife
marker
tape
TM
Developed in Southern California by Educational Insights.
© Educational Insights, Inc., Gardena, CA (U.S.A.). All rights
reserved. Learning Resources Ltd., King’s Lynn, Norfolk (U.K.).
Please retain this information. Made in Hong Kong.
www.Educational
Insights.com
Fabriqué en Hong Kong. Informations à conserver.
Made in Hong Kong. Bitte bewahren Sie unsere
Adresse für spätere Nachfragen auf.
Hecho en Hong Kong. Conservar estos datos.
3169 GeoScuplt G R0310 p2.indd 1 3/16/10 8:47:17 AM

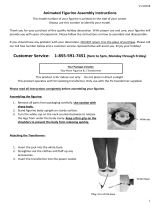
Cutting Out Your Foam Board
Getting Ready
Spend some time studying the location or landform that you are going to create. What are its physical
features? Does it have mountains, lakes, rivers, and/or a coastline? Are there major cities and/or a capital?
Find out what makes the location unique. You can’t show absolutely everything so think about which
features you would like to highlight.
Your foam is now in the shape of your landform! (If
you are creating a string of islands (Hawaii), you
may wish to paint the area around the islands blue
to represent the ocean, rather than cut out each
individual island.)
Lay out some newspaper and/or plastic on the
table to protect your workspace. Put a medium-
sized bowl of water on the table.
1
4
Consult your physical map to see where there are
mountains or other raised elements.
Tip Use sheets of crumpled aluminum foil or
newspaper to create mountain ranges and hills or
any other raised elements. Tape the aluminum foil/
newspaper into place on your foam board.
Cut short lengths (about 5 inches long) of Magic
Plaster Gauze. (continued on next page)
2
3
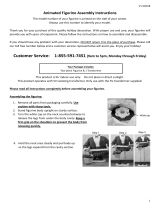
Dip a strip of Magic Plaster Gauze into the water.
Rub it between your thumb and ngers to break
down the powder and create a paste-like substance.
This will create a smoother eect. Run your ngers
down the strip, gently squeezing any excess water
back into the bowl.
4
Lay the strip on your foam board map. Smooth it
out with your ngers.
5
At the map edges, wrap the Magic Plaster Gauze
around the sides and tuck it under the map.
7
You can build additional mountains after you’ve
started placing the Magic Plaster Gauze. Place
multiple layers of Magic Plaster Gauze in one spot
to build up the mountain or use crumpled paper to
create a base. See Tip, step 2.
8
Let your map dry overnight. It will dry fastest outside
in direct sunlight. If drying indoors, allow 24 hours to
dry. Put the map in a place where it won’t be disturbed,
such as on top of a refrigerator.
9
Repeat steps 4-5 until you have covered the entire
map. You can apply multiple layers of Magic Plaster
Gauze to build up a thicker map. Thicker maps will
take longer to dry. See Figure 1.
6
Cut out the paper map with scissors.
This is your template.
1
Use a dull knife to cut along marker line.
3
Set the template on the foam board and
trace around it with a marker.
2
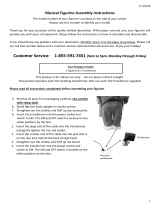
When completely dry, use the paints and paintbrush to paint
in color and details. Lay out some newspaper and/or plastic
on the table to protect your workspace. Put a medium-sized
bowl of water on the table for cleaning your brushes.
Study your physical map and reference materials to determine
which colors to use for details. Blue is a good choice for
lakes, rivers, and the ocean. Use the thin edge of the brush for
making thin rivers and painting small details. Use the broad
side to paint larger areas of color.
Materials Needed
paper map of your state or landform
scissors
marker
12" x 12" foam board
dull (butter) knife
Time Required: 30-60 minutes
Materials Needed
newspaper and/or plastic
bowl of water
physical, relief, or topographic map of
your landform
reference materials about your landform
foam map
aluminum foil
tape
Magic Plaster Gauze
scissors
Time Required: 1 day
Applying the Magic Plaster Gauze Continued...
Figure 1
You can create a ag by taping a piece of paper to a
toothpick. Push the toothpick through both the gauze
and foam layers until the toothpick stands upright by
itself. You may wish to decorate your map with other
materials such as clay, cotton balls, paper-mâché,
gurines, etc.
Allow the painted map to dry overnight.
Materials Needed
your dry map
physical, relief, or
topographic map
of your state or landform
reference materials
about the location
paint
paint brush
bowl of water
Time Required: 1 day
Optional:
• toothpick
• newspaper and/
or plastic
• tape
3169 GeoScuplt G R0310 p2.indd 2 3/16/10 8:47:20 AM
-
 1
1
-
 2
2


Educational Insights GeoSculpt 3-D Guide Product Instructions
- Type
- Product Instructions
Ask a question and I''ll find the answer in the document
Finding information in a document is now easier with AI
Related papers


Other documents
-
 Fraser Hill Farm FASC036D-28RED Installation guide
-
 Fraser Hill Farm FAMC058-2GL1 Installation guide
-
 Fraser Hill Farm FASC036M-11RED Installation guide
-
 M-1 60932MC User manual
-
 Fraser Hill Farm FCRY060-SNM1-WT User manual
-
 Made By Me 765940513729 User guide
-
Kmart 43316601 User manual
-
HAUNTED HILL FARM:Haunted Hill Farm HHRPR-5FLSA User manual
-
 Learning Resources LER1811 User manual
-
 Fraser Hill Farm FCRY061-DEERSLED1-WT1 Installation guide


