Page is loading ...

1
JULY 2017
IPC
™
Panels
Installation Manual
TABLE OF CONTENTS
INSTALLATION INSTRUCTIONS
GENERAL 2
INSTALLING THE IPC PANEL 3
INSTALLING THE PRESSURE
TRANSDUCER AND BELL
ASSEMBLY
4
PANEL ALARM CODES 5
AQUAWORX MARC™
OPERATING INSTRUCTIONS
GENERAL 6
MARC PLUG-IN & START-UP 7
CONTROLLER PASSWORDS
& LOGIN SETUP
7
MENU OPTIONS MAPPING 8
CONTROLLER MENU
OPTIONS 9
STATUS 10
EVENTS 10
MANUAL RUN 11
ACTIVATE SETTINGS 11
PUMP “A” SETTINGS 12
TIME SETTINGS 13
SD CARD OPERATIONS 13
USING THE SD CARD
SETTINGS
14
SAND FILTER PANEL SETUP 15
TIMED DOSING SETUP
FORMULATION
16
FREQUENTLY
ASKED QUESTIONS
18
www.infiltratorwater.com

Contact Infiltrator Water Technologies 1-800-221-4436 for additional technical and product information.
2
AQUAWORX IPC PANEL INSTALLATION INSTRUCTIONS
The Aquaworx IPC (Intelligent Pump Control) Panel
provides an innovative approach to pump control.
Designed specifically for the onsite industry, the IPC Panel
leverages simple pressure transducer technology for the
enhancement of pump system performance, and ease of
installation. Relying on an embedded microprocessor in
the pump controller and a floatless pressure transducer in
the pump chamber, the IPC Panel monitors liquid levels,
controls pumping time intervals, and logs events in real
time. Using the Mountable and Removable Controller
(MARC) as the user interface, the IPC Panel offers a cost-
effective solution with expanded capability.
Aquaworx offers three models of the IPC Panel; Simplex,
Duplex and Sand Filter, to meet a variety of system design
requirements. The Simplex Panel has the ability to time
control a single pump, while the Duplex Panel can control
two pumps in an alternating design with independent
timing. The Sand Filter Panel has the ability to time control
two individual pumps having independent level sensors,
allowing for a design which can time-dose a treatment
system and drainfield.
I. General
Unpack the Aquaworx IPC Panel and check for any visible
damage both external and internal. Also verify that there
are no cracks or damage to the pressure transducer bell.
Note: You will need to identify the number on the pressure
transducer bell as it is needed during the MARC setup.
Notify Aquaworx immediately at 1-877-278-2979 if any
damage has occurred.
ALL INSTALLATIONS MUST BE COMPLETED IN
ACCORDANCE WITH ALL APPLICABLE FEDERAL,
STATE AND LOCAL CODE.
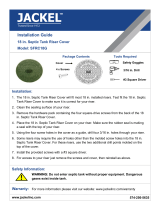
Aquaworx IPC Panel
REQUIRED
Gas Tight Seal
Conduit
Pump Tank Riser
Excess Transducer Cable
Pump Discharge
Pump Power Supply
Pressure Transducer Bell
Pump
Looped Snorkel Tube
secured to Top of Riser
Transducer Signal Wire
FIGURE 1: PUMP TANK TRANSDUCER ASSEMBLY

Contact Infiltrator Water Technologies 1-800-221-4436 for additional technical and product information.
3
AQUAWORX IPC PANEL INSTALLATION INSTRUCTIONS
II. Installing the IPC Panel
NOTE: A qualified electrician must perform all wiring.
Complete wiring diagram available at www.aquaworx.com
The following components and tools may be required
for installation:
• Screwdriver (sm and med size flat head)
• Pipe cutter and tape measure
• Fish tape
• Wire strippers/cutters
• Electrical tester
• Drill
• 3⁄4” to 1” screws
• 1” PVC coupler
• Step bit
• Hole saw
• Electrical conduit
• Electrical tape
• Splice box for pump connection
• Waterproof wire connectors
• 1” PVC (for transducer handle, amount determined by
tank depth (6’ length typical)
FIGURE 2: IPC PANEL WIRING SETUP AND
TRANSDUCER 3-WIRE CONNECTION
1. Mount the IPC Panel to the wall or post. Position the
IPC Panel so that the power supply enters the IPC Panel
through the bottom approximately 1” to the right of the
audible alarm unit.
2. On Simplex Panels drill two holes (3 holes for duplex)
in the bottom of the enclosure spaced approximately 2”
apart and in line with the audible alarm unit. When facing
the panel, the order of conduit connections from left to
right is shown below, as well as illustrated in Figure 2:
Power in: 2 dedicated 20 amp circuits from house to
power the panel, 120V (1) and pump, 120V or 220V(2)
Power out: Power supply from panel to pump
Transducer signal wire: Signal transmission from panel
to pump
NEMA 4X fittings must be installed in each field-drilled hole
to retain the integrity of the enclosure’s 4X rating.
Dedicated pump circuit from supply (#2)
(120 or 220 volt, 20 amp source; up to a 2 HP pump)
Power from panel to pump
(pump A for duplex)
Transducer signal wire terminal strip
Varistor surge suppressor
Ground terminals
Transducer wire and power in/out conduit connections
Audible alarm unit
Circuit board
Dedicated alarm from supply (#1)
(120 volt, 20 amp source)

Contact Infiltrator Water Technologies 1-800-221-4436 for additional technical and product information.
4
AQUAWORX IPC PANEL INSTALLATION INSTRUCTIONS
3. Power to pumps: run the panel (s) power wires from
the IPC Panel to the septic tank riser. Connect the wiring
in the splice box using water-tight connectors. Connect
pump wires to the IPC Panel by carefully following the
wiring diagram enclosed with the panel. A gas-tight seal
(see Figure 1) is required to prevent corrosive septic gases
from migrating into the IPC Panel.
4. Power to controller: wire the supply circuit to the panel.
Aquaworx recommends that the panel be wired to two
designated circuits. An external disconnect should be
incorporated into the supply circuit and mounted within
easy reach of the IPC Panel. Note: Site specific codes
have final authority on external wiring requirements.
III. Installing the Pressure Transducer
and Bell Assembly
The pressure transducer bell assembly replaces the tradi-
tional float tree assembly. The 1” PVC stand pipe may be
mounted by applying the same methods used to install a
float tree assembly.
1. Determine the position of the pressure transducer bell
assembly. The pressure transducer bell assembly must be
mounted so that it allows the liquid level to pump below
the bottom of the pressure transducer bell. This allows the
pressure transducer bell to get a fresh air bubble.
2. Feed the transducer signal wire and snorkel tube
through the 1” PVC stand pipe and glue to the pressure
transducer bell using a 1“ tee. The length of the stand
pipe when secured should position the bottom of the
pressure transducer bell above the top of the pump.
3. Cut off the snorkel tube approximately 9” lower
than the top of the stand pipe and secure it to the
transducer signal wire. The snorkel tube should be
positioned in the form of an upside-down U as high as
possible in the riser. This allows the snorkel tube to
create an air lock in the event of a flooded tank.
4) NOTE: The Z-bias value labeled on the side of the
pressure transducer bell. Later in the set-up, you will be
instructed to program the Z-bias into the IPC Panel.
5. Run the transducer signal wire back to the IPC Panel
and connect to the transducer signal wire terminal strip.
Connect Red to RD, blue to BL and black to BK (first
three positions). Make sure to leave enough cable in the
riser to allow for removal of the pressure transducer bell
assembly during maintenance. The transducer signal wire
is rated for direct burial. However, it can be run in a con-
duit. Site specific codes have final authority on installation
requirements.
NOTE: Do not attach the pressure transducer bell assembly to
the pump discharge pipe. Do not pinch or crimp the snorkel tube
tubing.
FIGURE 3: TRANSDUCER
Pump Power
Supply
Pump
Bell 4”
Above Off/
Idle Level
Pressure
Transducer
Bell
1” Tee
for Stand
Pipe
Drainage
1” PVC
Stand Pipe
Tank
Bracket
Snorkel Tube
Transducer
Signal Wire
Riser
Wall
Pump
Discharge
Excess
Transducer
Cable

Contact Infiltrator Water Technologies 1-800-221-4436 for additional technical and product information.
5
AQUAWORX IPC PANEL INSTALLATION INSTRUCTIONS
IV. Panel Alarm Codes
A) Visual Status Indicator
The indicator light on the front of the panel displays cur-
rent system status by flashing in unique 8 second pat-
terns. If the light does not flash for 8 seconds there is a
problem with the pump controller.
Patterns:
On solid The system is experiencing
a high-level alarm condition
1 short flash The system is idle
1 long flash The system is pumping
2 short flashes The system is waiting for the off
time to expire
B) Audible Status Indicator
The sounds convey event conditions that require atten-
tion. To silence the panel press the push to silence button
on the front of the IPC Panel. The following Morse Code
characters communicate specific system conditions:
Morse Code P ._ _. Controller was just powered up
On Continuous The water level is above the
high-level set point
Morse Code “S” . . . The level sensor is not
communicating with the controller
FIGURE 4: IPC PANEL WITH VISUAL ALARM
NOTE: SCB02 Panel uses a toggle switch on the side for
the same function.
C) Manual Pump/HOA Feature
Push to silence button may be used to manually operate
the pump in case a MARC is not available.
Steps:
1) Hold the alarm button down (continuously)
2) Turn off the power to the panel by throwing
the breaker or disconnecting the wires from the
transformer (Blue and Yellow).
3) Turn the power back on and release the alarm
button. The alarm should now only have a
single flash.
4) The pump will power on by holding the alarm
button down, and will turn off when released.
5) To return to automatic operation, the panel should
go through another power cycle without holding
down the alarm button.

Contact Infiltrator Water Technologies 1-800-221-4436 for additional technical and product information.
6
AQUAWORX MARC OPERATING INSTRUCTIONS
I. General
The MARC is a handheld device that is specifically
designed to program the Aquaworx IPC Panel product
line. The MARC has the ability to mount inside the IPC
Panel making it readily available for that individual panel.
Alternatively, it can be removed for use with multiple
panels. Removing the MARC has an additional benefit of
minimizing the ability of unauthorized persons to inadver-
tently adjust the system settings. The MARC connects to
and communicates with the panel using a standard RJ45
cable (included). The MARC includes a SD memory card
slot, allowing the user to capture and download system
events and settings onto a removable card. This provides
the operator with a history of system function, which is
critical to troubleshooting and maintaining a pump-driven
system.
FIGURE 5: THE MARC
Tracking SD-card slot
for event download
LCD text display
(2 line, 20 character)
Sturdy ABS enclosure
RJ45 Cable 3’ length
Simplex/Duplex and
backwards compatible
8-pin (RJ45) connector for easy
plug-in / disconnect
Enter
-/Left
Select
+/Right Cancel
II. MARC Plug-in and Start-up
1. Plug RJ45 cable into bottom of MARC unit.
2. Plug other end of RJ45 cable into panel connector.
3. LCD screen will display.
NOTE: The MARC receives its power from the IPC Panel
and does not have a power source of its own.

Contact Infiltrator Water Technologies 1-800-221-4436 for additional technical and product information.
7
AQUAWORX MARC OPERATING INSTRUCTIONS
FIGURE 6: IPC PANEL WITH THE MARC
IV. Controller Menu Functions
Below is a list of menu functions available to the user.
See Figure 7 for complete MARC menu mapping.
SIMPLEX = The “SIMPLEX” panel user may access the
above menus in addition to the following menus:
A) VIEW STATUS “A”
B) VIEW EVENTS
C) MANUAL RUN “A” OR “B”
D) ACTIVATE SETTINGS
E) PUMP “A” SETTINGS
F) TIME SETTINGS
G) SD CARD SETTINGS
H) LOGIN
RJ45 Cable
Connection to MARC
DUPLEX = The “DUPLEX” panel user may access the
above menus in addition to the following menus:
• STATUS “B”
• MANUAL “B”
• PUMP “B” SETTINGS
RJ45 Cable Connection to
Circuit Board
MARC

Contact Infiltrator Water Technologies 1-800-221-4436 for additional technical and product information.
8
AQUAWORX MARC OPERATING INSTRUCTIONS
FIGURE 7:
MARC SIMPLEX
MENU OPTIONS MAPPING
300 AQUAWORX HUI
R1.3.2.C (c) 2012 LIPS
V
iew Status “A”
View Events
Run Ti
me = 00000:00:03
Doses = 00000 V = 00000
06-10-03 1
1:53:44
0012 Event
SW = DLL
3.00 V1.0.4.d
ID = 04-10-2012
00-00 12:30:14 0012
Man Off 00.0
Continuation of events
depending on
the amount stored
Manual Run
Pump “A” or “B”
Time State Level
000:00 MRun 00.00
Time State Level
000:00 MStop 00.00
Activate
Settings
Waiting/Pumping/Idle 001:30
Level 03.6
Pump “A”
Settings
Pump On Time
01:00
Veto On Time
01:00
Pump Off Time
060:00
Veto Off Time
030:00
High Level
20.0
Start Level
1.0
Veto Level
19.0
Zero Bias
07, 08, 09...
Auto Clear
Set Time & Date
12:04:51 06-14-13
SD Card
Operations
Login
Save Events
Y/N
Clear Events
Y/N
Save Settings
Y/N
Activate
Time Settings
Save Full Event File
Y/N
Time State Level
000:00
Waiting 00.00
AQUAWORX
HUZ R1.3.2.2 by Infiltrator

Contact Infiltrator Water Technologies 1-800-221-4436 for additional technical and product information.
9
AQUAWORX MARC OPERATING INSTRUCTIONS
V. Controller Menu Options
View Status A
Displays panel Status “A” settings
(See Section A)
Displays real time event tracking log of system
(See Section B)
Manual pumping and stopping - HOA
(Hands Off Auto) switch
(See Section C)
Sets IPC Panel into auto mode after settings have
been modified
(See Section D)
Setup functions for Pump “A”
(See Section E)
IPC Panel setup for establishing local time and date
(See Section F)
Set of sub-menus designed to perform events and
settings retrieval, and to clear events when desired.
(See Section G)
Allows user to access administrative settings to update
advanced settings.
(See Section H)
View Events
Manual Run Pump “A”
Activate Settings
Pump A Settings
Time Settings
SD Card Settings
Login

Contact Infiltrator Water Technologies 1-800-221-4436 for additional technical and product information.
10
AQUAWORX MARC OPERATING INSTRUCTIONS
Section A.
STATUS: This is a read-only set of sub-menus that allow
the user to view the IPC Panel status in real-time and
program functions as it runs through the programmed
View Status A
Time State Level
000:00 Waiting 00.0
Run Time = 00000:00:03
Doses = 00000 V = 00000
06-10-03 11:53:44
0012 Event
SW = DLL3.00 V1.0.4.d
ID =04-10-2012
parameters. The IPC Panel identification number and
software version can be found in this menu.
NOTE: Status “B” is an available menu option on Duplex
panels.
300 AQUAWORX HUI
R1.3.2.C (c) 2012 LIPS
Time - min / sec
State - Pumping, Waiting, Idle
Level - Inches above bottom of bell
Run Time (hr / min / sec)
Doses - Cycle counter - normal dose
V - Cycle counter - veto dose
Date and time
Number of events
Software identification version and revision
IPC Panel identification number
Section B.
EVENTS: A read-only set of sub-menus that allows the
user to view the events logged into the system (up to
4,000 events). The LCD screen details the date, time,
liquid level, event code and event count number.
AQUAWORX HUZ R1.3.2.2
by Infiltrator
Software version
00-00 12:30:14 0012
Man Off 00.0
Date of
Event
Time of Event Event
Number
Event
Type
Level at
Time of Event

Contact Infiltrator Water Technologies 1-800-221-4436 for additional technical and product information.
11
AQUAWORX MARC OPERATING INSTRUCTIONS
Section C.
MANUAL RUN PUMP “A”: Allows the user to manually
operate the pump. The LCD screen details how long the
pump runs and the real-time liquid level in the tank. User
may toggle between pumping and stopped by pressing
the Enter button.
MANUAL RUN PUMP “B” (Duplex only): Allows the
user to manually operate a second pump. For duplex,
the pumping function will alternate between Pump A and
Pump B with each cycle of the Enter button. The screen
display for Manual “A” and Manual “B” are similar, as
follows:
Time State Level
000:12 MRun 00.0
Manual Run
Pump “A” or “B”
Time - Counter in that event (state)
State - MRun or MStop
Section D.
ACTIVATE SETTINGS: Allows the user to actuate
or upload the controller settings to the IPC Panel.
Waiting/Pumping/Idle 001:30
Level 03.6
Activate Settings
Activates setting and starts cycle
Goes to view status screen
NOTE: Once panel is set to Activate mode, formally
named Auto, it will return to the Status menu.
IMPORTANT:
ACTIVATE must be selected after
all SETTINGS changes for the new settings
to be saved to the processor.

Contact Infiltrator Water Technologies 1-800-221-4436 for additional technical and product information.
12
AQUAWORX MARC OPERATING INSTRUCTIONS
Section E.
PUMP “A” SETTINGS: Allows the user to set all pump
run parameters. Note: Pump “B” settings allow the user
to set parameters for a second pump (only for use on a
Duplex panel or sand filter).
Standard dose pump on time
Pump On Time (minutes, seconds)
Standard dose pump off time
Pump Off Time (minutes, seconds)
High level veto dose on time (see below)
Dose On Time (minutes, seconds)
High level veto dose off time
Dose Off Time (minutes, seconds)
High level alarm setting (inches)
Veto level setting (inches)
Standard dose level setting (inches)
Calibration of transducer to IPC Panel. The Z-Bias number
is located on the pressure transducer bell and should be
recorded during transducer installation
Additional doses or time required to clear the bottom of
the bell if the liquid level is below the start level
Pump On Time
001:00*
Pump A Settings
* All values shown are the factory setting.
Pump Off Time
060:00
Veto On Time
002:30
Veto Off Time
030:00
High Level
20.0
Veto Level
19.0
Start Level
001.0
Zero Bias
07
Auto Clear
02 Doses
Veto Dose: The Veto function is simply a separate level
that instructs the pump to run a different timing sequence
and is intended to prevent pump tank overflows. The veto
level is typically set above the high level alarm. When liq-
uid reaches the veto level, the veto pump cycle times are
initiated. The veto pump cycle times will remain in effect
until the liquid level falls below the veto level. It the veto
level is set above the alarm level, the alarm remains on.
The alarm will not de-activate until it is manually silenced
or the liquid level drops below the alarm level.
NOTE: If local regulation will not permit the use of an
override function, then set the veto level to the same
level as the high level alarm, and set the veto on and off
times times to establish the veto doses as a counter of
the number of doses completed above the alarm level.

Contact Infiltrator Water Technologies 1-800-221-4436 for additional technical and product information.
13
AQUAWORX MARC OPERATING INSTRUCTIONS
Section F.
TIME SETTINGS:
A set of sub-menus to program local date and time for
logged date and time-stamped events.
Set Time & Date
12:014:51 06-14-13
Time Settings
Current time / current date
Section G.
SD CARD OPERATIONS: A set of sub-menus designed
to perform events and settings retrieval, and to clear
events when desired.
Save Events
Y/N
SD Card Operations
Clear Events
Y/N
Save Settings
Y/N
Saves events to SD card
(write events = Y, don’t write events = N)
Clears currents events from control board
(clear events = Y, don’t clear events = N)
Saves settings to SD card
(write settings = Y, don’t write settings = No)
Save all 4000 previous events to SD card.
May contain non-events if the panel never
got to 4000 events.
(write settings = Y, don’t write settings = No)
Save Full Event File
Y/N

Contact Infiltrator Water Technologies 1-800-221-4436 for additional technical and product information.
14
AQUAWORX MARC OPERATING INSTRUCTIONS
VI. Using the SD Card
NOTE: It is recommended that a SD card with SD card
adapter be used with the the MARC 2. The SD card must
not exceed 1 GB of storage in order to operate properly.
1. Insert the SD card into the designated slot on the
MARC.
2. Scroll through the MARC menus to the SD Card
Settings menu, until the screen says “Write Events.”
3. ENTER = “Y” to capture events to SD card,
ENTER = “N” to skip.
NOTE: The MARC will show the events being
transferred to the SD card.
4. Once the data transfer is complete, the SD card can be
removed and placed in a card reader connected to a PC.
5. On the user’s PC, locate the designated drive for
the card reader.
6. Click on the file to identify the SD card events file
(.evt) and settings file (.set).
7. The file can be opened using a spreadsheet or
text editing program.
NOTE: Each event and settings file is saved by IPC Panel
serial number, allowing the user to save the data from
multiple IPC Panels on a single SD card.
Section H.
Login Menu
SD Card Reader
SD Card
Login
All
0000
Simplex
0000
Duplex
0000
Advanced / SF
Admin
0000
NOTE: It is no longer necessary to login to access the
operating menus on the MARC.
The login menus are not necessary for normal set-up
or operation conditions.
When changing the set-up on a panel to operate more
advanced settings, it may be necessary to login under
the Admin Menu.
Contact Infiltrator Systems at 1-800-221-4436 for
more information.

Contact Infiltrator Water Technologies 1-800-221-4436 for additional technical and product information.
15
SAND FILTER PANEL SET-UP
The IPC-DSF is designed for two pumps, two chambers
and two transducer systems such as Sand Filters or
Advanced Treatment Units. We named our system
Sand Filter; however, it may be used with other advanced
systems that require two pumps in different pump
chambers with separate liquid levels.
In a traditional Sand Filter design, Pump A operates the
pump in the Surge Tank that discharges to the sand filter,
and Pump B operates the Pump Basin that discharges
to the drainfield. Pump A is slaved to Pump B, so that if
Pump B has an alarm, then Pump A will not run. This is
important in order to protect the filter from an overload
condition.
The Control Panel & Transducer set-up will follow the
instructions for the Duplex panel found in Sections II & III
of this manual and the Wiring Diagram found in the panel
box. In addition, the IPC-DSF will require an additional
step to properly connect the low voltage Pressure
Transducer wires from both tanks.
See Figure 5. The small 6-pin wire terminal strip may
be wired using the following instructions (numbered 1-6,
from left to right).
1. Combine both (Sensor A & B) Red wires with a wire nut,
and run a single wire to terminal #1.
2. Connect the Blue wire from Sensor A to terminal #2.
3. Combine both (Sensor A & B) Black wires with a
wire nut, and run a single wire to terminal #3.
4. Connect the Blue wire from Sensor B to terminal #4.
Terminals 5 & 6 remain open.
The Sand Filter features may be accessed and set-up
using the MARC interface and by using the following
steps:
Figure 8: Sand Filter Panel
Terminal #: 1 2 3 4 5 6
Figure 5. Terminal Strip
1. Plug-in the MARC using the RJ45 (Cat5e) cord. Screen
should indicate Aquaworx, with version #.
2. Scroll to LOGIN and press ENTER, then scroll to the
ADMIN screen and press ENTER. SELECT login code
–4000, then press ENTER. The screen should read “Admin
logged in”.
3. To enable the Sand Filter feature, Scroll to MODE
SETTINGS and press ENTER. Scroll to CONTROLLER
MODE and press ENTER. Scroll through the Controller
Mode options until you find SAND FILTER. Press ENTER.
Press CANCEL to return to pump control options.
4. To save this setting to the processor, Scroll to
ACTIVATE SETTINGS, then press ENTER. Screen should
default to Status screen and your system should be in
Sand Filter Mode.
5. Scroll to PUMP A SETTINGS and press ENTER. Enter
the appropriate pump settings from designer by following
Section V of the manual. Important Note: remember to
calibrate both Pressure Transducers under the ZERO BIAS
setting. The zero bias may be found on both the label, and
bell of the transducer (Example ZB-07).
6. Complete the same step for PUMP B SETTINGS.
7. To save your new settings to the processor, Scroll to
ACTIVATE SETTINGS, then press ENTER. Screen should
default to Status screen.
Your IPC-DSF panel will now be ready for operation.

TIMED DOSING SETUP FORMULATION
Contact Infiltrator Water Technologies 1-800-221-4436 for additional technical and product information.
16
TIMED DOSING SETUP FORMULATION
IPC Panel Setup using the following Aquaworx IPC
Panels: IPC-S01, IPC-SM, IPC-D01, IPC-DM, IPC-DSF
and IPC-GD
SEVEN STEPS REQUIRED FOR THE IPC PANEL SETUP
1. Determine volume per inch
in the pump tank = (A) gal/in
2. Verify pump’s gal per minute
volume (gpm) = (B) gal per minute
3. Dose “ON” time or
Pump “ON” time = (C) minutes : seconds
4. Required dose volume (gpd) = (D) gal per dose
5. Number of doses per day
or 24 hours (dpd) = (E) does per day
6. Calculation for Pump “OFF” Time = (F) minutes : seconds
7. Establish Daily Flow Rate = gal per day
(set by designer)
“A” Calculate the Volume per inch for the Pump Tank
(gal/in)
Square tank:
((L” x W”)/144) x 7.48 (gal/cu ft)/12 = gal/in
Example #1:
Assuming the tank is 96” long x 48” wide x 1000/gals
= ((96” x 48”) x 7.48) /12
= (4608/144) x 7.48/12
= 32 x 7.48/12
= 239.36/12
= 19.9 gal/in (rounded up to 20 gal/in)
W
L
R
Table 1: Rectangular / Square Tanks
Width Feet (inches) Length Feet (inches)
Gallons of liquid
per inch
3’ 4” (40 in) 6’ 8” (80 in) 13.9
4’ (48 in) 4’ (48 in) 10.0
4’ (48 in) 8’ (96 in) 19.9
4’ 5” (53 in) 8’ 6” (102 in) 23.4
4’ 10” (58 in) 8’ 6” (102 in) 25.6
5’ 2” (62 in) 8’ (96 in) 25.8
5’ (60 in) 9’ (108 in) 28.1
5’ (60 in) 10’ (120 in) 31.2
5’ 8” (68 in) 10’ 8” (128 in) 37.7
4’ (48 in) 11’ (132 in) 41.1
6’ 6” (78 in) 12’ (144 in) 48.6
Table 2: Cylindrical Tanks
Tank Diameter Feet
(inches)
Gallons of liquid
per inch
2’ (24 in) 2.0
2’ 6” (30 in) 3.1
3’ (36 in) 4.4
3’ 6” (42 in) 6.0
4’ (48 in) 7.8
5’ (60 in) 12.2
6’ (72 in) 17.6
7’ (84 in) 24.0
8’ (96 in) 31.3
Cylindrical tank:
((3.14 x (R2) tank radius is half tank diameter)
x 7.48)/12 =gal/in
Example #2:
Assuming the tank is 2’ radius, 4’ inside diameter (ID)
= ((3.14 x 22 ft) x 7.48)/12
= (12.57 ft3 x 7.48 gal/ft3)/12 in/ft
= 93.996/12 in/ft
= 7.8 gal/in (rounded up to 8 gal/in)

Contact Infiltrator Water Technologies 1-800-221-4436 for additional technical and product information.
17
“B” Calculate the System Pump Volume in Gallons per
Minute
**This is required to calculate Dose Volume**
Gallons per minute (gpm) = (Draw Down x (gal/in))
1. Measure the pump discharge based on a 1 minute
draw down of the tank.
2. Using the MARC, on MANUAL settings (Hands Off
Auto) write down or record the liquid level.
3. Manually pump the tank for one minute. (Time will be
recorded on the MARC as you manually pump down.)
4. Write down or record the difference in liquid level
between the start and stop.
5. This will measure the liquid level draw down in inches
for a one minute manual (HOA) pumping.
Example:
Draw Down = 2” (per the one minute draw down
procedure listed above)
Gallons per minute (gpm) = (Draw Down x (gal/in))
Gallons per minute (gpm) = (2” x 20 gal/in)
(gpm) = 40
“C” Minimum Dose Size Equation: Dose “ON” Time
or PUMP “ON Time (D)
**This is required to calculate Dose Volume (C)**
Dose “ON” Time (D) = (A + 3B)
A = Time the pump is turned on until first squirt @ the first
orifice (this will compensate for time when no water is
being discharge to the system).
B = The time from when the first squirt shows @ the first
orifice until the laterals are equally pressurized.
By multiplying by 3, we are ensuring that 67% of the
water is being equally distributed.
Example:
Pump is turned on and the first squirt shows in 5 seconds
A = 5 (seconds)
The time from the first squirt until the system is
pressurized is 10 seconds
B = 10 (seconds)
Dose “ON” Time (D) = (A + 3B)
Dose “ON” Time (D) = 5 + (3 x 10)
Dose “ON” Time (D) = 5 + 30
Dose “ON” Time (D) = 35 seconds
“D” Calculation for Dose Volume
Gallons per dose (gpd) =
(Dose “ON” Time/60 x gallons per minute (gpm))
Example:
Gallons per dose (gpd) =
(Dose “ON” Time x gallons per minute (gpm))
Gallons per dose (gpd) =
(35 (seconds)/60(seconds/minute)) x 40 (gpm)
(gpd) = (.58 x 40)
(gpd) = 23.3 gallons
“E” Calculation for Number of Doses per Day
Number of doses per day =
gallons per day (estimated daily flow rate)/
gallons per dose
Example:
Assume 360 gallons per day system
(Typically set by designer)
Doses per day (dpd) =
360 gallons per day / 23.3 gallons per dose
Doses per day (dpd) = 360/23.3
(dpd) = 15.4 doses per day
(dpd) = 15 doses per day
“F” Calculation for Pump “OFF” Time
Take the number of hours in a day =
24 hours and divide this by the
number of doses per day
Example:
Pump “OFF” Time = 24 (hrs.)/15 (dpd)
Pimp “OFF” Time - 1.6 hrs or 1 hour/36

FREQUENTLY ASKED QUESTIONS
Contact Infiltrator Water Technologies 1-800-221-4436 for additional technical and product information.
18
TIMED DOSING SETUP FORMULATION
What does Z-BIAS mean?
Each transducer manufactured has a slightly dierent resistance
called zero bias. Every transducer is calibrated at the factory prior
to shipment. The calibration rating is labeled on the bell, and
recorded on the outside of the transducer package. The Z-BIAS
value needs to be programmed into the panel at start up.
What is Auto-clear?
Timed System: The air trapped in the transducer bell needs to be
replaced on occasion. During periods of low or no ow the level
will start to drop in the tank. Once the level drops down to the start
level the computer tracks the next dose or doses as auto-clear
doses. Since the start level is typically set to one dose volume,
the auto clear is typically set to one. (Example: A 40 gallon dose
would translate to a 2” dose in most 1, 000 gallon tanks) During
one of the doses the level will drop below the start level. The next
2” dose will then end below the bottom of the bell and the system
will be idle until the liquid level rises above the start level again. In
the case of small doses multiple auto-clear doses may be needed.
(Example: If the dose volume is 10 gallons, then 1/2” enough
doses are required to draw the level to one inch below the bell,
so in this case an auto clear of 4 would be used).
Demand System: In a demand dose system the start level be-
comes the pump ON and the bottom of the bell becomes the
OFF level. The auto clear is set in seconds - typically 10 seconds.
(Example: Pump will turn on at the start level, pump down to the
bottom of the bell then wait through the OFF time then run the ad-
ditional time to clear the bell).
Can I cut or splice the transducer signal wire?
It is OK to cut the transducer wire to length from the tank to the
panel. However, the cable should NOT be spliced. The high
potential of corrosion when splicing the signal wire will aect
the signal and could reduce the accuracy of the unit. The
transducers come in 4 lengths eliminating the need for eld
splicing. The lengths are 40’, 80’, 120’, and 240’.
What does VETO mean?
The VETO feature is a second timer setting (also known as an
override in some markets). If the ow increases above the Veto
level, the VETO timing replaces the normal time settings. If the
level in the tank is at or above the VETO level, the panel will
operate in the VETO schedule in addition to its normal time settings.
I have input the new settings but it still runs the default program.
If the timer schedule and/or the level functions are changed, the
AUTO feature MUST be selected. This will upload the new
changes to the board and is found on the MARC unit between
Manual A and Pump A settings.
How should I supply power to the panel?
The control power must be 120V. The pump circuit for the panel
can be wired either 120 volts or 240 volts depending on the pump
requirements. It is important to provide two designated circuits
to the panel, one circuit to the pump and one to the controls. The
REVIEW SIX STEPS REQUIRED
FOR THE IPC PANEL SETUP
7. Determine volume per inch
in the pump tank = 20 gal/in
8. Verify pump’s gal per minute
volume (gpm) = 40 gal per minute
9. Required dose volume (gpd) = 23.3 gal per dose
10. Number of doses per day
or 24 hr’s (dpd) = 15 does per day
11. Calculation for Pump “OFF” Time
= 1 hr/36 min Off time
12. Establish Daily Flow Rate
= 360 gal per day (set by designer)

Contact Infiltrator Water Technologies 1-800-221-4436 for additional technical and product information.
19
primary load draw is the pump and the most likely component to
trip the supply circuit breaker. With two circuits, if the pump circuit
tripped, power would be available to the controls and will notify the
homeowner of the problem.
Why does my control panel read the EVENTs once a minute?
If the Log Status in the panel is set to Y (yes), then it will record
every event once per minute. This will cause the 4000 event to
ll-up quickly in the panel. The Log Status may be set to N (no).
To change this using the MARC, go to Mode settings and press
enter. In the rst screen named Log Status, if you press enter the
Log Status can be changed to N (no).
Why does my Transducer always read a 00.0” level?
In some cases the Transducer or circuit board may need to be
replaced. Check all connections. Test any component before
installing it. Checking a transducer with a bucket of water is an
easy way to see if the new transducer solved the problem.
Why does the Transducer read a constant level, (ex: 1.5- 6.5”)
even though the pump is running?
The Transducer wiring to the circuit board is not in the proper
sequence. Make sure the input wires are RED (RD), BLUE (BL),
and BLACK (BK) from left to right on the wire terminal strip
attached to the circuit board.
How do you setup for a Redundant o Float?
The best way to use a redundant o is to wire a load rated oat
switch in line with the power in the pump vault. Secondly, many
pump companies supply a “piggy back oat” option.
How do I wire a panel for 230/240 Volt installations?
The control side of the panel must only be wired for 120 volt
installation. For the pump(s) power supply (Line side),
using 3-wire, connect the Red wire to the Neutral or Pump L1
terminal block and the Black wire to the Pump L2 terminal block.
The White neutral wire can be cut back.
What should I use to plug the conduit to prevent sewer gases
from entering the enclosure?
There is a variety of conduit sealing compounds available, but we
recommend, Chico SpeedSeal Compound, as it will quickly harden
to a dense, strong mass and is UL Listed and cUL Listed.
Can you run the same Transducer wire in the conduit for the
pump supply?
The Transducer wire can be run thru the same conduit as the
pump power supply without interference. However, the
Transducer is a low voltage wire and in some jurisdictions it is
not allowed to run both High/Low voltages in the same conduit.
Check with both regional and State Regulations rst.
Can I setup the IPC panel with a Remote Alarm?
Yes, a remote alarm can be purchased as an option with all
Aquaworx IPC panels. The remote alarm will provide the same
alarm sequence as the alarms on the main enclosure. The remote
alarm can be located up to 2000’ away from the main control box.
Contact customer service to purchase.
What is the dierence between DOSE, ADOSE & BDOSE in the
Event log?
Dose = A recorded standard Dose from pump A.
ADose = A recorded Autoclear Dose.
BDose = A recorded Dose from pump B.
Can the panel be setup using two transducers?
Yes, using a IPC Sand lter panel specically for installations that
require two separate pump systems each needing a separate
transducer for each pump. (Product ID number: IPC-DSF)
When I set the panel up to run both pumps what will happen?
This setting is designed to run both pump A and pump B during a
Veto level. This setting is used in conjunction with a Duplex panel
to pump the tank down faster. This should only be used if the
pumps are small and both pumps can run on one circuit or if it is a
specialty panel setup for individual circuits for each pump.
Can I put a heater unit inside the control panel?
Yes, Aquaworx oers a heater unit that can be easily setup in an
existing or new IPC panel. Contact customer service for more
information.
What is the battery on the circuit board, and/or will I lose my
events if the power goes out?
Its purpose is to keep the clock running, which will allow the data
logging to record when the power goes out and for how long the
power was o. The battery can last up to ve years without a
replacement but, it is recommend that it be change every year.
If the battery is lost and the power goes out all data and all
settings are retained and will function once power is restored,
however, the date and time will re-set to 00.
What is a V
aristor?
A varistor is a variable resistor used to protect excessive current in
a circuit. Our varistor is connected between the incoming line and
neutral. This 130V varistor serves as over voltage/surge protection
for the controller.
How do I setup the panel to handle a Sand lter application?
Using the MARC controller, under the Mode settings, the Run Both
/ SFI (Sand Filter Interface) menu will need to be set to Y (yes). This
will not allow Pump A to initiate if pump B has a high level alarm.
The MARC unit is not recording events from my SD card?
If the MARC screen is going blank during the download, then it is
probably receiving too much current from the SD card. This may
be caused by too much data on the card, or too much memory
on the card. We recommend a 1 Gigabit maximum SD card with
dedicated use for the MARC.
How do I wire a Transducer to the panel for a Sand lter
application?
Follow the instructions provided with the panel. If the
instructions are lost we can email you, or download from our
website, www.aquaworx.com

Contact Infiltrator Systems’ Technical Services Department for assistance at 1-800-221-4436
4 Business Park Road
P.O. Box 768
Old Saybrook, CT 06475
860-577-7000
• Fax 860-577-7001
1-800-221- 4436
www.infiltratorwater.com
U.S. Patents: 4,759,661; 5,017,041; 5,156,488; 5,336,017; 5,401,116; 5,401,459; 5,511,903; 5,716,163; 5,588,778; 5,839,844 Canadian Patents: 1,329,959; 2,004,564 Other patents pending. Infiltrator,
Equalizer, Quick4, and SideWinder are registered trademarks of Infiltrator Water Technologies Infiltrator is a registered trademark in France. Infiltrator Water Technologies is a registered trademark in Mexico.
Contour, MicroLeaching, PolyTuff, ChamberSpacer, MultiPort, PosiLock, QuickCut, QuickPlay, SnapLock and StraightLock are trademarks of Infiltrator Water Technologies
PolyLok is a trademark of PolyLok, Inc. TUF-TITE is a registered trademark of TUF-TITE, INC. Ultra-Rib is a trademark of IPEX Inc.
© 2017 Infiltrator Water Technologies All rights reserved. Printed in U.S.A.
R07 0717ISI
/