Page is loading ...

Cat. No. 43-1105
OWNER’S MANUAL
Please read before using this equipment.
ET-1105
Digital Spread Spectrum
900 MHz Cordless Telephone
with Caller ID/Call Waiting ID
43-1105.fm Page 1 Monday, August 30, 1999 1:57 PM

2
FEATURES
© 1999 Tandy Corporation.
All Rights Reserved.
RadioShack is a registered trademark used by Tandy Corporation.
Your RadioShack ET-1105 Digital
Spread Spectrum 900 MHz Cordless
Telephone uses advanced digital cord-
less technology to give you superior
sound quality and extended range. The
telephone digitizes and scrambles your
conversation before transmitting it be-
tween the handset and the base, so your
conversation is secure from interception
by other cordless telephone or scanner
users. Its cordless operation lets you
handle calls just about anywhere in your
home or office.
The phone can display a caller’s phone
number, name (if available), and the
date and time the call was received. It
can store up to 45 records as provided
by your local phone company to Caller
ID service subscribers.
If you have Call Waiting with Caller ID,
the phone displays incoming caller infor-
mation for a new call when you are al-
ready on the phone.
The ET-1105 has these features:
900 MHz Operation
— provides better
sound and less interference than many
other cordless phones.
Digital Spread Spectrum
— provides
the longest range and the utmost in se-
curity. Frequencies are constantly
changing across the entire 900 MHz
band, making your calls impossible to
monitor on scanners.
Headset Jack
— lets you connect an op-
tional headset (such as RadioShack Cat.
No. 43-195) for hands-free convenience
while you use the phone.
20-Number Memory Dialing
— lets you
store 20 numbers in memory for easy di-
aling.
Volume Control
— lets you adjust the
volume you hear through the handset.
Page
—
lets you send a paging signal
from the base to the handset to page
someone or locate the handset when it is
away from the base.
4-Hour Talk or 7-Day Standby Time
—
lets you talk for 4 hours or keep the
phone off the base for 7 days without re-
charging (with a fully charged battery
pack).
Caller ID Memory Dialing
— lets you
select a phone number stored in Caller
ID memory, then dial it with the touch of
a button.
20 Channels
— automatically selects a
clear channel when you make or answer
a call.
VIP Memory
— alerts you with a distinc-
tive ring when someone you have added
to the VIP list calls.
43-1105.fm Page 2 Monday, August 30, 1999 1:57 PM

3
Review Scrolling
— lets you easily
scroll through all information stored in
the ET-1105’s Caller ID memory.
Phone Information Display
— lets you
see incoming Caller ID information and
phone numbers as you dial them or re-
call them from the ET-1105’s memory
and Caller ID records.
Trilingual Messages
— lets you set the
phone to display messages in English,
French, or Spanish.
Out of Range Signal
— the handset
beeps twice to let you know when you
move out of the base’s operating range.
Security Access-Protection Code
—
helps prevent other cordless phone us-
ers from using your phone line while the
handset is off the base.
Flash
— sends an electronic switchhook
signal for use with special phone servic-
es such as Call Waiting.
Redial
— lets you quickly redial the last
number dialed.
Tone/Pulse Dialing
— lets you use your
phone with tone or pulse service.
This telephone has been tested and
found to comply with all applicable UL
and FCC standards.
WARNING
:
To reduce the risk of fire or shock
hazard, do not expose this product to rain or
moisture.
CAUTION
RISK OF ELECTRIC SHOCK.
DO NOT OPEN.
CAUTION
: TO REDUCE THE RISK OF
ELECTRIC SHOCK, DO NOT REMOVE
COVER OR BACK. NO USER-SERVICE-
ABLE PARTS INSIDE. REFER SERVICING
TO QUALIFIED PERSONNEL.
This symbol is intended to alert
you to the presence of uninsu-
lated dangerous voltage within
the product’s enclosure that might
be of sufficient magnitude to con-
stitute a risk of electric shock. Do
not open the product’s case.
This symbol is intended to inform
you that important operating and
maintenance instructions are
included in the literature accom-
panying this product.
!
!
43-1105.fm Page 3 Monday, August 30, 1999 1:57 PM

4
Important Caller ID Information
To use the phone’s Caller ID and Call
Waiting features, you must be in an area
where Caller ID and Call Waiting servic-
es are available and you must subscribe
to the services.
Where Caller ID is offered, one or more
of the following options are generally
available:
• Caller’s number only
• Caller’s name only
• Caller’s name and number
For the ET-1105’s Caller ID memory dial
feature to operate, you must receive the
caller’s number.
Important:
Cordless phones such as
this one require AC power to operate.
When the AC power is off, you cannot
dial out or receive incoming calls using
your ET-1105. For this reason, the ET-
1105 cordless phone should not be your
only telephone. To be safe, you should
also have a corded phone that does not
require AC power to operate so you can
still make and receive calls if there is an
AC power failure.
Your telephone operates on standard ra-
dio frequencies as allocated by the FCC.
Even though the access protection code
prevents unauthorized use of your phone
line, it is possible for other radio units op-
erating on similar frequencies within a
certain area to unintentionally intercept
your conversations and/or cause inter-
ference. This lack of privacy can occur
with any cordless phone.
READ THIS BEFORE
INSTALLATION
Each device that you connect to the
phone line draws power from the phone
line. We refer to this power draw as the
device’s
ringer equivalence number
, or
REN. The REN is on the bottom of the
base.
If you are using more than one phone or
other device on the line, add up all the
RENs. If the total is more than five (three
in rural areas), your phone might not
ring. If ringer operation is impaired, re-
move a device from the line.
FCC STATEMENT
This telephone complies with Part 68 of
FCC Rules
. You must, upon request,
provide the FCC registration number and
the REN to your phone company. These
numbers are on the bottom of the base.
Note:
You must not connect your ET-
1105 to any of the following:
• coin-operated systems
• party-line systems
• most electronic key phone systems
43-1105.fm Page 4 Monday, August 30, 1999 1:57 PM

5
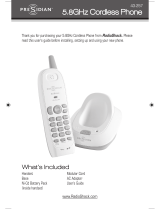
CONTENTS
Preparation .............................................................................................................. 6
Selecting a Location ........................................................................................... 6
Attaching the Handset’s Antenna ....................................................................... 6
Placing the Base on a Desk Top ........................................................................ 6
Mounting the Base on a Wall Plate .................................................................... 8
Connecting and Charging the Battery Pack ....................................................... 9
Setting the Dialing Mode .................................................................................. 11
Selecting the Language .................................................................................... 11
Setting the Area Code ...................................................................................... 12
Setting the Ringer ............................................................................................. 12
Turning the Ringer On or Off ...................................................................... 12
Checking/Setting the Ringer ...................................................................... 12
Using a Headset ............................................................................................... 13
Removing the Belt Clip ..................................................................................... 13
Telephone Operation ............................................................................................ 14
Making and Receiving a Call ............................................................................ 14
Setting the Handset’s Volume .......................................................................... 14
Using Redial ..................................................................................................... 14
Using Flash ...................................................................................................... 15
Using Tone Services on a Pulse Line ............................................................... 15
Using Page ....................................................................................................... 15
Memory Dialing ................................................................................................ 15
Storing a Number and Name in Memory ................................................... 16
Using the VIP Call List ............................................................................... 16
Entering a Pause ....................................................................................... 17
Recalling Numbers Stored in Memory ....................................................... 17
Dialing a Memory Number ......................................................................... 17
Chain-Dialing Service Numbers ................................................................. 17
Testing Stored Emergency Numbers ......................................................... 18
Deleting Information in a Single Memory Location .................................... 18
Deleting Information in All Memory Locations ........................................... 18
Caller ID Operation ............................................................................................... 19
Caller ID Displays ............................................................................................. 20
Reviewing Caller ID Records ............................................................................ 21
Storing Caller ID Records in a Memory Location ............................................. 21
Dialing Numbers from a Caller ID Record ........................................................ 21
Deleting Caller ID Records ............................................................................... 21
Troubleshooting .................................................................................................... 22
Care and Maintenance .......................................................................................... 25
43-1105.fm Page 5 Monday, August 30, 1999 1:57 PM

6
PREPARATION
SELECTING A LOCATION
You can place the phone on a desk top
or table, or mount it on a standard wall
plate. Select a location that is:
• near an accessible AC outlet
• near a telephone line jack
• out of the way of normal activities
• away from electrical machinery,
electrical appliances, metal walls or
filing cabinets, wireless intercoms,
alarms, and room monitors
The base’s location affects the phone’s
range. If you have a choice of several lo-
cations, try each to see which provides
the best performance.
Caution:
The supplied AC adapter was
designed specifically for your ET-1105.
Use only the supplied adapter.
ATTACHING THE
HANDSET’S
ANTENNA
Screw the antenna into the
hole at the top of the hand-
set.
PLACING THE BASE ON A
DESK TOP
Follow these steps to place the base on
a desk, shelf, or table.
1. Remove the bracket by holding in
both tabs and gently pulling out the
wide end of the bracket.
2. Plug one end of the supplied long
modular cord into the phone jack on
the back of the base.
Tabs
43-1105.fm Page 6 Monday, August 30, 1999 1:57 PM

7
3. Insert the supplied AC adapter’s
barrel plug into the
DC 9V jack on
the back of the base.
4. Route the adapter’s cord through
the strain relief slot on the bottom of
the base.
5. Insert the tabs on the narrow end of
the bracket into both upper slots on
the bottom of the base as shown
and push the tabs on the wide end
of the bracket into the upper slots on
the bottom of the base.
6. Plug the modular cord’s other end
into a modular phone line jack.
7. Plug the adapter into a standard AC
outlet.
8. Raise the base’s antenna to a verti-
cal position.
43-1105.fm Page 7 Monday, August 30, 1999 1:57 PM

8
MOUNTING THE BASE ON
A WALL PLATE
1. Follow Steps 1 through 3 under
“Placing the Base on a Desk Top” on
Page 6.
2. Route the modular cord through the
left groove on the bottom of the base
and the adapter cord through the
groove below the strain relief slot.
3. Insert the tabs on the narrow end of
the bracket into the slots on the bot-
tom of the base as shown and route
the other end of the short modular
cord through the center of the brack-
et.
4. Push the tabs on the wide end of the
bracket into the lower slots on the
bottom of the base.
5. Plug the short modular cord’s other
end into the wall plate jack, align the
base’s keyhole slots with the wall
plate studs, and slide the base
downward to secure it.
43-1105.fm Page 8 Monday, August 30, 1999 1:57 PM

9
6. Plug the adapter into a standard AC
outlet.
7. Raise the base’s antenna to a verti-
cal position.
CONNECTING AND
CHARGING THE BATTERY
PACK
The ET-1105 comes with a rechargeable
nickel-cadmium battery pack in the
handset but not connected. Before using
your phone, you must connect the bat-
tery pack and then charge it for about 16
hours.
1. Press down and slide off the com-
partment cover as shown.
2. Plug the battery pack’s connector
into the socket in the compartment.
The connector fits only one way.
Note:
For easier battery pack con-
nection, lift it out of the compart-
ment, insert its connector into the
socket, then replace the battery
pack inside the compartment.
3. Replace the cover.
To charge the battery pack, place the
handset on the base. The CHARGE indi-
cator on the base lights.
Recharge the battery pack when
and
LOW BATTERY appear on the
handset’s display.
43-1105.fm Page 9 Monday, August 30, 1999 1:57 PM

10
Notes:
• You can place the handset on the
base face down or face up without
removing the belt clip. If you want to
use the hanging hole on the back of
the handset to place the handset on
the wall-mounted base face-up, re-
move the belt clip (see “Removing
the Belt Clip” on Page 13). However,
the battery pack will not fully charge
in this position.
• When you first use the phone after
charging or recharging the battery
pack, the phone might not work and
you might hear an error tone when
you press
TALK. If this happens, re-
turn the handset to the base for
about 6 seconds. This resets the se-
curity access protection code.
• If the CHARGE indicator does not
light when you place the handset on
the base, be sure the battery pack
and AC adapter are correctly and
securely connected.
Also, check the charging contacts
on the handset and the base. If the
contacts are dirty or tarnished,
clean them with a pencil eraser.
• If the battery pack gets completely
discharged or the base loses power
while the handset is away from it,
the security access-protection code
needs to be reset. To reset the code,
place the handset on the base. If it
was the handset that lost power,
leave the handset on the base to
charge the battery pack.
• If the battery pack gets weak during
a call, the handset beeps once ev-
ery 16 seconds. If this happens, you
cannot make another call on the
phone until you recharge the battery
pack.
• About once a month, fully discharge
the battery pack by keeping the
handset off the base until and
LOW BATTERY appear. Otherwise,
the battery pack loses its ability to
fully recharge.
• To avoid damage to the battery
pack, always recharge the handset
before battery power grows too
weak to display .
• If you are not going to use your
phone for an extended period of
time, disconnect the battery pack.
This increases the battery pack’s us-
able life.
• The supplied battery pack should
last for about a year. When it loses
its ability to fully recharge, order a
replacement battery pack from your
local RadioShack store (see “Re-
placing the Battery Pack” on
Page 26).
43-1105.fm Page 10 Monday, August 30, 1999 1:57 PM

11
SETTING THE DIALING
MODE
Set T/P (Tone/Pulse) on the back of the
base for the type of service you have. If
you are not sure which type you have,
once the battery is fully charged, do this
test.
1. Set
T/P to T.
2. Lift the handset, then press
TALK
and listen for the dial tone.
3. Press any number other than
0.
Note:
If your phone system requires
that you dial an access code (
9, for
example) before you dial an outside
number, do not press the access
code either.
If the dial tone stops, you have
touch-tone service. Leave
T/P set to
T.
If the dial tone continues, you have
pulse service. Set
T/P to P.
SELECTING THE
LANGUAGE
The ET-1105 comes set to display all
Caller ID messages in English, but if you
want it to display messages in French or
Spanish, follow these steps.
1. Press
SETUP on the handset. LAN-
GUAGE
and the currently selected
language appear.
Note
: If you do not press any key
within 30 seconds after the lan-
guage selection display appears,
the ET-1105 exits the language se-
lection display without changing the
current selection.
2. To select another language, repeat-
edly press #/ until you see the de-
sired language.
3. Press
SETUP to store the selected
language.
T/P
TALK
SETUP
#/
43-1105.fm Page 11 Monday, August 30, 1999 1:57 PM

12
SETTING THE AREA
CODE
When you return a call from a Caller ID
record (see “Dialing Numbers from a
Caller ID Record” on Page 21), your
phone automatically dials 1, the area
code, and the number. The ET-1105 lets
you store one local area code and three
neighborhood area codes. If the number
you call has the same area code with
your local area code, the ET-1105 dials
the 7-digit local number. If the number
you call has the same area code with one
of three neighborhood area codes, the
ET-1105 dials the 10-digit local number.
Follow these steps to set area codes.
Note
: If you make a mistake or do not
press a key within 10 seconds during
these steps, start again at Step 1.
1. Pres
SETUP. The language selection
display appears.
2. Press / . The currently entered
area codes (or
AREACODE=000
000/000/000
) appear.
3. Enter your local area code first, then
the three neighborhood area codes,
then press
SETUP to store them.
SETTING THE RINGER
Turning the Ringer On or Off
You can turn the ET-1105’s ringer on
and off. Set
RINGER on the side of the
handset to
ON to hear an incoming call or
a page from the base. Set
RINGER to
OFF to silence the ringer.
Note
: With the ringer off, you can still
make or receive calls using this cordless
phone. Telephones on the same line still
ring when there is an incoming call, and
the IN USE indicator on the ET-1105’s
base flashes until you answer the call.
Checking/Setting the Ringer
You can set the ET-1105’s handset to
sound any of three ringer types. The
handset is preset to use the ringer tone
(
1). To change or hear the different
tones, press
FLASH when the phone is
not in use.
PROG. RINGER displays.
With
RINGER set to ON, press 1, 2, or 3,
then press
FLASH to confirm the setting.
(The last number button you pressed is
the tone you will hear.)
/
RINGER
43-1105.fm Page 12 Monday, August 30, 1999 1:57 PM

13
USING A HEADSET
You can make or answer calls with
hands-free convenience using an option-
al headset that has a
3
/
32
-inch (2.5 mm)
plug. We recommend RadioShack Cat.
No. 43-195, which is specially designed
for use with the ET-1105.
Follow these steps to use a headset.
1. Insert the headset’s plug into the
jack on the top of the handset.
2. Place the headset on your head with
the earpiece over either ear and ad-
just the microphone boom until it is
about even with your chin.
3. Hang the belt clip on your belt.
4. Make or receive calls as you would
normally (see “Making and Receiv-
ing a Call” on Page 14).
Notes
:
• Connecting a headset disconnects
the handset’s earpiece and micro-
phone.
• If you place the handset on the base
to recharge it while the headset is
connected, be sure the handset
seats properly.
REMOVING THE BELT
CLIP
The belt clip on the back of the handset
lets you hang the handset on your belt for
easy portability. But to use the hanging
hole on the back of the handset to place
the handset on the wall-mounted base
face-up, you must remove the belt clip.
Insert a flat-blade screwdriver into either
side of the belt clip, then pull it off.
To replace the belt clip, insert either tab
of the belt clip into one of the handset’s
slots, then snap the other tab into hand-
set’s other slot.
43-1105.fm Page 13 Monday, August 30, 1999 1:57 PM

14
TELEPHONE OPERATION
MAKING AND RECEIVING
A CALL
To make a call, lift the handset and
press
TALK. PHONE displays. When the
TALK indicator lights steadily and you
hear the dial tone, dial the desired phone
number or memory number (see “Memo-
ry Dialing” on Page 15).
The ET-1105 displays the phone number
as you dial. Then
PHONE disappears,
the duration of your call (after 14 sec-
onds) in minutes and seconds displays.
To answer a call if the handset is on the
base, lift the handset and press
TALK.
Or, if the handset is away from the base,
press any key on the handset before
speaking. The TALK indicator on the
handset lights and the IN USE indicator
on the base flashes.
To end a call, place the handset on the
base or press
TALK. The TALK and IN
USE indicators turn off.
Notes
:
• If you press
TALK to hang up and
the phone does not disconnect,
move closer to the base then press
TALK again, or place the handset on
the base.
• If you hear loud static during a con-
versation, move the handset closer
to the base.
•
OUT OF RANGE appears when the
distance from the handset to the
base is out of the phone’s range.
SETTING THE HANDSET’S
VOL UME
You can select any of four different vol-
ume settings by repeatedly pressing
VOLUME during a call.
USING REDIAL
You can quickly redial the last number di-
aled. Lift the handset and press
TALK.
When you hear the dial tone, press
REDI-
AL
. The number appears on the display
as the phone dials it.
Notes:
• The redial memory holds up to 32
digits, so you can redial long-
distance as well as local numbers.
VOLUME
REDIAL
43-1105.fm Page 14 Monday, August 30, 1999 1:57 PM

15
• We recommend you not use REDIAL
to dial numbers that include a tone
entry. This could result in a wrong
number being dialed. (See “Using
Tone Services on a Pulse Line.”)
• The redial memory does not store a
flash entry or any digits entered af-
ter you press
FLASH (see “Using
Flash”).
USING FLASH
FLASH performs the electronic equiva-
lent of a switchhook operation for special
services, such as Call Waiting.
For example, if you have Call Waiting,
press
FLASH to answer an incoming call
without disconnecting the current call.
Press
FLASH again to return to the first
call.
Note:
If you do not have any special
phone services, pressing
FLASH might
disconnect the current call.
USING TONE SERVICES
ON A PULSE LINE
Some special services, such as bank-by-
phone, require tone signals. If you have
pulse service, you can still use these
special tone services by following these
steps.
1. Be sure
T/P is set to P.
2. Press
TALK and dial the service’s
main number.
3. When the service answers, press
. ✱ appears. Any additional num-
bers you dial are sent as tone sig-
nals.
4. After you complete the call, return
the handset to the base or press
TALK. The phone automatically re-
sets to pulse dialing.
USING PAGE
To page the person who has the handset
or to locate the handset when the phone
is not in use, press
PAGE on the base.
The handset beeps twice per second for
15 seconds and
PAGING appears. The
MESSAGE indicator flashes while the
handset beeps.
To stop the handset from beeping before
it automatically stops, press any key on
the handset or
PAGE on the base.
Note
: You cannot page the handset dur-
ing a call.
MEMORY DIALING
You can store up to 20 phone numbers in
memory, then dial a stored number by
pressing a two-digit memory location
number.
PAGE
43-1105.fm Page 15 Monday, August 30, 1999 1:57 PM

16
Each stored number can be up to 16 dig-
its long.
Storing a Number in Memory
Notes:
• If
T/P is set to P and you want to use
tone dialing for a memory number,
you must store a as the first entry
of the number you want to tone dial.
• Do not store a number with both
pulse and tone entries in the same
memory location. This could result
in a wrong number being dialed.
• Each pause and tone entry ( )
uses one digit of memory.
• To keep your accounts secure, we
recommend you do not store your
personal access code for services
such as bank-by-phone in a memory
location.
• An error tone sounds and the phone
exits the programming mode if you
wait more than 30 seconds between
each keypress or enter more than
16 digits. You must start over at Step
1.
1. Press
MEM. MEMORY STORE
appears.
2. Enter the number you want to store.
The number appears on the display.
If you enter an incorrect digit, start
from Step 1, then re-enter the cor-
rect digit.
3. Press
MEM. ENTER 01-20 ap-
pears.
4. Enter a two-digit memory location
number between 05 and 20 (01–04
are reserved for your VIP Call List).
The ET-1105 beeps twice, and the
display becomes blank.
5. To keep a record of each stored
number, use a flat-blade screwdriver
to lift the plastic cover from the tele-
phone number index card. Write the
name on the index card.
Note:
If you receive a call while you are
storing information in memory, press
TALK to answer the call. After the call,
begin again at Step 1.
To replace a stored number, store a new
one in its place.
Using the VIP Call List
Your phone lets you save 4 phone num-
bers in the memory location numbers
01–04 as its VIP Call List. Whenever
someone calls from one of those 4 num-
bers, if you subscribe to Caller ID, the
system sounds distinctive rings after the
first ring to alert you. displays when
you recall the phone numbers (see “Re-
calling Numbers Stored in Memory” on
Page 17).
MEM
VIP
43-1105.fm Page 16 Monday, August 30, 1999 1:57 PM

17
Entering a Pause
In some telephone systems, you must
dial an access code (9, for example) and
wait for a second dial tone before you
can dial an outside number. You can
store the access code with the phone
number. However, you should also store
a pause after the access code to allow
the outside line time to connect. To do
so, press
REDIAL to enter a 2-second
pause after entering the access code.
P
appears. For a longer pause, press RE-
DIAL
again.
Recalling Numbers Stored in
Memory
1. Press CALL ID, then press #/ .
TOTAL MEM=xx displays.
Note
: If no phone number is stored,
MEM EMPTY displays.
2. Repeatedly press
REVIEW ▲ or ▼
until the desired number appears.
Dialing a Memory Number
1. Press TALK . The TALK indicator
lights.
2. When you hear the dial tone, press
MEM then enter the 2-digit memory
location number. The ET-1105 auto-
matically dials the displayed phone
number.
Or, follow Step 2 in “Recalling Numbers
Stored in Memory” on Page 17 to recall
the desired phone number. Then press
CALLBACK.
Chain-Dialing Service Numbers
For quick recall of numbers for special
services (such as alternate long distance
or bank by phone), store each group of
numbers in its own memory location.
When calling special services, dial the
service’s main number first. Then, at the
appropriate place in the call, press
MEM
and enter the number for the location
where the additional information is
stored.
#/
CALLBACK
43-1105.fm Page 17 Monday, August 30, 1999 1:57 PM

18
Testing Stored Emergency
Numbers
If you store an emergency service’s
number (police department, fire depart-
ment, ambulance) and you choose to
test the stored number, make the test
call during the late evening or early
morning hours to avoid peak demand pe-
riods. Remain on the line to explain the
reason for your call.
Deleting Information in a Single
Memory Location
1. Recall the memory location contain-
ing the information you want to
delete.
2. Press
DELETE. DELETE ? appears.
3. Press
DELETE again to confirm de-
letion. The previous memory loca-
tion number and the number stored
there appear.
To exit without deleting the informa-
tion, wait 10 seconds without press-
ing any button.
Deleting Information in All
Memory Locations
1. Press CALL ID, then press #/ .
TOTAL MEM=xx displays.
2. Press
DELETE. DELETE ALL ? ap-
pears.
3. Press
DELETE again to confirm de-
letion.
DELETE OK appears.
To exit without deleting all of the
memory location information, wait
10 seconds without pressing any
button.
DELETE
43-1105.fm Page 18 Monday, August 30, 1999 1:57 PM

19
CALLER ID OPERATION
If you subscribe to Caller ID service from
your phone company, the ET-1105 auto-
matically displays the information the
phone company sends, along with the
date and time the call was received, be-
tween the first and second rings of every
call you receive. It stores up to 45 num-
ber only or name and number call
records in its Caller ID memory.
The display also shows if caller informa-
tion is not available or if the number is
blocked by the sender (see “Caller ID
Displays” on Page 20).
The IN USE indicator flashes on the
base during an incoming call,
RING ap-
pears briefly, the call record and
NEW ap-
pear for 10 seconds, then the display
blanks out.
If you subscribe to your phone compa-
ny’s message waiting service, your sys-
tem informs you when you have a
message waiting. If the IN USE and
MESSAGE indicators on the base flash
(or appears after you press
TALK or
CALL ID on the handset), you have a
voice message in your mailbox. The IN
USE and MESSAGE indicators flash (or
appears after you press
TALK or
CALL ID on the handset) until you re-
trieve the message.
If you subscribe to Call Waiting, the
MESSAGE indicator lights on the base
during a call. The Caller ID record ap-
pears. If you want to answer the incom-
ing call, press
FLASH. To resume the
previous phone conversation, press
FLASH again.
REDIAL
43-1105.fm Page 19 Monday, August 30, 1999 1:57 PM

20
CALLER ID DISPLAYS
English
Display — French
Spanish
Description
xx NEW CID
TOTAL CID=
xx
NOUV IDAP
TOUT IDAP=xx
NUEV. ID.
TOTAL ID.=xx
The first line indicates the number of new calls. The sec-
ond line shows the total number of Caller ID records in
memory.
ERROR
ERREUR
ERROR
Appears when the Caller ID information was garbled, or if
there was an error during the transmission.
PRIVATE
PRIVÉ
PRIVADO
Appears if the caller chose to block sending Caller ID in-
formation. No caller information appears.
UNAVAILABLE
NON DISPON.
NO DISPON.
Appears if the caller is not within a Caller ID service area,
or during operator-assisted calls or calls made with a
credit card.
END OF LIST
FIN DE LISTE
FIN DE LISTA
Appears when you reach the end of your call records.
NO CID MSG
PAS DE MESSIDAP
NING MENS ID
Appears when there are no Caller ID records in memory.
R#xx
Appears when you review a Caller ID record from some-
one who has called more than one time from the same
number.
43-1105.fm Page 20 Monday, August 30, 1999 1:57 PM
/