Page is loading ...

STRIDER 130
ELLIPTICAL
USER MANUAL
CAUTION
READ ALL PRECAUTIONS AND
INSTRUCTIONS IN THIS MANUAL
BEFORE USING THIS EQUIPMENT.
KEEP THIS MANUAL FOR
FUTURE REFERENCE.
Visit facebook.com/trojanhealth
www.trojanhealth.co.za

2
index

3
It is the sole responsibility of the purchaser of Trojan products to read the owner’s manual, warning labels and
instruct all individuals, on proper usage of the equipment. Understanding each and every warning to the fullest
is important. If any of these instructions or warnings are unclear, please contact our Trojan Call Centre on
0861 TROJAN (0861 876526), within the Republic of South Africa. International Consumers can contact us
on: +27 10 206 4405
The equipment is only intended for HOME USE and is NOT INTENDED FOR COMMERCIAL,
INSTITUTIONAL AND/OR STUDIO FACILITIES USE.
Contact Trojan with any questions regarding this classication. It is recommended that all users of Trojan be
informed of the following information prior to use.
HEALTH WARNING
• Before starting any exercise or conditioning program you should consult with your personal physician to
see if you require a complete physical exam. This is especially important if you are inactive, are pregnant
or suffer from any illness.
• If at any time during exercise you feel faint, dizzy or experience pain, stop exercising immediately and
consult your physician.
• To avoid muscular pain and strain, begin each workout by stretching and warming up and end each
session by cooling down and stretching.
• This equipment is not intended for use by persons (including children) with reduced physical, sensory
or mental capabilities, unless they have been given instruction on the use of this equipment or are
supervised.
ACCESS CONTROL
Trojan recommends that all tness equipment be used in a supervised area. It is recommended that the
equipment be located in an access controlled area. Control is the responsibility of the owner. Keep children
away from all equipment. Parents or other supervising adults must provide close supervision of children, if the
equipment is used in the presence of children.
INSTALLATION
• Be secured to or set up on a solid, level surface to stabilise and eliminate rocking or tipping over during
training.
• Set up inside your home away from moisture and dust (the equipment is not designed for outdoor use).
• Set up with sufcient ventilation to ensure proper operation.
• Set up with sufcient space around the equipment so that all exercises can be completed safely. It is
recommended that there should be at least 1m of space around the equipment where access is required
to exercise. For treadmills it is recommended that you have 2 m of space behind the running deck.
• Have the equipment installed by our team of installers.

4
PROPER USAGE
• Do not use the equipment in any way other than as designed or intended by the manufacturer. It is
imperative that Trojan equipment is used properly to avoid injury.
• Injuries may result from exercising improperly or excessively.
• Your Trojan equipment should only be used by one person at a time.
• Be careful to maintain your balance while using, mounting, dismounting, folding, unfolding or assembling
your Trojan equipment to avoid injury.
INSPECTION
• Do not use or permit use of any equipment that is damaged or has worn or broken parts. For all Trojan
equipment use only replacement parts supplied by Trojan.
• Always make sure that all nuts and bolts are tightened prior to each use.
• Maintain labels and nameplates – do not remove labels for any reason, as it contains important
information.
• Equipment maintenance – preventative maintenance is the key to smooth operating equipment. Please
ensure that you follow our maintenance tips to ensure the continued correct function of your Trojan
equipment.
• Before any use, examine all accessories approved for use with the Trojan equipment for damage or wear.
• Should your Trojan equipment appear damaged or worn, do not attempt to use or repair the equipment
yourself.
• Please contact our service department on 0861 TROJAN (0861 876526) to arrange a repair.
OPERATING WARNINGS
• It is the purchaser’s responsibility to instruct all users of the proper operating procedures of all Trojan
equipment.
• Keep children away from all moving parts. Parents must provide close supervision of children if the
equipment is used in the presence of children.
• Do not wear loose tting clothing or jewellery when using the equipment. It is also recommended that
users tie up long hair to avoid contact with moving parts.
• Ensure that anyone not using the equipment stays clear of the user, accessories and moving parts while
the machine is in operation.
USER WEIGHT LIMITATIONS
• This Trojan Strider 130 Elliptical may not be used by persons weighing more than 100 kg.
SAVE THIS INSTRUCTION MANUAL FOR FUTURE USE AND REFERENCE
If any of these instructions or warnings are unclear please contact Trojan Customer Services on
0861 TROJAN (0861 876526) within the Republic of South Africa or visit www.trojanhealth.co.za.

5
Thank you for choosing the Trojan Strider 130 Elliptical. We take great pride in producing this
quality product and hope it will provide many hours of quality exercise to make you feel better,
look better and enjoy life to its fullest.
Yes, it is a proven fact that a regular exercise program can improve your physical and mental
health. Too often, our busy lifestyles limit our time and opportunity to exercise. The Trojan Strider
130 Elliptical provides a convenient and simple method to begin your assault on getting your body
in shape and achieving a healthier lifestyle.
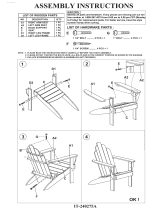
Before reading further, please familiarise yourself with the parts that are labelled. Read this manual
carefully before using The Trojan Strider 130 Elliptical.
Cross Walk Handles
Computer Console
Manual Tension Control
Pedal
Rear End Stabiliser
Functions: Scan / time / speed / distance / calories
Tension control: Manual
Weight of ywheel: 7 kg
Set-up size (mm): 955 (l) x 665 (w) x 1540 (h)
User weight: 100 kg (maximum)

6

7
INSTRUCTIONS FOR ASSEMBLY
• Unpack the carton and using the parts list check that all parts are accounted for.
• Do not dispose of the packaging material until assembly is completed.
• Tools are provided for use in assembly.
1
STEP 1: REAR STABILISER INSTALLATION
• Attach the Rear Stabiliser (26) onto the rear curve of the Main Frame (1) with two Cap Nuts (30), two
Curved Washers (31) and two Bolts (27).
• Tighten cap nuts with the provided Multi-Hex Tool.
CAUTION:
Ensure that cables are not damaged
during assembly or when
tightening screws.

8
2
STEP 2: FRONT STABILISER INSTALLATION
• Attach the Front Stabiliser (36) onto the front curve of the Main Frame (1) with two Cap Nuts (30), two
Curved Washers (31) and two Bolts (27). Tighten cap nuts with the provided Multi-Hex Tool. .
CAUTION:
Ensure that cables are not damaged
during assembly or when
tightening screws.

9
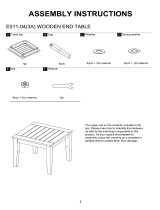
3
STEP 3: LEFT/RIGHT HANDRAILS AND FOOT BARS INSTALLATION
• Remove two Bolts (5), two Spring Washers (6), two Washers (7), and the two Wave Washers (48) from
the Rotation Rod (52).
• Place the Rotation Rod (52) into the hole of the Main Frame (1) and slide the Left/Right Handrails (56,12)
onto the Rotation Rod (52) and secure in place with two Bolts (5), two Spring Washers (6), two Washers
(7), and two Wave Washers (48).
• Tighten the Bolts with the two provided 6 mm Allen Wrench’s.
• Attach the right Foot Bar (16) onto the Right Crank with one Wave Washer (48), one Spring Washer (70)
and one Nylon Nut (58) for Right Crank. Tighten the Bolt and Nylon Nuts with the provided 8 mm Allen
Wrench and the Multi-Hex Tool.
• Install a Nut Cap (69) onto the Nylon Nut (58) of the Crank.
• Remove two the Self Tapping Screws (68) from the Right Handrails (12), the two Phillips Self Tapping
Screws (37) from the Decorative Cover of the Pedal Tube (22). Remove the Screws with the provided
Multi-Hex Tool with Phillips.
• Attach the Decorative Cover for Pedal Tube (22) onto the end of the Right Handrail (12) with two Self
Tapping Screws (68) and two Phillips Self Tapping Screws (37) that were removed. Tighten screws in place
with the provided Multi-Hex Tool.
• NOTE: Bolt for right Crank and Bolt for left Crank are marked “R” for Right and “L” for Left.
• Use the same procedure to attach the Left Foot Bar (53) onto the Left Crank and attach the Decorative
Cover for Pedal Tube (77,22) onto the end of Left Handrail (56).
• The Left Foot Bar (53) is attached by using Bolt (18L) which has a left-hand thread. It needs to be turned
in an anti-clockwise direction to tighten.
• The Right Foot Bar (16) is attached using Bolt (18R) which has a right hand thread. Turn clockwise to
tighten.

10
4
STEP 4: RIGHT AND LEFT FOOT PEDALS INSTALLATION
• Attach the Right Foot Pedal (11) onto the Right Foot Bar (16) with two Bolts (20) and two M8 Nylon
Nuts (19). Tighten the Nylon Nuts with the provided Multi-Hex Tool.
• Use the same procedure to attach the Left Foot Pedal (11) onto the Left Foot Bar (53).

11
CAUTION:
Ensure that cables are not damaged
during assembly or when
tightening screws.
4
STEP 5: RIGHT AND LEFT HANDRAIL ARMS INSTALLATION, CONSOLE
INSTALLATION
• Insert the Right Handrail Arm (3R) into the plastic bushing on the tube of the Right Handrail
• (12) with two Bolts (9), two Curved Washer (76) and two Cap Nuts (75).
• Use the same procedure to attach the Left Handrail Arm (3L) into the plastic bushing on the tube of the
Left Handrail (56).
• Connect the Sensor Wire (21) from the Main Frame (1) to the wire that comes from the Console (49).
• Place the Console (49) onto the plate on the Main Frame (1) then slide it down to lock the position.

12
CLEANING
The Trojan Strider 130 Elliptical can be cleaned with a soft cloth and mild detergent. Do not use
abrasives or solvents on plastic parts. Please wipe your perspiration off The Trojan Strider 130
Elliptical after each use. Be careful not to get excessive moisture on the computer display panel as
this might cause an electrical hazard or electronics to fail.
Please keep The Trojan Strider 130 Elliptical, especially the computer console, out of direct sunlight
to prevent screen damage.
Please inspect all assembly bolts and pedals on the machine for proper tightness every week.
STORAGE
Store The Trojan Strider 130 Elliptical in a clean and dry environment away from children.
PROBLEM SOLUTION

13
FUNCTION&PARAMETER:
OPERATION PROCEDURES:
AUTO ON/OFF
The Console turns on when any key is pressed or when it receives an input from the speed sensor is
registered. The Console will turn off automatically when the speed sensor registers no speed signal or no
button is pressed for 4 minutes.
RESET
Reset the Console by pressing the MODE button for 3 seconds or remove the batteries.
TIME
This will display the time of the workout from 1 second up to 99:59 minutes.
FUNCTION SELECTION
Press the MODE button to select a specic function you are looking for.
SCAN FUNCTION
This will automatically display of the following functions in the order shown for 6 seconds at a time;
TIME > SPEED > DISTANCE > CALORIE
BATTERIES
The Console uses two AAA batteries. If the screen does not display the readouts correctly. Please re-install
the batteries or replace the batteries with a new set.

14
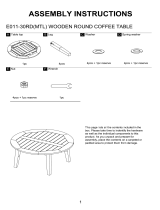
Tr apezius
Posterior
Tricep
Latissimus Dorsi
Gluteals
Hamstrings
Gastrocnemius
Tr apezius
Anterior
Pectoralis Major
Serratus Anterior
Biceps
Abdominal
Sartorius
Quadriceps
Tibialis
Trojan and the Heart and Stroke Foundation have joined forces to KEEP SOUTH AFRICA MOVING.
The Heart and Stroke Foundation South Africa encourages all South Africans to make heart-healthy choices
that include daily physical activity, exercise and a balanced diet. Use Trojan, SA’s No. 1 selling Home Fitness
brand to give you the ability to boost your tness level and lower your risk of cardiovascular disease.
Visit www.trojanhealth.co.za for equipment choices and exercise programs, and
www.heartfoundation.co.za for information on how to adopt a healthy lifestyle.
AEROBIC EXERCISE
Aerobic exercise is any sustained activity that sends oxygen to your muscles via your heart and lungs. Aerobic
exercise improves the tness of your lungs and heart − your body’s most important muscle. Aerobic exercise
tness is promoted by any activity that uses your large muscles (arms, legs, or buttock, for example). Your heart
beats quickly and you breathe deeply. An aerobic exercise should form part of your entire exercise routine.
WEIGHT TRAINING
Along with aerobic exercising which helps get rid of and keep off the excess fat that our bodies can store,
weight training is an essential part of the exercise routine process. Weight training helps tone, build and
strengthen muscle. If you are working above your target zone, you may want to do a lesser amount of reps.
Always consult your physician before beginning any exercise program.
MUSCLE CHART
TROJAN STRIDER 130 ELLIPTICAL TRAINER
The exercise routine that is performed on the Trojan Strider 130 Elliptical Trainer will develop the upper and
lower body muscle group as well as condition the circulatory system and provide a good aerobic workout.
These muscle groups are highlighted on the muscle chart below.

15
How you begin your exercise program depends on your physical condition. If you have been inactive for
several years, or are severely overweight, you must start slowly and increase your time on the equipment; a
few minutes per workout.
Initially, you may be able to exercise only for a few minutes in your target zone, however, your aerobic tness
will improve over the next six to eight weeks. Don’t be discouraged if it takes longer. It’s important to work
at your own pace. Ultimately, you’ll be able to exercise continuously for 30 minutes. The better your aerobic
tness, the harder you will have to work to stay in your target zone. Please remember these essentials:
• Have your doctor review your training and diet programs to advise you of a workout routine you
should adopt.
• Begin your training program slowly with realistic goals that have been set by you and your doctor.
• Monitor your pulse frequently.
• Establish your target heart rate based on your age and condition.
EXERCISE INTENSITY
To maximise the benets of exercising, it is important to
exercise with the proper intensity. The proper intensity
level can be found by using your heart rate as a guide.
For effective aerobic exercise, your heart rate should
be maintained at a level between 65% and 85% of your
maximum heart rate as you exercise. This is known as your
target zone. You can nd your target zone in the table below.
During the rst few months of your exercise program, keep
your heart rate near the low end of your target zone as
you exercise. After a few months, your heart rate can be
increased gradually until it is near the middle of your target
zone as you exercise.
To measure your heart rate, stop exercising but continue
moving your legs or walking around and place two ngers
on your wrist. Take a six second heartbeat count and
multiply the results by 10 to nd your heart rate. For
example, if your six second heartbeat count is 14, your
heart rate is 140 beats per minute. (A six second count is
used because your heart rate will drop rapidly when you
stop exercising).
Adjust the intensity of your exercise until your heart rate is
at the proper level.
For more information visit:
www.trojanhealth.co.za

16
SUGGESTED STRETCHES
The correct form for several basic stretches is shown at the right.
Move slowly as you stretch, never bounce.
1. Toe Touch Stretch
Stand with your knees bent slightly and slowly bend forward from
your hips. Allow your back and shoulders to relax as you reach
down toward your toes as far as possible. Hold for 15 counts, and
then relax. Repeat 3 times.
Stretches: Hamstrings, back of knees and back.
2. Hamstring Stretch
Sit with one leg extended. Bring the sole of the opposite foot
toward you and rest it against the inner thigh of your extended leg.
Reach toward your toes as far as possible. Hold for 15 counts, and
then relax. Repeat 3 times for each leg.
Stretches: Hamstrings, lower back and groin.
3. Calf/Achilles Stretch
With one leg in front of the other, reach forward and place your
hands against a wall. Keep your back leg straight and your back foot
at on the oor. Bend your front leg, lean forward and move your
hips toward the wall. Hold for 15 counts, and then relax. Repeat 3
times for each leg. To cause further stretching of the Achilles ten-
dons, bend your back leg as well.
Stretches: Calves, Achilles tendons and ankles.
4. Quadriceps Stretch
With one hand against a wall for balance, reach back and grasp
one foot with your other hand. Bring your heel as close to your
buttocks as possible. Hold for 15 counts, then relax. Repeat 3 times
for each leg.
Stretches: Quadriceps and hip muscles.
5. Inner Thigh Stretch
Sit with the soles of your feet together and your knees outward.
Pull your feet toward your groin area as far as possible. Hold for 15
counts, and then relax. Repeat 3 times.
Stretches: Quadriceps and hip muscles.
1
2
3
4
5
WORKOUT GUIDELINES
Each workout should include the following three parts:
A warm-up: 5 to 10 minutes of stretching and light exercise. A proper warm-up increases your body temperature, heart
rate, and circulation in preparation for exercise.
Training zone exercise: 20 to 30 minutes of exercising with your heart rate in your training zone. (Note: During the rst
few weeks of your exercise program, do not keep your heart rate in your training zone for longer than 20 minutes).
Cool-down: 5 to 10 minutes of stretching. This will increase the exibility of your muscles and will help to prevent post-
exercise problems.
EXERCISE FREQUENCY
To maintain or improve your condition, plan three workouts each week, with at least one day of rest between workouts. After
a few months of regular exercise, you may complete up to ve workouts each week, if desired. Remember, the key to success
is to make exercise a regular and enjoyable part of your everyday life.

17
Q1. My console is showing E1
Computer cannot read the speed value, motor damaged or signal lost.
Turn off the elliptical and unplug, leave for 30 seconds and then restart the elliptical.
If the error persists please contact our Trojan Call Centre on 0861 TROJAN (0861 876 526).
Q2. My console is showing E6
Computer is reading incline incorrectly, incline motor damaged or signal lost.
Turn off the elliptical, unplug the unit, leave for 30 seconds and then restart the elliptical.
If the error persists please contact our Trojan Call Centre on 0861 TROJAN (0861 876 526).
Q3. My computer console is not working
Check that your power cord is in your power outlet and is on.
Check that you have a power supply to your home.
Ensure that the console computer cables have been connected properly in the neck piece when assembling
the unit.
Q4. My LCD is dim
Check if unit is in direct sunlight, move if necessary. If display does not improve, please contact the Trojan Call
Centre on 0861 TROJAN (0861 876 526).

18
No. Description Qty No. Description Qty

19
No. Description Qty No. Description Qty

20
/