Focal Point X-Fire Widescreen & 1000 User manual

Category
Fireplaces
Type
User manual
Acquisitions
X-FIRES
Acquisitions X-Fires is a Registered Trade Mark
Designer flueless fires by
Acquisitions of London
INSTALLATION & USERS INSTRUCTIONS
Leave with the User
Revision C - 11/07
X-FIRE 1000
Product Codes
XF-1000L - 1000 Limestone model
XF-1000G - 1000 Granite model
XF-1000M - 1000 Mirror model
XF-1000L LPG - 1000 Limestone model LPG
XF-1000G LPG - 1000 Granite model LPG
XF-1000M LPG - 1000 Mirror model LPG
X-FIRE Widescreen
Product Codes
XF-WSL - Widescreen Limestone model
XF-WSG - Widescreen Granite model
XF-WSM - Widescreen Mirror model
XF-WSL LPG - Widescreen Limestone model LPG
XF-WSG LPG - Widescreen Granite model LPG
XF-WSM LPG - Widescreen Mirror model LPG
Acquisitions of London
24-26 Holmes Road
London NW5 3AB UK
Tel: 24 hours 0207 482 2949
TM
Country(s) of destination : GB, IE Product Identification No. 87BQ70
INSTALLATION INSTRUCTIONS
Preliminary Notes Before Installation
This appliance is a high efficiency, flueless, flame effect gas fire. It provides
radiant and convected warmth both efficiently and safely utilising the latest
type catalytic convertor burner technology.
The appliance incorporates a combustion monitoring system (Oxygen
Depletion System). It must not be adjusted or put out of operation. If
replaced then manufacturers original parts must be used. (see User
Instructions).
The appliance is designed to fit various types of situations as listed in the
Installation Requirements.
This appliance must be installed in accordance with the rules in force and only
used in a sufficiently ventilated space. A minimum of 100cm
2
(15.5in
2
) pur-
pose provided ventilation is required for this appliance. An openable window
or louvre is also required. This appliance is factory set for operation on the
gas type, and at the pressure stated on the appliance data plate.
The minimum room size should be as stated in section 3.1 of these instruc-
tions to allow adequate circulation of air and ensure the correct operation of
the fire. This volume may include adjacent spaces but these spaces must not
be separated by a door. In order to convert from cubic feet (ft
3
) to cubic
metres (m
3
) divide the room volume (in ft
3
) by 35.3. This appliance is intend-
ed as a secondary source of heat only and should not be used in a room with-
out some form of background heating present.
The appliance must not be installed in a bedroom, bathroom or any sleeping
area. The appliance does not require a flue system of any type as the cat-
alytic converter cleans the products of combustion to provide a complete
combustion system, which is intrinsically safe.
The appliance must be installed by a competent person in accordance with
Gas Safety (Installation and Use) Regulations 1998 or rules in force. It is
strongly recommended that a CORGI registered engineer is used for this pur-
pose, as they are the only persons approved by the HSE under the above reg-
ulations.
On initial light up of a new appliance, the ‘newness’ will burn off within the
first few hours of operation. During this period some smoke may be emitted
from outlet grille, this should be no cause for concern. Accordingly, the room
should be well ventilated with all windows and doors open during this period.
Read all these instructions before commencing installation.
IMPORTANT NOTES
This appliance is a catalytic flueless flame effect gas fire, providing radiant and convected
warmth. It is designed to operate on Natural Gas or Propane following factory set adjust-
ments, (see Data label on appliance for gas type and pressure).
It is the LAW that all gas appliances and fittings are installed by a competent person (such
as a CORGI registered fitter) and in accordance with the Gas Safety (Installation and Use)
Regulations 1998, the relevant British Standards for Installation, Codes of Practice and the
Manufacturers' Instructions. The installation shall also be carried out in accordance with the
following regulations:
The Building Regulations issued by the Department of the Environment, the Building
Standards (Scotland) (Consolidation) Regulations issued by the Scottish Development
Department.
Relevant British standards insofar as the relevant areas are not covered by these instructions.
Note: For Republic of Ireland, reference should be made to the relevant standards governing
installation. (IS 813: 1996)
Failure to comply with these regulations could lead to prosecution and deem the warranty
invalid.
This appliance must be installed in accordance with the rules in force and used only in a suf-
ficiently ventilated space. A minimum of 100cm
2
(15.5 in
2
) purpose provided ventilation is
required for this appliance, an openable window or louvre is also required. To reduce the pos-
sibility of draughts entering the room via the air vent, we recommend the use of "Black Hole"
or "Vortex" type vents featuring internal baffles.
Consult ALL instructions before installation and use of this appliance.
This appliance is free from any asbestos material. Refractory panels are constructed from
ceramic fibre.
1
Section Contents Page No.
1.0 Important Notes 1
2.0 Appliance Data 2
3.0 Installation Requirements 2
3.1 Room Sizing 2
4.0 Site Requirements 2
4.1 Ventilation 4
5.0 Unpacking the Appliance 4
5.1 Component Checklist 4
6.0 Gas Supply Routes 4
7.0 Preparing the Appliance 5
7.1 Fixing the Appliance 5
7.2 Checking the Burner 6
Section Contents Page No.
8.0 Testing and Commissioning 6
8.1 Operating the Appliance 6
8.2 Spark Failure 6
8.3 Setting pressure 6
8.4 Fitting the Frame Assembly 7
9.0 Briefing the customer 7
10.0 Servicing 7
10.1 Servicing the Burner Tray 8
10.2 Pilot Assembly 8
10.3 Catalysts 8
10.4 Testing for Firebox Leakage 9
11.0 Troubleshooting Guide 10
1.0
INSTALLATION REQUIREMENTS
This appliance may be installed with or without a hearth. If a hearth is fitted, the size and design may
be as desired. If the appliance is to be sited near a disused natural draught flue it is recommended that
the old flue should be partially sealed off to prevent draughts, however some ventilation will be required
to prevent condensation. The appliance is designed to be wall mounted. It is possible to install the appli-
ance onto certain types of combustible materials - see section entitled ‘Clearances to combustible mate-
rials’. Propane/LPG models must not be installed in cellars, basements or any room which is completely below
ground level. In the event that the fire is sited near a disused or unserviceable fireplace served by a nat-
ural draught flue, any existing under grate draught device should be sealed off to prevent loss of heat
or creation of draughts. The passageway into the flue should be partially sealed to prevent excessive
draughts, however some ventilation will be required in the old flue to prevent condensation and damp-
ness. Advice should be sought from your local building control officer.
ROOM SIZING
X-Fire 1000 models : The room size should be a minimum of 30m
3
(e.g. 11’6” x 11’6” x 8’) to allow
adequate circulation of air and ensure the correct operation of the fire.
X-Fire Widescreen models : The room size should be a minimum of 40m
3
(e.g. 13’4” x 13’4” x 8’) to
allow adequate circulation of air and ensure the correct operation of the fire.
This volume may include adjacent spaces but these spaces must not be separated by a door. To calcu-
late a room size in cubic metres (m
3
) divide the room volume in cubic feet (ft
3
) by 35.3.
SITE REQUIREMENTS
This appliance is designed to be wall-hung. Do not recess any part of the appliance into the
wall.
This Appliance may be installed in any room in a home,except bedrooms and bathrooms.
Installation in living rooms is common, however other rooms such as kitchens, dining rooms and hall-
ways are permitted, providing a suitable natural gas supply is available, and rooms sizing and venti-
lation requirements are strictly adhered to (see section 4.1).
The appliance is designed to be versatile, and as such will operate correctly when exposed to normal
gentle draughts experienced within the home. It is not recommended, however that the appliance be
2
3.0
APPLIANCE DATA
Please see Data label affixed to appliance for current data.
This appliance is for use only with the gas type, and at the pressure stated on the appliance Data label.
3.1
4.0
2.0
Gas Group
Inlet Pressure
Regulator Pressure
Max Energy Input (Gross)
Max Energy Input (Net)
Max Gas Rate
Min Energy Input (Gross)
Min Energy Input (Net)
Pilot Energy Input (Gross)
Burner Pressures -
High Hot (±1.5 mbar).
High Cold (±1.5 mbar).
Low Hot (± 0.75 mbar).
Low Cold (± 0.75 mbar).
Flow restrictor orifice
Injector
Oxypilot (SIT/Bray)
Gas control
Gas Inlet restrictor elbow
Ignition
Spark Gap (± 1.0mm)
1000 Natural gas
G20 Natural Gas CAT I2H
20 mbar (± 2.0mbar)
N/A
2.6 kW
2.35 kW
0.23 m
3
/h
1.5 kW
1.35 kW
166 W
150 W
13.5 mbar
13.0 mbar
4.2 mbar
3.7 mbar
1.30 mm
N/A
SIT/Bray 9082
BM733
8mm
Piezo spark
4.0 mm
1000 LPG
G31 Propane CAT I3P
37 mbar (± 2.0mbar)
24.5 mbar
2.2 kW
2.0 kW
0.085 m
3
/h
1.5 kW
1.38 kW
166 W
152 W
14.0 mbar
13.8 mbar
6.0 mbar
5.8 mbar
1.03 mm
1.30 mm (single)
Seagas P5-19
BM733
8mm
Piezo spark
4.0 mm
Widescreen Natural gas
G20 Natural Gas CAT I2H
20 mbar (± 2.0mbar)
N/A
3.5 kW
3.15 kW
0.34 m
3
/h
2.0 kW
1.8 kW
166 W
150 W
17.5 mbar
17.0 mbar
5.8 mbar
5.3 mbar
1.45 mm
N/A
SIT/Bray 9082
BM733
8mm
Piezo spark
4.0 mm
Widescreen LPG
G31 Propane CAT I3P
37 mbar (± 2.0mbar)
24.5 mbar
3.0 kW
2.75 kW
0.115 m
3
/h
2.0 kW
1.85 kW
166 W
152 W
14.0 mbar
13.7 mbar
6.0 mbar
5.9 mbar
1.45 mm
1.30 mm (single)
Seagas P5-19
BM733
8mm
Piezo spark
4.0 mm
SITE REQUIREMENTS (continued)
installed in areas where it is likely to be exposed to persistent strong draughts, that may be generated
by outside doors or windows, air vents etc. It is recommended that the appliance should not be installed
within 1 metre of any air vent.
Clearances to non-combustibles
Non combustible surfaces are defined as brick, metal, marble, concrete etc. and also a number of man-
made materials impervious to flame. If in doubt refer to the material manufacturer for further infor-
mation before proceeding with installation.
Clearances to the sides of the appliance are 50mm (2in). Clearance to the front of the appliance is
500mm (20in).
The back of the appliance may be installed directly onto a non-combustible wall, providing the area
behind the appliance is flat and does not interfere with the various vent holes in the back panel of the
appliance.
The appliance may be installed with or without a non combustible hearth. If a hearth is fitted, the size
and design may be as desired.
A non combustible shelf of any depth may be positioned above the appliance provided it is no closer
than 400mm from the top of the appliance glass panel and the wall above the appliance is non com-
bustible.
Clearances to combustible materials
Combustible materials are defined as wood, fabrics, or other materials likely to combust if exposed to
flame. Generally, any material, which is likely to discolour, melt or misshape when exposed to moder-
ate heat, should be considered as a combustible material or surface.
Clearance to the sides of the appliance are 100mm(4in) but curtains, drapes and other fabrics are not
permitted within a distance of 500mm(20in) of the appliance sides. No such materials are permitted
directly above the appliance regardless of distance.
The minimum clearance to the ceiling above the appliance is 800mm measured from the top of the
appliance glass panel.
Combustible materials should not be positioned directly in front of the appliance within a distance of
one metre.
Under no circumstances should any electrical equipment e.g. plasma screen TV sets etc. be positioned
on the wall above the appliance. The appliance is designed to be wall mounted alone and not in con-
junction with any type of combustible fire surround. No combustible shelves should be positioned on
the wall above the appliance. It should be established that any mirrors or picture frames etc. to be posi-
tioned on the wall above the appliance are able to withstand prolonged exposure to moderate heat and
moisture before proceeding with their installation.
The back of the appliance may be installed directly onto a combustible wall, providing it is relatively flat
and does not interfere with the various vent holes in the back panel of the appliance. The wall must be
structurally sound and constructed from a material capable of withstanding moderate heat. Finished
plaster, conventional wall paper and dry-lined plasterboard are examples of suitable materials. Materials
such as flock, blown vinyl and embossed paper which are sensitive to even small amounts of heat
should be avoided as scorching and or discolouration may occur over time.
If the appliance is to be mounted on a dry lined wall or a timber framed construction wall then the
integrity and ability of the wall to carry the weight of the appliance must be confirmed. It is important
in these circumstances that any vapour control barrier is not damaged, and that any structural mem-
bers of the house frame are not damaged.
The appliance may be positioned as close to a solid floor (i.e. stone, wooden laminate etc.) as the par-
ticular design of fireframe permits, however it is not permitted to install the appliance within 100mm
of carpet, rugs or fabric materials of any kind. This dimension is measured vertically to the bottom of
the appliance frame.
3
4.0
VENTILATION
A minimum of 100 cm
2
purpose provided ventilation is required for this appliance. This may be achieved
either with one vent 100 cm
2
at a high or low position in the room, or split ventilation i.e. 50cm
2
be
installed at high level and 50cm
2
be installed at low level within the room.
An openable window or equivalent is also required. The requirements of other flued appliance operat-
ing in the same room or space must be taken into consideration when assessing ventilation.
Any ventilation fitted must comply with BS 5871 part 4 and BS 5440 part 2. Ventilation fitted under,
or within immediate vicinity (1 metre) of the appliance must not be used as it may adversely effect per-
formance of the ODS system.
The appliance MUST NOT be installed in a bedroom, bathroom or any sleeping area. For Republic of
Ireland, see relevant rules in force.
UNPACKING THE APPLIANCE
Remove the straps and the top lid of the outer packaging, remove any instructions or fixing kits.
Read ALL these instructions before continuing to unpack or install this appliance.
Lift off the remaining packaging components.
Check that the components supplied correlate with the component checklist. Please dispose of all the
packaging materials at your local recycling centre.
COMPONENT CHECKLIST
QUANTITY DESCRIPTION
1 Firebox, burner assembly and outer case (wrap)
1 Set of manufacturers instructions
1 Decorative frame assembly
1 Screw and wall plug pack
1 Rubber grommet
GAS SUPPLY ROUTES
There are three possible entry points for the gas supply pipework to enter the appliance firebox. These
entry points are ‘knock out’ type holes.
Non-concealed gas connections may be made using the entry points at either end of the firebox or the
one in the bottom of the firebox. A concealed gas connection may be made using the knock out hole in
the centre back of the firebox. Widescreens have entry provision avoiding the need for knock-out. Select
the most appropriate entry point and knock out the relevant holes in both the firebox and the outer
casing.
No more than 1.5m of 8mm diameter pipe must be used to avoid unnecessary pressure drops.
If a concealed gas connection is to be made, the supply pipe should always be sleeved through walls
and floors using the shortest possible route.
For concealed supply pipe routing, pipes must (where possible) be vertical and providing there is suffi-
cient wall thickness available, they should be placed in pipe chases. Horizontal pipe runs should be
avoided. Prior to chasing a solid wall, an inspection should be made to note the proximity of any
cables/sockets outlets which may already be buried. Pipes must be secured using suitable clips and pro-
tected against corrosion. Ideally factory finished protected pipework and fittings should be used. Joints
should be kept to a minimum and compression fittings must not be used. The pipework installation must
be tested for soundness before any protection is applied and/or the pipework and fittings are buried.
If the appliance is to be mounted on the inner leaf of a con-
ventional cavity wall, or a solid wall, drill the required number
of holes using a 6.5mm masonry bit to a depth of 39mm. Insert
the fibre wall plugs as required.
If the appliance is to be mounted on a dry lined wall or a tim-
ber framed construction wall then special cavity screw fixings
will be required which are not supplied with this product. These
should be constructed from metal and not plastic.
If a concealed gas connection is to be made ensure the gas sup-
ply pipe is in it’s final position and can enter the appliance in
the correct position when the appliance is hung on the wall.
4
4.1
5.0
5.1
6.0
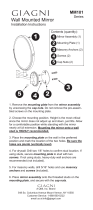
PREPARING THE APPLIANCE
1. Firstly remove the two retaining
screws on each side of the upper grille
and (X-Fire 1000 only) remove the
grille from the outer casing.
2. Remove the two retaining wing
nuts from the retaining studs that
protrude into the lower part of the
main firebox as shown.
The control knob is located on the
lower right hand side of the outer cas-
ing, and is mounted in an indicator
bracket, which has a metallic indica-
tion ‘pip’. Both the knob and the indi-
cator bracket should be removed as
follows;
3. Remove the retaining pin from the
gas valve spindle and withdraw the
control knob and the spindle exten-
sion from the right hand side of the
appliance.
4. Remove the four retaining screws
and the indicator bracket. The firebox
may now be detached from the outer
casing.
FIXING THE
APPLIANCE
It is recommended that the burner
height, where possible, should be
between 1.0 and 1.2 metres from the
floor. This will give the best viewing
position.
After selecting the final mounting
position of the appliance, taking into
account the site requirements as
specified in section 4 of these instruc-
tions, the integrity of the wall, and the
feasibility of the proposed supply
pipe routing, the firebox of the appli-
ance may be secured to the wall.
Due to the weight of the front facia, it is possible to fix the outer casing to the wall in up to nine (X-Fire 1000 mod-
els), or fifteen (X-Fire widescreen models) positions, depending on the strength/condition of the wall. If in doubt
always use extra fixings! Use a spirit level to ensure that the outer casing is level at all times during installation.
If the appliance is to be mounted on the inner leaf of a conventional cavity wall, or a solid wall, drill four holes using
a 6.5mm masonry bit, to a depth of 39mm. Insert the fibre wall plugs provided. If the appliance is to be mounted
on a dry lined wall or a timber framed construction wall then special cavity screw fixings will be required which are
not supplied with this product. These should be constructed from metal and not plastic.
Insert the screws into two of the upper holes, leaving 5mm protruding from the wall. Temporarily hang the outer
casing on the wall, and mark any additional fixing points as required. If the appliance is to be fitted to a lightly
coloured wall, it is advantageous to paint this wall area with black or dark paint in the vicinity of the lower rectan-
gular slots on the outer casing. This will mask the wall when viewed from the front of the appliance. Ensure paint is
fully dry before mounting the appliance. Use the outer casing as a template to mark this area on the wall. Remove
the outer casing from the wall and drill holes for the additional fixing points as required. Insert either wall plugs or
cavity screw fixings as required. Re-position the outer casing on the wall and using a spirit level to check the cas-
ing is square and level, tighten all of the fixing screws fully.
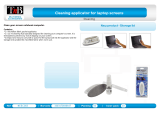
Now, with the outer casing fixed to the wall, the main firebox can be secured in position.
The firebox is held on the outer casing using four studs and two normal nuts (upper fix-
ings) and two wing nuts (lower fixings). Make sure that the upper nuts are un-screwed
approximately one turn from the fully tightened position in order to create a 2mm gap
as shown. The firebox may now be hung onto the top studs, and then pushed onto the
lower studs so that the lower studs protrude through the lower fixing holes in the back
panel of the firebox. Tighten the lower fixing wing nuts on to the lower fixing studs fully.
Next, re-fit the grille, (X-fire 1000 models only) the indicator bracket and the control
knob and spindle, and secure in position using the correct fixing screws (re-fitting is the opposite of removal as
detailed in section 7.0 of these instructions).
5
1. Remove the Grille.
Note: This design of grille
not fitted to widescreen
model
2. Remove retaining
wing nuts
3. Remove
spindle
retaining pin
4. Remove control indicator bracket and control knob
2mm
7.0
7.1
Note : X-Fire 1000
shown as example
5. Widescreen
models : Remove
two self-tapping
screws from the
Left hand side of
the outer casing
and one from the
right hand side.
5.
CHECKING THE BURNER
There are no imitation fuel bed components to install. The appliance features a ribbon burner which is
designed to produce a continuously variable band of flame over its length. The burner should be
visually inspected to ensure it is free from any foreign matter. If it is necessary to clean or dust off
the burner then the glass panel should be removed by removal of the retaining screws. Re-fit the
glass door after cleaning or inspection, ensuring the correct orientation and a good seal.
TESTING AND COMMISSIONING
Turn on and test the gas supply up to the fire for any leaks, in accordance with the current edition of
BS 6891 (natural gas installations) or the current edition of BS 5482 pt1 (propane installations).
OPERATING THE APPLIANCE
The pilot is visible behind the left hand side of the burner.
The control knob is located on the lower right hand side of the
outer case. It is of a spherical design and is marked as shown
in the diagram to the right;
Push in and turn the control knob to the SPARK position, and
hold there for a few seconds.
Continue turning anti-clockwise through the spark click to the
PILOT light position, ensuring the pilot has lit. If not, return the
knob clockwise, and repeat.
When the pilot lights after the spark, keep the knob depressed
for approximately ten seconds. Now release the knob and the
pilot should stay alight. If the pilot is extinguished during use,
wait three minutes before repeating the ignition procedure. To
achieve the HIGH setting, push the control knob in slightly and
continue turning anti-clockwise to the high position. The main
burner should light after a few seconds. To decrease the setting
to LOW, turn the control knob clockwise to the low setting.
To turn to the PILOT position from the HIGH or LOW positions, press the control knob in, and return to
the pilot position and release. To turn the fire OFF, keep the knob pressed in, return to the off position
and release.
SPARK FAILURE
The gap between the spark electrode and the pilot should be 3 - 5mm to produce a good spark. There
should be no need to adjust this. If under any circumstances the piezo electric spark fails, the pilot
cannot be lit manually. In the event of a failure to spark, check the HT lead connections.
SETTING PRESSURE
The pressure test point is located on the left hand side of the appliance, on the main burner pipe, next
to the brass restrictor adjacent to the front left hand side burner bracket. Release the setting pressure
test point screw, and attach a U gauge. Light the fire on the HIGH setting.
To commission the appliance, the burner pressure must be in accordance with the figures stated in the
data section of these instructions. The fire is factory set to achieve these pressures and any significant
variation could indicate a supply problem. If the pressure is too high, the gas supply meter may be set
incorrectly. This should be checked with the fire running and if necessary reset by the gas supplier.
If the burner pressure is too low, then check the inlet pressure with the appliance running. If this is
less than the inlet pressure stated in section 2.0 of these instructions it will need to be reset by the gas
supplier. If the setting pressure is too low, but
the meter pressure is acceptable, then a prob-
lem in the supply pipework is to be suspected.
This may be dirt and debris, kinked or inade-
quate size pipes, restriction in a fitting, shut off
elbow not fully open or solder flashing across a
joint. Identify the cause of the restriction and
rectify. Switch the fire off, disconnect the U
gauge and refit the test nipple screw. Light the
fire and check test nipple for gas tightness.
In the event that the burner pressure is not in
accordance with the figures stated in the data
section of these instructions, the appliance must
not be commissioned, and the manufacturer
should be contacted for guidance.
6
‘OFF’ position
‘SPARK’ position
‘LOW’ position
‘HIGH’ position
7.2
8.0
8.1
8.3
8.2
FINAL FITTING
OF THE FRAME
ASSEMBLY
Due to the weight of the
frame assembly, it is recom-
mended to seek assistance
for this operation.
The frame assembly will be
supported by keyhole slots
by four M6 screws which pro-
trude from the front of the
outer casing. Ensure each
screw is unscrewed approxi-
mately one turn from the
fully screwed in position in
order to create a 2mm gap
(shown). Simply hang the
facia panel onto the outer
casing, starting with the two
bottom fixings, ensuring that
the corresponding keyhole
shaped holes engage the
screwheads fully.
BRIEFING THE
CUSTOMER
All instructions must be
handed to the user for safe-
keeping. Show the customer
how to light and control the fire.
After commissioning the appliance, the customer should be instructed on
the safe use of the appliance and the need for regular servicing. Frequency
of service depends on usage, but MUST be carried out at least once annu-
ally.
Advise that cleaning of the fire may be achieved when the fire is cold using
a clean microfibre cloth on most surfaces. See cleaning instructions. Advise
that the fire will emit a "newness" smell for a time after initial commis-
sioning and that extra ventilation may be needed during this time.
Recommend that a guard be used for the protection of the young, pets, the elderly and the infirm
SERVICING
Isolate the fire from the gas supply. Ensure that the fire is fully cold before attempting service. A sug-
gested procedure for servicing is detailed below.
77
8.4
9.0
10.0
1. Lay out the dustsheet and tools.
2. Remove the facia section. Removal is the reverse of fitting as detailed in section 8.4.
3. Remove the glass door assembly and clean carefully.
4. Inspect the burner and the catalysts and clean if necessary with a soft brush.
5. Disconnect the gas supply.
6. Undo the four screws retaining the burner support brackets to the base and rear of the firebox.
7. Remove the burner unit, strip off the burner pipes and clean thoroughly.
8. Clean the in-line restrictor, pilot assembly and the burner tube. Do not attempt to remove the
pilot injector as this can cause damage.
9. Re-assemble components.
10. Turn on the gas supply and check tightness. Check pilot and burner for good ignition.
11. Refit the glass door assembly, ensuring a good seal.
12. Refit the facia as detailed in section 8.4.
13. Check the purpose provided ventilation is un-obstructed.
14. Light the fire and test setting pressures.
15. Check safe operation of the appliance.
For specific servicing instructions, see relevant sections.
SERVICING THE BURNER TRAY AND GAS ASSEMBLY
Firstly, remove the front facia (removal is the reverse of fitting as detailed in section 8.4), the glass
panel, and disconnect the gas connection inside the appliance. The gas connections to the gas valve
can now be released. Undo the four screws retaining the burner support brackets to the base and rear
of the firebox. The burner may now be removed.
Remove the pilot and main burner pipes and blow through to dislodge any debris. Now remove the
injector elbow (where fitted) and blow through to make sure it is entirely clear.
Unclip the pilot lint gauze and clean with a soft brush. Clean the exterior of the pilot assembly with a
soft brush and blow through the flame ports on the pilot head. Check the aeration holes are free from
lint or dirt. The pilot assembly can be removed if required by disconnecting the electrode HT lead, gas
pipe and unscrewing the mounting screws and lifting away.
The pilot assembly is a non-serviceable item and should not be taken apart. Aeration holes must be
absolutely clear internally for proper operation. NEVER MODIFY OR BEND THE THERMOCOUPLE TO
MAKE THE PILOT STAY ALIGHT. Modifications are dangerous and can have serious unseen effects
on safety. If the pilot will not stay lit there is a problem with dirt, the gas supply to it, or the thermo-
couple needs replacement.
The gas valve is a non-serviceable item. If this needs replacement, remove the M4 securing screw hold-
ing the valve bracket in place, remove all pipe unions, and the complete valve. Replacement must be
original manufacturers parts.
Re-assemble in the reverse of removal. Ensure setting pressures are as stated in Section 2; Appliance
Data.
PILOT ASSEMBLY
Remove the casing, internal firebox (as per servicing section), lint arrestor (if fitted) and pilot unit by
using a long screwdriver to remove the retaining screws.
Clean the pilot assembly with a soft brush and blow through. Check the aeration holes are free of any
dirt or lint. Clean thoroughly internally, the connection can be removed from the base of the pilot unit
using two spanners to make cleaning easier. Do not damage or try to dismantle the pilot injector.
The unit is factory set and the only check necessary is to ensure the spark gap is correct. See speci-
fications for gas setting.
NEVER MODIFY OR BEND THE THERMOCOUPLE TO MAKE THE PILOT STAY ALIGHT. If the pilot
will not stay lit there is a problem with dirt, the gas supply, or the thermocouple needs replacement.
Modifications are dangerous and can have a serious unseen effect on safety and therefore MUST not be
done. Replacements must be original manufacturers parts. Re-assemble in the reverse of removal.
Ensure setting pressures are as stated in Section 2; Appliance Data.
CATALYSTS
It is recommended that the catalysts are inspected for signs of damage and dirt during routine servic-
ing procedures. The expected life of the catalysts is in excess of 11,000 hours (10 years of normal use).
After this time the catalyst should be replaced.
If there are any deposits of dirt or soot on the catalysts they should be cleaned with a soft brush and
a vacuum cleaner. If removed for cleaning ensure the seals are in good condition before replacing the
catalyst. New seals will usually be required.
The performance of the catalyst may be checked using a combustion gas analyser as follows. Any
analyser used should conform to BS7927 : 1998 + A1 : 1999. A suitable analyser is a Telegan Sprint
2000 XT Combustion Flue Gas Analyser.
Important: The temperature of the gases emitted from the catalytic converters is in excess
of 350
°
C. Measuring gas of this temperature may damage some types of gas analysers. If in
doubt consult the equipment manufacturer.
Ignite the fire as per the operating instructions, and run at maximum setting for 15 minutes. Position
gas sample probe directly over the catalyst via the outlet grille, on top of the appliance. Record the car-
bon dioxide (CO2) concentration and then the carbon monoxide (CO) concentration as displayed by the
analyser - also noting the units in which the values are expressed.
Most analysers display carbon dioxide (CO2) concentrations in percentage (%) terms and carbon
monoxide concentration in parts per million (ppm) terms.
8
10.1
10.2
10.3
CATALYSTS (continued)
In order to calculate the combustion ratio for the appliance (CO/CO2) it is first necessary to express
both gas concentrations in terms of percentage. To convert from parts per million (ppm) to a percent-
age (%) divide the ppm figure by 10,000. Examples : 35ppm = 0.0035%, 15ppm = 0.0015%, 5ppm
= 0.0005%.
Now divide the concentration of carbon monoxide (CO) expressed in percent by the concentration of
carbon dioxide (CO2) to obtain the appliance combustion ratio.
The combustion ratio of the gasses emitted by the catalytic convertor should not exceed
0.0015.
If replacing, firstly, remove the decorative facia (removal is the reverse of fitting as detailed in sec-
tion 8.4). The catalysts are located on the top of the internal firebox and can be removed by
unscrewing the retaining nuts securing the clamping plate. Remove the catalyst and its seal and dis-
card.
Refit a new catalyst and seals in reverse order, ensure the catalyst and door have good seals.
TESTING FOR FIREBOX LEAKAGE
Appliances that are several years old or have been extensively dismantled should be checked for
soundness. It is important that all the products of combustion pass through the catalytic converters
at the top of the firebox before leaving the appliance.
The firebox is heated by lighting for a few minutes to provide a flow through the firebox. The burner
is then shut off and a smoke pellet or match introduced at the base of the fire underneath the burner
tray. Large quantities of smoke will emerge from the top of the appliance, but none should emerge
from the joints or gasket faces, especially around the door. It is important to note that the appliance
can never be expected to be 100% smoke tight and small quantities of smoke may be seen in cor-
ners of joints and gasket faces etc without affecting safety when the fire is in operation.
CO (%)
CO2 (%) = ratio
9
10.3
10.4
TROUBLESHOOTING GUIDE
Fire sparks but pilot does not light No gas to fire, check isolators are open.
Pipe work blockage, clean out.
Air not fully purged, re purge supply or wait longer.
Spark earthing to metal work, reset gap correctly.
Blocked pilot, clean out internally.
Pilot lights but then goes out Severe restriction in gas supply: clear obstruction.
Faulty thermocouple, replace pilot unit.
Blocked pilot, clean out.
Blocked lint gauze, clean.
Hold control knob in for longer.
Check control knob does not foul the control indicator plate.
If the pilot will not stay lit there is a problem with dirt, the
gas supply, or the thermocouple needs replacement.
Modifications are dangerous and can have a serious unseen
effect on safety. NEVER MODIFY OR BEND THE THERMOCOU-
PLE TO MAKE THE PILOT STAY ALIGHT.
Fire does not spark at pilot HT lead detached, refit.
Check the spark gap (see section 8.2).
Faulty piezo unit, replace.
Debris shorting out electrode, clean.
Spark shorting to metalwork under tray, realign HT lead.
Fire runs for a time Loose or faulty thermocouple, rectify.
and then cuts off Blocked pilot, clean out.
Dirt or lint in pilot aeration hole or on the lint gauze, clean
thoroughly.
If the pilot will not stay lit there is a problem with dirt, the
gas supply, or the thermocouple needs replacement.
Modifications are dangerous and can have a serious unseen
effect on safety. NEVER MODIFY OR BEND THE THERMOCOU
PLE TO MAKE THE PILOT STAY ALIGHT.
Pilot flame shrinks Poor gas flow to fire, check pressure with fire on high.
when fire is on high If pressure is low, remove any restriction in pipework or valve.
Check all isolators are adequately sized and fully open.
Check meter pressure is adequate.
If the pilot will not stay lit there is a problem with dirt, the
gas supply, or the thermocouple needs replacement.
Modifications are dangerous and can have a serious unseen
effect on safety. NEVER MODIFY OR BEND THE THERMOCOU
PLE TO MAKE THE PILOT STAY ALIGHT.
Fire smells when first Newness smell from brand new appliance.
lit or in use Leakage occurring. Carry out leakage test and rectify any
problems.
Combustible materials used in incorrect positions.
10
11.0
USER INSTRUCTIONS
1.0 Important Notes 1
2.0 Clearances to Combustibles 2
3.0 Ventilation & Room Size 2
4.0 Operating Instructions 3
5.0 Combustion Monitoring System 3
6.0 Cleaning 4
7.0 Servicing 4
8.0 List of Replacement Parts 4
IMPORTANT NOTES
The installation and Servicing of this fire MUST only be carried out by a competent person (such as a
CORGI registered fitter) in accordance with the Gas Safety (Installation and Use) Regulations 1998,
the relevant British Standards, Codes of Practice, the Building Regulations and the manufacturer's
instructions.
Failure to comply with the above recommendations could lead to prosecution and invalidate the appli-
ance warranty.
Always keep a note of the installer's name and address, CORGI registration number, the original pur-
chase receipt and the date of installation for future reference. Failure to produce these documents
may invalidate the warranty.
The appliance should be serviced regularly to ensure continued safe operation. See the servicing
section for further reference.
Parts of this appliance become naturally hot during use. It is recommended that a suitable fireguard
conforming to BS 8423 is used, especially where young children, pets, the elderly or infirm are con-
cerned.
The manufacturer of this appliance considers all surfaces as working surfaces with the exception of
the control knob.
Combustible items, such as flooring and furniture and soft wall coverings (such as blown vinyl or
embossed paper), low temperature surrounds etc may discolour if fitted too close to the fire. See
relevant section for further details on clearances to combustibles. No combustible materials or floor-
ing should protrude onto the hearth (if fitted).
This appliance incorporates a combustion monitoring system (ODS).
DO NOT burn any foreign material on this fire. Under no circumstances shall the appliance be used if
the glass front door or panel has been removed or damaged.
Do not place any objects on top of the appliance.
The integral catalyst should be checked by the installer upon servicing to ensure there are no defects
or obstructions that may prevent the satisfactory flow of combustion products.
The expected life of the catalyst is in excess of 11,000 hours (10 years of normal use). After this
time the catalyst should be replaced.
This appliance is only suitable for the gas type for which it is supplied.
WARNING: Due to the nature of this product the area around the top of the appliance (i.e. the grille)
gets very hot. Care should be taken when operating the appliance.
1.0
1
Section Content Page No
CLEARANCES TO COMBUSTIBLES
Clearances to combustible materials
Combustible materials are defined as wood, fabrics, or other materials likely to combust if exposed to
flame. Generally, any material, which is likely to discolour, melt or misshape when exposed to moder-
ate heat, should be considered as a combustible material or surface.
Clearance to the sides of the appliance are 100mm(4in) but curtains, drapes and other fabrics are not
permitted within a distance of 500mm(20in) of the appliance sides. No such materials are permitted
directly above the appliance regardless of distance.
The minimum clearance to the ceiling above the appliance is 800mm measured from the top of the
appliance glass panel.
Combustible materials should not be positioned directly in front of the appliance within a distance of
one metre.
Under no circumstances should any electrical equipment e.g. plasma screen TV sets etc. be positioned
on the wall above the appliance. The appliance is designed to be wall mounted alone and not in con-
junction with any type of combustible fire surround. No combustible shelves should be positioned on
the wall above the appliance. It should be established that any mirrors or picture frames etc. to be posi-
tioned on the wall above the appliance are able to withstand prolonged moderate heat before proceed-
ing with their installation.
The back of the appliance may be installed directly onto a combustible wall, providing it is relatively flat
and does not interfere with the various vent holes in the back panel of the appliance. The wall must be
structurally sound and constructed from a material capable of withstanding moderate heat. Finished
plaster, conventional wall paper and dry-lined plasterboard are examples of suitable materials. Materials
such as flock, blown vinyl and embossed paper which are sensitive to even small amounts of heat
should be avoided as scorching and or discolouration may occur over time.
The appliance may be positioned as close to a solid floor (i.e. stone, wooden laminate etc.) as the par-
ticular design of fireframe permits, however it is not permitted to install the appliance within 100mm
of carpet, rugs or fabric materials of any kind. This dimension is measured vertically to the bottom of
the appliance frame.
Clearances to non-combustibles
Non combustible surfaces are defined as brick, metal, marble, concrete etc. and also a number of man-
made materials impervious to flame. If in doubt refer to the material manufacturer for further infor-
mation before proceeding with installation.
Clearances to the sides of the appliance are 50mm (2in). Clearance to the front of the appliance is
500mm (20in).
The back of the appliance may be installed directly onto a non-combustible wall, providing it is rela-
tively flat and does not interfere with the various vent holes in the back panel of the appliance.
The appliance may be installed with or without a non combustible hearth. If a hearth is fitted, the size
and design may be as desired.
A non combustible shelf of any depth may be positioned above the appliance provided it is no closer
than 400mm from the top of the appliance glass panel.
VENTILATION AND ROOM SIZE
Purpose provided ventilation of 100cm
2
is required for this appliance. An openable window or equiva-
lent is also required.
Any ventilation fitted must comply with BS 5871 part 2 and BS 5440 part 2. Ventilation fitted under,
or within immediate vicinity of the appliance must not be used as it may adversely effect perform-
ance of the combustion monitoring system (ODS) system.
The requirements of other appliances operating in the space or room must be taken into considera-
tion when assessing ventilation requirements, this will have been carried out by your CORGI regis-
tered installer.
2
2.0
3.0
VENTILATION AND ROOM SIZE (continued)
A supply of fresh air into the room is advisable to maintain temperatures within limits.
The appliance MUST NOT be installed in a bedroom or bathroom.
For Republic of Ireland, see relevant rules in force.
X-Fire 1000 models : The room size should be a minimum of 30m
3
(e.g. 11’6” x 11’6” x 8’) to
allow adequate circulation of air and ensure the correct operation of the fire.
X-Fire Widescreen models : The room size should be a minimum of 40m
3
(e.g. 13’4” x 13’4” x 8’)
to allow adequate circulation of air and ensure the correct operation of the fire.
This volume may include adjacent spaces but these spaces must not be separated by a door. To cal-
culate a room size in cubic metres (m
3
) divide the room volume in cubic feet (ft
3
) by 35.3.
This appliance is intended as a secondary source of heat only and should not be used in a room with-
out some form of background heating present.
OPERATING INSTRUCTIONS
The pilot is visible behind the left hand side of the burner.
The control knob is located on the lower right hand side of the
outer case. It is of a spherical design and is marked as shown
in the diagram to the right;
Push in and turn the control knob to the SPARK position, and
hold there for a few seconds.
Continue turning anti-clockwise through the spark click to the
PILOT light position, ensuring the pilot has lit. If not, return the
knob clockwise, and repeat.
When the pilot lights after the spark, keep the knob depressed
for approximately ten seconds. Now release the knob and the
pilot should stay alight.
If the pilot is extinguished during use, wait three minutes
before repeating the ignition procedure.
To achieve the HIGH setting, push the control knob in slightly and continue turning anti-clockwise to
the high position. The main burner should light after a few seconds.
To decrease the setting to LOW, turn the control knob clockwise to the low setting.
To turn to the PILOT position from the HIGH or LOW positions, press the control knob in, and return to
the pilot position and release.
To turn the fire OFF, keep the knob pressed in, return to the off position and release.
COMBUSTION MONITORING SYSTEM
This fire is fitted with a combustion monitoring safety device (ODS). If the appliance shuts down dur-
ing use for no apparent reason then several reasons may be suspected. If a door or window has been
opened creating a draught, then pilot disturbance could be the problem and removal of the draught
should resolve this. The appliance can then be re-lit in accordance with the previous section.
If pilot disturbance is not the cause, then the ODS safety system may be in operation. Switch the appli-
ance OFF, call in your installer to check the appliance and ventilation. Remedial work must be carried
out as required. DO NOT allow the appliance to be used until the appliance and installation is passed
as safe. If the pilot continues to be extinguished, you must call your installer to check the operation of
the complete appliance.
‘OFF’ position
‘SPARK’ position
‘LOW’ position
‘HIGH’ position
3
3.0
4.0
5.0
CLEANING
Before carrying out any of the following operations, ensure that the appliance is OFF and completely
cold.
GLASS PANEL : This can be cleaned with a suitable glass cleaner, or propriety ceramic hob cleaner.
Test on a small area first.
PAINTED AREAS : These can be dusted or cleaned using a dry cloth.
LIMESTONE SURFACES : Remember that limestone is porous and therefore susceptible to marking in
use. The limestone frame may be cleaned with a small amount of warm soapy water. Any stubborn
stains may be removed with a diluted liquid domestic bleach and water solution. Superficial scratches
or stubborn surface stains can be smoothed out using a fine grade wet & dry sandpaper. Joints may be
grouted using a matching tile grout. The limestone frame may be sealed with an appropriate stone seal-
er (consult the retailer). This will give some protection against staining such as red wine, tea or coffee,
but may darken the stone slightly.
GRANITE SURFACES : In everyday use, a soft lint-free duster should be used to keep the granite
clean. Other marks , such as finger-prints may be removed from the granite frame by using proprietary
window-glass cleaner, or NET-TEX Hard Surface Cleaner.
MIRROR SURFACES : Handle the Mirror frame with great care as the mirrored material can be
scratched. Use only a damp microfibre cloth to clean and another microfibre cloth to dry. DO NOT use
dirty cloths or abrasive cleaners, as this may scratch the surface beyond repair.
SERVICING
The appliance should be checked on an annual basis to ensure it is working safely and that there is
no excessive build up of soot. The frequency of service will depend on usage, but MUST be carried
out at least once annually. Servicing must be carried out by a competent person, such as a CORGI
registered installer.`
The Installation instructions carry full servicing details for the use of the installer.
LIST OF SPARE PARTS
PART NO. ITEM PART NO. ITEM
F960003 1000 Glass Panel Assy F730023 Pilot Assembly NG
F920020/1 Wide Front Glass TRAY 1000 1000 Burner Tray NG
F920020/2 Side Glass x 2 TRAY Wide Wide Burner Tray NG
F730005 Gas Valve TRAY 1000 L 1000 Burner Tray LPG
F940136 Seal Kit for Catalyst TRAY Wide L Wide Burner Tray LPG
F780079 Catalyst F730048 Pilot Assembly LPG
XF-WSL Widescreen Limestone Frame XF-1000L 1000 Limestone Frame
XF-WSG Widescreen Granite Frame XF-10000G 1000 Granite Frame
XF-WSM Widescreen Mirror Frame XF10000M 1000 Mirror Frame
As our policy is one of continuous improvement and development , we hope therefore you will understand we must retain the right to amend details and/or
specifications without prior notice.
4
6.0
7.0
8.0
DO 005650/0
  • Page 1 1
  • Page 2 2
  • Page 3 3
  • Page 4 4
  • Page 5 5
  • Page 6 6
  • Page 7 7
  • Page 8 8
  • Page 9 9
  • Page 10 10
  • Page 11 11
  • Page 12 12
  • Page 13 13
  • Page 14 14
  • Page 15 15
  • Page 16 16

Focal Point X-Fire Widescreen & 1000 User manual

Category
Fireplaces
Type
User manual

Ask a question and I''ll find the answer in the document

Finding information in a document is now easier with AI