Page is loading ...

This product is produced in accordance with Toy safety Directive 2009/48/EC
of the European Parliament and the Council, Regulation regarding Essential
Requirements and Conformity Assessment of Toys, Regulation regarding
Conformity Marking and the standards applicable for this toy.
PLEASE READ CAREFULLY THIS INSTRUCTION MANUAL
AND KEEP IT IN A SAFE PLACE FOR FUTURE REFERENCE!
KIDS’ TOY BATTERY OPERATED
MOTORCYCLE
OFF ROAD

1
CAUTION! WARNINGS!
FOLLOW ALL WARNINGS, INSTRUCTIONS AND RECCOMENDATIONS IN
THIS MANUAL IN ORDER TO GUARANTEE THE SAFE USE OF THIS PRODUCT:
• USE ONLY UNDER DIRECT ADULT SUPERVISION! NEVER LEAVE THE CHILD UNATTENDED!
• THE TOY IS NOT SUITBALE FOR CHILDREN UNDER 3 YEARS!
• THIS TOY HAS NO BRAKES!
• DO NOT OVERLOAD THE TOY! TOY CAN ASSURE SAFETY ONLY WITH MAXIMUM CHILD’S
WEIGHT UP TO 30 KG.!
• THIS PRODUCT IS NOT A TRANSPORT MEANS!
• DO NOT USE ON ROAD LANES!
• KEEP AWAY FROM FIRE!
• CHECK IF ALL PARTS ARE IN GOOD ORDER BEFORE EACH USE. PAY SPECIAL ATTENTION
TO THE ELECTRIC CURCUIT, ALL ELECTRIC PARTS, CABELS AND SWITCHES.
• Use for a child aged 3 to 8 years!
• This toy must be used with raised attention! Some skills are required in order to avoid clashes, falls
or injuries to the child in the car or third parties!
• The toy should not to be used by two children simultaneously!
• Adult assembly is required!
• The child must wear shoes when using the toy! It is recommended to wear a helmet.
• DO NOT allow the child using the TOY or other children around it to touch the wheels or put items
in them!
• To be used only during the day and at places with strong light!
• Do not allow the child to stand in the car during movement! This could lead to injury to the child!
• Ifyoundunglueddecalorsticker,youmustglueorremoveitinordertoavoidtheriskofswallowing!
• Donotusetheproductifyoundmissingordamagedparts!
• Use only spare parts, which are approved by the producer and recommended by the distributor
orcompanyservice!Theproducerrevokesallresponsibilityincasepartsdierentfromtheoriginal
ones have been used.
• DonotmakechangesormodicationstotheTOY!Ifnecessary,contacttheretaileroranauthorized
service center for advice and repair.
• Do not make changes to the electric circuits or add other electric parts! If necessary, contact
theretaileroranauthorizedservicecenterforadviceandrepair.
• Use the product only for its purpose!
• DO NOT allow presence of children under 3 years before assembly of the TOY is complete.
In this way, you will avoid their access to small or loose parts!
• Donotattachstringsorcordsinordertoavoidtheriskofsuocation!
• Use only on even, safe playgrounds located at safe distance from road lanes!
• Do not use the product near stairs, escalators, curbs, swimming pools, heat sources!
• Keepnylonpackagesawayfromchildrentoavoidriskofsuocation!

2
WARNINGS AND GUIDELINES FOR USE OF RECHARGABLE BATTERIES!
IN ORDER TO AVOID CAUSING FIRE, ELECTRIC SHOCK, EXPLOSION OR PERMANENT
DAMAGE TO THE PRODUCT, YOU MUST FOLLOW THESE GUIDELINES:
• ONLY ADULTS SHOULD CHARGE THE BATTERY!
• Usethebatteryandchargerincludedinthisset.Donotusebatteriesandchargersofdierenttype.
Do not use batteries and chargers from other similar products.
• Never modify the electric circuits.
• Do not allow close contact of the battery terminals (short circuit).
• The battery and its components should be kept dry.
• During charging of the battery, explosive gases are released. Do not charge near heat sources
andammablematerials.ChargethebatteryONLYindryandwell-ventilatedplaces.
• NEVERliftormovethetoybyitscablesorchargercord.Thismaydamagethebatteryorcausere.
• IMPORTANT! Always wash your hands after touching the battery. The rechargeable batteries contain
lead and lead compounds, which may lead to cancer on the reproductive organs.
• Do not open the battery. It contains lead acid and other substances which are corrosive and toxic.
• Do not disintegrate the charger. The cable inside may cause electric shock.
• NEVER allow a child to hold or charge the battery. The battery is heavy and contains electrolyte.
• Do not drop or hit the battery. This may cause serious injuries.
• Before charging the battery, check if it is damaged and if cables and charger look intact.
In case you notice any damage or wear, do not charge the battery.
• Do not allow the battery to deplete completely. If not used, batteries must be charged once in a month
in order to keep their cell charge.
• When charging the battery, it must be even and not tilted.
• Alwaysxthebatterywell.Incasethetoytipsover,thebatterymayfalloutandinjurethechild.
• NEVER allow children to play with the charger or the battery.

3
MAIN FEATURES
Suitable age 3-8years
Maximum loading Up to 30 kg
Battery, 1 piece 6V/4.5 AH
Motor, 1 pieces 1*25W
Speed 3 km/h
Charger Input:110-240V,50/60Hz
Output: 6V DC 500mA
Battery charging time:
– First charging
– Next charging
8-12hours
8 hours
Fuse, 1 piece 5А
Toy size, cm 82*52*58
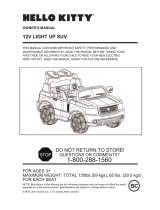
MAIN PARTS
1. Body
2. Steering bar, set
3. Rear wheel – 2 pcs.
4. Gris, set
5. Side mirrors (left and right)
6. Charger
7. Rear axis
8. Front axis
9. Mud guard
10. Foot rest
11. Rear console
12. Bolt for steering bar
13. Fasteners, set
14. Plastic brackets
15. Decorative covers
1
2
33
4
4
5
6
7
8
9
10
11
12
13
14
15

4
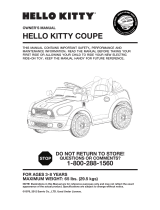
INSTALLING OF FRONT AND REAR WHEELS
CONNECTING THE BATTERY
1. Thread the rear axis through the corresponding slot at body of motorcycle.
2. Place the rear wheels onto the axis at both sides.
3. Place the washers (a) at both sides of rear axis.
4. Fix with nuts (b) at both sides.
5.Installwithpressurethedecorativecovers(c)atrearwheels.Byxingyouwillhearaclicksound.
"click"
(a)
(b) (c)
(d)
12 3
4
67
5
IMPORTANT! FOLLOW EXACTLY THE GUIDELINES AND THE SEQUENCE OF STEPS FOR
PRODUCT ASSEMBLY AND USE WHICH YOU WILL FIND IN THE FIGURES IN THIS MANUAL.
CAUTION! FIXING IN CERTAIN POSITION IS MOST OF THE TIMES ACCOMPANIED WITH A CLICK!
CAUTION! CHECK THE SECURE FIXING AFTER EACH OPERATION!
CAUTION!Beforeassemblyoftheproduct,turnothepowersupply(OFF)ofthetoy!
Needed tools: screwdriver (not included).
ASSEMBLY GUIDE

5
INSTALLING THE STEERING BAR SET
INSTALLING MUD GUARDS
15. Thread the mud guard through the tubes of steering bar.
16.Fixatbothsideswithscrewsasshowninthegure.
6. Untighten the screws and remove the seat from the body.
7. Remove the white cover (d) from battery.
8.Jointhecablewiththebatteryasshowninthegure.
9.Placetheseatbackatthebodyandxwiththescrews.
10. Joi the steering bar cable with the motorcycle cable.
11. Place the steering bar to the body, so both slots of steering bar match the slot at the body.
12. Thread the bolt through the slot.
13. Place washer (i) in down ending.
14. Fix with nut (f).
8
10 11 12
13 14
15 16
9
(f)
(i)

6
17. Place the front wheel between the tubes at fork, so that the slot at wheel matches the slots at fork.
18. Thread the front axis through the slot at wheel and fork.
19. Place one washer (g) at both sides of axis.
20. Fix with nuts at both sides.
21. Join the connectors of cables from toy and foot rest with the pedal.
22.Installthefootreststothebodyoftoy,asshowninthegure.
23. Place the side mirrors (e) at both sides of the steering bar.
24. Fix with a screw each of the mirrors.
25.Insertthegrisatbothsidesonsteeringbars.
INSTALLING THE FRONT WHEELS
INSTALLING THE FOOT RESTS
INSTALLING THE SIDE MIRRORS AND GRIFFS
17 18
19 20
21 22
23 24 25
(g) (h)
(e)
"click"

7
INSTALLING THE REAR CONSOLE
CHARGING THE BATTERY
Place the console in rear part of body and press
insideuntilitisxed.
If the motorcycle starts to move slower, it is time to recharge the battery. In order to recharge the battery,
it is not necessary to remove it from the toy.
IMPORTANT!BeforechargingthebatteryALWAYSturno(OFF)thepowersupplyofthetoy!Battery
charging must be done only by an adult! Battery and its charger must be kept in place inaccessible to
children! Children must not touch the battery or its charger!
•Beforetherstusethebatterymustbechargedfor8-12hours.
• After each use or once a month, charge the battery for 8 hours.
• During battery charging, the charger may become hot, which is normal and you should not
be worried.
• To charge the battery you must use only the charger provided by the manufacturer.
• If you notice smoke, odor, sound or some other unusual happening, stop the charging and contact
yourauthorizeddealer.
Charging plug of the toy is located aside the body of
toy under the seat.
Open the cover at charger jack. Plug the charger in
motorcycle’s input.
Plug the charger in the wall power outlet. The bat-
tery will start charging.
Motorcycle is assembled.
26

Use only on even surfaces! DO NOT use on grass!
8
1
3
2
4
5
6 7 8 9 10
1. Power supply switch
2. FORWARD/STOP/REARWARD motion switch
3. Musical panel
FORWARD motion of toy
Set the button FORWARD/STOP/REARWARD (2) in position FORWARD ( ).
Press the pedal. Motorcycle will move forwards.
STOP the motion of toy
Set the button FORWARD/STOP/REARWARD (2) in position STOP (Stop ).
Release the pedal.
REARWARD motion of toy
Set the button FORWARD/STOP/REARWARD (2) in position REARWARD ( ).
Press the pedal. Motorcycle will move rearwards.
FOR BATTERY REPLACEMENT, YOU MUST CONTACT
THE DEALER OR AN AUTHORIZED SERVICE.
FUNCTIONS AND USAGE OF THE MOTORCYCLE
The battery loses some of its charge over time. Depending on it use, it can function
between 1 and 3 years.

9
MUSICAL PANEL
4.USBinterface:ItplaysaudiolesonlyinMP3format.
5. Display for battery charging.
6.MP3jack:ItplaysaudiolesonlyinMP3format.
7. Horn button: By pressing this button a horn sound will play; by holding the button you can lower
the sound level.
8. Button for play and stop of melodies.
9. Button to switch melodies by pressing. By holding the button you can increase the sound level.
7. Button for mode changing.
This toy is equipped with one fuse 5A, located under the seat. If the motor, electric system and battery
are overloaded, the fuse will turn o the power of the toy. After 15-20 seconds the fuse will re-start
automatically, power will be restored and the toy will function normally. If during normal use the fuse is
turningomultipletimes,please,contactthemanufacturerorauthorizeddealer.Inordertopreventfuse
turningoyoumustfollowtheserecommendations:
• Do not overload the toy! Maximum load must be 30kg.
• Do not attach any trailers to the motorcycle.
• Do not wet the motorcycle or its electric components.
• Do not change the electric scheme.
FUSE
4
5
6 7 8 9 10

10
TROUBLE SHOOTING
If you need assistance, please, contact the authorized dealer or manufacturer!
PROBLEM PROBABLE CAUSE PROBLEM SOLUTION
MOTORCYCLE
DOES NOT MOVE
Battery is exhausted
Charge the battery.
After each use or once a month,
charge the battery for 8-12
hours, but no more than 16
hours.
Thefuseisturnedo Look „FUSE”
Plugs or connectors are loose Check if the battery plugs are
well connected and not loose.
Battery has lost its
ability to hold charge
Replace the battery with a new
one.
Contact the authorized dealer
or service.
Electric system is damaged Contact the authorized dealer
or service.
Motor is damaged Contact the authorized dealer
or service.
MOTORCYCLE WORKS
FOR SHORT TIME
Battery is not fully charged Check if the battery plugs are
well connected and not loose.
Battery is old
Replace the battery with a new
one.
Contact the authorized dealer
or service.
MOTORCYCLE IS
MOVING SLOWLY
Battery has low charge
Replace the battery with a new
one.
Contact the authorized dealer
or service.
Battery is old
Replace the battery with a new
one.
Contact the authorized dealer
or service.
Toy is overloaded Maximum load is up to 30 kg.
Toy is used under
bad conditions
Do not use the toy under bad
conditions
(See „Care and maintenance”)
“Deadzone”ofthemotor
“Dead zone” of the toy means
that electricity does not reach
the connectors and toy needs
a repair.
Contact the authorized dealer
or service.

11
BATTERY DOES
NOT CHARGE
Plugs or connectors are loose Check if the cables or plugs are
correctly connected.
The charger is not
plugged in a wall outlet Check if charger is plugged.
The charger does not work Contact the authorized dealer
or service.
CHARGER BE-
COMES VERY HOT
DURING CHARGING
This is normal and you
should not worry.
CARE AND MAINTENANCE
• Periodically check the plastic parts for cracks or damages.
• Oil regularly the moving parts.
• Clean the toy with soft cotton cloth or sponge with water or mild detergent.
• Do not use aggressive detergents, containing abrasive particles, ammonia, bleach or spirits.
• Store the product in clean and dry place indoors. Do not expose to direct sunlight, moisture or
harsh weather!
• Do not use the product on muddy, sandy or gravel surfaces – this could damage the moving parts.
• For security reasons, when transporting or storing the battery, the product must be in its usual position
(not upside down) – the battery contains electrolyte.
Used materials: plastic, metal.
ELMOR024xxxx/ HZBB-1188F

Manufacturer: Made for Chipolino Ltd in China.
Importer: Chipolino Ltd, Bulgaria, Plovdiv,
Golyamokonarskoshosse№1;tel.+35932600889
tel.:+35932600889
www.chipolino.com
/