Page is loading ...

CN2300
Graphical 1/4 DIN
Profiler and Recorder
e-mail: [email protected]
For latest product manuals:
omegamanual.info
Shop online at
omega.com
®
User’s Guide
®
MADE IN UNITED KINGDOM
M5113/1012
It is the policy of OMEGA Engineering, Inc. to comply with all worldwide safety and EMC/EMI regulations that apply. OMEGA is constantly pursuing certification of its
products to the European New Approach Directives. OMEGA will add the CE mark to every appropriate device upon certification.
The information contained in this document is believed to be correct, but OMEGA accepts no liability for any errors it contains, and reserves the right to alter specifications without notice.
WARNING: These products are not designed for use in, and should not be used for, human applications.
WARRANTY/ DISCLAIMER
OMEGA ENGINEERING, INC. warrants this unit to be free of defects in materials and workmanship for a period of 13 months from date of
purchase. OMEGA’s WARRANTY adds an additional one (1) month grace period to the normal one (1) year product warranty to cover
handling and shipping time. This ensures that OMEGA’s customers receive maximum coverage on each product.
If the unit malfunctions, it must be returned to the factory for evaluation. OMEGA’s Customer Service Department will issue an Authorized Return
(AR) number immediately upon phone or written request. Upon examination by OMEGA, if the unit is found to be defective, it will be repaired or
replaced at no charge. OMEGA’s WARRANTY does not apply to defects resulting from any action of the purchaser, including but not limited to
mishandling, improper interfacing, operation outside of design limits, improper repair, or unauthorized modification. This WARRANTY is VOID if
the unit shows evidence of having been tampered with or shows evidence of having been damaged as a result of excessive corrosion; or current,
heat, moisture or vibration; improper specification; misapplication; misuse or other operating conditions outside of OMEGA’s control.
Components in which wear is not warranted, include but are not limited to contact points, fuses, and triacs.
OMEGA is pleased to offer suggestions on the use of its various products. However, OMEGA neither assumes responsibility for any
omissions or errors nor assumes liability for any damages that result from the use of its products in accordance with information
provided by OMEGA, either verbal or written. OMEGA warrants only that the parts manufactured by the company will be as specified
and free of defects. OMEGA MAKES NO OTHER WARRANTIES OR REPRESENTATIONS OF ANY KIND WHATSOEVER, EXPRESSED OR
IMPLIED, EXCEPT THAT OF TITLE, AND ALL IMPLIED WARRANTIES INCLUDING ANY WARRANTY OF MERCHANTABILITY AND
FITNESS FOR A PARTICULAR PURPOSE ARE HEREBY DISCLAIMED. LIMITATION OF LIABILITY: The remedies of purchaser set forth
herein are exclusive, and the total liability of OMEGA with respect to this order, whether based on contract, warranty, neglige
nce,
indemnification, strict liability or otherwise, shall not exceed the purchase price of the component upon which liability is based. In no
event shall OMEGA be liable for consequential, incidental or special damages.
CONDITIONS: Equipment sold by OMEGA is not intended to be used, nor shall it be used: (1) as a “Basic Component” under 10 CFR 21 (NRC),
used in or with any nuclear installation or activity; or (2) in medical applications or used on humans. Should any Product(s) be used in or with any
nuclear installation or activity, medical application, used on humans, or misused in any way, OMEGA assumes no responsibility as set forth in our
basic WARRANTY/ DISCLAIMER language, and, additionally, purchaser will indemnify OMEGA and hold OMEGA harmless from any liability or
damage whatsoever arising out of the use of the Product(s) in such a manner.
OMEGAnet
®
Online Service Internet e-mail
omega.com [email protected]
RETURN REQUESTS/INQUIRIES
Direct all warranty and repair requests/inquiries to the OMEGA Customer Service Department. BEFORE RETURNING ANY PRODUCT(S) TO
OMEGA, PURCHASER MUST OBTAIN AN AUTHORIZED RETURN (AR) NUMBER FROM OMEGA’S CUSTOMER SERVICE DEPARTMENT (IN
ORDER TO AVOID PROCESSING DELAYS). The assigned AR number should then be marked on the outside of the return package and on any
correspondence.
The purchaser is responsible for shipping charges, freight, insurance and proper packaging to prevent breakage in transit.
FOR WARRANTY
RETURNS, please have the following
information available BEFORE contacting OMEGA:
1. Purchase Order number under which the product was
PURCHASED,
2. Model and serial number of the product under warranty, and
3. Repair instructions and/or specific problems relative to the
product.
FOR NON-WARRANTY REPAIRS,
consult OMEGA for current repair
charges. Have the following information available BEFORE contacting
OMEGA:
1. Purchase Order number to cover the COST of the repair,
2. Model and serial number of the product, and
3. Repair instructions and/or specific problems relative to the
product.
OMEGA’s policy is to make running changes, not model changes, whenever an improvement is possible. This affords our customers the latest in technology and
engineering. OMEGA is a registered trademark of OMEGA ENGINEERING, INC.
© Copyright 2012 OMEGA ENGINEERING, INC. All rights reserved. This document may not be copied, photocopied, reproduced, translated, or reduced to any
electronic medium or machine-readable form, in whole or in part, without the prior written consent of OMEGA ENGINEERING, INC.
Servicing North America:
U.S.A.: Omega Engineering, Inc., One Omega Drive, P.O. Box 4047
ISO 9001 Stamford, CT 06907-0047 USA
Toll Free: 1-800-826-6342 TEL: (203) 359-1660
FAX: (203) 359-7700 e-mail: [email protected]
Canada:
976 Berar
Laval (Quebec), H7L 5A1, Canada
Toll-Free: 1-800-826-6342 TEL: (514) 856-6928
FAX: (514) 856-6886 e-mail: [email protected]
For immediate technical or application assistance:
U.S.A. and
Canada
Sales Service: 1-800-826-6342/1-800-TC-OMEGA
®
Customer Service: 1-800-622-2378/1-800-622-BEST
®
Engineering Service: 1-800-872-9436/1-800-USA-WHEN
®
Mexico/ TEL: 001 (203) 359-1660 FAX: 001 (203) 359-7700
Latin America:
e-mail: [email protected]
Servicing Asia:
China:
: 1698 Yi Shan Road, Unit 102
Min Hang District
Shanghai, China 201103 P.R.C.
Hotline: 800 819 0559/400 619 0559
e-mail: [email protected]
Servicing Europe:
Benelux
: Toll-Free: 0800 099 3344 TEL: +31 20 347 21 21
FAX: +31 20 643 46 43 e-mail: [email protected]
Czech Republic: Frystatska 184
733 01 Karviná, Czech Republic
TEL: +420-59-6311899 FAX: +420-59-6311114
e-mail: [email protected]
France: Toll-Free: 0800 541 038 TEL: 01 57 32 48 17
FAX: 01 57 32 48 18 e-mail: [email protected]
Germany/Austria:
Daimlerstrasse 26
D-75392 Deckenpfronn, Germany
Toll-Free: 0800 8266342 TEL: +49 (0) 7056 9398-0
FAX: +49 (0) 7056 9398-29 e-mail: [email protected]
United Kingdom:
OMEGA Engineering Ltd.
ISO 9001 Certified
One Omega Drive, River Bend Technology Centre, Northbank
Irlam, Manchester M44 5BD United Kingdom
Toll-Free: 0800-488-488 TEL: +44 (0) 161 777-6611
FAX: +44 (0) 161 777-6622 e-mail: [email protected]
Certified


5. OPERATION MODE –ADDENDUM
This section details changes to Operation Mode on units fitted with USB, Recorder
or Profiler options. These are in addition to the standard features and screens.
Refer to the Concise Product Manual for more information about these.
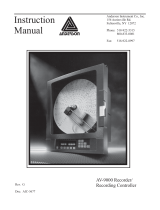
Normal Operation With Profile Progress
LED Indicators
LED Function Labels
Process Value & Setpoint
Engineering Units
Profile Progress Graph
Segment Progress Graph
Profile Status Indicator:
Profile Progress Screen
► Run, ▌▌ Held, ■ Stopped
Other screens show detailed Profile & Segment information, the status of the
Profile Event outputs and the Recorder status. If Enabled in Profiler Setup, the
user can also Run, Hold or Abort the selected profile and Start/Stop a data
recording in Operation Mode.
Manual Control
Depending on the Control Configuration settings, automatic or manual control can
be selected from the Auto/Manual selection screen, or via a digital input. Switching
to or from manual mode is via Bumpless Transfer. In Manual mode the Setpoint
display is replaced by a 0 to 100% power output level, labelled “Man”.
Press or to set the required manual power.
Note: Selecting Manual Control will cause a running profile to hold until
control is returned to automatic mode.
Caution: Manual power level is not restricted by the output power limits.
6. AUTOMATIC TUNING MODE
Engage Pre-Tune, Self-Tune or Auto Pre-Tune as required, from the Automatic
Tuning Menu. Pre-tune is a “single-shot” routine that disengages when complete.
Note: Automatic tuning will not engage if either proportional band is set to
On/Off control. Also, Pre-tune (inc. Auto Pre-Tune) will not engage if the
setpoint is ramping, a profile is running, or the Process Variable is <5% of
span from setpoint. If Auto Pre-Tune is selected, Pre-tune will attempt to run at
every power up. Refer to the full user guide (available from your supplier) for
details on tuning.
7. ADDITIONAL SCREEN SEQUENCES – USB, DATA RECORDER AND PROFILER VERSION
Note: This section provides supplementary information for the additional screen sequences relating to the options covered by this manual. This information should
be read in conjunction with the screen Sequences section of the Concise Product Manual.
The parameters displayed depend on how the instrument has been configured. After 2 minutes without key activity, most screens revert to the next higher menu level, until
reaching the base Operation Mode display. Screens marked persist unless changed by the user. Menus marked
= Require an un-lock code for access.
Screen Navigation
= Accept Value & Move Back = Next Item/Increment = Prior Item/Decrement = Accept Value & Move Forward + = Move Up One Menu Level
The symbols are showed to the right of the lists when more menu options are available above
or below
.
MAIN MENU OPTIONS
Select required Menu Option from list. Press to continue . - Press + to move from Operation Mode to Main Menu
Additional Operation Mode Screens and Options:
Calibration Check Due Warning
If a Calibration Reminder is set, and the due date has passed. - if enabled in Control Configuration. Recorder version only.
Base Operating Screen.
Bar Graph = Primary/Secondary Power; Control Deviation or Recorder Memory Use. - see Bar Graph Format screen.
Event Status
Active / inactive status of all configured Events - Profiler version only.
Profile Operating Screen.
Profile Bar Graph = Profile name & overall progress and Current segment number and progress; plus Running/Held/Stopped indicator.
Profile Control
If a profile is running, from: Do Nothing; Abort Profile (end immediately); Jump to Next Profile Segment; Hold Profile or Release Hold
If no profile running, from: Do Nothing; Run Profile or End Profile Control (returns to std. controller operation). - if enabled in Profile Control Menu.
Profile Information
Profile Status (Running, Held, Aborted, Ended); Profile Time Remaining, Cumulative Held Time; Cycles Completed & Sequences Completed
Segment Information
Current segment number and type (Ramp Up, Ramp Down, Dwell, or End); Segment Time Remaining, Loops completed if loop-back active.
Recorder Memory Full Warning
Warns if recording has stopped after the memory is used up – only seen if recording mode is Record Until Memory Used
Start/Stop Data Recording
Manually Stop, or Start a new recording. – if Recorder Log Trigger is Operator Start/Stop.
Recorder Status Information
Shows if a recording is in progress; the recording mode; memory usage per sample; memory remaining and approximate recording time remaining.
Refer to the Concise Product Manual for information about the standard screens.
Setup Wizard:
Refer to the Setup Wizard section of the Concise Product Manual for more information.
Supervisor Mode:
Refer to the Supervisor Mode section of the Concise Product Manual for more information.
Configuration Menu:
Configuration Mode Unlocking
Enter correct code number to access Configuration Mode. Default Value = 10
Configuration Options
Select required Configuration Menu Option from list. Press to continue.
Refer to the Additional Configuration Menu screens sequences opposite for information about the Configuration Sub-Menus.
Automatic Tuning Menu:
There are no additional screens for these features. Refer to the Concise Product Manual for more information about this menu.
Profile Setup Menu:
General Profile Configuration:
Global Settings that apply to all profiles
Profile Setup Menu Unlocking
Enter correct code number to access the Profile Setup Menu. Default Value = 10
General
Profile Run/Hold Signal
Selects the method used to Run or Hold a profile. From: Digital Input A; Digital Input B or Key Pad Only.
Profile Abort Signal
Selects the method used to force a profile to end immediately. From: Digital Input A; Digital Input B or Key Pad Only.
Control In Operation Mode
Enables/disables the ability to control profiles (run, hold or abort) from Operation Mode.
Enable Edit While Running
Enables/disables the ability to edit profiles whist a profile is running (current or next segment will not change until after profile is restarted).
Create A Profile
Creates a new profile. A warning is displayed if the maximum number of 64 profiles or 255 segments is exceeded.
Profile Header Details
Enter Profile Name
Up to 16 characters can be used to name each profile
Profile Starting Point
The setpoint value to be used at the beginning of the first segment. From: Actual Setpoint or Process Variable value at the time the profile starts.
Profile Start Trigger
From: None (profile start is not delayed); After Delay or Day and Time (Recorder version only).
Profile Start Time
The time (hh:mm:ss) when the profile should run. – if Day and Time is the Profile Start Trigger. Caution: Take care not to clash with other profiles.
Profile Start Day(s)
Day(s) when the profile should run. From: Mon; Tue; Wed; Thu; Fri; Sat; Sun; Mon-Fri; Mon-Sat; Sat-Sun or All. – if Day and Time is the Trigger.
Profile Start Delay
The delay time, up to 99:59 (hh:mm), for a profile to begin after the start request has been given.
Profile Recovery Method
Power-on action if profile was running at power-down (e.g. a power cut), or following correction of a signal break. From: Control outputs off;
Restart profile; Maintain last profile setpoint; Use controller setpoint; Continue profile from where it was when power failed.
Profile Recovery Time
Recovery Method ignored (profile continues from where power failed), if power off for less than this time. Max 99:59 (hh:mm). - Recorder only.
Profile Abort Action
Action after profile is forced to stop before it’s end. From: Control outputs off; Maintain last profile setpoint or Use controller setpoint.
Profile Cycles
The number of times the program should run each time it is started (1-9999 or Infinite).
Profile Segment Details
Segment Number
Shows the number of the profile segment being created from 1-255
Segment Type
From: Ramp Time (time to reach target SP); Ramp Rate (rate of change towards target SP); Step (jump to target SP), Dwell (keep current SP);
Hold (hold profile until released); Loop (back to previous segment); Join (join to another profile); End (end the profile) or Repeat Sequence Then
End.
Segment Target Setpoint
The setpoint value to be reached by the end of this segment if type is Ramp Time, Ramp Rate or Step.
Segment Ramp Time
The time (hh:mm:ss) to reach the Segment Target Setpoint if segment type is Ramp Time.
Segment Ramp Rate
The rate of change towards the Segment Target Setpoint if segment type is Ramp Rate. The rate can be set from 0.001 to 9999.9 units per hour.
Segment Dwell Time
The time (hh:mm:ss) to maintain the current setpoint.
Segment Loop
Enter the segment to loop back to, and the number of times to loop back, before continuing forward to the next segment. No 2 Loops can cross.
Segment Auto-Hold Type
From: None (no auto-hold); Above Setpoint (hold if too high only); Below Setpoint (hold if too low only) or Band (hold if too high or low).
Segment Auto-Hold Band Value
The distance from setpoint beyond which the profile is held. The profile continues once the process is back within this band.
Segment Hold Release Type
From: Digital Input A; Digital Input B; Front Keys or Time Of Day. (Time of day on Recorder version only )
Hold Release Time
The time of day (hh:mm:ss) when a Hold Segment will release if Release Type is Time Of Day. Release occurs at the next occurrence of this time.
Times To Repeat Sequence
The number of times the entire sequence of profiles should run. – if the last segment is Repeat Sequence Then End.
Segment End Type
Action after profile ends. From: Control outputs off; Maintain last profile setpoint; Use controller setpoint.
Select Profile To Join
Choose a profile to join to from the list provided. This profile will start immediately the current profile ends. – if the last segment is Join.
Segment Events
Select the events to be active during this segment. For end segments, Active events stay on until the unit exits profiler mode or a new profile runs.
Edit A Profile Header
Choose the profile to be edited from the list of names is provided – For profile header details see “Create A Profile” above.
Edit A Profile Segment
Choose the profile, then the segment to be edited from the lists provided – For profile segment details see “Create A Profile” above.
Insert A Segment
Choose the profile, then the new segment’s position from the lists provided – For profile segment details see “Create A Profile” above.
Delete A Segment
Choose the profile, then the segment to be deleted from the lists provided. End, Join or Repeat segments cannot be deleted.
Delete A Profile
Choose the profile to be deleted from the list of names is provided. The user is then prompted confirm that it should be deleted.
Delete All Profiles
Deletes all profiles from memory. The user is prompted to confirm that all profiles should be deleted. Caution: Use with care!
Profile Control Menu:
Profile Control Menu Unlocking
Enter correct code number to access the Profile Control Menu. Default Value = 10
Profile Control
If a profile is running, choose from: Do Nothing, Abort Profile (end immediately); or Jump to Next Profile Segment, Hold Profile or Release Hold
If no profile running, choose from: Do Nothing, Run Profile or End Profile Control (Return to normal controller operation).
Select Profile To Run
Choose the profile to run from the list of names is provided. The profile name and run status is then confirmed.
Continued….
MAIN MENU OPTIONS
(Continued)
USB Menu:
USB Mode Unlocking
Enter correct code number to access USB Menu. Default Value = 10
Read/Write To USB Device?
From: Read/Write Configuration File; Read/Write Profile File or Write Recorder Log File.
Write
Select Profile To Write
If writing a profile to the USB Memory Stick, choose a profile to write from the list provided.
Enter A File or Folder Name
Enter an 8-character folder name for logs, or a file name for configurations and profiles. An extension (bct for configurations, .pfl for profiles) is added
automatically . Caution: Existing files/folders with the same name will be over-written.
Writing Profile/Configuration File
The file is being written. Caution: Do not disconnect USB device until completed! Data loss or corruption may result.
Transfer Successful
Confirmation of successful data transfer. Press to continue
Read
Select File
Select the Configuration or Profile file to transfer from the USB stick. Caution: A configuration read overwrites all existing instrument settings.
Reading Profile/Configuration File
The file is being read. Caution: Do not remove the memory stick whist this operation is in progress. Data loss or corruption may result.
Transfer Successful
Confirmation of successful data transfer. Press to continue
Transfer Failure
For write failures, check the disk space on the USB stick. For read failures, check the maximum number of profiles/segments is not being exceeded.
Recorder Menu:
Recorder Mode Unlocking
Enter correct code number to access Data Recorder Menu. – if Log Trigger is Recorder Menu Start/Stop. Default Value = 10
Recording In Progress Warning
If recording in progress when Recorder Menu entered. - Access to the Start/Stop or Abort screens only until the recording is stopped.
Start/Stop Data Recording
Manually Stop, or Start a new recording. – if Log Trigger is Recorder Menu Start/Stop.
Abort Recording
Forces a recording to Stop, overriding the selected record trigger. – if Log Trigger is During Alarms; Digital Input A or B; or During Profile.
Recorder Status Information
Shows if a recording is in progress; the recording mode; memory usage per sample; memory remaining and approximate recording time remaining.
Delete Recording
Clears the recorder memory. Caution: Permanently removes All recorded data.
Product Information Mode:
There are no additional screens for these features. Refer to the Concise Product Manual for more information about this menu.
Service Information Mode:
There are no additional screens for these features. Refer to the Concise Product Manual for more information about this menu.
ADDITIONAL CONFIGURATION MENU OPTIONS
Output n Events
w
Direct or reverse acting for Profile Run or End; Event 1; 2; 3; 4; 5 or Logical AND of Event n & Alarm n . - Profiler version only
Select Configuration Options from list. Press to continue. - Press + to move back to Main Menu
Input Configuration - Additional Options:
Calibration Reminder
Enable/Disable
Enables/disables the Calibration Reminder at start-up (and daily thereafter), if the due date has passed - Recorder version only
Calibration Reminder Due Date
Sets the due date for Calibration Reminder - Recorder version only
Refer to the Concise Product Manual for information about the standard screens.
Control Configuration:
There are no additional Control Configuration options. Refer to the Concise Product Manual for information about the standard screens.
Output Configuration - Additional Screens:
Output n Events
Direct or reverse acting for Profile Run or End; Event 1; 2; 3; 4; 5 or Logical AND of Event n & Alarm n . - Profiler version only
Refer to the Concise Product Manual for information about the standard screens.
Alarm Configuration:
There are no additional Alarm Configuration options. Refer to the Concise Product Manual for information about the standard screens.
Communication Configuration:
There are no additional Communication Configuration options. Refer to the Concise Product Manual for information about the standard screens.
Recorder Configuration:
No Recorder Warning
If the Recorder Configuration menu is entered on an instrument without this option.
Recording In Progress Warning
If recording in progress when Recorder Configuration entered. - Access to the Start/Stop or Abort screens only until the recording is stopped.
Recording Mode
Record Until Memory Used (Stop recording when full) or Continuous FIFO (First In - First Out - overwrites oldest data when full).
Caution: A FIFO recording will overwrite all previous recordings in memory. Download the data to USB memory stick before selecting this option.
Recording Sample Interval
From: Every 1; 2; 5; 10; 15; 30 Seconds, or Every 1; 2; 5; 10; 15; 30 Minutes.
Recorder Trigger
The recording Start/Stop trigger method. From: Operation Mode; Recorder Menu; On Alarm; Digital Input A or B state; or During Profile.
Trigger On Alarms
Any from: Alarm n – Where n is alarms 1 to 5. Any combination of these can be set to trigger (TRG) or not (OFF).
Values To Record
Any from: Process Variable value; Maximum or Minimum PV (since previous sample); Setpoint; Primary Power or Secondary Power.
Events To Record
Any from: Alarm n Status or Unit On/Off. Note: An alarm state change between samples is also recorded. This uses additional recorder memory.
Profiler Events To Record
Any from: Profiler Event n Status. Note: A profile event state change between samples is also recorded. This uses additional recorder memory.
Recorder Status Information
Shows if a recording is in progress; the recording mode; memory usage per sample; memory remaining and approximate recording time remaining.
Clock Configuration:
Date Format
w
The format used for displayed dates: dd/mm/yyyy (Day / Month / Year) or mm/dd/yyyy (Month / Day / Year). – Recorder versions only.
Set Date
w
Sets the internal clock Date. – Entered in the format defined by Date Format screen. – Recorder versions only.
Set Day Of Week
w
Sets the day of week used by the internal clock. – Recorder versions only.
Set Time
w
Sets the internal clock Time. - In hh:mm:ss (Hours : Minutes : Seconds) format. – Recorder versions only.
Display Configuration:
Bar Graph Format
The type of bar graph to display in the main Operation Mode screen. From: PID Power; Control Deviation or % Recorder Memory Use.
Lock Code Configuration:
Lock Code View 2
View and edit the USB Menu; Recorder Menu; Profiler Setup Menu and Profiler Control Menu Lock Codes (1-9999 or OFF) - if fitted.
Reset To Defaults:
There are no additional options for Reset To Default. Refer to the Concise Product Manual for information about the standard screens.
/