Zebra Technologies ZT400 User manual

Category
Label printers
Type
User manual

Zebra Technologies ZT400 streamlines your printing operations with its intuitive control panel, comprehensive connectivity options, and adaptable media handling capabilities. Its user-friendly interface simplifies navigation and configuration, enabling seamless integration into your workflow. Unleash versatile printing applications with support for direct thermal and thermal transfer printing methods, catering to a wide range of label materials.

Zebra Technologies ZT400 streamlines your printing operations with its intuitive control panel, comprehensive connectivity options, and adaptable media handling capabilities. Its user-friendly interface simplifies navigation and configuration, enabling seamless integration into your workflow. Unleash versatile printing applications with support for direct thermal and thermal transfer printing methods, catering to a wide range of label materials.

© 2014 ZIH Corp. All product names and numbers are Zebra
trademarks, and Zebra and the Zebra logo are registered
trademarks of ZIH Corp. All rights reserved.
P1060608-003
4/8/14
ZT400™ Series Quick Reference Guide
Use this guide to operate your printer on a daily basis. For more detailed information, refer to
the User Guide.
Printer Components
Figure 1 shows the components inside the media compartment of your printer. Depending on
printer model and the installed options, your printer may look slightly different. Familiarize
yourself with these components before continuing with the printer setup procedure.
Figure 1 • Printer Components
1
Media door
6
Printhead-open lever
2
Printhead pressure adjustment toggles
7
Ribbon take-up spindle
3
Control panel
8
Ribbon supply spindle
4
USB host port
9
Media supply hanger
5
Printhead assembly
10
Media supply guide
1
3
4
2
10
9
8
7
6
5
Control Panel
2
P1060608-003 ZT400™ Series Quick Reference Guide 4/8/14
Control Panel
The control panel (Figure 2) indicates the printer’s current status and allows the user to control
basic printer operation.
6
13
12
9
8
11
10
1 2 3 4 5
14 15 16
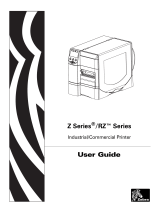
Figure 2 • Control Panel
7
1
STATUS light These indicator lights
show the current status
of the printer. For more
information, refer to the
User Guide.
2
PAUSE light
3
DATA light
4
SUPPLIES light
5
NETWORK light
6
The display shows the printer’s current status and
allows the user to navigate the menu system.
7
RIGHT SELECT
button
These buttons execute
the commands shown
directly above them in
the display.
8
LEFT SELECT button
9
The UP ARROW button changes the parameter
values. Common uses are to increase a value or to
scroll through choices.
10
The OK button selects or confirms what is shown
on the display.
11
The LEFT ARROW button, which is active only
in the menu system, navigates to the left.
12
The RIGHT ARROW button, which is active only
in the menu system, navigates to the right.
13
The DOWN ARROW button changes the
parameter values. Common uses are to decrease a
value or to scroll through choices.
14
The PAUSE button starts or stops printer operation
when pressed.
15
The FEED button forces the printer to feed one
blank label each time the button is pressed.
16
The CANCEL button cancels label formats when
the printer is paused.
Press once to cancel the next label format.
Press and hold for 2 seconds to cancel all label
formats.
3
Preparing the Printer for Use
4/8/14 ZT400™ Series Quick Reference Guide P1060608-003
Preparing the Printer for Use
After you have familiarized yourself with the printer components, prepare the printer for use.
To set up the printer, complete these steps:
1. Select a location for the printer that meets these conditions:
must be a solid, level surface of sufficient size and strength to hold the printer
must include enough space for ventilation and for accessing the printer components
and connectors
should be within a short distance of an appropriate power outlet that is easily
accessible
2. Unpack and inspect the printer. If necessary, report any shipping damage. For more
information, refer to the User Guide.
3. Place the printer in the preselected location.
4. Plug the female end of the A/C power cord into the A/C power connector on the back of
the printer.
Caution • When you are loading media or ribbon, remove all jewelry that could come into
contact with the printhead or other printer parts.
Caution • Before touching the printhead assembly, discharge any built-up static electricity
by touching the metal printer frame or by using an anti-static wriststrap and mat.
Preparing the Printer for Use
4
P1060608-003 ZT400™ Series Quick Reference Guide 4/8/14
5. Plug the male end of the A/C power cord into an appropriate power outlet.
6. Connect the printer to a computer using one or more of the available connections. The
standard connections are shown here. A parallel connection or a wireless connection may
also be available on your printer.
Internal wired Ethernet print server
Serial port
USB port
115 V AC
230 V AC
5
Preparing the Printer for Use
4/8/14 ZT400™ Series Quick Reference Guide P1060608-003
7. Raise the media door.
8. Load ribbon (if using Thermal Transfer mode) and media into the printer (see Load Media
and Ribbon on page 8).
9. Close the media door.
Preparing the Printer for Use
6
P1060608-003 ZT400™ Series Quick Reference Guide 4/8/14
10. To verify that the media and ribbon are loaded correctly, print a printer configuration
label.
a. Press and hold the
CANCEL button.
b. Turn on (
I) the printer.
If the media and ribbon are loaded correctly, a printer configuration label prints. A
sample label is shown here.
7
Preparing the Printer for Use
4/8/14 ZT400™ Series Quick Reference Guide P1060608-003
11. To test the connection between your printer and your computer, use a label design package
to create a sample label and send it to the printer. Zebra recommends ZebraDesigner Pro.
You can download this software from http://www.zebra.com/software and operate it in
Demo mode to print a sample label.
Load Media and Ribbon
8
P1060608-003 ZT400™ Series Quick Reference Guide 4/8/14
Load Media and Ribbon
Use the instructions in this section to load ribbon (if used) and media in Tear-Off mode.
Ribbon is used with thermal transfer labels. For direct thermal labels, do not load ribbon in the
printer. For instructions for loading fanfold media or for loading in different print modes, refer
to the User Guide.
To load ribbon and roll media in Tear-Off mode, complete these steps:
Load Media
1.
Caution • When you are loading media or ribbon, remove all jewelry that could come into
contact with the printhead or other printer parts.
Note • In some of the drawings that follow, the printer is shown without a ribbon system to
give you a better view of the components involved in media loading.
Caution • The printhead may be hot and could cause severe burns. Allow the
printhead to cool.
Open the printhead assembly by rotating the printhead-open lever.
9
Load Media and Ribbon
4/8/14 ZT400™ Series Quick Reference Guide P1060608-003
2. Remove and discard any tags or labels that are dirty or that are held by adhesives or tape.
3. Pull out the media supply guide as far as it goes.
4. Place the roll of media on the media supply hanger. Push the roll as far back as it will go.
Load Media and Ribbon
10
P1060608-003 ZT400™ Series Quick Reference Guide 4/8/14
5. Slide in the media supply guide until it touches the edge of the roll.
6. Slide the media guide all the way out.
11
Load Media and Ribbon
4/8/14 ZT400™ Series Quick Reference Guide P1060608-003
7. From the media hanger (1), feed the media under the dancer assembly (2), through the
media sensor (
3), and under the printhead assembly (4). Slide the media back until it
touches the inside back wall of the media sensor.
8. Slide in the media guide until it just touches the edge of the media.
1234
Load Media and Ribbon
12
P1060608-003 ZT400™ Series Quick Reference Guide 4/8/14
9. Which type of media did you load into the printer?
10. Push down the printhead assembly (1), and then rotate the printhead-open lever (2) until it
locks into place.
11. If necessary, press PAUSE to exit pause mode and enable printing.
Load Ribbon
12. Position the ribbon with the loose end unrolling as shown.
If you loaded... Then...
Direct Thermal media
Continue with step 10.
Thermal Transfer media
Continue with step 12.
Important • Use ribbon that is wider than the media to protect the printhead from wear.
Ribbon must be coated on the outside (refer to the User Guide for more information).
1
2
13
Load Media and Ribbon
4/8/14 ZT400™ Series Quick Reference Guide P1060608-003
13. Place the roll of ribbon on the ribbon supply spindle. Push the roll back as far as it will go.
14. Slide the ribbon under the printhead assembly, and then wrap it several turns around the
ribbon take-up spindle.
Load Media and Ribbon
14
P1060608-003 ZT400™ Series Quick Reference Guide 4/8/14
15. Push down the printhead assembly (1), and then rotate the printhead-open lever (2) until it
locks into place.
16. If necessary, press PAUSE to clear any errors and enable printing.
1
2
15
Load Media and Ribbon
4/8/14 ZT400™ Series Quick Reference Guide P1060608-003
Remove Used Ribbon
Remove used ribbon from the ribbon take-up spindle each time you change the roll of ribbon.
To remove used ribbon, complete these steps:
1. Has the ribbon run out?
2. While holding the ribbon take-up spindle, turn the ribbon release knob to the left until it
stops.
The ribbon release bars pivot down, easing the spindle’s grip on the used ribbon.
3. Slide the used ribbon off of the ribbon take-up spindle and discard.
If the ribbon... Then
Ran out Continue with the next step.
Did not run out Cut or break the ribbon before the ribbon take-up spindle.
Caution • Do not cut the ribbon directly on the ribbon
take-up spindle. Doing so may damage the spindle.
  • Page 1 1
  • Page 2 2
  • Page 3 3
  • Page 4 4
  • Page 5 5
  • Page 6 6
  • Page 7 7
  • Page 8 8
  • Page 9 9
  • Page 10 10
  • Page 11 11
  • Page 12 12
  • Page 13 13
  • Page 14 14
  • Page 15 15

Zebra Technologies ZT400 User manual

Category
Label printers
Type
User manual

Zebra Technologies ZT400 streamlines your printing operations with its intuitive control panel, comprehensive connectivity options, and adaptable media handling capabilities. Its user-friendly interface simplifies navigation and configuration, enabling seamless integration into your workflow. Unleash versatile printing applications with support for direct thermal and thermal transfer printing methods, catering to a wide range of label materials.

Ask a question and I''ll find the answer in the document

Finding information in a document is now easier with AI