Page is loading ...

3
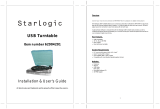
QUICK START GUIDE
o Make sure that the items listed below are included in the box.
o READ SAFETY INSTRUCTION BOOKLET BEFORE USING THE PRODUCT
o Go to http://www.ion-audio.com for product registration.
INTRODUCTION
The LP Dock is a revolutionary product which allows you to record music from vinyl records and
external audio inputs directly to your iPod*. In addition, the USB turntable connects directly to your
computer to turn your treasured vinyl recordings into digital music. We have included several
software packages to aid you in converting your vinyl recordings: Please note that it is not required to
install any software in order to record directly to your iPod. However, you should install one of the
following applications to take advantage of computer recording:
EZ Vinyl/Tape Converter** (PC only) is the quickest and easiest way to turn your recordings
into digital media. EZ Vinyl/Tape Converter conveniently saves your recordings in your iTunes*
library. Novice users may find this application preferable. On the CD, we have included a
handy Software Quickstart Guide with step-by-step instructions on software installation and
operation.
EZ Audio Converter (Mac only) is a basic converter application for Mac OS X and is ideal for
novice users. Please refer to the included Software Quickstart Guide for step-by-step
instructions on software installation and operation.
Audacity (PC and Mac) is intended for the advanced user. This application allows for advanced
audio editing and processing, such as normalization, noise removal, 78 RPM speed conversion,
and automatic track separation. The Audacity Software Guide can be found on the included CD
– please refer to this guide as you are working with Audacity.
To install the software: simply insert the included CD into your computer and follow the on-screen
instructions.. After you finish converting your vinyl, you can then burn to CD or load onto portable
media devices.
* iTunes and iPod are trademarks of Apple, Inc., registered in the U.S.A. and other countries.
** A version of EZ Vinyl/Tape Converter with Gracenote MusicID is available for download at your product’s page at www.ion-audio.com.
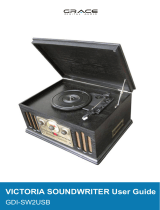
SLIPMAT
45RPM
ADAPTER
COUNTERWEIGHT
PLATTER
USB
CABLE
CD
PRE-MOUNTED
CARTRIDGE
LP DOCK
TURNTABLE

4
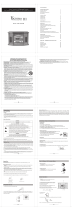
GENERAL CONTROLS
1
4
5
3
2
(bottom panel connections)
1. Power Cable: This power cable should be plugged into a wall receptacle AFTER all audio
connections are made.
2. RCA Audio Output Cables: These cables should be plugged into the audio inputs of your
home stereo system. (Please note: you can still copy records to your iPod or computer,
even if the audio outputs of the turntable are not connected to a stereo system).
3. RCA PHONO | RCA LINE Switch: There is a switch on the bottom panel, next to the RCA
cables, that selects between PHONO/LINE. Use PHONO level for plugging into a turntable
input on a home stereo. Use the LINE level for plugging into CD/AUX/TAPE inputs.
WARNING: You may damage your receiver if you plug in a LINE level into a PHONO
input.
4. Gain: This knob can be used to adjust the gain level of the audio signal from the turntable.
If the audio from the turntable is too quiet or too loud, use this knob to adjust the volume
setting.
5. USB Audio Output: Use the included USB Cable to connect your turntable to your
computer. The USB connection will provide audio from the turntable and stereo input to
your computer. The USB connection will also output audio from your computer through
the turntable’s RCA outputs. For transferring your vinyl records to your computer, we
have provided two different software packages on the included CD. EZ Vinyl/Tape
Converter (PC) and EZ Audio Converter (Mac) are the easiest and quickest ways to
transfer your vinyl records and should be used if you are a beginner. Alternatively, if you
are an advanced user you may wish to install and use the Audacity software (PC and
Mac), which allows you to take advantage of advanced audio editing features, such as
audio normalization, noise removal and automatic track separation.

5
6
11
8
6
7
9
10
12
13
14
15
16
17
18
21
19
20
22
23
6. Power Button: Turns the unit on and off.
7. Platter: This platter must be securely fastened to the turntable prior to operation. The
Motor Drive Belt can be found on the drive ring underneath the platter. See SETUP
INSTRUCTIONS for detailed information on installing the Motor Drive Belt.
8. Start/Stop Buttons: This button starts and stops the turntable motor. If the button seems
to not be functioning, check to make sure that the Motor Drive Belt is properly installed in
the SETUP INSTRUCTIONS.
9. 1/8” Stereo Line Input: Connect Tape Players, Reel to Reel, or any other audio source
here. This signal is sent to the computer through the USB. Make sure that your phono
cartridge is installed while using this input for maximum sound quality. Also make
sure that your RCA jacks are either plugged into an input device or not in contact with
metal.
10. 33 and 45 RPM Buttons: These buttons control the RPM of the turntable platter. A red
LED indicates which RPM mode has been selected.
NOTE: If the turntable is powered down while in the 45 RPM setting, it will return to 33
RPM when it is powered up.
NOTE: You can record your 78RPM records by recording them at 33 or 45rpm, then
changing them to 78 in the Audacity software.

6
12
13
14
15
16
17
18
11. iPod Dock: Connect your iPod to this dock. Please make sure that your iPod fits snuggly
over the dock connector but do not force it! The dock allows you to record your vinyl
directly to your iPod or to play back music from your iPod through the turntable’s RCA
outputs. The LPDOCK is compatible with the following iPod models:
* On 3
rd
generation iPod, only the buttons “Play”, “Rewind”, and “Fast Forward”
are supported. Buttons “Select”, “Menu”, and “Rec Mode” are unsupported.
** On iPod Touch, only music player navigation is supported.
Note that your turntable can also charge your iPod while it is docked. When not recording,
the turntable will automatically charge your iPod. To ensure the best recording quality and
to prevent unwanted noise from entering your recordings, iPod charging will be disabled
as soon as you begin recording. We do understand, however, that you may be recording
long sessions which require your iPod to remain charged for longer periods of time. While
recording, you can turn on iPod charging by pressing |<< and >>| simultaneously. You
can turn it off at any time by pressing |<< and >>| again.
iPod CONTROLS: The following controls can be used to browse
and navigate menus and features of your iPod directly from the
turntable.
12. Scroll – This knob acts as Touchwheel controller on your
iPod.
13. Menu – This button acts as the ‘Menu’ button on your iPod.
14. Select – This button functions as the ‘Select’ command on
your iPod.
15. Rec Menu – Enters Record Mode (Voice Memo) on your iPod.
See ‘Recording to your iPod’ section for more details.
16. |<< - Functions as the ‘|<<’ button on your iPod.
17. >>| - Functions as the ‘>>|’ button on your iPod.
18. >|| - Functions as the ‘>||’ button on your iPod.
Please note that pressing |<< and >>| simultaneously while
recording will enable iPod charging. Press again to disable
iPod charging.
iPod Model Playback Record
iPod
Classic
5th generation
4th generation
3rd generation*
1st and 2nd generation
iPod Nano
3rd generation
2nd generation
1st generation
iPod Shuffle
iPod Mini
iPod Touch**

7
TONE ARM: Items 19 – 23 are all parts of the tonearm. Refer to the TONEARM SETUP
section for additional details on these controls.
19. Counter Weight and Scale Ring: The Counterweight is used to
balance the head shell and cartridge assembly so that the proper
amount of stylus pressure is applied to the record.
20. Anti-Skate Adjustment: This knob is used to compensate for
inward tracking forces. See TONEARM SETUP for more details.
21. Arm Clip: This specially designed arm clip secures the tone arm
while at rest or when not in use. The arm clip has been designed to
remain in the up position while unlocked.
NOTE: When transporting the turntable, it is always recommended
that the headshell be removed and the arm clip secured to prevent
tonearm or turntable damage.
22. Tone Arm Lock Nut: This Aluminum nut is used to secure the head
shell and cartridge assembly to the tone arm tube. See Cartridge
Setup for more details.
23. Cartridge and Headshell: The cartridge is pre-mounted on a
standard headshell. The cartridge is user replaceable and
compatible with a variety of standard cartridges. Be sure to remove
the clear plastic cover before operating the turntable from the
cartridge.
PLATTER SETUP
WARNING: Incorrect Platter setup can lead to poor turntable performance, platter
instability or permanent motor damage.
1. Start by placing the rubber drive belt around the inner bottom ring of the turntable platter.
This should come preinstalled, but check to make sure that it is not twisted or damaged.
2. Install the Platter on the center spindle and press it down firmly. Check to make sure that it
rotates uniformly and does not wobble excessively.
3. Rotate the platter so that the one of the holes is aligned with the Start Stop button on the
front corner of the turntable. The brass motor spindle should be visible through this hole.
4. Reach into the hole and pull the rubber drive belt off of the inner ring, and install it over the
motor spindle. Be careful not to twist the rubber drive belt during this step. Check to make
sure the platter rotates uniformly. If the drive belt is properly installed, there should be a
slight amount of tension that brings the platter to a stop after spinning it freely.
21
19
20
22
23

8
TONEARM SETUP
1. Begin by rotating the
counterweight counter-
clockwise until it is in the
complete forward position
(NOTE: this is also the
maximum amount of
pressure that can be
applied to the cartridge.)
2. Now there should be a
feeling of weight and
resistance when the head
shell is raised and
lowered. Begin rotating
the counterweight
clockwise (away from the pivot point) until the weight and resistance feeling is gone. If
done properly, the tone arm will pivot with very little resistance back and forth indicating
that there is exactly 0 grams of stylus pressure.
3. With the counterweight in its new position further away from tone arm pivot point, grasp
the scale ring of the counter weight and rotate it until "0" is in the vertical position.
4. Finally, rotate the counterweight (and scale ring) counter-clockwise (towards the pivot
point) until the desired amount of weight is reached. If the scale rotates 360 degrees
beyond the zero point, the new scale ring reading should be added to 3.5.
*The included head shell and cartridge assembly requires a minimum of 3 grams and no
more than 5 grams for optimum performance.
Setting the Anti-Skate Adjustment
In most cases, the Anti-Skate should be set to its minimum setting. Anti-Skate compensates for
inward tracking forces that occur with certain cartridges when the stylus nears the center of the
record. If the turntable is experiencing excessive skipping while nearing the center spindle, try
increasing the Anti-Skate in the increments indicated on the dial. Start by adding an increment
of 1, test its performance, then increase it more, and so on.
IMPORTANT
Make sure that the felt slipmat is always placed on top of the platter while using the turntable.
Failure to use the slipmat may cause damage to your media as well as damage to the turntable.
Remove the plastic cartridge cover (needle cover) before operating the turntable.

9
RECORDING TO YOUR iPod
Please follow the instructions below to record music directly to your iPod. Note that your iPod
will record audio from your turntable, as well as audio coming through the 1/8” Stereo Input.
Note that it is possible to record to your iPod without having any audio connections plugged in.
However, we highly recommend connecting the audio outputs (RCA or USB) to a speaker
system so you can monitor your recordings.
1. Place your iPod into the dock, making sure that it fits snuggly over the connector. Note
that depending on your iPod model, you may need to use the Universal Dock Adapter
included with your iPod.
2. Place a record on the platter and cue the music you would like to record.
3. Press the turntable’s REC MENU button – this will enter Record Mode on your iPod (Voice
Memo will be displayed on the screen of your iPod).
Note: With certain iPod models, pressing the Rec Menu button may not automatically
enter Voice Memo Mode. You may need to highlight the Voice Memo option and press
Select before proceeding.
Note: With certain iPod models, it may not be possible to enter Voice Memo Mode if your
iPod is currently in a music/video playback screen. If you experience difficulties accessing
Voice Memo Mode, exit to the Main Menu by pressing Menu and try again.
4. When you are ready to start recording, press the Select button to begin recording to your
iPod.
5. Now, press the turntable’s PLAY button to begin playing the music you wish to record.
6. When you wish to stop recording, simply pause the turntable.
7. Then, use the Scroll knob to select ‘Stop and Save’ and press Select. (Alternatively, you
can pause the recording and continue later by selecting ‘Pause’).
When you have finished, you can locate the recording by navigating to Extras X Voice
Memos. Your recordings will be identified by the date and time that the recording was
completed.
IMPORTANT: Renaming your recordings directly from your iPod is not recommended. If you
change the filename, your iPod may no longer be able to access the file. If you would like to
rename the recording, you should transfer the file to your computer, rename it and import it
back into your iTunes library as an AAC or MP3 file.

10
SYNCING YOUR iPod THROUGH THE TURNTABLE
Your iPod can be synced to your iTunes right from the turntable. Follow the instructions below
to establish the connection.
1. Make sure that your turntable is connected to your computer, using the included USB
cable. (Windows users: If this is the first time that you are connecting the turntable, allow
your computer to automatically initialize the necessary hardware drivers. Proceed when
“Your New Hardware is Installed and Ready To Use” message appears on the bottom
corner of your computer screen screen.)
2. Press and hold the turntable’s Menu button while inserting the iPod into the dock. When
your iPod connects to your computer, you will see “Do Not Disconnect” displayed on the
screen of your iPod. DO NOT REMOVE YOUR iPod FROM THE DOCK WHILE “DO
NOT DISCONNECT” IS DISPLAYED AND BEFORE PROPERLY EJECTING THE iPod
FROM YOUR COMPUTER! OTHERWISE YOU MAY DAMAGE YOUR iPod AND
DESTROY ITS CONTENTS!
3. Once your iPod is properly connected to your computer, iTunes should start automatically.
(PC users: if you have not yet installed iTunes, you can insert the CD included with the
turntable. Follow the on-screen instructions to install the application.)
4. If you have made any new recordings since the last time your iPod was connected to the
computer, you will see the following screen:
Select ‘Yes’ if you would like to
move the recordings (referred to
as voice memos) to your iTunes
library.
While your iPod is docked and synced to your computer, you can transfer music to and from it,
just as if it was connected directly to your computer.
Note that you can even listen to music from your computer through the turntable’s RCA audio
output!
IMPORTANT: TO SAFELY DISCONNECT YOUR iPod FROM
YOUR COMPUTER, EJECT YOUR iPod BY CLICKING ON
THE EJECT BUTTON.
NOTE: When you eject your iPod from your computer, you will
need to remove and replace it in the dock if you wish to keep
using it with the LPDOCK.

11
CONVERTING YOUR 78RPM VINYL
If you wish to transfer your 78RPM records to your computer, you will need to install and use
the Audacity application. This application can be found on the CD included in the box. Please
install Audacity and follow the instructions below to record your 78RPMs. For Audacity
troubleshooting, refer to the Audacity Software Guide included on the CD.
1. Connect your turntable to your computer’s USB port.
2. Open Audacity.
3. In Audacity, go to EDIT -> PREFERENCES and set the Recording Device to ‘USB Audio
Codec’ – this is your USB turntable (select 2 channels to record in stereo).
4. Select your computer’s soundcard as the Playback Device. Note that the device name will
vary from computer to computer but should never be set to ‘Microsoft Sound Mapper’.
Alternatively, you can select “USB Audio Codec” if you would like to play the audio through
the turntable’s RCA outputs.
5. Lastly, check ‘Software Playthrough’ so you can hear the music through your audio device
while recording.
6. You are now ready to record. Press the RECORD button in Audacity to begin recording.
7. Play your 78RPM at 33 or 45RPM.
8. Once you have recorded the desired material, press STOP in Audacity.
9. Click on EDIT menu, then click on SELECT, then click on ALL (shortcut: “CTRL-A”).
10. Click on the EFFECT menu, click on CHANGE SPEED.
11. When the CHANGE SPEED box opens, you will see Standard Vinyl RPM selections. The
“from” should be set to 33 or 45 RPM (depending on the speed you selected on your
turntable), and the “to” should be set to 78 RPM.
12. Click on PREVIEW to hear your recording converted to the correct speed of 78 RPM.
Click on OK to finalize the conversion to 78 RPM.
13. Once you are finished, you can save your file by going to FILE -> EXPORT AS WAV.
This will save the recording as a .WAV audio file.
14. Pick a destination on your computer, a name for your recording, and click SAVE.
15. The recording can now be found in the location where you saved it in the previous step.

12
TROUBLESHOOTING
Refer to the following troubleshooting scenarios if you experience difficulty recording your vinyl
to your iPod or computer.
PROBLEM CAUSE SOLUTION
Needle is not on the record. Place the needle on the record.
Turntable not powered.
Make sure that the turntable is connected to a live power outlet
and that it is powered on.
I am not hearing any audio
when I am recording.
RCA outputs not connected to
speaker system.
Make sure you have connected the turntable’s RCA outputs to a
speaker system and that the speaker system is powered on.
Cartridge connection is not
secure.
Cartridge must be securely connected to the tonearm whenever
you are using the turntable.
Vinyl record is dirty or
scratched.
Try dusting off and gently wiping the surface of the record before
playing it.
I am experiencing poor
sound quality.
iPod is charging while recording.
To ensure maximum audio quality, iPod charging should be
turned off while recording. If you have turned this feature on,
please disable it by pressing |<< and >>| simultaneously.
When recording vinyl to my
computer, the recording
sounds loud and distorted.
The turntable Gain level is too
high.
Turn down the Gain knob.
When recording vinyl to my
computer, the recording is
barely audible.
The turntable Gain level is too
low.
Turn up the Gain knob.
I cannot hear my recordings
when I try to play them from
my computer.
While the turntable is
connected, I cannot listen to
any music from my
computer.
Computer audio output not set
correctly.
Make sure that your computer’s audio playback options are
configured in one of the following ways:
In Windows XP, go to Start X Control Panel X Sounds
and Audio Devices (on Windows XP) or Start X Control
Panel X Sound (on Windows Vista) and make sure that
your computer’s audio card is selected as the Sound
Playback device under the Audio tab.
Alternatively, you can play audio from your computer
through the turntable’s RCA audio outputs. Simply select
“USB Audio Codec” as the Sound Playback device and any
audio from your computer will play through the turntable’s
RCA outputs.
When recording into my
computer on Windows Vista,
my recordings are mono
instead of stereo.
Recording input properties in
Vista not set to “stereo”.
In Vista, you may need to manually specify “stereo” for the
recording input.
Go to Start X Control Panel X Sound (in Classic View). Then,
click on the Recording tab and highlight the Microphone input
(USB Audio Codec). Click on Properties to bring up the input
settings. Next, click on the Advanced tab and select “2 channel,
16 bit, 44100 Hz (CD quality)” in the Default Format pull-down
menu. Lastly, click Apply to accept the settings.
iPod not docked properly.
Make sure that the iPod is properly connected to the dock. If
necessary, you may need to use the Universal Dock Adapter,
included with your iPod.
iPod is synced to your
computer.
You will not be able to record to your iPod while it is synced to
your computer through the USB connection. Eject the iPod from
your computer, remove it from the dock, then connect it again.
I am not able to record to my
iPod.
iPod is not in Record Mode
(Voice Memo).
Ensure that your iPod is in Record Mode. Press the Rec Menu
button on the turntable to enter Record Mode. Then, press
Select on the turntable to begin recording.
My music is playing at a
strange pitch.
Incorrect speed selected on the
turntable.
Make sure that you are playing your records at the speed they
were intended to be played. Select between the two different
speeds by pressing 33RPM or 45RPM.
BEFORE RETURNING THE PRODUCT, please contact ION Audio or your retailer for
technical support. Contact information can be found in the Safety Instruction Booklet
included with this product.
/