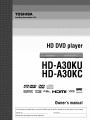
Toshiba HD-A30KU Owner's manual
- Category
- DVD players
- Type
- Owner's manual

HDDVDplayer
HD-A3OKU
HD-A3OKC
V I D E 0 _' DIGITAL AUDIO
oo_ _a,, H.--zrlrllTM
DIGITAL" PLUS TRUE_ DigitalSurr0und
J_C ®
VRS PRooEssoR
by
by A.chor B_x Analog Devices
Owner'smanual
In the spaces provided below, record the Model and Serial No. located on the rear panel of your player.
Model No. Serial No.
Retain this information for future reference.

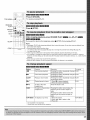
SAFETY PRECAUTIONS
WARNING : TO REDUCE THE RISK OF
ELECTRIC SHOCK, DO NOT REMOVE
COVER (OR BACK). NO USERSERVICEABLE
PARTS INSIDE. REFER SERVICING TO
QUALIFIED SERVICE PERSONNEL.
The lightning flash with arrowhead symbol, within an equilateral triangle,
is intended to alert the user to the presence of uninsulated dangerous
voltage within the products enclosure that may be of sufficient magnitude
to constitute a risk of electric shock to persons.
The exclamation point within an equilateral triangle is intended to alert
the user to the presence of important operating and maintenance
(servicing) instructions in the literature accompanying the appliance.
WARNING:
CAUTION:
ATTENTION:
CAUTION:
FCC NOTICE:
WARNING:
TO REDUCE THE RISK OF FIRE OR ELECTRIC SHOCK, DO NOT EXPOSE THIS APPLIANCE
TO RAIN OR MOISTURE. DANGEROUS HIGH VOLTAGES ARE PRESENT INSIDE THE
ENCLOSURE. DO NOT OPEN THE CABINET. REFER SERVICING TO QUALIFIED PERSONNEL
ONLY.
TO PREVENT ELECTRIC SHOCK, MATCH WIDE BLADE OF PLUG TO WIDE SLOT, FULLY
INSERT.
POUR €:VITER LES CHOCS €:LECTRIQUES, INTRODUIRE LA LAME LA PLUS LARGE DE LA
FICHE DANS LA BORNE CORRESPONDANTE DE LA PRISE ET POUSSER JUSQU'AU FOND.
This HD DVD player employs a Laser System.
To ensure proper use of this product, please read this owner's manual carefully and retain for future
reference. Should the unit require maintenance, contact an authorized service location - see service
procedure.
Use of controls or adjustments or performance of procedures other than those specified herein may
result in hazardous radiation exposure.
To prevent direct exposure to laser beam, do not try to open the enclosure.
Visible and invisible laser radiation when open and interlocks defeated.
DO NOT STARE INTO BEAM.
This equipment has been tested and found to comply with the limits for a Class B digital device, pursuant
to part 15 of the FCC Rule. These limits are designed to provide reasonable protection against harmful
interference in a residential installation.
This equipment generates, uses, and can radiate radio frequency energy and, if not installed and used in
accordance with the instructions, may cause harmful interference to radio communications.
However, there is no guarantee that interference will not occur in a particular installation.
If this equipment does cause harmful interference to radio or television reception, which can be
determined by turning the equipment off and on, the user is encouraged to try to correct the interference
by one or more of the following measures:
- Reorient or relocate the receiving antenna.
- Increase the separation between the equipment and receiver.
- Connect the equipment into an outlet on a circuit different from that to which the receiver is connected.
- Consult the dealer or an experienced radio/TV technician for help.
Changes or modifications made to this equipment, not expressly approved by Toshiba, or parties
authorized by Toshiba, could void the user's authority to operate the equipment.

CAUTION:
These servicing instructions are for use by qualified service personnel only. To reduce the risk of electric
shock do not perform any servicing other than that contained in the operating instructions unless you are
qualified to do so.
Location of the required label
3

IMPORTANT SAFETY INSTRUCTIONS
1. Read these instructions. ADDITIONAL SAFETY INSTRUCTIONS
2. Keep these instructions.
3. Head all warnings.
15. Do not overload wall outlets; extension cords, or integral
convenience receptacles as this can result in a risk of
fire or electric shock.
4. Follow all instructions.
5. Do not use this apparatus near water.
16. Never expose the apparatus to dripping or splashing or
place items such as vases, aquariums, any other item
filled with liquid, or candles on top of the unit.
6.
7.
8.
Clean only with dry cloth.
Do not block any ventilation openings. Install in
accordance with the manufacturer's instructions.
Do not install near any heat sources such as radiators,
heat registers, stoves, or other apparatus (including
amplifiers) that produces heat.
17.
18.
19.
Keep your fingers well clear of the disc tray as it is
closing. Neglecting to do so may cause serious personal
injury.
Do not place anything on top of this unit.
Do not place the apparatus on amplifiers or equipment
that may produce heat.
9. Do not defeat the safety purpose of the polarized or 20.
grounding-type plug. A polarized plug has two blades
with one wider than the other. A grounding-type plug has
two blades and a third grounding prong. The wide blade
or the third prong are provided for your safety. If the
provided plug does not fit into your outlet, consult and
electrician for replacement of the obsolete outlet.
10. Protect the power cord from being walked on or pinched
particularly at plugs, convenience receptacles, and the
point where they exit from the apparatus.
11. Only use attachments/accessories specified by the
manufacturer.
12. Use only with the cart, stand, tripod, bracket, or
table specified by the manufacturer, or sold with the
apparatus. When a cart is used, use caution when
moving the cart/apparatus combination to avoid injury
from tip-over.
Never block or cover the slots or openings in the unit.
Never place the unit:
• on a bed, sofa, rug or similar surface;
• too close to drapes, curtains, or walls; or
• in a confined space such as a bookcase, built-in
cabinet, or any other place with poor ventilation.
The slots and openings are provided to protect the unit
from overheating and to help maintain reliable operation.
21. Do not use a cracked, deformed, or repaired disc. These
discs are easily broken and may cause serious personal
injury and apparatus malfunction.
22.
If the apparatus should emit smoke or an unusual odor,
immediately disconnect the power cord from the wall
outlet. Wait until the smoke or smell stops, then ask your
dealer for a check and repair. Neglecting to do so may
cause fire.
23. During thunderstorms, do not touch the connecting
cables or the apparatus.
13. Unplug this apparatus during lightning storms or when
unused for long period of time.
14. Refer all servicing to qualified service personnel.
Servicing is required when the apparatus has been
damaged in any way, such as power-supply cord or
plug is damaged, liquid has been spilled or objects
have fallen into the apparatus, the apparatus has been
exposed to rain or moisture, does not operate normally,
or has been dropped.
4

I Precautions
• Never disconnect the power cord from a wall outlet while
the player is turned on, unless it is in an emergency. Doing
so may cause malfunction.
• When shipping the player, the original shipping carton
and packing materials come in handy. For maximum
protection, repack the unit as it was originally packed at
the factory.
• Do not use volatile liquids, such as insect spray, near the
player. Do not leave rubber or plastic products in contact
with the player for a long time. They will leave marks on
the finish.
• The top and rear panels of the player may become warm
after a long period of use. This is not a malfunction.
• For usual absence
Be sure to remove the disc from the player and turn off the
power.
• Prolonged absence
Unplug the player from a wall outlet. (This will stop the
clock. Display "SETUP MENU" by pressing SETUP (_
page 30), and reset the clock.)
• Place the player on a level surface. Do not use it on a
shaky or unstable surface such as a wobbly table or
inclined stand. The loaded disc may dislodge from its
proper position and cause damage to the player. Before
placing the player, make sure that the surface can stand
the weight of the player. Never place the player in a high
location to avoid damage to the product or person by an
accidental fall of the player.
• When you place this player near a TV, radio, or VCR, the
playback picture may become poor and the sound may be
distorted depending on the condition and location of said
equipment. In such an event, place the player as far away
as practical from the TV, radio, or VCR.
• To avoid damage to this product, never place or store the
unit in direct sunlight; hot, humid areas; or areas subject to
excessive dust, oily smoke, cigarette smoke or vibration.
This owner's manual explains the basic instructions for
this player. Some HD DVD discs or DVD video discs
are produced in a manner that allows specific or limited
operation during playback. As such, the player may not
respond to all operating commands. This is not a defect in
the player. Please refer to the notes on compatible discs
later in this Introduction and to the discussion of DVD
playback and features later in this manual.
"®" may appear on the TV screen during operation. "Q"
means that the operation is not permitted by the player or
the disc.
Because of problems and errors that can occur during
the creation of HD DVD, DVD and CD software and/or
the manufacture of HD DVD, DVD and CD discs, Toshiba
cannot assure that this player will successfully play every
disc bearing the HD DVD, DVD or CD Iogos. If you happen
to experience any difficulty playing an HD DVD, DVD or
CD disc on this player, please contact Toshiba Customer
Service.
The HD DVD player operates more like a computer and
differently than a standard DVD player. In addition to
containing a microprocessor, it contains an operating
system, random access memory (RAM), and an HD DVD
drive. The operating system includes software that is
transferred to the RAM when the machine is turned on and
at other times during operation. This transfer can take time.
Therefore, when you turn the HD DVD player on, it may
take a little while before it is ready to use. Likewise, other
functions may not be performed as quickly as they would
on other AV equipment. Please take these factors into
consideration as you use the HD DVD player.
Use a soft, dry cloth for cleaning.
• Do not use any type of solvent, such as thinner or benzine
as they may damage the surface of the player.
The volume level of some commercial HD DVD and DVD
discs may seem lower than that of audio CDs, other
software, etc. If you turn up the volume of the TV or amplifier
to play such discs, be sure to turn it back down after
playback finishes.
5

I Precautions (continued)
Moisture condensation damages the unit. Please read
the following carefully.
Moisture condensation occurs, for example, when you pour
a cold drink into a glass on a warm day. Drops of water
form on the outside of the glass. In the same way, moisture
may condense on the optical pick-up lens inside this unit,
one of the most crucial internal parts of the unit.
Moisture condensation occurs during the following
cases.
• When you bring the unit directly from a cold place to a
warm place.
• When you use the unit in a room where you just turned
on the heater, or a place where the cool air from an air
conditioner blows directly on the unit.
• When the unit is moved from an air conditioned room to a
hot, humid location.
• When you use the unit in a humid place.
Do not use the unit when moisture condensation may
occur.
If you use the unit in such a situation, it may damage discs
and internal parts. Connect the power cord of the unit to the
wall outlet, turn on the unit, remove the disc, and leave it
for two or three hours. After two or three hours, the unit will
have warmed up and evaporated any moisture. Keep the
unit connected to the wall outlet and moisture condensation
will seldom occur.
• The unauthorized recording, use, display, distribution, or
revision of television programs, videotapes, HD DVDs,
DVDs, CDs and other materials, is prohibited under the
Copyright Laws of the United States and other countries,
and may subject you to civil and/or criminal liability.
• This product incorporates copyright protection technology
that is protected by method claims of certain U.S. patents
and other intellectual property rights owned by Macrovision
Corporation and other rights owners. Use of this copyright
protection technology must be authorized by Macrovision
Corporation, and is intended for home and other
limited viewing uses only unless otherwise authorized
by Macrovision Corporation. Reverse engineering or
disassembly is prohibited.
Dolby and the double-D symbol are registered trademarks of
Dolby Laboratories.
Manufactured under license from DTS, Inc. under one or more
of the following U.S. Pat. No's: 5,451,942; 5,956,674; 5,974,380;
5,978,762; 6,226,616; 6,487,535 and other U.S. and world-
wide patents issued and pending. "DTS" and "DTS Digital
Surround" are registered trademarks of DTS, Inc. Copyright 1996,
2002-2006, DTS, Inc. All Rights Reserved.
HDMI, the HDMI logo and High-Definition Multimedia Interface
are trademarks or registered trademarks of HDMI Licensing LLC.
SHARC and Melody are registered trademarks of Analog
Devices, Inc.
VRS is a trademark of Anchor Bay Technologies, Inc.
__ and
Licensing'_'_-z'_:::z"_E==_'Corporation-Logo_ are trademarks of DVD Format/
All other brand and product names mentioned in this manual
are trademarks and/or registered trademarks of their respective
holders.

I Table of contents
SAFETY PRECAUTIONS ....................................... 2
IMPORTANT SAFETY INSTRUCTIONS ............... 4
Precautions ........................................................... 5
Table of contents ................................................... 7
Featu res ................................................................. 8
Disc compatibility ........................................................ 8
Customer support ....................................................... 9
Index to parts and controls ................................ 10
Accessories ......................................................... 13
Remote control ................................................... 13
Loading batteries ...................................................... 13
Preparation ........................................................... 14
Resolution and connection ....................................... 14
Step 1: Connecting to a TV ..................................... 15
Step 2: Connecting to audio system ......................... 16
Step 3: LAN connection ............................................ 17
Step 4: Power connection ....................................... 17
Step 5: Powering on ................................................. 18
Step 6: Setting up the player .................................... 18
A: Language .............................................. 18
B: Time ...................................................... 19
C: Resolution ............................................. 20
D: Audio output ......................................... 21
E: Ethernet ................................................ 22
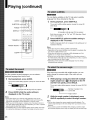
Playing .................................................................. 24
Playing a disc ........................................................... 24
To pause playback .................................... 25
To stop playback ...................................... 25
To resume playback from the location
last stopped ............................................... 25
To change the playback speed ................. 25
To select the sound .................................. 26
To select subtitles .................................... 26
To select the camera angle ....................... 26
To locate a position .................................. 27
To play repeatdly ....................................... 27
To check the current status ....................... 27
HD DVD playing options in the future ....................... 28
A/B/C/D buttons ........................................ 28
Cursor controls .......................................... 28
Controller port ........................................... 28
Requirements for HD DVD discs/
Web-enabled network content .................. 28
Output sound conversion table ......................... 29
Customizing the function settings ..................... 30
Settings ................................................................. 31
Picture ...................................................... 31
Audio ......................................................... 32
Language .................................................. 32
Ethernet .................................................... 34
General .................................................... 34
Firmware update ....................................... 35
Before calling service personnel ...................... 36
License information on the software used
in the TOSHIBA HD DVD player ..................... 37
Specification ....................................................... 43
Limited United States Warranty ......................... 44
Limited Canadian Warranty ................................ 46
INFORMATION ON CUSTOMER
SUPPORT ......................................... Back cover

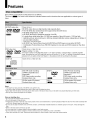
I Features
Discs which can be played on this player are as follows.
The icons ( _ ) are used in this manual to indicate features and/or functions that are applicable to various types of
discs.
HD DVD video disc
12cm (43/4in.)
HD DVD video discs are high-density, high-capacity discs.
• The HD DVD disc standard has been approved by the DVD forum.
• HD DVD (single layer): 15 GB
• HD DVD (dual layer): Maximum capacity of 30 GB
• A single layer single sided disc (15 GB) has capacity of about 8 hours in 1125 line high
definition picture; about 48 hours in 525 line standard definition picture (depending on bitrate of
pre-recorded contents).
"1GB means 1,000,000,000 bytes.
• HD DVD Twin Format Discs have both HD DVD and DVD layers on one side. HD DVD
Combination Format Discs have HD DVD material on one side and DVD material on the other
side.
DVD video disc 12cm (43/4 in.) /8cm (31/4 in.)
_ _ Region number 1 or ALLThe region number of this HD DVD player is 1 If region numbers,corresponding to a specific playable
v i DEO area, are printed on your DVD video disc and you do notfind "1"or "ALL", or the disc is encodedto permit
playbackonly in regions other than Region 1,disc playbackwill not beallowed by the player.
Audio CD 12cm (43/4in.) /8cm (31/4in.)
DiGiTAL AUDIQ
rd 6i ai:
DVD-RW DVD VR mode recording DVD-R DVD VR mode recording
(CPRM compatible discs _ (CPRM compatible discs
supported.) _ supported.)
R
Rw DVD Video mode recording R4.7 DVD Video mode recording
Finalized discs only. ( _ ) Finalized discs only.
CD-RW CD-DA (audio CD) format CD-R CD-DA (audio CD) format
( _ ) Finalized discs only. (_ ) Finalized discs only.
Notes
• This player can play pictures of the NTSC color system only.
• You cannot play non-standardized discs even if they may be labeled as above.
• Discs other than the above cannot be played. Even some of the above discs may not be able to be played depending on their state.
• Blu-ray Discs cannot be played on this player.
Notes on handling discs
• Do not touch the playback side of the disc.
• Do not stick paper or tape to discs.
• Fingerprints and dust on the disc may cause picture and/or sound deterioration or prevent playback. Wipe the disc from the center outwards with
a soft cloth. Always keep the disc clean.
• Do not use any type of solvent such as thinner, benzine, commercially available cleaners or antistatic spray for vinyl LPs. It may damage the
disc.
• Refer to the instructions of the disc as well.
• Do not store discs in a place subject to direct sunlight or near heat sources.
• Do not store discs in places subject to moisture and dust such as a bathroom or near a humidifier.
• Store discs vertically in a case. Stacking or placing objects on discs outside of their case may cause warping.

HD DVD with high-definition content required for HD
viewing. Viewing high-definition content and up-converting
DVD content may require an HDCP capable DVI or HDMI
input on your display device. Up-conversion of DVD content
will result in near HD picture quality. Firmware update may
be required for some interactive features depending on
content, which may also require an always-on broadband
internet connection. Some features may require additional
bandwidth. Some recordable media may not be supported.
Dolby Digital Plus, Dolby TrueHD and DTS support for up
to 5.1 channels (DTS HD support for DTS core only). MP3/
WMA audio files not supported. HDMI audio support for
PCM only. Because HD DVD is a new format that makes
use of new technologies, certain disc, digital connection
and other compatibility and/or performance issues are
possible. This may, in rare cases, include disc freezing while
accessing certain disc features or functions, or certain parts
of the disc not playing back or operating as fully intended.
If you experience such issues, please refer to the FAQ
sections of www.toshibahddvd.com or www.tacp.toshiba.
com for information on possible work-around solutions or
the availability of firmware updates that may resolve your
problem, or contact Toshiba Customer Solutions. Some
features subject to delayed availability. 1080p capable
display required for 1080p output resolution. In some cases,
the included remote control may not operate additional
devices or certain features of such devices, in which case, it
is suggested that you use the original remote control for the
applicable device. Use of HDMI Control which is a feature
based on HDMI-CEC requires an HDMI-CEC compatible
display device. While every effort has been made at the
time of publication to ensure the accuracy of the information
provided herein, product specifications, configurations,
system/component/options availability are all subject to
change without notice.
Note
• The firmware in this player can be updated. See _ page 35 for
details.
iii!i! I!I!¸I!
Certain HD DVD discs may contain or have the capability of
downloading studio-provided, web-enabled network content.
To minimize any potential compatibility and/or connectivity
issues, before viewing such content, it is recommended that
you perform the firmware update process to ensure that
your HD DVD player is using the latest firmware version.
Do not unplug or turn off the player when downloading
studio-provided, web-enabled network content. Doing so
may cause data stored in the player's persistent storage to
be lost.
• An HDMI jack for connecting a single cable to output video
and audio signals
• Component jacks
For high definition video playback:
• HD display (some discs may require HDCP capable input)
• HD DVD disc with HD content
For Dolby ®Digital Plus and Dolby TrueHD multi-channel
audio playback:
• A/V Receiver with HDMI TM multi-channel LPCM capable
audio input and 5.1 channel speaker setup.
To reach Toshiba Customer Solutions in the U.S. please
call 1 (800) 319-6684, or visit www.toshibahddvd.com or
www.tacp.com/custome rsupport.
To reach Toshiba Customer Support in Canada, please
call 1 (800) 268-3404 or visit www.toshiba.ca and click on
support.
Before accessing, try updating this player's firmware. For
details on how to update, see "Update (Firmware update)"
(_ page 35).
This HD DVD player is manufactured under the HD DVD
Format adopted by the DVD Forum. The DVD Forum
approved AACS (Advance Access Content System)
as content protection system for HD DVD format like it
approved CSS (Content Scramble System) for DVD format.
Therefore, certain restrictions are imposed on play, analog
signal output, etc. of AACS protected contents.
When you use pre-recorded contents, the contents may
designate whether or not to apply such restrictions.
As those restrictions may be adopted and/or changed and
announced by AACS after the production of this product, the
operation of this product and restrictions thereon may vary
depending on the time you purchase this product as well as
during the life of this product.
To obtain updated information about AACS and this product,
please contact the following:
* In the U.S., please call 1 (800) 319-6684, or visit www.
toshibahddvd.com or www.tacp.com/customersupport.
* In Canada, please call 1 (800) 268-3404 or visit www.
toshiba.ca and click on support.

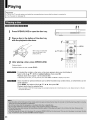
I Index to parts and controls
No. Control Function Page
(_ ON/STANDBY button Turns the power on or restores the unit to the standby mode. 18
(_) ON/STANDBY indicator Blue: power on / Red: standby mode 18
(_ Front panel display See the next page. 11
@ Remote sensor Receives infrared signals from the remote control. 13
(_ Disc tray Loads a disc into the disc drive. 24
(_ Extension port For future functions. 28
Locates a chapter or track.
(_ 1_14/_ (SKIP) buttons 25
: forward direction / 1414:reverse direction
(_) II(PAUSE) button Stops playback momentarily. 25
@ •(STOP) button Stops playback. 25
(D I_ (PLAY) button Starts playback. 24
(_ OPEN/CLOSE button Opens and closes the disc tray. 24
No. Control Function Page
(_ AC IN socket Connect the supplied power cord. 17
(_) Ventilation fan Do not cover the ventilation holes. -
(_ LAN port Use this to connect to a network with an always-on broadband connection. 17
DIGITAL AUDIO OUTPUT BITSTREAM/ Outputs digital audio signals. Connect to a digital audio input on an amplifier
@ PCM OPTICAL jack equipped with digital audio decoder. When connecting the optional digital 16
cable, fit the connector into the jack firmly.
(_) VIDEO OUTPUT jack Outputs video signals to a connected TV or amplifier. 15
(_ COMPONENT VIDEO OUTPUT jacks Outputs video signals to a connected TV or monitor.
Connect to a TV or monitor equipped with component video jacks. 15
(_ HDMI OUTPUT jack Outputs video/audio signals to a connected TV, monitor or AV amplifier.
Connect to a TV, monitor or AV amplifier equipped with HDMI input. 15
(_ ANALOG AUDIO OUTPUT jacks Outputs audio signals to a connected TV or AV amplifier. 16
10

® ®
No. Function
Displays the video output format currently selected.
(_) (i: interlaced, p: progresive)
(_) I_ : Playing
(_) II : Pausing
(_ _ : Fast forward playback
(_) 41_1 : Fast reverse playback
(_ Shows a title number.
HD DVD: An HD DVD is loaded.
(_) DVD: A DVD is loaded.
(_ A CD is loaded.
(_) A disc which contains advanced content is loaded.
(_) Total playing time is displayed.
(_) Remaining playing time is displayed.
(_) Shows a chapter number.
(_) Shows a track number.
@ Multi channel sound is output.
(_) 2ch sound is output.
(_) Playing a scene recorded with multi angles.
(_ Playing in repeat mode.
HDMI connection is verified between the player and
(_) another device.
Displays the total playing time of the disc, elapsed
(_) time, remaining time, a number of title, chapter or track,
messages, etc.
Pressing DIMMER button on the remote control changes the brightness of the display. (Normal / dimmed / off)
• Turning off the power resets this setting.
11

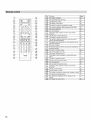
®
............................................
......................................
.......
T
AUDIO 88BT;TL_ AN_LE DISPMY
rOP_ENU MENU
No. Function Page
(_ To display subtitles. 26
(_) To open/close the disc tray. 24
(_) To select the sound. 26
(_ To display a top menu. 24
(_) To select a content or position to enter. 18, 24
(_ To resume playback while playing an HD DVD. 25
(_) To pause playback. 25
(_ To start playback. 24
(_ To locate a title, chapter or track in the reverse 27
direction.
(_) To play fast in reverse direction. 25
(_) To display a repeat mode menu. 27
To set the 8 direction buttons to move the cursor
(_) during HD DVD playback. 28
To operate as indicated by the video display during
(_) HD DVD playback. 28
(_) To enter numbers. 27
(_) For future functions which may become available by
software update.
(_ To select a camera angle. 26
(_ To turn the power on or off. 18
(_ To display operating status. 27
To display a menu included on many DVD video
(_) discs. 24
(_}) To enter a selected content. 18, 24
(D To return to the previous menu. 18
@ To stop playback. 25
@ To play fast in forward direction. 25
@ direction.T°locate a title, chapter or track in the forward 25
(_) To play in slow motion. 25
To play frame by frame. 25
@ To display a window to locate a title, chapter or track. 27
(_) To clear entered information. 27
To change the brightness of the display on the
(_) player. 11
(_ To display the setup menu. 30
12

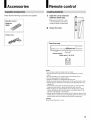
I Accessories
Remote control
Batteries
(AAA)
Power cord
I Remote control
2
Open the cover and load
batteries (AAA size).
Make sure to match the + and
- on the batteries to the marks
inside the battery compartment.
Close the cover.
Operating range
Within about 7 m (23 ft)
Notes
• Do not drop or give the remote control a shock.
• Do not leave the remote control near an extremely hot or humid
place.
• Do not spill water or put anything wet on the remote control.
• Do not disassemble the remote control.
• Dispose of batteries in a designated disposal area.
• Batteries should always be disposed of with the environment in mind.
• Always dispose of batteries in accordance with applicable laws and
regulations.
• If the remote control does not operate correctly, or if the operating
range becomes reduced, replace all batteries with new ones.
• When necessary to replace batteries in the remote control, always
replace all batteries with new ones. Never mix battery types or use
new and used batteries in combination.
• Always remove batteries from remote control if they are dead or if the
remote control is not be used for an extended period of time. This will
prevent battery acid from leaking into the battery compartment.
Caution
Never throw batteries into a fire.
13

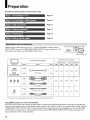
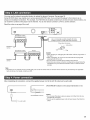
I Preparation
Proceed the following steps to set the player ready.
Page 15
Page 16
Page 17
Page 17
Page 18
Page 18
Check the type of video input on your TV. To view high definition content, use the
HDMI OUTPUT jack or the COMPONENT VIDEO OUTPUT jacks to connect to a TV.
Some discs may require use of the HDMI OUTPUT jack.
HDMI OUTPUT jack
TV input
HDMI INPUT
Most
recommended*
®®®
Y PB PR
®
VIDEO
Connection to this player
Signal Cable Page
Video 15
Audio HDMIcable (16)
Video 15
Audio
Video
Audio
Component video cable
16
Audio cable
_ 15
Composite video cable
Audio cable
16
Resolution from this player
HD (High Definition) SD (Standard Definition
1080p 1080i 720p 480p 480i
Yes Yes Yes Yes Yes
No Yes* Yes* Yes* Yes*
No No No No Yes
* Some discs may prohibit output in this format• In this case, use the HDMI connection•
*Why HDMI connection is most recommended?
HD DVD and DVD video disc creators have the option to include copy protection instructions in their discs that prohibit the
output of some standard video or high definition video (original 720p, 1080i or 1080p or up-converted 480i or 480p) from the
COMPONENT VIDEO OUTPUT jacks. If such instructions are present in the disc you are playing, you must use the HDMI
OUTPUT jack to view the disc in a high definition format and the COMPONENT VIDEO OUTPUT jacks, if activated, will
output video only in 480i or 480p resolution.
14

• Connect the player directly to your TV. If you connect the player to a VCR, TV/VCR combination, video selector
or AV amplifier, the playback picture may be distorted due to copy protection.
• Be sure to turn off the power and unplug both units from the wall outlet before making any connections.
To view 1080p output, make this connection.
HDMI transfers digital audio and uncompressed digital video on
a single cable. As a result, audio cables and video cables don't
need to be connected separately to a device.
HDMI cable (not supplied)
_To HDMI OUTPUT Y
TV
Depending on the TV connected, you can use the CEC
function. For detail, see _ page 35.
Notes
• When the HDMI connection is not verified, an error message appears
on the front panel display. In this case, disconnect the HDMI cable
then connect it again, or turn off the connected HDMI device then
turn it on.
• HDMI output is digital only, DVI analog is not supported.
• HDMI is an evolving technology, so it is possible that some devices
may not operate properly with this player.
• To get the most possible benefit from Dolby Digital Plus, you should
connect your HD DVD player to your AV receiver using its HDMI
input. If your AV receiver has this type of input, make sure it is
connected to your HD DVD player and that the input is set to use
audio from HDMI (and not the SPDIF coaxial or optical input). If your
AV receiver does not have an HDMI input, then the next best choice
is to use the SPDIF (coaxial or optical) input on your AV receiver.
• If you use the SPDIF optical output or analog outputs to connect
your audio system and have the "Digital Out HDMI" (_ page 21) set
to "Auto" or "PCM", the audio output level from these jacks will be
reduced when listening to a multichannel disc. To restore the audio
output level, set "Digital Out HDMI" to "Downmixed PCM".
Some discs may be down converted or require HDMI
connection.
Not compatible with 1080p. To view 1080p output, select HDMI
connection.
_ omponent video cables _
(not supplied)
To COMPONENT
VIDEO OUTPUT
TV
This connection only sends video signals. Be sure to make audio
connection on _ page 16.
I Composite video (yellow) cable 1
(not supplied)
To VIDEO OUTPUT
480i output only regardless of the resolution settings (_ page 20)
or the connections of other output jack.
TV
This connection only sends video signals. Be sure to make audio
connection on @ page 16.
Note
• This player supports simultaneous output of video on its HDMI and component video ports. However, some discs may restrict output of video
on the component video ports when viewing high definition content or up-converted DVD content. The resolution on the HDMI output will be
the same as the resolution output on the component video output. Thus, because the HDMI output can change automatically to match the
maximum available resolution of your display, if you connect both the HDMI output and component output, the resolution on the component
output will change if the HDMI output auto-adjusts.
15

I Preparation (continued)
Sound can output from connected audio system.
If you made the HDMI connection between the player and a TV, this step is unnecessary. Skip to Step 3.
You can enjoy the benefits of Dolby Digital Plus or Dolby TrueHD by connecting the HDMI OUTPUT jack of your player
to an AV receiver with an HDMI audio input.
This connection requires selection of "Digital Out HDMI" (Step 16, _ page 21).
To HDMI OUTPUT U
;;::_:._J®'.oLN_....................zi]
HDMI cable @ _ HDMI cable
(not supplied) (not supplied)
HDMI INPUT
"V"V _'
AV amplifier
HDMI compatible
device
Caution
• When you are connecting (via the HDMI
OUTPUT jack) an AV decoder that does not have
Dolby Digital or DTS decoding capability, be sure
to set "Digital Out HDMI" (_ page 21) to "PCM"
or "Downmixed PCM". Otherwise, high volume
sound may damage your hearing as well as the
speakers.
Note
• You may need to adjust the HDMI audio output
to match the capabilities of your AV amplifier. In
this case, set "Digital Out HDMI" (_ page 21) to
"PCM".
iiliiiiiiiiiiiiiiiiiiiiiiiiiiiiiiiiiiiiiiiiiiiiiiiiiiiiiiiiiiiiiiiiiiiiiiiiiiiiiiiiii
You can listen to down-converted Dolby Digital Plus and Dolby TrueHD as well as Dolby Digital and DTS using a receiver
with Dolby Digital and DTS decoding capabilities and an optical digital input.
This connection requires selection of "Digital Out SPDIF" (Step 16, _ page 21).
i_ Optical digital cable (not supplied)To DIGITAL AUDIO OUTPUT
BITSTREAM/PCM OPTICAL
.L
..................
°°1
D
a©@
-y
AV amplifier
*To use the optical digital output, use an
optical cable to connect this jack to an optical
audio input on a device capable of processing
Dolby Digital, DTS bitstream, or PCM audio.
Sound is output only in 2ch format.
Audio cable (not supplied)_
To ANALOG _
AUDIO OUTPUT I I
........... _t "-'AV amp f er--
16

You may use the internet connection feature to update the player's firmware. See _ page 35.
Some HD DVD discs may enable you to access special HD DVD sites, if you connect the player to the Internet via an
always-on broadband connection. For example, if an HD DVD site includes content such as links to future movie trailers, you
can watch the content on the player via the Internet. You do not need to connect to a PC to use this function.
Read the notes on _ page 28 as well.
w
Broadband modem
(with integrated router)
Broadband _ [_ [_ [_ _[_/
service
Use a commercially available straight LAN cable
(Category 5/CAT5 or better with RJ45 connector).
Press down to remove
Lock portion
Broadband modem Router
Broadband L_ ] L
service
Connect either.
Plug
Caution
• When plugging or unplugging the LAN cable, hold tbe plug portion of
the cable.
• When unplugging, do not pull on the LAN cable but unplug while
pressing down on the lock.
• Do not connect a modular phone cable to the LAN port.
• Since there are various connection configurations, please follow the
specifications of !our telecommunication carrier or internet service
provider.
Note
• Depending on the internet service provider (ISP), the number of devices that carl receive internet service may be limited by the applicable
terms of service. For details, contact your ISP.
After completing all connections, connect the supplied power cord to the AC IN socket and a wall outlet.
To a wall outlet
ON/STANDBY indicator
ON/STANDBY indicator on the player illuminates in red.
Caution
• Do not power this player using any power cord other than the one
supplied with this player.
• Do not use the supplied power cord with any device other than this
player.
17

I Preparation (continued)
1
2
Turn on the TV or monitor, and select the input
which the player is connected to.
Press ON/STANDBY.
ON/STANDBY button
AUDIO SU£TITLE ANGLE DISPLAY
IOPMENU MENU
ON/STANDBY button
ON/STANDBY indicator
Make the settings which are necessary to operate the player.
When the power turns on, ON/STANDBY indicator on the
front panel changes color from red (standby mode) to blue
(operation).
Start up (and disc loading (_ page 24)) may take time.
When you power on this player for the first time, the setting
menu will appear. Go to Step 6 to make the necessary
setup.
• To power off the player
Press ON/STANDBY.
To move a cursor ]
_il I: I ' To enter the I
_ s!ilected item
To return to the ]
previous menu
To input digits }
To display the
setting menu
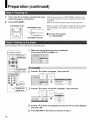
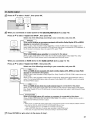
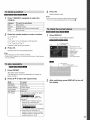
1 Make sure that the following menu is displayed.
(If not, press SETUP to display it.)
_anguag_ 4
Ethernet _,
eene_al _
iiiiiili_i¸ i!i_iiill i!_ ¸ :i ¸¸ ,,,,,,,,,,,,,,,,,,,,, ,,,,,_
guag_ ..........................
2 Press • / • to select "Language", then press OK.
3
Subtitle Language None ]
[ Audio Language English ]
[ On Screen Language English ]
Press • / • to select "On Screen Language", then press OK.
On Screen Language
French
German
Spanish
Italian
4
5
Press • / • to select the language you want use for on-screen displays,
then press OK.
Press RETURN or • to return to the menu of step 1.
18

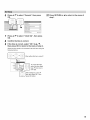
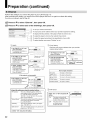
6 Press • / • to select "General", then press
OK.
10Press RETURN or 4 to return to the menu of
step 1.
7
8
9
I Clock Set I
I OSD On/Off Off I
I Remote Controller Sound Off I
I HDMI Control Off I
I Screen Saver Off I
I Maintenance I
I Twin Format Disc HD DVD I
Press • / • to select "Clock Set", then press
OK.
Confirm the time is correct.
If the time is correct, select "OK" by • / •,
then press OK to return to the menu of step 2.
When the time needs to be corrected, set each item using the
following buttons.
\
Time Zone
Year I_
Month /_
Date/_
Time_
After setting this item, press V.
_1 _ Tocorrectthedigit,
_ ?_?_¢_ I select the item again
# Ibyl/,theninput a
new digit.
I _-J I After setting this, press_<
I __ I then • to select OK "then
press OK button.
19

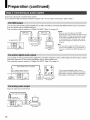
I Preparation (continued)
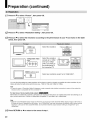
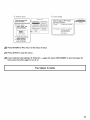
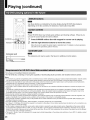
11Press • / • to select "Picture", then press OK.
IEnhanced Black Level Off
IRGB Output Range Standard
IPicture Mode Auto
I Resolution Setting up to 1080i
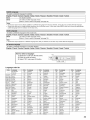
12Press • / • to select "Resolution Setting", then press OK.
13Press • /• to select the resolution according to the performance of your TV as shown in the table
below, then press OK.
1_ HDMI input]
HDM] INPUT
Select the resolution.
I I _°°
I Component video
I input
I_/[IDE O_ellow)input
Select the resolution
(except up to 1080p "
and "up to 1080p/
24Hz") according to
the performance of
the connected TV.
e.g. [ 480i ]
I upto 480p I
I upto720p I
I up to 1080p I
lupto 1080p/24HzI
I 480i I]
I upto480p I
I up to720p I
I up tol080p I
Iupto 1080p/24HzI
Select any resolution except "up to 1080p/24Hz".
You may find that setting the output resolution of the player to match as closely as possible the native resolution of your
display provides the best picture performance (e.g., 720p for 720p and 1080p for 1080p).
Note
• In case the menu of "Resolution Setting" disappears, make composite video (yellow) connection to restore it, then select the
resolution which is compatible with the connected TV.
For best view of movie material (24p output) _
Movie films are traditionally captured at 24 frames per second and this player can maintain this frame rate allowing you to
enjoy in their native form. Connect a 1080p/24Hz compatible TV and select "up to 1080p/24Hz".
Note
• Most film based HD DVDs display images at 24 frames per second and video based HD DVDs display images at 30 frames or
60 fields per second. Depending on the content, "up to 1080p/24Hz" may lower smoothness of playback and/or reduce vertical
resolution. In the case of video based HD DVDs, we recommend that the output resolution setting is changed from "up to
1080p/24Hz".
14Press RETURN or 4 to return to the menu of step 1.
20
Page is loading ...
Page is loading ...
Page is loading ...
Page is loading ...
Page is loading ...
Page is loading ...
Page is loading ...
Page is loading ...
Page is loading ...
Page is loading ...
Page is loading ...
Page is loading ...
Page is loading ...
Page is loading ...
Page is loading ...
Page is loading ...
Page is loading ...
Page is loading ...
Page is loading ...
Page is loading ...
Page is loading ...
Page is loading ...
Page is loading ...
Page is loading ...
Page is loading ...
Page is loading ...
Page is loading ...
Page is loading ...
-
 1
1
-
 2
2
-
 3
3
-
 4
4
-
 5
5
-
 6
6
-
 7
7
-
 8
8
-
 9
9
-
 10
10
-
 11
11
-
 12
12
-
 13
13
-
 14
14
-
 15
15
-
 16
16
-
 17
17
-
 18
18
-
 19
19
-
 20
20
-
 21
21
-
 22
22
-
 23
23
-
 24
24
-
 25
25
-
 26
26
-
 27
27
-
 28
28
-
 29
29
-
 30
30
-
 31
31
-
 32
32
-
 33
33
-
 34
34
-
 35
35
-
 36
36
-
 37
37
-
 38
38
-
 39
39
-
 40
40
-
 41
41
-
 42
42
-
 43
43
-
 44
44
-
 45
45
-
 46
46
-
 47
47
-
 48
48


Toshiba HD-A30KU Owner's manual
- Category
- DVD players
- Type
- Owner's manual
Ask a question and I''ll find the answer in the document
Finding information in a document is now easier with AI