Vulcan Hart K12ETT-ML-136068 Operating instructions

Category
Electric kettles
Type
Operating instructions

This manual is also suitable for

INSTALLATION &
OPERATION MANUAL
FORM 35455 (11-08)
ELECTRIC
TILTING
COUNTER KETTLES
MODELS
K6ETT ML-136067
K12ETT ML-136068
K20ETT ML-136069
For additional information on Vulcan-Hart or to locate an authorized parts
and service provider in your area, visit our website at www.vulcanhart.com
VULCAN-HART
DIVISION OF ITW FOOD EQUIPMENT GROUP, LLC
WWW.VULCANHART.COM
3600 NORTH POINT BLVD.
BALTIMORE, MD 21222
— 2 —
ELECTRIC TILTING COUNTER KETTLES
IMPORTANT FOR YOUR SAFETY
THIS MANUAL HAS BEEN PREPARED FOR PERSONNEL QUALIFIED TO
INSTALL ELECTRICAL EQUIPMENT, WHO SHOULD PERFORM THE INITIAL
FIELD START-UP AND ADJUSTMENTS OF THE EQUIPMENT COVERED BY THIS
MANUAL.
Improper installation, adjustment,
alteration, service or maintenance can cause
property damage, injury or death. Read the
INSTALLATION, OPERATING AND MAINTENANCE
Instructions thoroughly before installing or servicing
this equipment.
IN THE EVENT OF A POWER FAILURE,
DO NOT ATTEMPT TO OPERATE THIS DEVICE.
— 3 —
ELECTRIC TILTING COUNTER KETTLES
TABLE OF CONTENTS
GENERAL .........................................................................................................................................4
Unpacking ...................................................................................................................................5
Installation Codes and Standards .............................................................................................5
INSTALLATION................................................................................................................................. 5
Location ......................................................................................................................................5
Minimum Clearance ................................................................................................................... 5
Installing Electric Kettle on Counter ..........................................................................................6
Installing Floor Mounted K20ETT ..............................................................................................6
Electrical Connection................................................................................................................. 6
Electrical Specifications ............................................................................................................ 6
OPERATION .................................................................................................................................... 7
Venting ........................................................................................................................................ 7
Filling the Reservoir Jacket ....................................................................................................... 7
Electric Kettle Operation ...........................................................................................................7
MAINTENANCE ................................................................................................................................9
Troubleshooting ....................................................................................................................... 10
SERVICE AND PARTS INFORMATION ...................................................................................... 11
— 4 —
ELECTRIC TILTING COUNTER KETTLES
INSTALLATION, OPERATION AND MAINTENANCE OF
K6ETT, K12ETT, K20ETT
ELECTRIC STEAM TILTING KETTLES
SAVE THESE INSTRUCTIONS
FOR FUTURE USE
GENERAL
Vulcan countertop tilting kettles are produced
with quality workmanship and material. Proper
installation, usage and maintenance will result
in many years of satisfactory performance. It
is suggested that you thoroughly read this
entire manual and carefully follow all of the
instructions provided.
Electric kettles must be connected to an
electrical supply according to current local
codes. The electric steam kettles are available
in 6-, 12- and 20-gallon capacity models.
TABLE 1. MODEL CHART
Model Gallons Quarts Liters
Number
K6ETT 6 24 23
K12ETT 12 48 45
K20ETT 20 80 76
60
30
30
150
120
90
0
H
g
v
a
c
p
s
i
Fig. 1 K12ETT Electric Steam Kettle
Fig. 2 K20ETT Electric Steam Kettle
— 5 —
ELECTRIC TILTING COUNTER KETTLES
Before installing, verify that the electrical supply
required for the equipment covered by this
manual agrees with the specifications on the
machine data plate, located on the back of the
unit. The data plate for the kettle is located on
the control box. If the electrical supply does
not agree with the equipment requirements,
do not proceed with the installation. Contact
your dealer or Vulcan-Hart Company
immediately.
UNPACKING
This kettle was inspected before leaving the
factory. The transportation company assumes
full responsibility for safe delivery upon
acceptance of the shipment.
Immediately after unpacking, check for
possible shipping damage. If kettle damage is
found, save the packaging material and
contract the carrier within 15 days of delivery.
INSTALLATION CODES AND
STANDARDS
In the United States, Vulcan kettles must be
installed in accordance with:
1 State and local codes
2 NFPA Standard NFPA-96, Vapor Removal
from Cooking Equipment, latest edition,
available from the National Fire Protection
Association, Batterymarch Park, Quincy,
MA 02269
3 National Electrical Code (ANSI/NFPA
No.70, latest edition) available from the
National Fire Protection Association
(NFPA), Batterymarch Park, Quincy,
MA 02269
In Canada, Vulcan kettles must be installed in
accordance with:
1 Local codes
2 Canadian Electrical Code (CSA C22.2
No.3, latest edition) available from the
Canadian Standards Association, 5060
Spectrum Way, Mississauga, Ontario,
Canada L4W 5N6
LOCATION
The K6ETT and K12ETT tilting kettles are to
be permanently mounted on a counter or a
stand. The K20ETT is to be floor mounted.
MINIMUM CLEARANCE
TABLE 2. MINIMUM CLEARANCE
REQUIREMENTS
Capacity in Clearance in
Gallons Inches
6 5.25
12 6.5
20 8.0
INSTALLATION
— 6 —
ELECTRIC TILTING COUNTER KETTLES
INSTALLING ELECTRIC KETTLE ON
COUNTER
Fig. 3 Mounting Hole Location
1. Position the kettle on the counter or stand
in its final installed location with sufficient
rear clearance (see Table 2 for minimum
required clearance) from the wall to allow
the kettle to tilt completely without
obstruction. Mark the four corner locations
of the kettle base as shown in Fig. 3.
2. Remove the kettle from the counter and
drill four
7
/16" diameter holes according to
the measurements in Fig. 3.
3. Prepare a clean, dry surface according to
package directions on a high grade NSF
listed sealant.
4. Apply a continuous bead of sealant along the
complete outer edges of the kettle base.
5. Position the kettle in place and secure
firmly with supplied hardware.
6. Thoroughly wipe off excess sealant.
INSTALLATING FLOOR MOUNTED K20ETT
1. Position the kettle in its final installed
location to provide drainage directly below
pour path, with sufficient rear clearance
(see Table 2) from the wall to allow the
kettle to tilt completely without obstruction.
2. Level the kettle by making necessary
adjustments using the flanged feet.
3. Mark anchoring hole locations through the
flanged feet.
4. With hole location marked, drill holes to
accommodate
5
/16" studs.
5. Reposition the kettle.
6. Bolt the kettle down and apply a high grade
NSF listed sealant around bolt heads and
flange making contract with floor surface.
Wipe off excess sealant immediately.
ELECTRICAL CONNECTION
Electrical and grounding
connections must comply with the applicable
portions of the National Electrical code and/
or other local electrical codes.
1. Open control box.
2. Connect electric supply to terminal block.
3. See wiring diagram located inside the
control box lid.
ELECTRICAL SPECIFICATIONS
TABLE 3. ELECTRICAL SPECIFICATIONS
Model PH 208V / 240V 308V / 480V
K6ETT 1 7.5 kW-10kW N/A
K12ETT, 1 12 kW-16kW N/A
K20ETT
K6ETT 3 7.5 kW-10kW 7.5 kW
K12ETT, 3 12 kW-16kW 12 kW
K20ETT
Note: K6ETT and K12ETT have external
terminal block. In K20ETT, terminal
block is inside control box.
— 7 —
ELECTRIC TILTING COUNTER KETTLES
The kettle and its parts are
hot. Use care when operating, cleaning or
servicing the kettle.
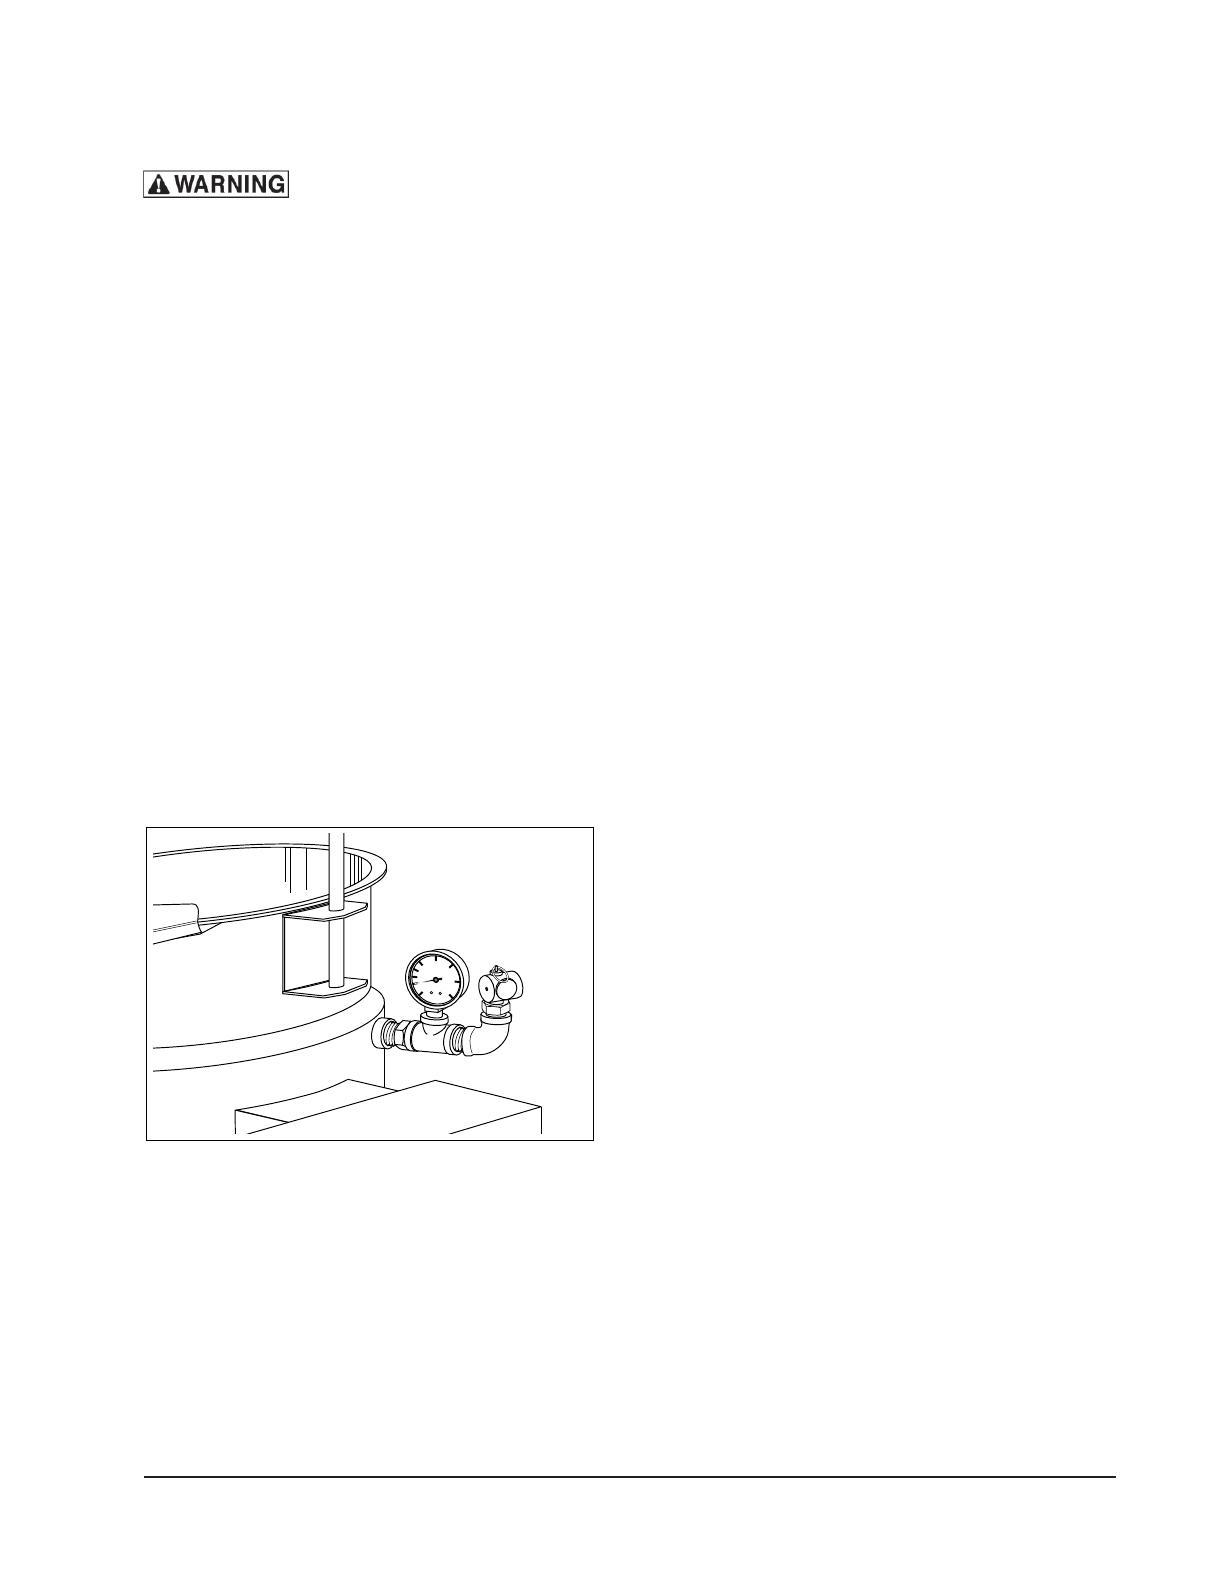
VENTING
While the kettle is cold, check the vacuum/
pressure gauge. The gauge should be in the
vacuum zone measuring between 25 to 30 in.
Hg (84 to 100kPa). If not, there is air in the
jacket and it must be removed by venting for
proper heating.
1. Place the power switch in the ON position
with the kettle empty.
2. Set the temperature control thermostat to
boil and heat until the heat indicator light
goes off.
3. Pop the pressure relief valve for 10
seconds.
4. Let the kettle cool. Check for a correct
vacuum of 25 to 30 in. Hg (84 to 100kPa).
If reading is not low enough, repeat the
venting procedure steps 1 through 3.
60
30
30
150
120
90
0
H
g
v
a
c
p
s
i
Fig. 4 Rear of Kettle
FILLING THE RESERVOIR JACKET
During use, the reservoir water level must be
maintained high enough to submerge the
heating elements. If the low water light is
illuminated during use, the water level is not
adequate and the low water control has
automatically shut off the heating elements.
OPERATION
Before adding water to the reservoir, the water
supply should be analyzed to ensure that
hardness is no greater than 2.0 grains per
gallon and the pH level is within the range of
7.0 to 8.5. Water which fails to meet these
standards should be treated, or use ionized
distilled water with sodium. Equipment failure
caused by inadequate water quality is not
covered under warranty.
1. Set the thermostat and power switch to
OFF position.
2. Release any pressure by popping the
pressure relief valve. Then remove the
1
/
2" plug on the back of the kettle.
3. Insert a funnel into the vent opening and
add 3 or 4 ounces of water.
4. Replace and properly tighten
1
/2" plug.
5. Turn on the unit.
If the low water light turns on, turn off the unit
and repeat steps 3 and 4. If low water light is
off, follow the venting procedure (see
VENTING) to vent air from reservoir.
ELECTRIC KETTLE OPERATION
1. Turn the console power ON/OFF switch to
the ON position.
2. Preheat the kettle by placing the thermostat
knob at Simmer/Boil (desired setting) and
wait until the temperature light cycles off.
NOTE: Food products with milk or egg base
should be placed into a cold kettle before
cooking. Avoid sudden contact of these
food products to a hot kettle surface
because they stick to the surface.
3. Pour the food to be cooked into the kettle.
— 8 —
ELECTRIC TILTING COUNTER KETTLES
TABLE 4. CONTROLS AND INDICATORS
Item Function
Tilt Handle Tilts kettle.
Power ON/OFF Switch Controls power to the kettle.
Power ON Indicator (Amber) When lit, unit powered.
Low Water Indicator (Red) When lit, indicates insufficient water in the kettle jacket.
Temperature Light (Amber) When lit, indicates the heating element is on.
Thermostat Knob Regulates kettle temperature from simmer to a rolling boil.
Vacuum Pressure Gauge Indicates the vacuum inside the kettle jacket.
Tilt Lock Mechanism Prevents kettle from tilting.
60
30
30
150
120
90
0
H
g
v
a
c
p
s
i
Fig. 5 Kettle Controls
THERMOSTAT AND TEMPERATURE
1. Place the thermostat knob at the required
temperature setting, from warm to boil,
representing a temperature range from
approximately 90ºF to 300ºF (32ºC to
149ºC) in the reservoir.
2. When the cooking is finished, set the
thermostat knob and the power ON/OFF
switch to the OFF positions.
3. Pull the tilt lock mechanism to release tilt
lock. Pour the finished product from the
kettle using the tilt handle.
4. When cooking is completed, immediately
add water to the kettle to prevent residue
from drying and sticking to the inside of the
kettle.
5. Allow kettle to cool and then follow
CLEANING procedure.
— 9 —
ELECTRIC TILTING COUNTER KETTLES
Disconnect
electrical
power to the machine and
follow Lockout/Tagout
procedures before cleaning.
NOTE: Do not hose down under any
condition. Failure to comply will void
the warranty.
The kettle interior and exterior should be
washed after each use when a different food
is to be cooked next or when cooking is
completed for the day.
MAINTENANCE
1. Add water to the kettle for cleaning and to
prevent residue from drying and sticking to
the inside of the kettle.
2. Loosen stuck-on food by allowing it to soak
at a low temperature setting.
Never use harsh or corrosive cleaning
chemicals.
Never scrape the inside of the kettle with
abrasive cleansers metal tools or steel
scouring pads, which will scratch the surface,
spoil the appearance and make it more difficult
to thoroughly clean.
3. Add mild detergent and scrub the kettle
interior with a nylon brush.
4. Thoroughly rinse the interior and dry with a
soft cloth.
5. Rinse the exterior and dry with a soft cloth.
CLEANING
— 10 —
ELECTRIC TILTING COUNTER KETTLES
SYMPTOMS POSSIBLE CAUSES/REMEDY
Power switch not turned on/Turn on kettle power switch.
Kettle unplugged/Plug kettle in.
Breaker tripped or turned off/Reset or turn breaker on.
Internal fuse failed/Call authorized servicer.
Controls failure/Call authorized servicer.
Power switch not turned on/Turn on kettle power switch.
Thermostat not set/Set thermostat to desired level.
Kettle is up to set temperature/If higher temperature desired, increase
thermostat setting.
Kettle not positioned up right/Tilt kettle up till tilt lock latches.
Kettle low on water, low water light is on/Fill jacket and vent per
procedure in Installtion & Operation manual.
Controls failure/Call authorized servicer.
Heating element failure/Call authorized servicer.
Controls failure/Call authorized servicer.
No vacuum in jacket/Refer to venting instructions in Installtion &
Operation manual.
Wrong supply voltage for kettle/Check that data plate matches building
supply voltage or call authorized servicer.
Low voltage to unit/Call authorized servicer.
Kettle not coming
on, no power light.
Kettle not heating,
no heat light
Kettle not heating,
heat light is on
Kettle heats up slow
or will not come
to boil
K6ETT, K12ETT, K20ETT ELECTRIC COUNTERTOP KETTLE TROUBLESHOOTING
— 11 —
ELECTRIC TILTING COUNTER KETTLES
To obtain service and parts information concerning this model, contact the Vulcan-Hart Service
Agency in your area (refer to our website, www.vulcanhart.com for a complete listing of Authorized
Service and Parts depots).
When calling for service, the following information must be available: model number, serial number,
manufacture date (MD) and voltage.
SERVICE AND PARTS INFORMATION
— 12 —
ELECTRIC TILTING COUNTER KETTLES
(11-08)
PRINTED IN U.S.A.
  • Page 1 1
  • Page 2 2
  • Page 3 3
  • Page 4 4
  • Page 5 5
  • Page 6 6
  • Page 7 7
  • Page 8 8
  • Page 9 9
  • Page 10 10
  • Page 11 11
  • Page 12 12

Vulcan Hart K12ETT-ML-136068 Operating instructions

Category
Electric kettles
Type
Operating instructions
This manual is also suitable for

Ask a question and I''ll find the answer in the document

Finding information in a document is now easier with AI