
DFH14102W

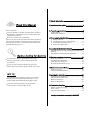
DishwasherFeatures.......... ..... ..................... ...3
A Wa te r S often er... ...... ...... ...... ... ...... ...... ..... ..4、
At tentio n b efore or af ter loadin g the Dish was her
Baskets..........................................................9
FilteringSystem................ .............................13
Caring for the Dishw asher..................... .........14.
B Loa ding the S altinto t heSoft ener. ...... ... ...... .5、
C Fill theRinseAid Dispenser.........................5、
D Functi onofDetergent . ................................6
、
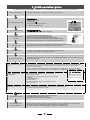
WashCycl eTable..... ......................................11
Turningon theAppliance................................12
Change theProgramme.............. ....... .........12....
At the end of theWash Cycle...........................12
PositioningtheAppliance...... ............. ..........15..
Wate r C o nnec ti on. ... . ..... ...... .... ...... ..... .. . ..... ..16.
A bout P ower C onne c tion.. .. ... .... .. . ... ..... . . ...... .1 5.
St artof dishwasher........ ........ ................ ......17..
Beforecallingforservice.... ............... ........ .....18.
Errorcodes.................................... ..............1 9.
Technical information.............................. .....20..
ControlPanel...................................................3
The Method Loading Normal Dishware.............10
To r eview the se ction o ntroubl eshooting Tip s
willhelpyoutosolve somecommon problems
by yourself .
Dear Cu stom er ,
Please carefully readthis manual beforeusing the
dishwasher, it will helpyou to useandmaintain the
di shw a sher prope rly.
Passit on to anysubsequentowneroftheappliance.
Thi s ma nual c ont ain s sec ti ons on safety Instru ct io ns ,
OperatingInstructions,InstallationInstructionsand
Tr ou bl es hooti ng Tip s, etc .
The man ufac tu rer, follow ing a pol icyo fcon sta nt
developmentandupdatingof the product,may
make m odifi catio ns w itho ut giving prior no tice.
This usermanualshallalsobegot fromthe
manufacturerorresponsiblevendor.
Keepit to refertoitata laterdate.
Ifyo ucan not solv ethe problems by yo urself ,
please ask fo rt he help o f p rofe ssiona l te chnician s.

Thisapplianceis intended to beused in household
andsimilarapplicationssuch as:
-staff kitchen areas in shops, offices and other
working environments;
-farm houses;
-byclientsin hotels,motels and other residential type
environments;
-bedand breakfast typeenvironments.
Thisappliancecanbe used by children aged from8
years and above andpersonswith reduced physical,
sensory or mental capabilities or lack of experience
andknowledgeif theyhave beengivensupervision
or instruction concerning useof the applianceina
safe way andunderstand the hazardsinvolved.
Children shall not play with the appliance. Cleaning
andusermaintenance shall not be madeby children
withoutsupervision. For EN60335-1
This appliance is not intended for use by persons
(including children)withreducedphysical, sensory
or me nta l c apabi li tie s, or lac k of exp er ie nce an d
knowledge ,unless they have been given supervision
or instruction concerning useof the appliancebya
personresponsiblefortheir safety. ForIEC60335-1
This applianceis for indoor useonly,for household
useonly.
To prote ct against the risk of electrical shock, do not
immerse theunit,cord or plug inwaterorotherliquid.
Please unplugbefore cleaningand maintenancethe
appliance.
Use a soft clothmoistenwithmild soap,and then use
adryclothtowipeitagain.
()
()
Wh en using you r dish washer,
follow the pre cautions listed be low:

This appliance must be earthed. In the event of a
malfunction or breakdown, earthing will reduce the risk
of anelectric shock by providing a path of least
resistance of electric current. T his appliance is equipped
with a cord having an equipment-earthing conductor
and a grounding plug.
The plug must be plugged into an appropriate outlet that
is installed and earthed in accordance with all local
codes and ordinances.
Improper connection of the equipment-earthing
conductor can result in the risk of an electric shock.
Check with a qualified electrician or service
representative if you are in doubt whether the appliance
is properly grounded.
Do not modify the plug provided with the appliance;
If it does not fit the outlet.
Have a proper outlet installed by a qualified electrician.
Do not abuse, sit on, or s tand on the door or dish rack of
the dishwasher.
Do not operate your dishwasher unless all enclosure
panels are properly in place.
Open the door very carefully if the dishwasher is
operating, there is a risk of water squirting out.
Do not place any heavy objects on or stand on the door
when it is open. The appliance could tip forward.
When loading items to be washed:
1) Locate sharp items so that they are not likely to
damage the door seal;

2) Warning: Knives and other utensils with sharp points
must be loaded in the basket with their points down or
placed in a horizontal position.
Check that the deterge nt powder is empty after
completion of the wash cycle.
Do not wash plastic items unless they are marked
dishwasher safe or the equivalent.
For plastic items n
ot so marked,
check the manufacturer's
recommendations.
Use only detergent and rinse additives designed for
an automatic dishwasher.
Never use soap, laundry detergent, or hand washing
detergent in your dishwasher.
Children should be supervised to ensure that they do not
play with the appliance.
The door should not be left open, since this could increase
the risk of tripping.
If the supply cord is damaged, it must be replaced by the
manufacturer or its service agent or a similarly qualified
person in order to av oid a hazard.
During installation, the power supply must not be
excessively or dangerously bent or flattened.
Do not tamper with controls.
The appliance is to be connected to the water mains using
new hose sets and that old hose-sets should not be reused.
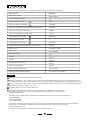
The maximum nu mber of place settings to be washed
is 14.
The maximum permissible inlet water pressure is 1MPa.
The minimum permissible inlet water pressure is 0.04MPa.

Dispose of the dishwasher packaging material
correctly.
All packaging materialscan be recycled.
Plasticparts are markedwith thestandard
international abbreviations:
PE forpolyethylene,e.g. sheet wrapping material
PS for polystyrene, e.g. padding material
POM polyoxymethylene, e.g. plastic clips
PP polypropylene, e.g. Salt filler
ABS Acrylonitrile Butadiene Styrene, e.g.Control
Panel .
Packaging material could be dangerous for children!
For disposing ofpackage and theappliance please
go to a recycling centre.Therefore cut off the power
supply cable and make the door closing device
unusable.
Cardboard packagingismanufactured from recycled
paper and should be disposed in the waste paper
collection for recycling.
By ensuringthisproductis disposedofcorrectly, you
willhelp preventpotential negativeconsequences
fortheenvironmentandhuman health,whichcould
otherwise be caused by inappropriate waste handling
of this product.
Formore detailedinformation aboutrecycling ofthis
product, please contact your local city office and your
household waste disposal service.
DISPOSAL:Donot dispose this product as unsorted
municipal waste. Collection of suchwaste separately
forspecial treatmentis necessary.

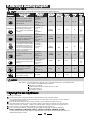
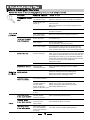
With each wash cycle.
Compartment
For programmes with p re- wash only.
(Follow the user instructions!)
Electric indicator on control panel (if provided).
Check the rinse aid level
(On models with water softener system only.)
Electric indicator on control panel (if provided).
If there is no s alt warning light in the control panel
(for some models), youcan estima te when tofill the salt into
the softener by the number of cycles the dishwasher has run.
Checkthe regene ration
salt level
Load the baskets
Select a programme
Close the door , turn on the water tap and press the . The machine will start working
after about 10 seconds.
Start/Pause Button
Runnin g the dishwasher
Switch off the appliance
Turn off the water tap,
unload the baskets
Fill the detergent dispenser
Warning: wait a few minutes (about 15 minutes) before unloading the dishwasher to avoid handling
the dishes and ute nsils while they are s till hot and more susceptible to break.
They will also dry better .Unload the appliance, starting from the lower basket.
Changing the programme
Add forgotten dishes in the
dishwasher.
Scrape off any large amount of leftover food. Soften remnants of burnt food in pans,
then load the baskets. Refer to the dishwasher loading instructions.
Press the Programme Button until the selected programme lights up.
( See the section entitled Operationg instruction )“”
When the working cycle h asfinished, the buzzerof the
dishwasher will sound 8 times, thenstop.
Turn off the appliance using the On/Off Button.
If the appliance is switched
off during a wash cycle.
Open the do or car e full y.
Hotsteammay escape
w hen th edoor isopen ed!
If the appliance is switched of f during a wash cycle, when switched
on agai n, please re-select the washing cy cle and operate the dishwasher
according to the original Power-on state ).
Switch on the appliance Press the On/Off button to switch on the appliance,Open the door.
For detailedoperating methodread thecorresponding contenton theinstruction man ual.
1. Arunning cycle can only be modified if it has been running for a short time . Otherwise the detergent
m ay have already been relea sed and the water already drained. If this is the case, the detergent
dispenser must be refilled.
2.
Press the Start/Pause button, the machine will be in standby state, press the program
button more than 3 seconds then you can change the program to the desired cycle setting
1.Pr ess the Start/Pause Button to stop the washin g.
2.Open the door a little .
3.After the spray arms stop working, you can open the door
completely.
4.Add forgotten dishes.
5.Close the door
6.Pr ess the Start/Pause Button, the dishwasher w i ll run
after 10 seconds.
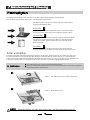
A B C

3.Operation Instruction3.Operation Instruction
33
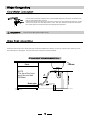
before using it for the first time.
To get the best performance from your dishwasher, read all operating instructions
IMPORTANTIMPORTANT
Dishwasher FeaturesDishwasher Features
11
12
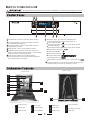
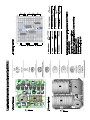
Back View
1
2
3
4
5
7
8
9
10
Front view
Lower basket
Salt container
Dispenser
Cup shelf
Spray arms
Filter assembly
Inlet pipe connector
Drain pipe
Upper basket
Cutlery rack
Top spray arm
1
Inner pipe
5
6
7
8
9
10
12
11
3
2
4
6
Control PanelControl Panel
Start /Pause button: To start the selected
washing program or pause the washing program
when the machine is working.
On/Off Button: To turn on/off the power supply.
Delay Button : To Press the button to delay.
Program Button : To Press the button to select
appropriate Program.
Alt Button: Dual zone wash function, press the
button to select either upper basket or lower basket
loaded, and the response indicator .
Language Button: To Press the button to select
the appropriate language.
Display screen: to show the reminding time
and the state(running state, delay time etc )
Program indicators:
Rinse Aid indicator:
Indicates when the dispenser needs to be refilled.
Child lock indicator:
Add salt indicator:
Indicates when the dispenser needs to be refilled.
Delay hours indicator:
Language indicator:
Delay time ,Remain time ,or error codes indicator:
Alt functions indicator:
11
22
33
44
55
66
77
11 33
66
44 7 7 55
2288
Child lock button: press the two buttons for 3 seconds
simultaneously to lock the program .
88
or unl koc

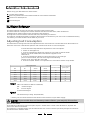
Th e wat er so ften er must be s et m anu al ly, usin gthe wa terhard ness di al.
Th e wat er soften eris des igned to remove mi nerals andsa lts f romt hewat er, w hich woul dha ve
a detrim enta lor advers e effe ct on the ope ration of the appliance.
Th e higher the cont entof these mine rals and salts ,th ehar der your wat er is .
Th e soft ene r sho uld be adjus ted according to the hard nessof t he wate rin y our area. Yo ur local WaterA uthor it y
can advise you onthehardnessofthewater inyour area.
AdjustingSalt Consumption
The dishwas her is de signed toallow for a djus tment i n the amo unt of sa lt co nsumed bas ed on the ha rd ness of
the waterused.Thisisintended tooptimiseandcustomise thelevelof salt consumption.
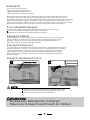
1. Swit chon theappl iance;
2. Press the Start/Pause button for morethan 5 secon ds to start the w ater
softener set model withi n60seco nds afte rthe a ppliance w as
sw it ched on;
3. Press the button to sel ectthe proper set a ccording to
your lo calenvironm ent, the sets willchange inthe following
sequence : H1 ->H2->H3->H 4->H5->H6;
4. Press the On/Off butto n or no operation for 5 seconds t o end these tup model.
St art/P ause
WAT ER SOFTENER
Th eh ardness ofthe wa terv ar iesfrom place to plac e.If har dwater isused inthe dishwa she r, de posits w ill
form on the dish esa nd uten sils .
Th ea pplian cei seq ui pped with asp eci al so ften er that uses asalt container specifically des ign ed to eliminate
lime an dmi ne ra ls fr om the wate r.
Contact your local wat erbo ard f orinfor mation on the har dne ssof your w ater su pply.
dH
mm ol /l
0~90~5 0~0.94
H1
0
10-20
6-11
1.0-2.0 H2
9
21-30
12-17 2.1-3.0
H3
12
H4
20
fH
0~6
7-14
15-21
Clar ke
WATER HARDNESS
SelectorPo si tion
Salt consumption
(gram/cycle)
Ple ase f ollo wthe s teps bel ow fo r ad justment insal tc onsumpt ion.
18-2 2 31-40 22- 28 3 .1- 4 .0
If your model doesn ot have anyw ater soften er, you mayskip this section.
°
Clark:British degree
°
fH: F rench de gree
°
DH : Ge rman de gre e
dH=1.25Clarke=1.78fH=0.178mmol/l
°
°
°
1
41-60
23-34 4.1-6.0
H5
30
H6
60
29-42
35-5 5 61-98 43- 69 6 .1- 9 .8
The manufa ctory s etting: H4(E N50242)
Be fore using you r dis hwashe r for th efirst time :
A. Set the wa ter softener
B. Add 1.5Kg d ishw ash er sa lt an dt hen f ull fi llthe salt con tainer with w ater
C. Filltherinseaiddispenser
D. Fill indete rgent

1.The sal tcon tai ner must onl y be r efilled w hen the salt wa rning light inthe control panel comes on.
Depend ing on how well thes alt dissolve s,th es alt warnin glight may st ill be on even though the
salt contai ner is fi lled .
If ther eisn osalt w arning light in the con tr olpanel (fo rso me Mode ls) ,you c an estimate wh ent o f ill
the s altint othe softener by the cycles that the dishw asher has run.
2. If th ereare spills ofthe salt ,a soak or a r apid pro gramshoul d be run to remo vethe exce ssive salt.
Always use thesalt intende dfor use w ith di shwasher.
The salt c o ntain er i slocated beneath the lower basket and shoul db efill edas explaine d
int he f oll ow ing :
Attention!
Only us e salt spe cifi cally desi gne dfort he usei nd ishwa shers! E very other type of
salt n ot speci fical ly de signed fo r theu se in ad ishwas her, espe cial lyt able salt, wi ll
damage the w ater sof tener. In case of dama ges caused by the use o funsuit able
salt t he ma nufact ure rdoes not g ive anywa rranty no r is li able for a ny damag es cau sed.
Only fil lwi thsal tjust b efore star ting one of th eco mp let e washingp rograms.
This wi llp revent anyg rains of sa ltor sa lty wate r, w hi ch ma yhave b een spill ed,
remain ing on the bo ttom o fthe machi nef or anype riod oftime , which may cau se
c o rrosion.
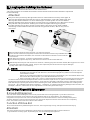
Th er i nse aid isrel eas edd uri ngthe final rin seto pr event water fro m forming dr oplets o ny o ur dis he s, w hic h can
leave spots ands treaks. It also improve sdry ingby allowing wate rtor oll offt he di shes. Your dishwasheri s
designedtouseliquidrins eaids.The rinsea iddispenser islocated insidethedoornext tothe detergentdispenser.
To fil l the di spe ns er, op en the cap a nd pour the r inse ai din to th e dispens er until t hele vel i n dicator t urns com pletel y
black. Thev olume oft he ri nseai dc ontaineris about 110ml .
RinseAid Dispenser
Function of RinseAid
Rinse ai d is aut om at ic ally a dded during the l ast r inse, ensuring thorough rinsi ng, and spo tan dst reakfree dryi ng.
Attention!
Only usebranded rinseaid for dishwasher.Never fill therinseaiddispenser withanyothersubstances
(e.g. Di shwasher cleani ng ag ent, liq uid d eterge nt) .Th is wou lddamag e the app liance .
3.I fthe mach ine needs to be dum ped f or ther easo nsof tra nsit, r ep airand s o on , pleas e u set hebi bul ouscloth or
analog toblotup thewaterin the salt container,andscrew thecaptightly,afterward, transitor repairthemachine.
Af tertr ansi ting orre pairi ng th em ach inean dc onfirmin git inorde r, load the salt into thes ofte nera ccor dingto t he
proces sof B. Loadi ng the salt int ot heS oft en er .O ther wise , itc ould b em ake the big da mage to the ma chin e,for
examp le,rustiness,conkand so on. Such problemsareoutof theguaranteeran ge.
“”
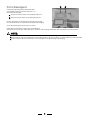
Fullfillthesaltcontainerwithwater,Itis normalfora smallamountofwatertocome outofthe
salt contai ner.
A Afterthelowerbasket hasbeenremoved,unscrewandremovethecap from thesaltcontainer.
C
D Af ter f illing t he contai ner, scre w the c apti ght ly bac kcl ockwise.
E T he salt war ning light will st op bei ng aft er the salt contai ner h asb eenfi lled with s alt.
F Immediatelyafter fillingthesaltinto thesaltcontainer,a washingprogramshould bestarted
p rogr am Otherw ise t he filt er syste m, pump or othe r import ant par ts of t he machine ma yb eda maged
by salty w at er. This i sout of w arrant y.
(We s uggest to us ea short
).
B Place the end of t he fu nnel (sup plied) in to th e h ole a nd intro du ce a bout 1 .5kg o f di shwas her sa lt.

To open the di spen ser,tur nthe cap to the "o pen" (le ft) a rrow an dl ift it out.
Po ur t he rin se aid int othe dispe nser, be ing caref ul not to o ver fill .
Replace the ca pby inserting italigned with "open " arr owand t urningit tot he closed (right) arrow.
Adjusting RinseAid Dispenser
The rinse aid dis penser has si x or four s ett ings.Al ways sta rt wi th thed ispe nser
set o n "4". If spot s and p oo r dr ying are a p rob lem, increa sethe amo untof r inse
aid d ispensed b y rem oving the d ispe nserli dand r ot atin gthe d ial to "5". If the
dishes still are no tdr yi ng pr operlyo r are show s pots, a dj ustt he dial to the next
highe r lev erun til your dish es are sp ot-free. The recomm end ed set ting is "4".
(Factory valueis "4".)
Increasethe dose if thereare dropsof waterorlimespotsonthe dishes afterwashing.
Reduceitifthere aresticky whitis hstains on yourdish esorabluishfilm on glasswareor
knife blades.
1
2
3
As the ri nse aidd imin ishes,th esiz eo f th e black dot
ontherinseaidlevel indicator changes,asillustrated below.
Full
3/4full
1/2full
1/ 4 full - Should refilltoeliminate spotting
Em pt y
When to Refill the RinseAid Dispenser
Ifth erei s no rinse-aid war ning ligh tin thec ontr olp anel, you can estimate the am ount fro m th e col our
ofth eop tical level indicator C loca ted ne xt to thecap. When th e rin se-a idc onta iner isful l,the whole
indicato rwill bedark .As t herinse -aid diminishes, thesi zeof the dark dot de cr ea ses. You sho uld n ever let
t he r i ns e aid l ev el fall 1 / 4 full.
durin gthe next wa sh. Don 'tfor get t o re plac et he cap be for e you close dis hwa she rdo or.
Clean up a n y rinse ai d sp i ll ed while du rin g filli ng wi th a n ab so rbe nt cloth t o a v oi d ex ce ssiv e f oam i n g
Deterge nts wi th its chem ical ingredie nts ar enecess ary to re move dir t,c rush dir t an d trans port itou tof the di shw asher.
Mostofthecommercialqualitydeterge ntsare suitableforthispurpose.
""
ProperUseofDetergent
Useonly det er gent s pe cifically m ade for the use i nd ishwa shers. K eep your det ergent fresh anddry.
Don't putpowdereddetergentinto the dispenser until you'reready to wash dishes.
Attention!

Amount ofDetergenttoUse
Based ontheir chemicalcomposition,detergentscanbesplitintwobasictypes:
Detergenttabletsof different brandsdissolveat differentspeeds. For thisreasonsome
dete rgen tta bl etsca nnot dissolve an ddev el op the irf ull cl eanin gpower dur ing short
prog ra ms.There fore please u sel ong program swh en u sin gde terg ent t ablet s, t o
ensur e the comp lete r e moval of det erg e n t re si du al s.
The dispens er m us tbe re fille dbef or e th e star tof e ach wash cy cle f ollowing the inst ructi ons
provided i nt he w ash cycle t able .You rdis hwa sher uses le ssde terg ent and rinse aid tha n
Conventionaldishwasher.Generally, only one tablespoon ofdetergent isneededfor
anormalwashload. Moreheavily soileditems needmoredetergent.Alwaysaddthe
dete rgen tj ust b e fore star ting the dish was her, othe rwis eit coul d g e tdamp and w ill n ot
di s sol v e prope r ly.
Concentrated Detergent
DetergentTablets
Detergent Dispenser
conventional, alkaline detergentswithcausticcomponents
l ow a lk al i ne concentrat ed det erge nt s w i t h natural e n zymes
Normally ne w pu lverised dete rgent is with out phos pha te.T hus the wate rso ftener fu ncti on o f
phos ph ate i s not give n. I n t h i s c a se we r e com m e nd to f il l salt in the sa lt co nta i n er ev en when
the h ardness of wate r is only 6 d H.If dete rg entsw it ho ut phosphate are used in the case of hard water
often whi tes pots app ear ond ish esa ndglasse s. I n this case pl ease add mo re detergent to reach
bett er resu l ts . Dete r gents wi tho ut ch l orine d o on ly bl e ach a little. Stronga nd c olo u red s p o t s will not
bere mo ved com plete ly. Inth isc a se p lease ch oos ea prog ram wi th ahi gher tem pera ture.
°
Detergents
The re ar e 3 s orts of det e rgent s
1.Withphosphate andwithchlorine
2.Withphosph ate andwi thout chlorine
3.Wi thou tph osphate and without chlo rine
Always a dd th ed etergent j us t b efore start ingea chw ashcycle.
Onlyusebrandeddetergentaidfordishwasher.
If the l id is closed: pr ess rele asebutt on.T he l id will sp ring open.
Detergent t able t
Detergent pow der
Push latch to open
Dishwasher detergent is corrosive!
Takecare to keep it outof reachof children.

Fillt hede tergent dispens erw ith d etergen t.
Th e mar k ing i n d i c ates t h e dosi ng l eve l s , a s
i ll us tra ted o n the r ight:
Th ep lace o f main wash cyc ledeterg ent pl aced.
Th ep lace of pr e-wash c ycle det erge nt p laced.
Pleaseo bserve th em anufa ct urers do sing and stor age
Recommendationsas statedonthedetergent packaging.
Close the lid and press untilit locks in place.
I f th e d i sh es are h eav i ly soi l ed , pl ace a n a ddit i o nal
detergen tdos ein the pre- was hdetergent cha mber.Th isd etergen t will take effe ctd uring the pre -wash p has e.
A
B
Fillin Detergent
You f indin formation ab out the amo unt ofdet er gent forth esi ngle pro gram me on t he l astpage .
Pl eas ea ware, tha t accordi ng t othe lev elso iling and the spe cific har dness of wat er d iffer ence sa repossib le.
Pleaseobservethemanufacturer's recommendationsonthe detergentpackaging.
A B

Cutlery withwooden,horn china or
mother -of-pearl handle s
Plast icite msthat aren otheat resist ant
Older cut lery w ith glued par tst hat arenot
temperatureresistant
Bonded c utl er y i te m sor di shes
Pewter or coo per items
Crystal gla ss
Steel items subject torust ing
Wooden p latters
Items madefromsynthetic fibres
So me types of g lasses can b ecome
dull afte ra larg enumber of w ashes
Silv er an d a lumi num par ts have a
tendencyto discolourduring washing
Glazed patterns mayfadeif machine
washed frequently
Are not suitable
Are of limited suitability
Dishesanditemsofcutlerymustnotlie insideoneanother, orcover eachother.
To av oidda mage to gl asse s,th eym ust not touc h.
Lo ad large ite msw hic h ar e most difficult to c lea nint oth e l owe rbask et.
The u pper basket i sdesig ned to ho ld m ored eli cate and lighter d ishwa re such as glasses ,coffee
andteacups
Lo ng blad edkni ves stored inan upright positio nare a p otenti al hazard!
Lo ng and/ ors harp itemso f cut lery such as carvi ng kniv esmust bepositi oned
h orizon ta lly i n the upper b aske t.
P lease do not ove rload yo ur di shwashe r. T his is i mp or tant forgoo dresu ltsa ndfor
r easonab leconsu mpti ono f en ergy.
Load holl owi tems such as cup s,glasses, pans etc. With the openi ng f aci ng downwa rds s o that
w a t er c ann o t c o l l ect i n t he c ont a i n e r or a dee p base .
Considerbuyingutensilswhich are identifiedas dishwasher-proof.
Usea mild detergentthatisdescribedas'kindtodishes'.Ifnecessary, seek further
informationfromthedetergentmanufacturers.
Forparticular items,selectaprogramwithaslowatemperatureaspossible.
To pr even t da ma ge, d o n ot take gla ssandc utl ery out of the di shwas he r i mmed iatel y
aft er the p rog ramm ehas ende d.
(For b est perf ormance ofthe dishwasher, f ollow the seload ingguide lines.
Featu res and appeara nce of baske ts and cutler yba sket smay vary from y our m odel.)
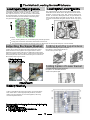
Scrape off any larg eamounts o fle ft over food. S often remnan ts o fburnt food inpans.
It isnot necess ary tor inse thed ishes under running water.
Pl ace objects in the dishwas herin foll owing way :
1.I tem ssuch a scups, g lasses, pots /pa ns,e tc. a re faced dow nwards.
2.Curved i tems, or ones withreces ses,shoul dbe l oadedasla nts oth atwate r can runoff.
3.All u tensils a restacked secur ely and can not ti pov er.
4.All u tensils a re placed in t he way that t hespray arms can rotat efreely d ur ingwa shin g.
Ve rysm all it ems s houldn ot b ewashe din the dish washer as they c ould ea silyfall out o f the basket.
To pre ven t wa ter drippi ngfr om the uppe rba sket i ntothe lower basket, w e re commend tha tyou
empty the lowe rbasket first an dthe nthe upper ba sket.

Th eu pper basket isdesign edto holdm ore delicate
and l ighte rd ishware s uch as glasses, coffee a nd
teacups and saucers,aswell asplates,small bowls
andshallowpans (as long astheyarenot toodirty).
Position thedishe sandco okw ares othatthey will
notgetmovedbythespray ofwate r.
We su g ges t tha t you pla ce l arge i tem s a nd t h emo st
difficulttocleanitemsaretobe placedinto thelower
basket : su cha spo ts,pans, lids, se rving d ishes and
bow ls, as shown i n t h e fi gureb el ow. I t is prefer ab l e to
place s ervi n g d i she s and lids on the s i d e of th e ra c ks
in ord er to avoidbl ocki ngthe ro tat ion of t he t op spra y
arm.
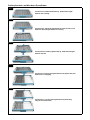
Pots,servingbowls,etc,mustalwaysbeplacedtopdown.
Dee p pot s s ho uld be sla nt ed t o a ll ow wate r t o flow ou t.
Ple ase be r eminded that:
T heB otto mB as k etfe atu re sfo ldin g sp ikes so that larg er or mor epo ts a nd pans can be l oade d.
Folding Spikes o f L ow er B asket
For better stacking of pots and pans,
the spikes can be folded down as
show in the picture right.
Adjusting the Upper Bask et
The h eigh tof the upp er ba sket can be ad justed ino rder to
create mo respace for larg eut ensil sb othfor the upp er
/lowe rb asket. The height o f th eupper basket c anb e
adjusted byplacing thewheelsondifferentheight ofthe
rails. Long items, serving cutle ry, salad servers and knives
shouldbe placedon theshelfsothattheydonotobstruct
therotationofthesprayarms..
Folding back the cup shelives
Fo r bet ter s tacking ofpo ts a ndpans ,
th e sp ik es can befol de d dow n a s
showin th e pict u re ri gh t.
Cutleryshouldbe placed inthecutlery rackseparately
f rom eac hot her i nth eap propriate po sitions, a ndd o
m ake sure th eut ensil sd onot nes t tog ether,th isma y
causebadperformance.

Sta rt ing a c ycl e wash
Dr aw out the lowe ran dup per basket,l oad thedish esand p ush the mback.
I ti scommen ded t oload the lo wer basket fi rst,t hen the uppe rone (see th e sec tion en title d
Loadingthe Dishwasher ).
Pour in the d eterg ent (seethe sect ione ntit led Sal t, D etergen t and RinseAi d ) .
I nse rttheplu ginto the socket. The pow ersupp lyis 220-240 VAC / 50HZ, th e specificat ion
of th eso cket is10A 2 50VAC. Mak es ure t hatthe water supply is tu rned onto f ull pres sure.
Clo se the door, pr ess the ON/OFF Button, a nd thed ispl ay w ill turn on.
Pr ess the program Bu tt on , th ewa sh program w ill b echang ed a sfo llows di rectio n:
I f a p rogram isse lect ed ,the resp onse ligh twi ll light.Th en p ress the Start/Pause button, the
dish wash erbegin st o start.
“”
“”
Auto Intensive->Normal->ECO->Glass->60min ;-> ->Rapid->Soak
1
2
3
4
5
*E N50242 : Th is progr ammeis the test cycle. The inf orma tion for compar ability test
in acco rdance w ithEN 50242, as follows:
Capacity: 14 setti ng
Positi onU pper ba sket: upp er wheels o nr ails
Rinse aid s ett ing: 6
Pl:0.4 9w; Po:0.45 w.
Means:need to fill rinse intothe Rinse-Aid Dispenser.
()
Intensive
Normal
(or )3in1
5/ 30 g
(or )3in1
5/30g
(or )3in1
5/3 0g
Rapid
Pre- wash (50 )
Wash ( 65 )
Rins e
Rins e
Rins e(65 )
Drying
℃
℃
℃
Pre- wash(45 )
Wash ( 55 )
Rins e
Rins e(65 )
Drying
℃
℃
℃
Pre-w ash
Wash (45 )
Rinse(55 )
Dr y ing
℃
℃
Wash ( 40 )
Rins e
Rins e(45 )
℃
℃
185
195
175
40
1.3
0.83
1.6
0.6
18
14
10
11.5
60 min
(5 0 )
Was h(6 0 )
Rinse (60 )
Drying
Pre-wash
℃
℃
℃
60 10
1.15
5/30g
30g
Soak
Pre- wash
8
0. 0 1 4
Gl ass
(or )3i n1
5/30g
Ri ns e
Dr ying
Pre-wa sh
was h (45 )
Rinse(60 )
℃
℃
115
0.87
14
Au to
Auto sensingwash, lightly,
normally or heavi lysoi led
crockery,withorwithout
dried-on food
Pre- wash
Auto was h
Rinse
Rinse
Drying
(45 )
(4 5-55 )
(65 )
℃
℃
℃
5/ 30 g
120~180
0.9~1.3
8.4~1 6
To rinsedishesthatyouplan
tow ash l ater t hat da y
For normallysoil edloads,
such as , plates,glasses
and lightly soiledp ans.
pots
Fo r h eavie s t soile d cr o cker y,
andnormally soiledpots
pans dishes etc with dried
onsoiling.
、
、
For l ight ly so iled loads that
do not need e xcellent dry ing
effic iency.
For lightl yso iled cro cker y
and glass .
Ashorterwashfor lightly
so iled lo adst hat do not
nee ddrying.
Thisisstandard programme,
it is suit ab le to cle an no rmal ly
soiledt ablewareand itisthe
mostefficientprogrammein
terms ofits combinedenergy
andwaterconsumption for
th at ty pe of ta bl ew ar e.

Whe nt he wo rking cycle has fi nish ed, then st op.Turn o ff the ap pliance u sing the ON /OFF bu tton, shutoff the
wate rsupply and ope nt he do orof the di shwasher. Wai tfor afe wmi nute sbefore unl oadi ng t hedishw asher to
avoid handlin gth edis hes and ute nsi ls whi let hey a res til l h ot a ndmore susc ept ible t obr eakage. The yw il lals o
drybetter.
SwitchOff the Dishwasher
The p rogram light is on but isn otblin king, onl y in this case the pr ogramm ehas e nded.
1.Sw itch off the di shwasher bypre ssing the ON/OF F butto n.
2.Turnoff thewater tap!
Openthedoor carefully.
Hot dishes ar e sensit iveto kn ocks. The dishes shou ld t heref orebe a llowed to cool d own around 15 minut es
before removingfromthe appliance.
Open t hed ish was her's door,leave it ajarand wait afew m inutes before rem oving t he dis hes.In this way they
will be cool erand t he dryi ng will beim proved.
Unloadingthedishwasher
Itis normal that the dishwas her is we tinside.
Empty thelow erbasket first a nd the nthe upperon e.T his w ill avoid water dripp ing from t he uppe r Basket onto
the dishes inthe l ower on e.
Ifyou open thedoor ,t hemachinewill pause. The program lightwill
stopblinking unlessyou close thedoor .A fteryou closethedoor,themachinewillkeep
on working after10 seconds.
dur ing awashcycle
Premis e:
Acycl e that is un derway canon lybe modified if it has on ly been r unning for a s hort time. Ot herwis e, the
de tergent m ay hav ealr eady be en re lea sed,a nd the applian cem ay have alre ady dr ain ed the wash wa ter.
If this i sthe case ,the deter gent d ispenser must be refil led(see the sec tion entitled " Load ing the
Det ergent " ).
Pres sthe Start/P ause but ton , the m achine will be i n s tand by state, pres sthe prog ram button more t han
3s then you can change the program t o th ede sired cycle setting (see th es ection en titled " St ar ting a w ash
cycle. . ." ).
1
2
Aforg o tten dish can be added any time before the det ergent cup opens.
Add forgotten dishes.
Close the door
After the spray arms stop working, you can open the door
comp letely.
2
3
Open the door a litt le .
1
4
5
6
Press the Start/Pause Button to stop the washing.
Press the , the dishwasher will run
after 10 seconds.
Start/Pause Button
When you pressthe Start/Pause buttontopause during washing, the will
stopblinking and thedishwasher will mooingeveryminute unlessyou pressthe
S tar t /Pa us e bu tto n t o st art .
ru nni ng i ndic at or
It is dangerous toopen the door when washing,
because the hot water may scald you.

The filter pre vent slar ger remn ant sof food orot her objects from ge tting inside th epu mp.
Theresidues may blockthefilter, inthiscasethey mustberemoved.
The fi lter systemc on sists of a coar se filte r,a flat (Main filter)
A n da mi cro filter( F i ne f i lter) .
Food and soil particles trapped inthisfilter arepulverizedby a
specia l jet onthe lower spr ayarm a ndw ash edd own tod rain.
Larger items, s uc h as pie c eso f bo ne s or gl as s, t ha t could b l o ck
thedrainaretrappedinthe coarse filter.To removetheitems
caugh t by the fil ter, gen tly sque eze the tapo nth eto pof t his
filterandliftout.
Thisfilter holdssoil andfoodresiduesinthe sumpareaand
preventsitfrombeingredepositonthe dishes duringwashcycle.
Main filter
1
Coarse filter
2
Fine filter
3
2
3
1
Filterassembly
Thefilterefficiently
For best performance and re s ults, the filte rmustb e cle anedre gula rly. t hisreaso n, i t isa goo di dea t o
r emo ve th el arger foo dpar ti clestr app edin the filter aft ere ach was hcyc leb yrin sing the semicirc ular filte ran d
c up unde rr unnin gw ater. To re moveth ef il terde vice ,p ull th ec up ha ndle in t heupwa rdd irect ion.
re mo vesf oodpart icle sfrom th ewa shw ate r,all owin git tobe rec ycleddu ring the cycl e.
For
T he dish was her must n e ver be u sed wi t ho ut t he f il t er s.
Imp ro per repl ace mentof the f ilter may red uce the perform anc elevel ofthe applian ce
and damagedishesandutensils.
1
2
St ep 1 Turn t he filter in anti-clockwis edirectio n,:
St ep 2 lift the filter assy up:
When following this procedure from step1 to step 2, the filter system will be removed;
when following it from Step 2 to Step 1, the filter system will be installed.

The cont ro l p ane lcan be clea ned by u sing a lightly dampen edcloth .
Afte rcle an ing, m ake sureto dry it tho roug hly.
For the ext erior, us e a go od appli ance po lis h wax.
Neveruse s harp objects, scouri ng pa ds o rh arsh c lean ers ona ny p ar tof the dis hwa sher.
ProtectAgain st Freezing
1.Cutoffthe electricalpower tothedishwasher.
2.Turnoff the wat ersu ppl y an ddisco nnect the water i nlet pi pe from the w ater valve.
3.Drain the water f romthe inle tpipe an dwater valve. (U se apan to gathe r th ew ater)
4.Reconnect the wate rinlet pipe tothe water val ve.
5.Remove the filter at the bott omo f the tub and use a spong et o soak up wate r in the sum p.
pl ease take frost prot ection meas uresont he dishw asher in wi nter. Every fter washing c ycles,
pl ease op erate as follows
time a
:
Cleaning the Filter
CleaningThe Door
To cle an t h e c o a rs e fil t er and t he fin e fil t e r, us e a cl ean i n g bru s h. Reas sem ble t hef ilter parts as shown in th e fi gures
on t he last page and rein sert t he enti re ass em bly in the dis hwa sher, po s itio ning it i n itss eat and pres sing dow nwa rds.
Whencleaning thefilters, don't knock onthem. Otherwise, thefilterscould be
contortedandtheperformanceofthe dishwashercouldbe decreased.
To cle an th ee dge around t hed oor,you should u seonly a sof twarm, damp cl oth.
To av oid pene trat iono f wa ter i nto t hed oor lock and el ectrical com po nent s,d o not
usea spray cleaner ofany kind.
Never u sea spr ay c lean ert ocle an the d oor panel asit m ay dam age the door loc k
and electricalcomponents.
Abr asive agent so r som epa per towels shou ldnot b euse dbecau seof theri skof
sc r a t c hi ng o r l eavin g spots on t he st ai n les s stee l sur fa ce.
Cleaning the SprayArms
I fyour dishwasher cannot work beca use of the ice,
pl ease con tac tprofessi onal service pe rso ns.
It is n e ce ss ar y t o c lean th e sp r ay ar ms regular ly for hard
wate rchemicalswillclogthesprayarmjetsandbearings.
- Inspec t t he filte rsfor blo ckin ga ftere ver ytime t he dis hwa she rhas be enused .
- By unscrew ing the c oar sefil ter, y oucan rem ove the filter syst em .Re movean yfoo dre mna nts and
cleanthefilters underrunningwater.
Remarks:
Theentirefilter assembly shouldbe cleanedonce a week.
Toremovethelowersprayarm,pull outthesprayarmupwa rd.
To r e mo v e the upper sp raya rm, ho ld the n ut, r ot ate the a rm
clockwisetoremoveit.
Washthe arm s in soapy an dwarm water an duse asoft brush t o
clean thejets .Replace them after ri nsingthe mthorough ly.

Itisrecommend thatyourunawashcycle withthe
dish washer e mpt yan dthe nr emove th eplu gfr omthe
socket, turno ff the wa te r supp ly and le ave the door of
t he appli a n c e s l i ght ly op en. Th is wil l help t h e door
sealstolastlongerandpreventodoursfromforming
withinth eappliance.
If the appliance must be move d,tr yt o keep i tin t he
verticalposition. Ifabsolutelynecessary,itcanbe
positi oned on its back.
Oneofthefactorsthatcauseodourstoforminthe
dishwasher is foo dth atre mainstr app edi n theseals .
Periodic clea ning with adamp sponge will p rev entt his
f r o m oc curr in g.
Ensu rethe v oltage a ndfrequenc yo f thep owe rbe ing cor respond st o
t hose on the ratin gpl ate. Only in sert the plug into an electrica lsocke twhi ch i sear thed
pr operly. I fth eel ectri cal sockett owhich thea ppl iance mustb ec onn ecte dis not
appropriatefortheplug, replacethe socket, ratherthan usingaadaptors orthelikeas
they couldcause overheatingandburns.
Plea selook a t th erati ng labe l t o know the rat ingv oltage a ndcon nectt he d ishwashe rto the app ropriate power su pply.
Use t her equir ed fuse 10a mp, timede lay fuse or circui tbreak errecomm end ed and pr ov ide separ ate circu its erving
only this appliance.
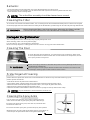
Posi tion the ap pliance in t he desired location. T he back should rest ag ainst thew all behind it, and the side s,
along the adjacent cabinets o rwal ls.T he d is hwash er i s equ ippe dwi thwater supply and d rain hos esth at can
be positioned either tothe righ tor the l efts ide st o fac ilitate p roper i nstallati on.
O nce th e applianceis positione dfor levellin g,the height of the di shwashe r
m ay be altered v iaadjust mentof thescre wing leve lof the fee t. In any case,
th eappl ia nceshould notbe i nclin ed more t han 2 .
Befo re cleaning orper formi ng mainten ance, always
remove the plug fr om t hesocket.
Tocleanthe exteriorandrubberparts ofthe dishwasher,
donotuse solventsor abrasivecleaningproducts.
O nly use a c lo th w ith warm soapy wate r.
To re m ov esp ots orst ains f rom the sur face of t he
in teri or, use a clo th dampe ned wit hwa ter a na l ittle
v inega r, o ra clean ing pro duct mades peci fical lyfor
dishwashers.
Remove the Plug
No Solv ents orAb rasive C leani ng
Mov ing theApplia nce
Seals
Aft er every wa sh, turn off t hewa ter supp ly t othe
applia nce and leaveth e doo rs lightl yop en soth at
m oisturean dodour sar eno ttra pped inside .
After EveryWash
Whennot inUsefor aLongTime
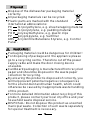
For personal safety:
Do not use an extension cord or an adapter plug
with this appliance.
Do not, under any circumstances, cut or remove the
earthing
Connection from the power cord.
Page is loading ...
Page is loading ...
Page is loading ...
Page is loading ...
Page is loading ...
Page is loading ...
Page is loading ...
Page is loading ...
Page is loading ...
-
 1
1
-
 2
2
-
 3
3
-
 4
4
-
 5
5
-
 6
6
-
 7
7
-
 8
8
-
 9
9
-
 10
10
-
 11
11
-
 12
12
-
 13
13
-
 14
14
-
 15
15
-
 16
16
-
 17
17
-
 18
18
-
 19
19
-
 20
20
-
 21
21
-
 22
22
-
 23
23
-
 24
24
-
 25
25
-
 26
26
-
 27
27
-
 28
28
-
 29
29


Brandt DFH14104W User manual
- Category
- Dishwashers
- Type
- User manual
Ask a question and I''ll find the answer in the document
Finding information in a document is now easier with AI
Related papers
-
Brandt VH1472J User manual
-
Brandt DFC6519S Owner's manual
-
-
-
Groupe Brandt DFH1317WE Owner's manual
-
-
Brandt DFH15532W User manual
-
-
Brandt DFH13114W User manual
-
Brandt VH1520J User manual
Other documents
-
Hoover HDI 2T1045 User manual
-
Teka LP8 400 User manual
-
-
Whirlpool GCX 5929/1 User guide
-
Becken MAQ LAVAR LOICA DWD147 ANDAMAN IX Owner's manual
-
-
Whirlpool ADPF 941 WH User guide
-
-
-