NEC NP-PH1000U User manual

Type
User manual

NEC NP-PH1000U is a high-quality projector enabling a wide range of applications due to its multiple connection options like VGA and its ability to project from a computer or video device. Furthermore, it allows for manual adjustment of focus and zoom for the projected image.

NEC NP-PH1000U is a high-quality projector enabling a wide range of applications due to its multiple connection options like VGA and its ability to project from a computer or video device. Furthermore, it allows for manual adjustment of focus and zoom for the projected image.

PH1000U
Quick Setup Guide
PH1000U
Quick Setup Guide
Connect the power cord (optional) and use the VOLTAGE SELECT switch
according to the voltage being used.
Schließen Sie das Netzkabel (optional) an und verwenden Sie den Hebel
VOLTAGE SELECT entsprechend der verwendeten Spannung.
Branchez le cordon d’alimentation (optionnel) et utilisez le commutateur
VOLTAGE SELECT en fonction de la tension utilisée.
Collegare il cavo di alimentazione (opzionale) e usare l’interruttore
VOLTAGE SELECT a seconda della tensione utilizzata.
Conecte el cable de alimentación (opcional) y utilice el interruptor
VOLTAGE SELECT de acuerdo al voltaje que se está usando.
Ligue o cabo de alimentação (opcional) e utilize o interruptor VOLTAGE
SELECT de acordo com a tensão a ser usada.
Anslut nätkabeln (tillval) och ställ in VOLTAGE SELECT-omkopplaren
enligt den spänning som används.
Подключите силовой кабель (дополнительный) и воспользуйтесь
переключателем VOLTAGE SELECT в соответствии с используемым
электрическим напряжением.
전원 케이블(옵션)을 연결하고 사용 중인 전압에 맞게 VOLTAGE
SELECT 스위치를 사용하십시오.
Connect your computer to the
projector.
Schließen Sie ihren Computer an den
Projektor an.
Connecter l’ordinateur au projecteur.
Collegate il vostro computer al
proiettore.
Conectar el ordenador al proyector.
Ligue o seu computador ao projector.
Anslut din dator till projektorn.
Подключите компьютер к проектору.
컴퓨터를 프로젝터에 연결하십시오.
Supplied computer cable (VGA)
Computer-Kabel (VGA) (im Lieferumfang
enthalten)
Câble d’ordinateur fourni (VGA)
Cavo per computer (VGA) in dotazione
Cable de ordenador suministrado (VGA)
Cabo de computador (VGA) fornecido
Medföljande datorkabel (VGA)
Прилагаемый компьютерный кабель (VGA)
제공된 컴퓨터 케이블(VGA)
(
page 13 of the User’s Manual)
Remove the lens cap.
Nehmen Sie die Linsenkappe ab.
Retirer le cache-objectif.
Rimuovete il copriobiettivo.
Quite la tapa de la lente.
Retire a tampa da lente.
Ta bort linsskyddet.
Снимите крышку объектива.
렌즈 캡을 벗기십시오.
1. Tryck huvudströmbrytaren till ON-läge ( I ).
2. Tryck på POWER
-tangenten på projektorhöljet eller POWER ON-tangenten på fjärrkontrollen.
1. Установите главный переключатель питания в положение «Вкл.» ( I ).
2. Нажмите кнопку ПИТАНИЕ
на корпусе проектора или кнопку POWER ON на пульте дистанционного управления.
1. 주 전원 스위치를 ON 위치(I)로 누릅니다.
2. 프로젝터 캐비닛의 전원
단추 또는 리모컨의 POWER ON 버튼을 누르십시오.
1. Press the main power switch to the ON position ( I ).
2. Press the POWER
button on the projector cabinet or the
POWER ON button on the remote control.
1. Schalten Sie den Hauptnetzschalter auf die EIN-Position ( I ).
2. Drücken Sie die POWER-Taste
am Projektorgehäuse oder die
Taste POWER ON auf der Fernbedienung.
1. Basculez le commutateur principal d’alimentation en position ON
(I).
2. Appuyez sur le bouton POWER
sur le boîtier du projecteur ou
bien sur la touche POWER ON de la télécommande.
1. Portate l’interruttore di alimentazione principale sulla posizione
ACCESO ( I ).
2. Premete il tasto DI ACCENSIONE
sul proiettore o il tasto
POWER ON sul telecomando.
1. Pulse el interruptor de alimentación principal hacia la posición ON
( I ).
2. Pulse le botón POWER
de la carcasa del proyector o el botón
POWER ON del mando a distancia.
1. Prima o interruptor da alimentação para a posição “ON” ( I ).
2. Prima o botão ALIMENTAÇÃO
na estrutura do projector ou o
botão POWER ON no comando à distância.
Adjust the picture size and position.
Einstellung der Bildgröße und Bildposition.
Ajuster la taille et de la position de l’image.
Regolate delle dimensioni e della posizione dell’immagine.
Ajuste del tamaño y la posición de la imagen.
Ajuste o tamanho da imagem e a posição.
Justera bildstorlek och position.
Настройте размер и положение изображения.
영상 크기와 위치를 조정하십시오.
(
page 21 of the User’s Manual)
(
page 24 of the User’s Manual)
Adjusting with buttons on the cabinet
Anpassung mithilfe der Tasten auf dem Gehäuse
Ajustage avec les touches du boîtier
Regolazione mediante i tasti sul proiettore
Ajuste con los botones de la carcasa
Ajustar com botões na estrutura
Justera med tangenterna på höljet.
Настройка с помощью кнопок на корпусе
проектора
캐비닛의 단추를 사용한 조정
Focus
Fokus
Mise au point
optique
Fuoco
Enfoque
Focagem
Fokus
Фокус
초점
Zoom
ZOOM (+) (–) Button Botão ZOOM (+) (–)
ZOOM (+) (–)-Taste ZOOM (+) (–)-tangentg
Touche ZOOM (+) (–)
Кнопка ZOOM (+) (–)
Tasto ZOOM (+) (–)
ZOOM (+) (–) 버튼
Botón ZOOM (+) (–)
FOCUS (+) (–) Button Botão FOCUS (+) (–)
FOCUS (+) (–)-Taste FOCUS (+) (–)-tangentg
Touche FOCUS (+) (–)
Кнопка FOCUS (+) (–)
Tasto FOCUS (+) (–)
FOCUS (+) (–) 버튼
Botón FOCUS (+) (–)
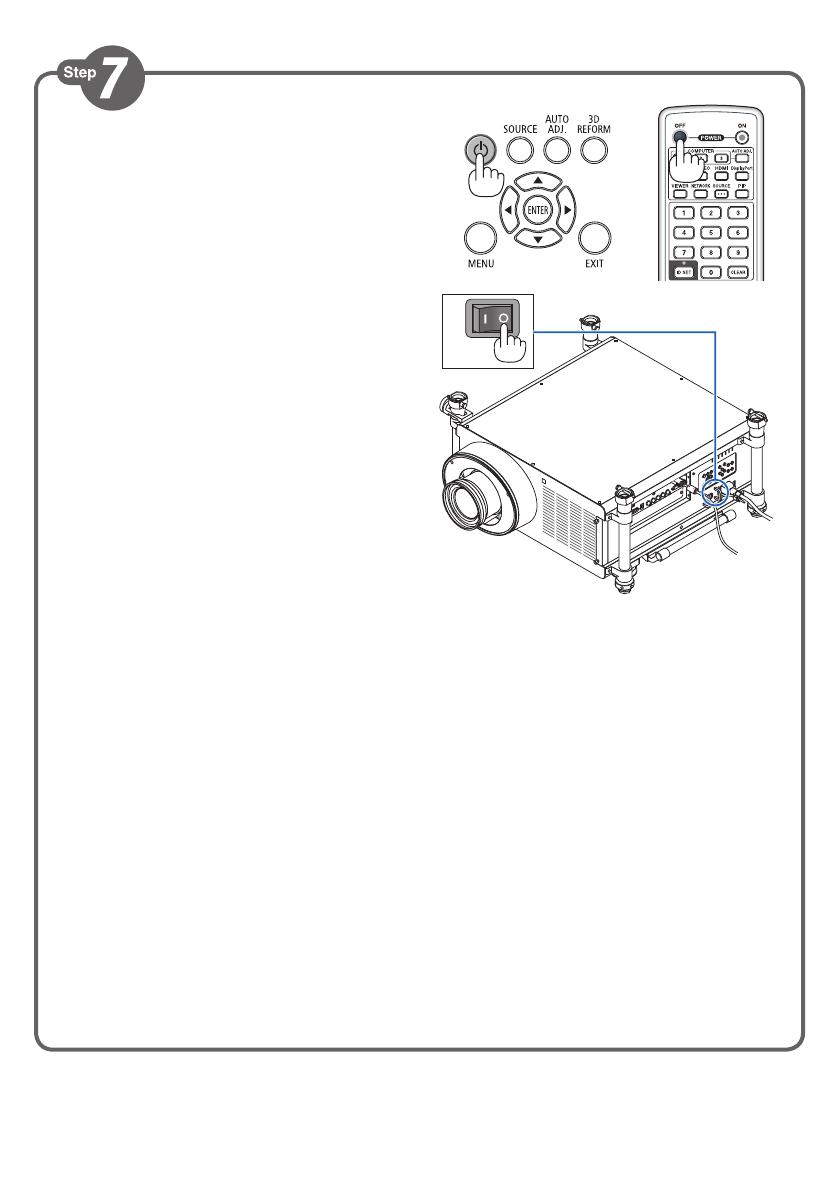
1. Press the POWER OFF button twice.
The lamp will go off. The POWER indicator will
change color to orange and the STATUS indicator
will light green. This indicates the projector is in
the standby mode.
2. Press the Main Power Swithc to the OFF position (
).
3. Disconnect all the cables.
1. Drücken Sie die POWER-OFF-Taste zweimal.
Die Lampe schaltet sich aus. Die POWER-Anzeige
ändert ihre Farbe zu orange, und die STATUS-
Anzeige leuchtet grün. Dadurch wird angezeigt,
dass sich der Projektor im Standby-Modus
befindet.
2. Schalten Sie den Hauptnetzschalter auf die AUS-
Position (
).
3. Ziehen Sie alle Kabel ab.
1. Appuyez deux fois de suite sur la touche POWER
OFF.
La lampe s’éteint. Le témoin POWER change de
couleur et passe à l’orange, puis le témoin STATUS
s’allume en vert. Ceci indique que le projecteur se
trouve en mode de veille.
2. Basculez le commutateur principal d’alimentation en
position OFF (
).
3. Débranchez tous les câbles.
1. Premere due volte il tasto POWER OFF.
La lampada si spegne. L’indicatore POWER cambia
colore in arancione e l’indicatore STATUS si
accende in verde. Ciò indica che il proiettore è in
modalità di attesa.
2. Portate l’interruttore di alimentazione principale
sulla posizione SPENTO (
).
3. Scollegare tutti i cavi.
1. Pulse el botón POWER.OFF dos veces.
La lámpara se apagará. El indicador POWER
cambiará a color naranja y el indicador STATUS se
iluminará en verde. Esto indica que el proyector se
encuentra en el modo de espera.
2. Pulse el interruptor de alimentación principal hacia
la posición OFF (
).
3. Desconecte todos los cables.
1. Prima duas vezes o botão POWER OFF (Desligar
alimentação).
A lâmpada apaga. O indicador da alimentação muda
de cor para laranja e o indicador STATUS (Estado)
acende em verde. Isto indica que o projector está
em modo espera.
2. Prima o interruptor da alimentação para a posição
“OFF” (
).
3. Desligue todos os cabos.
7N8N2121
Printed in China
©NEC Display Solutions, Ltd. 2011
Ver. 1 07/11 (T)
1. Tryck på POWER OFF-tangenten två gånger.
Lampan släcks. POWER-indikatorn ändrar färg
till orange och STATUS-indikatorn lyser grönt.
Detta visar att projektorn är i standby-läge.
2. Tryck huvudströmbrytaren till OFF-läge (
).
3. Koppla bort alla kablar.
1. Дважды нажмите кнопку POWER OFF.
Лампа погаснет. Индикатор POWER изменит цвет на
оранжевый, а индикатор STATUS загорится зеленым
цветом. Это означает, что проектор находится в режиме
ожидания.
2. Установите главный переключатель питания в
положение «Выкл.» (
).
3. Отсоедините все кабели.
1. POWER OFF 버튼을 두 번 누릅니다.
램프가 꺼집니다. POWER 식별등의
색상이 오렌지색으로 변경되고 STATUS
식별등이 녹색으로 켜집니다. 이것은
프로젝터가 대기 모드에 있음을
나타냅니다.
2. 주 전원 스위치를 OFF 위치(○)로
누릅니다.
3. 모든 케이블 연결을 분리합니다.
(
page 31 of the User’s Manual)
  • Page 1 1
  • Page 2 2
  • Page 3 3
  • Page 4 4
  • Page 5 5
  • Page 6 6

NEC NP-PH1000U User manual

Type
User manual

NEC NP-PH1000U is a high-quality projector enabling a wide range of applications due to its multiple connection options like VGA and its ability to project from a computer or video device. Furthermore, it allows for manual adjustment of focus and zoom for the projected image.

Ask a question and I''ll find the answer in the document

Finding information in a document is now easier with AI