Christie DHD1052-Q User manual

Category
Data projectors
Type
User manual

This manual is also suitable for

Q Series
DWU1052/DHD1052
Quick Setup Guide
020-000860-01
1
DWU1052/DHD1052
Quick Setup Guide
020-000860-01 Rev. 1 (12-2015)
LIT MAN USR DWU/DHD1052 CON
Projector
DWU1052/DHD1052
User's Manual
Quick Setup Guide
Thank you for purchasing this projector.
Install the projector according to the
environment and manner the projector will
be used in.
Projector top
Projector bottom
This manual is intended to explain only how to setup this product.
For proper use
of this product, refer to this manual and the other manuals for this product.
Refer to tables T-1 to T-2 at the back of User's Manual (concise) as well as the
following to determine the screen size and projection distance. The values shown
in the table are calculated for a full size screen.
1 Setting up
2 Arrangement
3 Installing the lens unit
See the manual of the optional lens.
Follow this manual step by step for a quick installation.
Screen size
Projection distance
, : Screen height
Elevator feet
2
DWU1052/DHD1052
Quick Setup Guide
020-000860-01 Rev. 1 (12-2015)
LIT MAN USR DWU/DHD1052 CON
Before connecting the projector to a device, consult the manual of the device to
con rm that the device is suitable for connecting with this projector and prepare
the required accessories, such as a cable in accord with the signal of the device.
Consult your dealer when the required accessory did not come with the product or
the accessory is damaged.
After making sure that the projector and the devices are turned off, perform the
connection, according to the following instructions.
Before connecting the projector to a network system, be sure to read User's
Manual - Network Quick Setup Guide too.
Computer
(Wired)
Remote
control
Monitor
4 Connecting with your devices
USB
wireless
adapter
(optional)
VCR/DVD/Blu-ray Disc
TM
player
Computer
Another
projector
Access
point
HDBaseT
TM
DVI
VIDEO OUT
SDI OUT
Camera for
commercial use
3
DWU1052/DHD1052
Quick Setup Guide
020-000860-01 Rev. 1 (12-2015)
LIT MAN USR DWU/DHD1052 CON
Use the supplied cable tie
to fasten the cables.
USB wireless adapter: USB-WL-11N-NS
Temperature range: 0 ~ 45 °C (Operating)
Cable tie
1.
Loosen the screw on the bottom left of the WIRELESS port.
5 Fastening the cables
6 Fastening the adapter cover
Tab
2.
Insert the tab of the cover into the hole at the upper right of the WIRELESS
port in the direction of the arrow.
3.
Align the screw holes on the projector and the cover. Then insert the screw
removed from the projector into the hole and tighten the screw.
4
DWU1052/DHD1052
Quick Setup Guide
020-000860-01 Rev. 1 (12-2015)
LIT MAN USR DWU/DHD1052 CON
1.
Insert the connector of the power cord into the AC (AC inlet) of the projector.
2.
Firmly plug the power cord’s plug into the outlet. In a couple of seconds after
the power supply connection, the POWER indicator will light up in steady
orange.
WARNING►Use the supplied power cable only.
►Do not use tied power cord.
7 Connecting to a power supply
AC
Power cord
WARNING
►Do not use
tied power cord.
5
DWU1052/DHD1052
Quick Setup Guide
020-000860-01 Rev. 1 (12-2015)
LIT MAN USR DWU/DHD1052 CON
Insert the batteries into the remote control before using it.
(Batteries are not included.)
21 3
1.
Make sure that the power cord is rmly and correctly connected to the
projector and the outlet.
2.
Make sure that the POWER indicator is lighted in steady orange.
3.
Press STANDBY/ON button on the projector or the ON button on the remote
control.
8 Installing the batteries
9 Turning on the power
The projection lamp will light up and POWER indicator will begin blinking in green.
When the power is completely on, the indicator will stop blinking and light in
steady green.
POWER
indicator
ON button
STANDBY/ON
button
POWER
TEMP
LAMP 1
LAMP 2
SECURITY
SHUTTER
FILTER
6
DWU1052/DHD1052
Quick Setup Guide
020-000860-01 Rev. 1 (12-2015)
LIT MAN USR DWU/DHD1052 CON
INPUT button
Press ASPECT button on the remote control.
10 Selecting an input signal
11 Selecting an aspect ratio
Press the INPUT button of the projector or the input buttons of the remote
control.
ASPECT
button
Follow the on-screen display (OSD) for proper operation.
12 Changing the display language
1.
Press the MENU button on the remote control or the control panel of the
projector.
2.
From EASY MENU, select LANGUAGE.
Then, select your desired language.
Buttons for input ports
7
DWU1052/DHD1052
Quick Setup Guide
020-000860-01 Rev. 1 (12-2015)
LIT MAN USR DWU/DHD1052 CON
1.
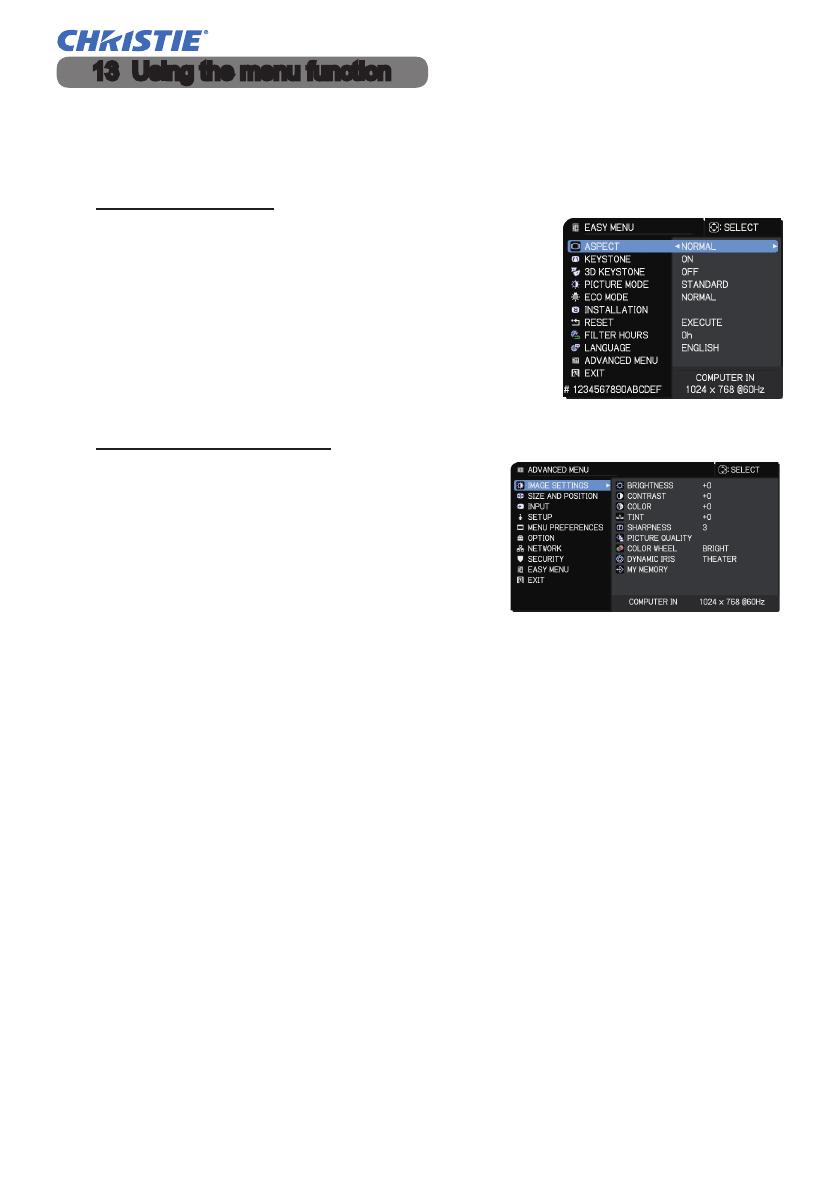
To start the MENU, press the MENU button. The MENU you last used (EASY
or ADVANCED) appears. EASY MENU has priority to appear just after
powered on.
2.
(1) Use the ▲/▼ cursor buttons to select an
item to operate. If you want to change it to the
ADVANCED MENU, select the ADVANCED
MENU.
(2) Use the ◄/► cursor buttons to operate the
item.
In the EASY MENU
13 Using the menu function
(1) Use the ▲/▼ cursor buttons to select a
menu. If you want to change it to the EASY
MENU, select the EASY MENU. The items
in the menu appear on the right side.
In the ADVANCED MENU
3.
To close the MENU, press the MENU button again or select EXIT and press
the cursor button or ENTER button. Even if you do not do anything, the
dialog will automatically disappear after about 30 seconds.
(2) Press the ► cursor button or ENTER
button to move the cursor to the right side.
Then use the ▲/▼ cursor buttons to select
an item to operate and press the ► cursor
button or ENTER button to progress. The
operation menu or dialog of the selected
item appears.
(3) Use the buttons as instructed in the OSD to operate the item.
8
DWU1052/DHD1052
Quick Setup Guide
020-000860-01 Rev. 1 (12-2015)
LIT MAN USR DWU/DHD1052 CON
Wired or wireless connection is available for this projector.
For wired connection, use LAN cable to connect
(Refer to User's Manual - Network Quick Setup Guide too.)
Before connecting to the network, contact the network administrator.NOTE
15 Connecting to the network
14 Changing the Installation settings
1.
Press the MENU button, then follow below.
2.
Choose according to your settings.
EASY MENU > ADVANCED MENU > SETUP > INSTALLATION
FRONT / DESKTOP
REAR / DESKTOP
REAR / CEILING
FRONT / CEILING
hub
9
DWU1052/DHD1052
Quick Setup Guide
020-000860-01 Rev. 1 (12-2015)
LIT MAN USR DWU/DHD1052 CON
For wireless connection, use USB wireless adapter (USB-WL-11N-NS).
(Refer to User's Manual - Network Quick Setup Guide too.)
Without an access point communication (Simple Access Point)
With an access point communication (Infrastructure)
Before connecting to the network, contact the network administrator.
NOTE
Use Projector Web Control or Crestron e-Control to adjust or control the projector
using a network from a web browser on a computer which is connected to the
same network.
Enter the projector's IP address into URL input box of the Web browser as the
example below, and then press the Enter key or
button.
Example: If the IP address of the projector is set to 192.168.1.10:
Enter “http://192.168.1.10/” into the address bar of the web browser and press the
Enter key or click button.
16 Web Control
10
DWU1052/DHD1052
Quick Setup Guide
020-000860-01 Rev. 1 (12-2015)
LIT MAN USR DWU/DHD1052 CON
■Projector Web Control
Advanced controls are available on this web control.
Logon with your user name and password.
User name Administrator
Password <blank>
■Crestron e-Control
Basic controls are available on this web control.
This projector can be used with another projector of the same model to project an
image on the same screen.
■Instant Stack
Superimpose the image easily projected from the projectors.
■Intellectual Stack and Simple Stack
Intellectual Stack - Two projectors are connected with RS-232C cable.
Simple Stack - Two projectors are not connected with RS-232C cable.
To use this feature, setup both projectors as shown below.
STANDBY MODE in SETUP menu: NORMAL
(EASY MENU > ADVANCED MENU > SETUP > STANDBY MODE)
COMMUNICATION TYPE under COMMUNICATION in SERVICE menu: OFF
(EASY MENU > ADVANCED MENU > OPTION > SERVICE)
STACK LOCK in SECURITY menu: OFF
(EASY MENU > ADVANCED MENU > SECURITY > ENTER PASSWORD)
17 Using Instant Stack feature
11
DWU1052/DHD1052
Quick Setup Guide
020-000860-01 Rev. 1 (12-2015)
LIT MAN USR DWU/DHD1052 CON
Use the same model of projectors and install them side by side.
L (50cm or more)
Projector
Screen
size
0 ± 10cm
L: distance
[cm]
Recommended screen size
[inch]
50 270
75 330
100 390
Installation
Setting up the fi rst projector (Set A)
2. Perform the INSTALLATION setting  rst if necessary as it may change the
image position. (8)
3. Adjust the image of Set A to  t the screen with the ZOOM, FOCUS and LENS
SHIFT features.
Adjust the image position using KEYSTONE and 3D KEYSTONE if necessary.
1. Turn on Set A.
4. Display the menu with the MENU button.
5. Use the ▲/▼/◄/► buttons to go into the following menu.
EASY MENU > ADVANCED MENU > OPTION > SERVICE >
COMMUNICATION > STACK
STACK menu will appear on screen.
6. Select STACK MODE then SUB, and press the ► button twice to  nish the
settings.
EASY MENU KEYSTONE
3D KEYSTONE
ADVANCED MENU > SETUP >
GEOMETRY CORRECTION
KEYSTONE
3D KEYSTONE
12
DWU1052/DHD1052
Quick Setup Guide
020-000860-01 Rev. 1 (12-2015)
LIT MAN USR DWU/DHD1052 CON
2. Reset the adjustment of KEYSTONE and 3D KEYSTONE on Set B.
1. Turn on Set B.
Setting up the second projector (Set B)
3. Adjust the image size and position of Set B with the ZOOM, FOCUS and
LENS SHIFT features such that the image can be superimposed well to the
image of Set A.
4. Display the menu with the MENU button.
5. Use the ▲/▼/◄/► buttons to go into the following menu.
EASY MENU > ADVANCED MENU > OPTION > SERVICE >
COMMUNICATION > STACK
STACK menu will appear on screen
6. Select STACK MODE then MAIN, and press the ► button twice to nish the
settings.
For more details of setup and adjustments, refer to the User's Manual (detailed).
NOTE • The information in this manual is subject to change without notice.
• The illustrations in this manual are for illustrative purposes. They may differ
slightly from your projector.
• The manufacturer assumes no responsibility for any errors that may appear in
this manual.
• The reproduction, transfer or copy of all or any part of this document is not
permitted without express written consent.
EASY MENU KEYSTONE
3D KEYSTONE
ADVANCED MENU > SETUP > GEOMETRY CORRECTION KEYSTONE
3D KEYSTONE
18 Troubleshooting
Check the following web address where you may nd the latest information for this
projector.
http://www.christiedigital.com
  • Page 1 1
  • Page 2 2
  • Page 3 3
  • Page 4 4
  • Page 5 5
  • Page 6 6
  • Page 7 7
  • Page 8 8
  • Page 9 9
  • Page 10 10
  • Page 11 11
  • Page 12 12
  • Page 13 13
  • Page 14 14
  • Page 15 15
  • Page 16 16
  • Page 17 17
  • Page 18 18
  • Page 19 19
  • Page 20 20
  • Page 21 21
  • Page 22 22
  • Page 23 23
  • Page 24 24
  • Page 25 25
  • Page 26 26
  • Page 27 27
  • Page 28 28
  • Page 29 29
  • Page 30 30
  • Page 31 31
  • Page 32 32
  • Page 33 33
  • Page 34 34
  • Page 35 35
  • Page 36 36
  • Page 37 37
  • Page 38 38
  • Page 39 39
  • Page 40 40
  • Page 41 41
  • Page 42 42
  • Page 43 43
  • Page 44 44
  • Page 45 45
  • Page 46 46
  • Page 47 47
  • Page 48 48
  • Page 49 49
  • Page 50 50
  • Page 51 51
  • Page 52 52
  • Page 53 53
  • Page 54 54
  • Page 55 55
  • Page 56 56
  • Page 57 57
  • Page 58 58
  • Page 59 59
  • Page 60 60
  • Page 61 61
  • Page 62 62
  • Page 63 63
  • Page 64 64
  • Page 65 65
  • Page 66 66
  • Page 67 67
  • Page 68 68
  • Page 69 69
  • Page 70 70
  • Page 71 71
  • Page 72 72
  • Page 73 73
  • Page 74 74
  • Page 75 75
  • Page 76 76
  • Page 77 77
  • Page 78 78
  • Page 79 79
  • Page 80 80
  • Page 81 81
  • Page 82 82
  • Page 83 83
  • Page 84 84
  • Page 85 85
  • Page 86 86
  • Page 87 87
  • Page 88 88
  • Page 89 89
  • Page 90 90
  • Page 91 91
  • Page 92 92
  • Page 93 93
  • Page 94 94
  • Page 95 95
  • Page 96 96
  • Page 97 97
  • Page 98 98
  • Page 99 99
  • Page 100 100
  • Page 101 101
  • Page 102 102
  • Page 103 103
  • Page 104 104
  • Page 105 105
  • Page 106 106
  • Page 107 107
  • Page 108 108
  • Page 109 109
  • Page 110 110
  • Page 111 111
  • Page 112 112
  • Page 113 113
  • Page 114 114
  • Page 115 115
  • Page 116 116
  • Page 117 117
  • Page 118 118
  • Page 119 119
  • Page 120 120
  • Page 121 121
  • Page 122 122
  • Page 123 123
  • Page 124 124
  • Page 125 125
  • Page 126 126
  • Page 127 127
  • Page 128 128
  • Page 129 129
  • Page 130 130
  • Page 131 131
  • Page 132 132
  • Page 133 133
  • Page 134 134
  • Page 135 135
  • Page 136 136
  • Page 137 137
  • Page 138 138
  • Page 139 139
  • Page 140 140
  • Page 141 141
  • Page 142 142
  • Page 143 143
  • Page 144 144
  • Page 145 145
  • Page 146 146
  • Page 147 147
  • Page 148 148
  • Page 149 149
  • Page 150 150
  • Page 151 151
  • Page 152 152
  • Page 153 153
  • Page 154 154
  • Page 155 155
  • Page 156 156
  • Page 157 157
  • Page 158 158

Christie DHD1052-Q User manual

Category
Data projectors
Type
User manual
This manual is also suitable for

Ask a question and I''ll find the answer in the document

Finding information in a document is now easier with AI