VTech 5200 Parents' Manual

Category
Toys & accessories
Type
Parents' Manual

This manual is also suitable for

91-003699-000
US
Parents Guide
2
2
2
INTRODUCTION
Kidizoom
®
Duo DX is a fun and easy-to-use digital camera with two
lenses: a front camera and a sele camera. Take photos or group
pictures with funny photo effects. You can also take videos with live face
lters.
The camera also features a built-in ash and a voice-recording feature
with ve different voice-changing effects. There are also fun augmented-
reality (AR) games, classic games and creativity features which allow
you to enhance your photos with a variety of frames, stamps and wacky
effects.
PRODUCT LAYOUT AND BUTTONS
On/Off Button
OK Button
Zoom Wheel
Star Button
Delete Button
Home Button
Playback
Button
Volume Button
Viewnder
Rear Sele
Camera
Directional Pad
(D-Pad)
USB Port
Headphone
Jack
microSD
Card Slot
Microphone
Camera
Selector Button
Flash
Front Camera
Shutter Button
Rotary Ring
3
3
3
FEATURES
On/Off Button
Press this button to turn the camera on or off.
Camera Selector Button
When in Camera mode, press this button to toggle between the Front
Camera and Rear Sele Camera.
Shutter Button
Press this button to take a photo, or to start and stop video recording.
TIP: If you prefer a left-handed Shutter button, you can interchange the
Camera Selector button and the Shutter button functions. Please refer
to the Camera Settings section on page 19.
D-Pad
Press these buttons to move the cursor and to make selections.
Flash Shortcut
: When in Camera mode, press up on the D-pad to
switch between different ash modes.
Timer Shortcut
: When in Camera mode, press down on the D-pad
to toggle the Timer mode On and Off.
Home Button
Press this button to go to the Main Menu or go back to the previous
submenu.
OK Button
Press this button to conrm a choice or action.
Tip: The OK button can also be used to take a photo in Camera mode.
Star Button
Press this button to add effects to photos and videos or to display the
effects menu in other modes.
Rotary Ring
Turn the Rotary Ring to add or change the color lter effect in Camera
or Video modes.
Volume Button
Press the Volume button and then left or right on the D-pad to adjust
the volume.
Delete Button
Press this button to delete a photo, video or voice le.
Zoom Wheel
Push this button upwards to zoom in and downwards to zoom out.
4
4
4
USB Port
Plug the included USB cable into this port to connect to your computer
for data transfer.
MicroSD Card Slot
Insert a microSD card (not included) here for memory expansion.
INCLUDED IN THIS PACKAGE
Kidizoom
®
Duo DX
USB cable (for data transfer only)
Wrist strap
Parent’s guide
WARNING: All packing materials such as tape, plastic sheets,
packaging locks, removable tags, cable ties and
packaging screws are not part of this toy, and
should be discarded for your child’s safety.
NOTE:
Please keep this parent’s guide as it contains important
information.
ATTENTION : Pour la sécurité de votre enfant, débarrassez-vous
de tous les produits d’emballage tels que rubans
adhésifs, feuilles de plastique, attaches, étiquettes et
vis d’emballage. Ils ne font pas partie du jouet.
NOTE : Il est conseillé de conserver ce guide des parents car il
comporte des informations importantes.
PRODUCT SPECIFICATIONS
Display 2.4" TFT color LCD
Photo
Resolution
Front Camera
High Resolution Mode:
2560 x 1920 (5MP) for regular photos
1600 x 1200 (2MP) for photos with a camera effect
Low Resolution Mode:
640 x 480 (0.3MP)
Rear Sele Camera
1600 x 1200 (High) / 640 x 480 (Low)
Resolution adjustment is found in Settings
Video
Resolution
320 x 240
640 x 480 when taking video without effects using
a microSD card
5
5
5
Video Length
limit per le
10 minutes when using a microSD card
Digital Zoom 4X
Focus Range 1.5 feet - ∞
Flash Range 3 - 9 feet
Internal Memory 256MB built-in memory (shared with program data;
actual memory available for user storage will be
less)
File Format Photos: Standard Baseline JPEG
Videos: AVI (Motion JPEG)
Memory Card
Format and
Capacity
microSD / microSDHC card (not included) with
capacity from 1 GB to 32 GB and FAT or FAT32
format
Connectivity USB 2.0 cable included for data transfer to and
from computer
Batteries 4 AA (LR6) alkaline batteries
Optimal
Operating
Temperature
32-104°F (0-40°C)
STORAGE CAPACITY FOR REFERENCE
Media Quality
Internal
Memory
16GB card 32GB card
Photos
0.3 MP 1,570 151,700 303,500
5.0 MP 140 13,800 27,700
Video
(min)
320 x 240 8 770 1,550
640 x 480 N/A 320 650
MP3
(min)
128 kbps 170 16,600 33,200
NOTE: Estimations are based on normal lighting conditions. Actual
capacity varies depending on shooting environment.
The video length limit is ve minutes per le when using the internal
memory and 10 minutes per le when using a memory card.
6
6
6
GETTING STARTED
BATTERY REMOVAL AND INSTALLATION
Note: Adult assistance is required for battery installation.
1. Make sure the camera is turned Off.
2. Locate the battery covers on the handles of the camera. Open the
battery covers separately by pressing each trigger inwards.
3. Remove old batteries by pulling up on one end of each battery.
4. Install 4 new AA batteries (2 on each side) as illustrated.
5. Replace each battery cover and make sure it clicks into position.
BATTERY NOTICE
Use new alkaline batteries for maximum performance.
Use only batteries of the same or equivalent type as recommended.
Do not mix different types of batteries: alkaline, standard (carbon-
zinc) or rechargeable, or new and used batteries.
Do not use damaged batteries.
Insert batteries with the correct polarity.
Do not short-circuit the battery terminals.
Remove exhausted batteries from the toy.
Remove batteries during long periods of non-use.
Do not dispose of batteries in re.
Do not charge non-rechargeable batteries.
Remove rechargeable batteries from the toy before charging
(if removable).
Rechargeable batteries are only to be charged under adult supervision.
7
7
7
MEMORY CARD INSTALLATION
Kidizoom
®
Duo DX is compatible with microSD/microSDHC memory
cards up to 32GB (memory cards sold separately).
Make sure the camera is
turned Off.
Locate the microSD Card
Slot at the bottom of the
camera.
Pull up the rubber cover.
Insert the memory card as
illustrated.
Once the memory card is
detected, it will be used as the default memory source of the camera.
To remove the memory card from the slot, push the card once and it
will eject.
NOTE: If a memory card is being used, data stored in the internal
memory cannot be accessed by the camera unless the memory
card is removed. To prevent accidental data loss, make sure to
back up all important data from your memory card before using it
in the camera.
TO BEGIN USING KIDIZOOM
®
DUO DX
Press the On/Off button to turn the camera on.
If it is the rst time that you are turning the camera on, the Try-Me
demo video will start playing. Press the Shutter button to exit the Try-
Me demo mode. The Try-Me demo will be disabled and will not play
again.
After the camera exits demo mode, set the time and date. Press up
or down on the D-pad to select the correct day, month, year, hour and
minute. Press left or right on the D-pad to jump to the previous or the
next item. Finally, press the OK button to conrm the setting. If you
wish to change the date and time later, you may do so in Settings.
After the Try-Me demo mode has been disabled and you turn the cam-
era on, the Camera mode preview screen will be activated and you
can start taking photos.
Press the Home button to go to the Main Menu to access other
activities.
Press the On/Off button again to turn the camera off.
8
8
8
BATTERY STATUS
When the screen shows the Low Battery icon , we recommend
installing a fresh set of batteries as soon as possible. The unit will not
function properly when it shows the Batteries Exhausted icon . New
batteries should be inserted before further use.
AUTOMATIC SHUT OFF
To preserve battery life, the Kidizoom
®
Duo DX camera will
automatically shut off after three minutes without operation in Camera
or Video modes. In other modes, the auto-off time is two minutes.
While using Wacky Slideshow, the auto-off time is 15 minutes.
CONNECTING TO A COMPUTER
You can connect Kidizoom
®
Duo DX to a PC or Mac computer using
the included USB cable. Once connected, you can transfer les between
the camera and computer. Please follow these steps to make the
connection.
NOTE: The USB connection does not charge the camera’s batteries.
Turn the camera Off before connecting to a computer.
Pull up the rubber cover of the USB Port on the bottom of the camera.
Insert the USB cable (small end) into the USB Port on the camera.
Insert the larger end of the USB cable into a USB Port on your
computer. A USB Port is usually marked with this symbol:
Two removable drives called VTech 5200 and VT SYSTEM will open
on your computer after you have connected. VTech 5200 is for storage
of your data. VT SYSTEM is for storage of system data and cannot
be accessed. If there is a memory card in the camera, the removable
drive will show the content of the memory card only.
To avoid any potential damage to your Kidizoom
®
Duo DX:
When the cable is not connected to the camera, ensure that the
rubber cover fully covers the USB Port of the camera.
Please ensure that the microSD Card Slot rubber cover of the
camera is tted in place properly.
9
9
9
NOTE:
Once the camera is connected to your computer, do not insert or
remove a memory card and do not disconnect the camera while
les are transferring.
To back up photo or video les taken by the camera:
Locate and open the DCIM folder on the removable VTech 5200 drive.
Your photo and video les will be organized in subfolders such as
100VTECH. Copy and paste your photo and video les onto a location
on your computer to back them up.
To back up voice les recorded by the camera:
Open the VOICE folder on the removable VTech 5200 drive.
Copy and paste the voice les to a location on your computer.
To transfer MP3 les to the camera:
Open the MUSIC folder on the removable VTech 5200 drive.
Copy and paste your MP3 les from your computer into the MUSIC
folder on the removable VTech 5200 drive.
To transfer photo or video les to the camera:
Select the photo or video les you would like to transfer from your
computer rst.
Locate and open the DOWNLOAD folder on the removable VTech
5200 drive, then copy and paste photo les into the PHOTO subfolder,
or VIDEO subfolder for video les.
NOTE:
Do not transfer photo or video les created by other cameras to the
Kidizoom
®
Duo DX, as these le formats may not be compatible.
After you have nished, disconnect the camera by following the
steps to safely remove hardware from your computer. You can then
physically disconnect the USB cable and the camera from your
computer.
SYSTEM REQUIREMENTS FOR COMPUTER CONNECTION:
Microsoft
®
Windows
®
7, Windows
®
8 or Windows
®
10 operating systems.
Mac OS X 10.9, 10.10, 10.11, macOS 10.12, 10.13 or 10.14.
USB port required.
10
10
10
ACTIVITIES
Home Menu
Press the Home button to go to the Main
Menu and select an activity.
Use the D-pad to select a mode and press
OK to conrm selection.
You can change the wallpaper to a preset
picture, or you can select a photo you’ve
taken. Please see the Settings section for
more information.
1. Camera
In Camera mode, you can take normal photos, self-portrait photos
or pictures with funny effects. Press the Camera Selector button to
change between the Front Camera and Rear Sele Camera. Use
the Zoom Wheel anytime for the digital zoom function and press the
Shutter button or OK button to take a photo.
Photo Effects and Picture Modes
To add a photo effect, press left or right on the D-pad to select an effect,
or press the Star button to go to the photo effect menu to select a photo
effect by type.
To add or change the color lter effect, turn the Rotary Ring when in
Camera mode. The lter will also affect any other photo effects selected.
The 3X Photo Burst mode will take three photos in one shutter press.
Flash and color lter effects are disabled in this mode to achieve fast
and continuous capture.
The Auto-Portrait Picture mode will let you take sele pictures
automatically. Face the Sele Camera and listen for the words “Say
cheese!” The camera will initiate a countdown and take a picture. Please
ensure adequate lighting conditions and keep the camera steady to
assist face detection.
NOTE: If the camera volume is muted, the words “Say cheese!” will not
be heard.
Self-Timer
Turn the self-timer on from the Settings menu to enable a countdown
period before taking a photo. From the preview screen, you can also
press down on the D-pad to turn the self-timer on or off.
11
11
11
Flash
By default, the camera Flash will be set to Auto-Flash
mode, in which
the camera automatically determines whether the Flash is needed.
Press up on the D-pad to change to Always-Flash
or Disable-Flash
modes if desired.
NOTE: Camera Flash will not be available in these conditions:
3X Photo Burst mode
When using the Sele Camera
If the low battery icon is displayed
WARNING: Turn off the Auto-Flash when taking
a close-up photo of a face to avoid eye discom-
fort.
2. Video
In Video mode you can take normal videos, videos with funny live lters,
and you can also add a color lter effect. Select the Video mode icon in
the Main Menu and press the OK button to get started.
Taking Normal Videos
Press the Shutter button or OK button to start
or stop recording.
Use the Zoom Wheel anytime for the digital
zoom function.
To add or change the color lter effect, turn the
Rotary Ring when in Video mode and before
beginning to lm. The lter will also affect any
selected video themes.
Selecting a Live Face Filter
You can select a Live Face Filter by pressing
left or right on the D-pad and pressing the
OK button to conrm the selection. Press the
Shutter button to start recording, and the
lter will follow your movement.
Press the Star button to go to the Live Face
Filter menu to view all lters and select a lter to use.
NOTE:
Please ensure adequate lighting conditions and keep the camera steady
to assist face detection.
12
12
12
3. Collage Camera
With Collage Camera, you can make collage pictures by taking several
photos in sequence.
First, press left or right on the D-pad to select a layout.
In the selected layout, follow the frames to take pictures of your friends
or yourself using the Shutter button or OK button. If you want to retake
the last frame, just press the Delete button.
When all the collage frame's pictures are taken, press the OK button
to conrm and save the picture. You can review your collage pictures
anytime in Playback mode.
4. Playback
Press the Playback button to view your photos and videos.
Press up or down on the D-pad to view the previous or next le.
Use the Zoom Wheel to zoom out and view the les as thumbnails.
Then, use the Zoom Wheel to zoom in and return to a full screen
view.
• Press the OK button to play a video. While playing the video, press
left on the D-pad to rewind or right on the D-pad to fast forward, both
at 2X the speed. Press the button again to change the speed to 4X.
Press it one more time or press the OK button to return to 1X speed.
When zoomed in on a photo, use the D-pad to pan to a different part
of the photo. Use the Zoom Wheel to zoom out or press the OK
button to return to standard viewing.
Press the Star button to show the wallpaper menu. Select Yes to set
the current photo as the Main Menu wallpaper.
5. Music Player
In Music Player mode, you can listen to your own MP3 les in the
MUSIC folder of the internal camera memory or memory card. You need
to transfer MP3 les to the camera from your computer before using this
function.
The music les/folders will appear and play in alphabetical order.
Press up or down on the D-pad to navigate and press the OK button to
play a music le or enter a folder to explore the les inside.
When viewing the contents of a folder, if you want to exit the current
folder, select the back icon
on the rst row of the list.
13
13
13
When a song is playing, press left or right on the D-pad to fast forward
or rewind. Press the OK button to pause or resume playback.
If you want to delete the highlighted le, press the Delete button.
Press the Star button to go to the Music Options menu to change the
music player options.
Music Options Menu
Press left and right on the D-pad to set the options:
Set Shufe to ON to play the music in a random order.
Set Repeat to ONE to loop the currently playing song. Repeat to ALL
will keep playing all music les in the folder.
Press the Star button to return to the player.
NOTE: The automatic shut-off function is disabled when music is playing.
6. Wacky Slideshow
In Wacky Slideshow, you can view the photos on the camera as a slide-
show with funny effects.
There is a time delay between each photo that can be changed (see
settings information below). There are also several different transition
effects that can be seen when the photos change.
Note: The photos will not be saved with the Wacky Slideshow effects.
This is only for viewing in this mode.
Press the Star button to go to the Wacky Slideshow menu and adjust
the settings:
• Background Music: Choose among three songs or turn off music
• Wacky Effects: On or Off
• Shufe: On or Off
• Delay: Set time gap between photos
7. Creative Tools
Press left or right on the D-pad to scroll through the functions and press
the OK button to make a selection.
A.
Photo Editor
In Photo Editor, you can add photo frames, stamps, special effects and
fantasy effects to a photo.
Press up or down on the D-pad to view photos, then press the OK button
to conrm your selection and start editing. An editing menu will appear.
Use the D-pad to choose a function and press the OK button to begin.
14
14
14
Photo Frames
Choose this function to add a photo frame to your photo. Press left or
right on the D-pad to select a frame, then press the OK button to conrm
your selection.
Stamps
Choose this function to add a stamp to your photo. Press left or right
on the D-pad to choose a stamp, then press up or down to enlarge
or shrink it. Press the OK button to conrm your selection, then use
the D-pad to position the stamp. Finally, press the OK button again to
apply the stamp to the photo.
Special Effects
Choose this function to add distortion, kaleidoscope or color lter
effects to your photo. Press left or right on the D-pad to choose an
effect, then press up or down to change the size of the area to which it
will be applied. Press the OK button to conrm your selection. Use the
D-pad to move the effect to where you would like to apply it, then press
the OK button to add it to the photo.
For color lter effects, simply select the effect, then press the OK button
to apply it.
Note: Generating a special effect on your camera may take more than
one minute.
Fantasy Effects
Choose this function to add a fantasy effect to your photo. Press left or
right on the D-pad to select an effect, then press the OK button to apply
the effect.
Undo
Choose this function to undo the last edit.
Save As
Choose this function to save the photo that you edited as a new le.
Note: The process of saving an edited photo with a distortion effect may
take more than one minute.
15
15
15
B. Animation Maker
Animation Maker is a tool for creating your own stop-motion animations.
Sample demo projects are available in the project selection screen.
Within this menu, you can view the sample animations and add, view or
edit your own projects. Press up or down on the D-pad to select a project.
Then press left or right on the D-pad to select a function and press the
OK button to continue. To delete a project, press the Delete button to
display the delete menu, and select Yes to conrm.
NOTE: The demo projects are for reference only. They cannot be edited,
deleted or saved as videos.
Play Animation
You can preview your animation with fun background music. While
playing the animation, press the OK button to stop and return to the
project.
Edit Project
Here you can further edit a project:
Add frames
Take more photos after the newest frame.
(Maximum number of frames = 100)
Play animation
Preview the animation with the selected
background music.
Save as video
Save the animation as a video (AVI le) to
watch or share on a computer.
(It may take a few minutes to save the
animation as a video)
Advanced options
Change the settings:
Animation speed
Background music
Overlay of the last frame on the preview
screen
16
16
16
New Project
In the preview screen, you can start taking photos. This series of
photos will become the frames of your animation. When completed,
the photos you took can be played continuously as an animation. In
the preview screen, press the OK button or Shutter button to take a
photo when the camera icon is highlighted. The last image taken will
be overlaid on the screen to help line up the next photo. Press left or
right on the D-pad after you are nished taking photos and the project
selection screen will appear. Press left or right to play the animation,
further edit it or create a new project.
NOTE: You can delete the frame currently being viewed by pressing
the Delete button to display the delete frame menu, then select Yes to
conrm and continue.
C.
Silly Face Detector
With the Silly Face Detector, you can take a picture of your friend and it
will tell you how silly or smart your friend is!
First, make sure the entire face is in the center of the frame. When the
frame turns to green, it means that a face has been detected. Press
the OK button to start the scanning process and the result will appear
in a few seconds. To see the last three results, press left or right on the
D-pad.
NOTE: All results in Silly Face Detector are generated randomly and
are just for fun.
D.
Voice Recorder
In Voice Recorder mode, you can record your
own voice for up to 10 minutes per recording.
Press the OK button to start recording when
the record icon is highlighted
. Press
the OK button again to stop recording. After
recording, it will show the playlist of saved
recordings automatically.
Press the OK button to play back the
recording when the play icon is highlighted
. Press the OK button
again to pause.
From the playlist, press left or right on the D-pad to highlight the
record icon
and record a new voice le, or the play icon to
play the selected le.
17
17
17
To add a voice-changing effect to an existing recording, press left
or right on the D-pad to move the highlight to the Effects icon .
Press OK button or Star button to go to the Voice-Changing Effects
menu.
From the Voice-Changing Effects menu, use the D-pad to select a voice-
changing effect and press the OK button to add the effect. To save the
altered recording as a new le, use the D-pad to highlight the Save As
icon
and press the OK button to start the saving process. You will
automatically be returned to the playlist after the saving process completes.
8. Games
There are ve built-in games on the Kidizoom
®
Duo DX. From the
Games menu, use the D-pad to select a game and press the OK button
to enter the selected game.
WARNING: Stay alert and be aware of your surroundings while
playing Augmented Reality (AR) camera games.
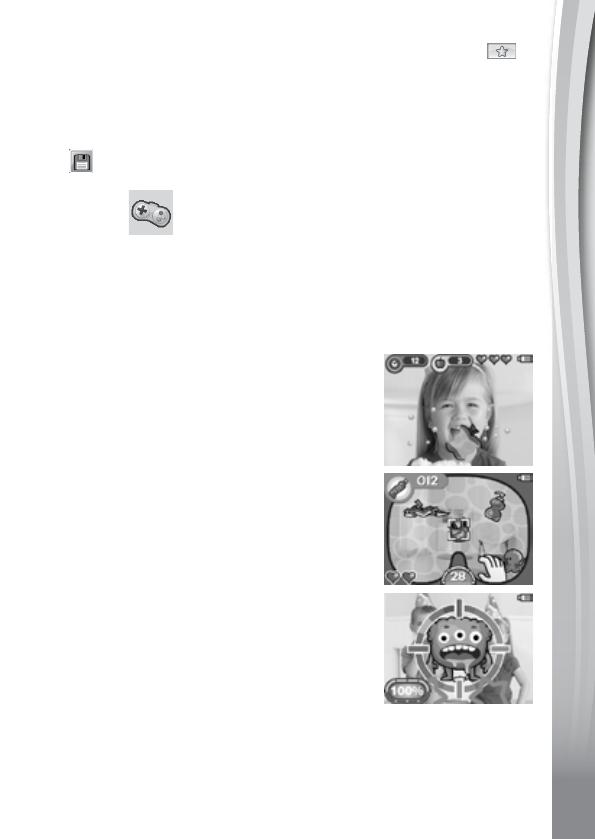
A. Chomp Challenge (AR game)
It’s time for a chomp challenge! Position your
face at the center of the screen, and when the
correct food comes out, pretend to chomp down
on it to score. Stay still and don't chew when the
non-food items appear! Be careful, if you miss
more than 2 of the target food items you will
have to repeat the level before advancing.
B. Save the Ocean (AR game)
Help clean the ocean by picking up litter. Move
the camera around and press the OK button
when the garbage is in the target. Be careful
not to touch the living sea creatures that may
get in the way.
C. Monster Detector (AR game)
Find the right colors to discover monsters all
around you!
First, observe the color sequence and press OK
to continue. Next, move the camera around to
nd those colors in the world around you in the
correct order. When you nd the correct color,
position it in the middle of the target on your screen and the target will ash
red before moving on to the next color you need to nd. Once you nd
all the colors in the correct order, a monster will appear for you to battle.
Keep it in the center of the target and press the OK button repeatedly to
capture it.
18
18
18
Select the Monster Book icon to check out all the monsters that you
have captured in the game.
D. Sushi Mania
In this game, you’re the master sushi chef! As
customers make their orders, assemble the
correct rice and toppings to keep them happy.
E. Bounce Around
Use the D-pad to bounce the ball off the shuttle
and break all the blocks to progress.
Game Time Limit
By default, the ve built-in games have no
time limit. To set a daily game time limit, go to
Parental Settings from the Settings menu.
9. Settings
Press left and right on the D-pad to choose a setting to adjust.
A. Set Wallpaper
Set your favorite wallpaper or use one of your own photos as the back-
ground of the Main Menu.
Press up or down on the D-pad to select your favorite wallpaper and
press the OK button to conrm. To set one of your own photos as the
wallpaper, select the photo icon
to go to the photo selection screen.
Then select the photo you would like to use and press the OK button
to conrm.
B. Memory
Review the status of the camera’s internal memory or of the memory
card (if one is inserted). There are three advanced options:
1. Erase All Photos and Videos
This will delete all les in the DCIM and DOWNLOAD folders in the
internal memory or memory card (if one is inserted).
2. Format
This will erase all data in the internal memory or memory card
(if one is inserted).
19
19
19
3. Factory Reset
Factory Reset will erase the contents stored in the internal memory
and reset all system settings to factory default, e.g. le index, photo
resolution, game level and captured game faces.
NOTE: If a memory card is being used, data stored in the internal
memory cannot be accessed on the camera unless the memory card
is removed. When the internal memory of the Kidizoom
®
Duo DX is
getting full, or when the le indexes are used up, back up all the les
from the camera’s internal memory to your computer and then delete the
les in the camera’s internal memory to free up space.
C. Camera Settings
This menu allows you to adjust various camera options. Press up or
down on the D-pad to select an item and press the OK button to toggle
the options.
Front Camera Resolution For the best picture quality, please select
high resolution
or choose low resolution if you would
like to have room to save more pictures.
Indoor Light Frequency The default frequency is set according to
your region. Please leave your camera set to the default value unless
you are traveling.
Left-Handed Shutter Button – Set the left-handed Shutter button to
On or Off. When this option is set to On, the functions of the Camera
Selector button and the Shutter button will be interchanged.
D. Date & Time
This menu shows the current date and time. To change the date or
time, press the OK button and use the D-pad to adjust the settings.
After entering the Set Date & Time menu, use the D-pad to change
the settings. When nished, press the OK button to exit this menu.
E. Language
Choose from a list of available languages to change the text interface
of the camera.
F. Parental Controls
The Parental Controls menu allows you to limit playtime for the ve
games.
Press and hold the Star button until you see a pop-up message asking
for a passcode. Use the D-pad to enter the two-digit answer to the
equation and press the OK button to proceed.
20
20
20
On the next screen, you can choose from the following options:
No limit This is the default option in which games can be played for
any amount of time.
Disable games – This will disable all games and the Games submenu
will be hidden from the Main Menu.
15 / 30 / 60 / 90 minutes per day When the accumulated game play
time reaches the selected time limit, the player cannot play any games
until the following day.
CARE & MAINTENANCE
1. Keep the camera clean by wiping it with a slightly damp cloth.
2. Keep the camera out of direct sunlight and away from any direct heat
source.
3. Remove the batteries when the camera is not in use for an extended
period of time.
4. Do not drop the camera on a hard surface and do not expose it to
moisture or immerse it in water.
WARNING
A very small percentage of the public, due to an existing condition, may
experience epileptic seizures or momentary loss of consciousness when
viewing certain types of ashing colors or patterns.
While Kidizoom
®
Duo DX does not contribute to any additional risks,
we do recommend that parents supervise their children while they play
games. If your child experiences dizziness, altered vision, disorientation,
or convulsions, discontinue use immediately and consult your doctor.
Please note that focusing on and handling a Kidizoom
®
Duo DX
camera at close range as a game controller for a prolonged period of
time may cause fatigue or discomfort. We recommend that children take
a 15-minute break for every hour of play.
  • Page 1 1
  • Page 2 2
  • Page 3 3
  • Page 4 4
  • Page 5 5
  • Page 6 6
  • Page 7 7
  • Page 8 8
  • Page 9 9
  • Page 10 10
  • Page 11 11
  • Page 12 12
  • Page 13 13
  • Page 14 14
  • Page 15 15
  • Page 16 16
  • Page 17 17
  • Page 18 18
  • Page 19 19
  • Page 20 20
  • Page 21 21
  • Page 22 22
  • Page 23 23
  • Page 24 24
  • Page 25 25
  • Page 26 26
  • Page 27 27
  • Page 28 28
  • Page 29 29
  • Page 30 30

VTech 5200 Parents' Manual

Category
Toys & accessories
Type
Parents' Manual
This manual is also suitable for

Ask a question and I''ll find the answer in the document

Finding information in a document is now easier with AI