Page is loading ...

TV
USER'S MANUAL
P
%
'm

IMPORTANT INFORMATION
WARNING
To reduce the risk of fire or electric
shock, do not expose this product
to rain or moisture.
To reduce the risk of electric shock, do not remove
cover (or back). No user-serviceable parts inside. Refer
_C-I< "'_NOTO_ [ servicing to qualified service personneh
_kThis symbol indicates
"dangerous voltage" inside the
product that presents a risk of
electric shock or personal injury.
,_ This symbol indicates
important instructions
accompanying the product.
Caution: To prevent electric shock, match wide blade of plug to wide slot, fully insert.
Attention: Pour 6.viter les chocs _lectriques, introduire la lame la plus large de la fiche dans la borne
correspondante de la prise et pousser jusqLI au fond.
Refer to the identification/rating label located on the back panel of your product for its proper operating voltage.
FCC Regulations statethat unauthorized changes or modifications to this equipment may void the user's authority to
operate it.
Caution: If fixed (non-moving) images are left on the screen for long periods, they may be permanently imprinted on the
picture tube (or ProJection TV picture tubes). Such images include network loges, phone numbers, and video games. This
damage is not covered by your warranty. Extended viewing of channels displaying these images should be avoided.
Cable TV Installer: This reminder is provided to call your attention to Article 820-40 of the National Electrical Code (Section
54 of the Canadian Electrical Code, Part1) which provides guidelines for proper grounding and, in particular, specifies that the
cable ground shall be connected to the grounding system of the building as close to the point of cable entry as practical.
PRODUCT REGISTRATION 1
Pleasefill out the product registration card and return it immediately. Returning the card allows usto contact you if needed.
Keep your sales receipt to obtain warranty parts and service and for proof of purchase. Attach it here and record the serial and model
numbers in case you need them. The numbers are located on the back of the product.
Model No.
Serial No.
Purchase Date:
Dealer/Address/Phone:
G-LINK, VCR Plus+, C_,PlusCode, GUIDE Plus+, and GUIDE Plus+ Gold are trademarks of Gemstar Development Corporation.
TheVCR Plus+ and GUIDE Plus+ systems are manufactured under license from Gemstar Development Corporation andVCR Index
Systems B.V., respectively.
THOMSON CONSUMER ELECTRONICS AND GEMSTAR ARE NOT IN ANY WAY LIABLE FOR THE ACCURACY OF THE PROGRAM
INFORMATION PROVIDED BYTHE GUIDE PLUS+ SYSTEM. IN NO EVENT SHALL THOMSON CONSUMER ELECTRONICS OR
GEMSTAR BE LIABLE FOR ANY AMOUNT REPRESENTING LOSS OF PROFITS, LOSS OF BUSINESS, OR INDIRECT, SPECIAL, OR
CONSEQUENTIAL DAMAGES IN CONNECTION WITH THE PROVISION OR USE OF ANY INFORMATION, EQUIPMENT, OR
SERVICESRELATING TO THE GUIDE PLUS+ SYSTEM.
VCR required for recording.

TABLE OF CONTENTS
SETUP AND CONNECTIONS ............................................ 3
Step 1: Unpack the TV ..................................................... 4
Step 2: ConnectYour TV .................................................. 4
Step 3: Connect the G-LINK Cable ................................... 9
Step 4: Plug in theTV .................................................... 10
Step 5: Place Batteries in Remote ................................... 10
Step 6:Turn on theTV .................................................... 10
On-Screen Program Guide ....................................... 10
Step 7: Program the TV .................................................. 10
INTERACTIVE SETUP .......................................................... 11
Using Point and Select ................................................... 12
Entering Setup ................................................................ 12
Select a Language .......................................................... 13
Auto Channel Search ..................................................... 13
The GUIDE Plus+ Gold System ...................................... 14
Setting the Time ............................................................. 16
Setting the VCR1 Channel (auto tuning) ........................ 16
Setting theVCR2 Channel (auto tuning) ......................... 17
Setting the DVD Channel (auto tuning) .......................... 18
Setting the SAT/CABLE Channel (auto tuning) ................. 19
Labeling the Channels ................................................... 20
USING THE REMOTE .......................................................... 21
Remote Buttons ............................................................. 22
Accessing the Video Input ........................................ 23
Programming the Remote .............................................. 24
Testing the Remote ................................................... 24
Using Automatic Code Search .................................. 24
Using Direct Entry .................................................... 24
Using the Remote to Control a Device ..................... 25
Modes of Operation ................................................. 25
Front Panel ..................................................................... 25

TABLE OF CONTENTS
FEATURES AND MENUS .................................................... 27
Menus and Control Panels ............................................. 28
Menus ...................................................................... 28
Control Panels .......................................................... 29
Audio Menu .................................................................. 30
Using the Remote to Select an Audio Processor ............. 31
Picture Quality Menu .................................................... 32
Screen Menu ................................................................. 33
Using Closed Captioning .......................................... 34
Closed Captioning Modes ........................................ 34
Turning off Closed Captioning .................................. 34
Channel Menu ............................................................... 35
Time Menu .................................................................... 36
Parental Controls and V-Chip ......................................... 37
V-Chip TV Rating Limit ............................................. 38
Channel Block .......................................................... 43
Front Panel Block ...................................................... 43
Lock/Unlock Parental Controls ................................. 43
GUIDE Plus+ Gold System ............................................ 44
Downloading Data ................................................... 45
News ........................................................................ 48
Schedule .................................................................. 48
Messages .................................................................. 49
Editor ....................................................................... 50
Setup ........................................................................ 50
PIP (Picture-in-Picture) Operation .................................. 51
Setup Menu ................................................................... 52
Channel Marker ............................................................. 52
REFERENCE ............................................................................. 53
Troubleshooting ............................................................. 54
Making Connections to the Front Panel .......................... 56
Care and Cleaning ......................................................... 56
PROSCAN TV LIMITED WARRANTY ............................. 57
Accessory Information ................................................... 58
Index ............................................................................... 61
2

SETUP AND
GET rING STARTED
This manual is designed to get you
The first four sections of the
to get yourTV Setup and Oc
Interactive Setup, Progra_ the Rem:
the Features and Meraus of your TV,
The Reference section !n the back
contains troubleshootin_ _ips, care
instructions, accessory ordering
warranty
_uhow
in the
and use allof
book
cleaning
_tion and your
1
3
4
FEATURES
REMO _]
5 REFERENCE
x
q
US
Check out the notes that have been
added throughout the manual in these Tip
Boxes. There are some important
tips that will help you get the most from
your TV.
3

SETUP AND CONNECTIONS
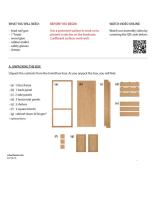
STEP1: UNPACK THETV
Make sure to locate the remote control.
STEP2: CONNECTING YOURTV
There are three types of connections outlined in this section:
TV Only: If you're only going to connect the
TV to your home antenna or cable
system.
The Basic Connection:
If you're going to connect the TV to a
VCR or satellite receiver.
Advanced Connections:
If you're going to make multiple
connections, hooking up the TV to
one or two VCRs, DVD player, and a
satellite receiver.
Cable information and illustrations are given for each type of
connection. Once you have completed your desired connection you
may skip forward to Step 3.
TV ONLY
This is a basic connection from an antenna or cable system to your TV.
Connect the cable into the Cable/Antenna jack as shown.
CABLES
You will usethe following cable to make your connection:
Coaxial Cable:These cables carry audio and video
signal to theTV from an antenna, cable, or cable
box.
Important Stand Information
Direct View TVs: 27"- 36" diagonal
CAUTION: Choose the location for your
TV carefully. Take precautions that the
stand or other furniture the TV is placed
on is properly located (seeImportant
Safeguards sheet) and of adequate size
and strength to prevent the TV from
accidentally being tipped over, pushed
off, or pulled off. This could cause
damage to the TV and/or personal injury.
Before You Connect
Protect against power surges:
• Connect all components before
plugging any power cords into the wall
outlet.
• Turn off the TV and/or component
before connecting or disconnecting
any cables.
• Make sure all antennas and cables are
properly grounded. Refer to the Safety
Tips sheet packed with your TV.
"IV
CABLE,CABLEBOX,ORANTENNA
TV May Differ
Once you have completed this connection go to Step 3, on page 9.
4

SETUP AND CONNECTIONS
THE BASIC CONNECTION
The basic connection below (TV and VCR) is the most common
connection and is therefore used to illustrate a single component
connection with your TV. For better sound and picture quality and
multiple component connection information refer to the next section,
Advanced Connections.
CABLES
You will usethe following cable to make your connection:
Coaxial Cables: These cables carry both the audio
and video signal to the TV from an antenna, cable,
or cable box. In this connection, a second Coaxial
Cable carries the signal through the VCR to the TV.
CABLE, CABLE BOX, OR ANTENNA
VCR1
I
TV
How TO VIEW THE VCR
To watch theVCR in this connection tuneTV to
Channel 3 or 4.
Later, in the Interactive Setup section you will
program theTV to automatically tune to Channel 3
or 4 when you turn on theVCR.
Once you have completed this connection go to Step 3, on page 9.
our TV May Differ 1
odel PS27610 does not have external
eaker terminals.
5

SETUP AND CONNECTIONS
ADVANCED CONNECTIONS
Advanced connections give you better sound and video by separating
the audio and video signals and enable you to connect multiple
components.
This section describes the types of inputs available on the back of your
TV and suggests ways you can usethem for optimum performance.
BACK OF THETV
The diagram below describes each of the back panel jacks. When
connecting AN cables, be sure to connect corresponding OUTPUTS
and INPUTS (Video to Video, Right Audio to Right Audio, etc.).
Once you have made your connections
you will want to program the TV to tune
to the correct Video INPUT channel in
order to see and hear audio and video
from the component. You will program
this later in the Interactive Setup.
Input 1
Connect any of the following components:
• VCR • ]nternet Access Device
• Laserdisc Player • DVD Player
• Satellite Receiver
To view the component connected to Input 1:
Use the WHO,INPUT button on the remote.
Input 2 (VIDEO orY P. P.)
Connect any of the following components:
• VCR • Internet Access Device
• Laserdisc Player • DVD Player
• Satellite Receiver
Use the Y P_P_jacks instead of the VIDEO jacks to connect an
optional component video source, such as a DVD player. Unlik(
a single video input, theY, P_,PRjacks maintain the video signal
as three separate signa sthrough these three jacks. To ensure
maximum picture quality, usethree video-grade cables for theY,
Pt_,and PRconnections.
To view the component connected to Input 2:
Use the WHO.INPUT button on the remote.
S-Video
This optional
connection
can be used
for better
video quality
picture.
Speaker Terminals*
Use to connect external
speakers for surround sound.
Make sure the Speaker
Selection is set to
EXTERNAL.
Audio Outputs
audio receiver or
amplifier for variable controlled
or fixed level stereo output.
Cable/Antenna
signal input from a cable,
cable box, or an off-air antenna. Can
also be used for basic component
connections.
G-LINK
Connect the G-LINK
cable for one-button
recording and channel
tuning from the Guide.
* Model PS27610 does not have these features.
6

SETUP AND CONNECTIONS
SAMPLE CONNECTIONS
The following are sample connection scenarios which you may
encounter when connecting components to your TV.
CABLES
You will usethe following cable to make your connection:
Coaxial Cables:Carries the signal from the
antenna or cable directly to the television or
through a cable box, as needed by your cable
system.
Audio/Video Cables: Carries sound an(] video
from the component to the TV.
S-Video Cable: Carries video from an S-Video
capable component which provides best
picture quality.
TV AND STEREoVCR
CABLE, CABLE BOX, OR ANTENNA
VCR
IN F'R'OM ANTcH 3
VIDEO R AUDIO L OUT TO -rv
? e
+ PJehT- + L_=T-
roUT2
INP
_uD_ _rmb-
Once you have completed this connection go to Step 3,
on page 9.
Note that model PS27610 does not have external speaker terminals.
Cautions:
Position cables to Avoid Audio Hum or
Interference
• Insert all cables firmly into jacks.
• Place the audio/video cables to the
sides of the TV's back panel instead of
straight down the middle.
• Try not to coil any twin-lead cables
and keep them away from the audio/
video cables.
Protect your components from
Overheating
• Do not block ventilation holes in any
of the components. Arrange the
components so that air can circulate
freely.
• Do not stack components.
• Allow adequate ventilation when
placing your components in a stand.
• Place an amplifier on the top shelf of
the stand so heated air rising from it
will not flow around other
components.
How TOVIEwYouRVCR
To watch the VCR in this connection, pressTV to put the
remote control into TV mode, then pressWHO•INPUT to
scroll through the video input channels until you tune to
VID1 input.
In the Interactive Setup section you can program the TV to
automatically tune to theVlD1 input channel when you
pressVCR1 on the remote.
Most Audio/Video cables are combined
into one cable with three heads on
each end.
We show individual v,_,o._,)v,_,o _,)
cables in these
sample _Rlght Audio(red)
connections. Either
may be used, but " " )
you must be sure to
connect Video to Video, Right to Right
and Left to Left.
7

SETUP AND CONNECTIONS
TV, VCR AND SATELLITE RECEIVER
CABLE,CABLEBOX, ORANTENNA
SATELLi_RECEIVER
®
VCI
Once you have completed this connection go to Step 3,
on page 9.
How TO VIEwYOuR COMPONENTS
To watch the Satellite Receiver in this connection,
pressTV to put the remote control into TV mode, then
press WHO,INPUT to scroll through the video input
channels until you tune to VlD1 (or SVID1) input.
To watch the VCR in this connection, pressTV to put
the remote control into TV mode, then press
WHO,INPUT to scroll through the video input
channels until you tune to VlD2 (or COMP2 if
connected to theY PisP_<jacks) input.
In the Interactive Setup you can program the TV to
automatically tune to the correct input channel when
you press the component button on the remote.
TV, VCR, SATELLITERECEIVERANDDVD
CABLE, CABLE BOX, OR ANTENNA
6AIIEU_IIIE
[
Note that model PS27610 does not have |
external speaker terminals.
J
SATELLmERECEIVER
@
Once you have completed this connection go to Step3,
on page 9.
8
How TO VIEwYouR COMPONENTS
To watch the Satellite Receiver in this connection, press
TV to put the remote control into TV mode, then press
WHO-INPUT to scroll through the video input
channels until you tune to VID1 (or SVID1 ) input.
To watch theVCR in this connection tune to Channel 3
or4.
To watch the DVD player in this connection, press TV
to put the remote control into TV mode, then press
WHO-INPUT to scroll through the video input
channels until you tune toVID2 (or COMP2 if
connected to theY P_PRjacks)input.
In the Interactive Setup you can program the TV to
automatically tune to the correct input channel when
you press the component button on the remote.

SETUP AND CONNECTIONS
STEP3: CONNECT THE G-LINK CABLE
The G-LINK cable enables the GUIDE Plus+ Gold System (the on-
screen guide that lists what shows are on TV) to work with your VCR
and/or cable box.
Cable Box - If your TV is connected to a cable box and you don't
connect the G-LINK cable, no channels will be listed in the on-screen
program guide.
VCR - If your TV is connected to a VCR and you don't connect the G-
LINK cable, one-touch recording won't work. The other features of the
guide will work properly.
How TO FIND THE REMOTE CONTROL SENSOR
The G-LINK cable is used to send commands to
your VCR and/or cable box. You must remove the
DEMO PIN before you can connect the G-LINK
cable.
You have to place the G-LINK wands in front of the remote control
sensor on the VCR and/or cable box. Some cable boxes and VCRs have
the remote control sensor labeled on the unit. Ifthe remote sensor isn't
labeled on your VCR and/or cable box, you need to use the remote
control that came with the VCR and/or cable box to locate the sensor.
1. Turn off theVCR and/or cable box.
2.
Hold the remote control (not the one that came with your TV, but
the one that came with the (:able box and/or VCR to which you're
connecting the G-LINK cable) so it istouching the front of the
component.
3.
Slowly move the remote control across the front of the component
(VCR or cable box) while you press the power button on and off.
You must press and release the power button each time you move
the remote (holding down the button won't work).
4. When the component turns on, you've located the remote control
sensor.
5. Place the wands of the G-LINK cable underneath your VCR and/or
cable box (seeinstructions on right).
Placing the Wands Under the VCR
and/or Cable Box
Place the wands of the G-LINK cable
underneath your VCR and/or cable box.
Place them about one inch away from the
remote control sensor.
C_,t _oG¢[NK j_K
9

SETUP AND CONNECTIONS
STEP4: PLUG IN THETV
Plug the end into the wall outlet, matching the wide blade of the plug
with the wide slot in the outlet. Be sure to insert the plug completely.
STEP 5: PLACE BATTERIES IN REMOTE
• Remove the battery compartment cover from the back of the
remote.
• Insert fresh batteries. Make sure that the polarities (+ and -) are
aligned correctly.
• Replace the cover.
STEP6:TURN ON THETV
PressTV on the remote, or press POWER on the TV itself.
Pressing the TV button not only turns on the TV, but puts the remote
into TV mode, so that the buttons on the remote will control TV
functions.
ON-SCREEN PROGRAM GUIDE
TheTV is designed to bring up the GUIDE Plus+ on-screen program
guide when you usetheTV button on the remote to turn on theTV
(after you have set up the GUIDE Plus+ system). For more information,
see "GUIDE Plus+ Gold System "on page 44.
To GET OUT OF THE GUIDE:
• PressOK to exit the Guide and tune to the highlighted channel.
• PressGUIDE to exit the Guide and tune to the channel displayed
in the View window.
• PressCLEAR to exit the Guide and go to the last channel you were
watching.
STEP 7: PROGRAM THE TV
Proceed to the next section, Interactive Setup. The interactive setup
routine walks you through the steps needed to fully configure the TV.
The first stepsask you to select your preferred language for the menu
system and to begin the auto channel search, which puts available
cable TV or antenna signals into the TV's memory.
Projection TV Only:
If the picture appears to have a double or
triple image or if you notice rings or halos
around objects, you may have to adjust
the color convergence. Details (:an be
found under the Screen menu heading in
the Features and Menus section of this
manual.
10

INTERACTIVE SETU]
THERE'S AN ON-SCREEN SETUPROUTINE
The interactive setu t
needed to configure the TV:
Select a menu languag@
Search for availab!e channels
Set up the GUIDB Plus+ Gold
Set the time
Set theVCR1 channel
Set theVCR2 channel ....
Set the DVD channel
Set the SAT/CABLE channel
Make the channel list and labels
the steps
USING ....
4 FEATURES AND
NUS
%
1t

INTERACTIVE SETUP
USING POINT AND SELECT
You only need to know one rule when using the remote to access on-
screen menus and control panels: point and select. The point and
select method hastwo steps.
1. Pointto a menu item using the MOVE arrows on the remote.
Topoint up or down, press the up or down arrows. To point left or
right, press the left or right arrows.
2. Select a menu item by pressing MENU or OK.
Selecting an item tells the TV's menu system to go ahead and
make the change or go to a place you have indicated.
ENTERING SETUP
The first screen of the Interactive Setup appears automatically when
you turn on your TV for the first time or after a power outage.
1. PressMENU to begin setup or CLEAR to exit.
<3©C>
Point and Select buttons
You can also access the Interactive Setup through the Main menu:
1. PressMENU to bring up the Main menu.
2.
Point to Setup and press MENU or OK. The first Setup screen
comes up, asking you to confirm that you want to begin.
You can also select a menu item by
entering the item number with the
number buttons on the remote.
PressCLEAR at any time to remove all
displays from the screen and return to TV
viewing.
12

INTERACTIVE SETUP
3. Point to Begin setup now and press MENU or OK.
SELECT A LANGUAGE
The first part of the setup routine asks you to select your preferred
language for the menu system.
1. Point to your preferred language for the menu system.
2. PressMENU or OK to select that language.
AUTO CHANNEL SEARCH
The next part of the setup routine asksyou if you want the TV to search
automatically for all channels available through your antenna or cable
TV system. This is sometimes called "autoprogramming."
Search for channels
I.
PressMENU or OK to tell the TV to begin searching for channels.
The display gives you a progress report and tells you when it has
finished.
2. PressMENU or OK to continue.
I f you skip Auto Channel Search now, you
can access it later through the Channel
menu.You can also put channels in
memory manually using List & Labels.
See Features and Menus for more details.
13

INTERACTIVE SETUP
THEGUIDE Plus+ GOLD SYSTEM
The next step lets you set up the GUIDE Plus+ Gold System to display your local
program listings, and control your cable box and VCR.
You can either press MENU or OK to bring up the GUIDE Plus+ Gold initial
menu or point to Skip this Step to move to the next step in the Interactive Setup.
GUIDE Plus+
• ]
You can set up the GUIDE
Plus+ Gold System during
Interactive Setup. You can
also access the GUIDE
Plus+ menus by pressing
menu on the remote, and
selecting GUIDE Plus+
Menu.
SETTING UP THE GUIDE Plus+ GOLD SYSTEM
To complete the GUIDE Plus+ Gold setup, the G-LINK wands must be properly aligned with your cable box
and VCR if you have them. Refer to the Setup and Connections section for additional information.
Select your Country and enter your ZIP or
Postal code.
USA
The next series of screens asksyou about
your cable TV setup. If you have a cable
box, you need to set the GUIDE Plus+
Gold System to control it. Otherwise, it
may not be able to locate and download
program information.
Tune your cable box to Channel 2 and
then select the brand of your cable box
from the choices available. The system
then searches for the correct code to
control your cable box. When your cable
box switches to channel 9 it has located
the correct code.
14

INTERACTIVE SETUP
Select Yesif the cable box changed to channel 9, or No if it did not. If you select No, the system will try another code.
If the GUIDE Plus+ Gold System cannot recognize either your cable box orVCR after several tries, a screen stating
"Cable Box (VCR) test failed...Please consult your manual and try again" appears.You have a choice to either TryAgain
or Skip Cable Box Setup. If you get this message, you should also:
• Double check the brand of your cable box or VCR, and try entering it again.
• Check to make sure the G-LINK wands are positioned correctly.
If you choose to skip the cable box (or VCR) setup some features of the guide may not be available until you successfully
complete this procedure.
Once the correct model of cable box has
been identified, you need to set the cable
box's output channel. Enter the channel
you use to view channels through your
cable box usually 3 or 4. Consult your
cable box's instruction book or your
cable company if you are not sure.
Choose Oto useVlDEO INPUT.
Select YESif you have a VCR, or NO if not.
(Answering NO automatically skips forward
to the end of GUIDE Plus+ Gold setup.)
Tune yourVCR to channel 2 and turn it off.
Enterthe brand of your VCR.
When the GUIDE Plus+ Gold System
correctly identifies the correct code for
your VCR, the VCR's tuner changes to
channel 9.
Select YESif the VCR automatically
changed to channel 9, or NO if it did not.
If you select NO, the system will try
another code.
The last screen that comes up after you've successfully finished the
GUIDE Plus+ Gold setup gives you an opportunity to view a demo. If you
don't want to view the demo, highlight EXITand press OK.
Remember:
• Leave your cable box turned ON to download program information.
• Leave your VCR turned OFF to record programs and download
program information.
15

INTERACTIVE SETUP
SETTING THE TIME
The next step in the Interactive Setup lets you set the time of day. If
your GUIDE Plus+ Gold System has not complete(] its first download,
you need to set the time.
Once the system has completed its first download, it setsthe time for
you automatically an(] you may not seethis screen.
1. PressMENU or OK to bring up the SET TIME control panel.
2.
Use the left and right arrows to point to the hour an(] minutes
spaces. Use the digits to enter the numbers an(] the up an(] (]own
arrows to change from AM to PM.
3. Press MENU or OK to continue.
SETTING THE VCRI CHANNEL (AUTO TUNING)
The next step lets you set the VCR1 channel. When you set the VCR1
channel, you're telling the TV what channel to tune to when you press
theVCRl button on the remote. This is called auto tuning.
Indicate which input you used to connect theVCR. If you don't have a
VCR1 component connected to the TV, skip this step or select Not
Connected from the VCR1 Channel choice list. (For more, seeAuto
Tuning in the Features and Menus section.)
16

INTERACTIVE SETUP
1. PressMENU or OK to bring up theVCRl choice list.
2.
Point to the choice that matches the way you have your VCR
connected to the TV. If you used audio/video cables, choose the
video input you connected the cables to.
3. Press MENU or OK to continue.
SETTING THE VCR2 CHANNEL (AUTO TUNING)
The next step lets you set the VCR2 channel. When you set the VCR2
channel, you're telling theTV what channel to tune to when you press
the VCR2 button on the remote.
Indicate which input you used to connect a second VCR. If you don't
have a second VCR component connected to the TV, skip this step or
select Not Connected from the VCR2 Channel choice list. (For more,
see Auto Tuning in the Featuresand Menus section.)
1. PressMENU or OK to bring up theVCR2 choice list.
17

INTERACTIVE SETUP
2.
Point to the choice that matches the way you have your second
VCR connected to the TV. If you used audio/video cables, choose
the video input you connected the cables to.
3. Press MENU or OK to continue.
SETTING THE DVD CHANNEL (AUTO TUNING)
The next step lets you set the DVD channel. When you set the DVD
channel, you're telling theTV what channel to tune to when you press
the DVD button on the remote.
Indicate which input you used to connect a DVD player. If you don't
have a DVD player connected to the TV, skip this step or select Not
Connectedfrom the DVD Channel choice list. (R)r more, see Auto
Tuning in the Features and Menus section.)
Use TV with DVD
1. PressMENU or OK to bring up the DVD choice list.
2. Point to the choice that matches the way you have your DVD
player connected to the TV. If you used audio/video cables, choose
the video input you connected the cables to.
3. PressMENU or OK to continue.
18
/