
TECHNICAL REFERENCE
HDR 24HDR 24
HDR 24HDR 24
HDR 24/96
24 TRACK/24 BIT, DIGITAL AUDIO HARD DISK RECORDER AND EDITOR

HD24/96 Technical Reference 2
TABLE OF CONTENTS
F
OREWORD
................................................................................................................................. 7
About This Manual/How To Use This Guide ..................................................................................... 7
C
ONVENTIONS
............................................................................................................................. 7
Text Conventions................................................................................................................................. 7
Window Navigation Conventions........................................................................................................ 7
H
ARDWARE
O
VERVIEW
.............................................................................................................. 8
Front Panel User Interface Conventions.............................................................................................. 8
System Control Buttons .................................................................................................................................. 8
Page Left and Page Right Buttons.................................................................................................................. 8
Select Buttons ................................................................................................................................................. 8
Front Panel Display and Controls........................................................................................................ 9
Transport Controls ......................................................................................................................................... 9
Current Time Display ..................................................................................................................................... 9
Status LEDs .................................................................................................................................................. 10
Front Panel Alphanumeric Display (LCD)........................................................................................ 10
Project Information Display......................................................................................................................... 10
Menu / Status Display................................................................................................................................... 10
Rear Panel.......................................................................................................................................... 11
BNC Termination Switch.............................................................................................................................. 11
MIDI Connector ........................................................................................................................................... 11
Ethernet Jack................................................................................................................................................ 11
Accessory Slots............................................................................................................................................. 11
G
RAPHICAL
U
SER
I
NTERFACE
(GUI) O
VERVIEW
................................................................... 11
GUI Conventions ............................................................................................................................... 13
Mouse Clicking............................................................................................................................................. 13
Window and Dialog Box Paradigms ............................................................................................................ 13
Keyboard ...................................................................................................................................................... 14
GUI Track Display and Controls ....................................................................................................... 15
Project Information Display......................................................................................................................... 15
Current Time Display ................................................................................................................................... 15
Time Bar / Marker Bar Overview ................................................................................................................. 15
Time Bar....................................................................................................................................................... 16
Song Offset ................................................................................................................................................... 16
Marker Bar and Markers.............................................................................................................................. 16
Track Area ......................................................................................................................................... 16
Track Area Scrolling Conventions ............................................................................................................... 17
Track View Controls..................................................................................................................................... 17
Zoom Tricks.................................................................................................................................................. 17
Auto Scroll.................................................................................................................................................... 17
Screen Drag (Special Scroll) Mode.............................................................................................................. 18
Track Control Area ............................................................................................................................ 18
Track Number button.................................................................................................................................... 18
Record Ready buttons................................................................................................................................... 18
Take View and Active Take Number Buttons................................................................................................ 19
Solo and Mute buttons.................................................................................................................................. 19
Track Name .................................................................................................................................................. 19
Lists Panel.......................................................................................................................................... 20
Region List.................................................................................................................................................... 20
Cue List......................................................................................................................................................... 20
Part No. 820-231-00 Rev. B 19th Jan 2001
©2001 All Rights Reserved. Mackie Designs.

HD24/96 Technical Reference 3
History List – Undo and Re-do..................................................................................................................... 21
F
ILE
M
ANAGEMENT
................................................................................................................. 22
Projects and Playlists – Keeping Track of the Files .......................................................................... 22
What’s A Project?......................................................................................................................................... 22
What’s A Playlist? ........................................................................................................................................ 22
Concepts of Project Organization ................................................................................................................ 22
Project Management .......................................................................................................................... 23
Project Manager........................................................................................................................................... 23
New Project .................................................................................................................................................. 23
Open Project................................................................................................................................................. 24
Save Project.................................................................................................................................................. 24
Rename a Project ......................................................................................................................................... 24
Delete Project............................................................................................................................................... 25
Templates...................................................................................................................................................... 25
P
LAYLIST
M
ANAGEMENT
......................................................................................................... 26
Regions .............................................................................................................................................. 26
Region List.................................................................................................................................................... 26
Region Views ................................................................................................................................................ 27
Region Names............................................................................................................................................... 27
Capture Region............................................................................................................................................. 27
Importing Audio Files .................................................................................................................................. 28
Render Tracks............................................................................................................................................... 28
Purge Unused Files ...................................................................................................................................... 29
Backup and Restore ........................................................................................................................... 30
M
EDIA
M
ANAGEMENT
.............................................................................................................. 31
Formatting Drives .............................................................................................................................. 31
Verify Drive Performance ................................................................................................................. 32
Mount/Refresh Drives ....................................................................................................................... 32
T
RANSPORT
O
PERATION
.......................................................................................................... 33
Transport Controls ............................................................................................................................. 33
REWIND....................................................................................................................................................... 33
FAST FWD ................................................................................................................................................... 33
STOP ............................................................................................................................................................ 33
PLAY............................................................................................................................................................. 34
Locate Points – LOC, LOC1, LOC2, LOC3, and LOC4).................................................................. 34
LOC (Transport Locate)............................................................................................................................... 34
Numbered Quick Locate Points (LOC 1, 2, 3, and 4)................................................................................... 34
Looping (LOC 1 and LOC 2)........................................................................................................................ 36
Loop Selection .............................................................................................................................................. 36
Auto Punch (LOC 3 and LOC 4) .................................................................................................................. 36
AutoPlay mode................................................................................................................................... 36
Cues ................................................................................................................................................... 37
Preroll ................................................................................................................................................ 37
Time Code Chase............................................................................................................................... 37
R
ECORDING
O
PERATIONS
........................................................................................................ 38
Record Standby and Record Ready (Arming tracks)......................................................................... 38
RECORD ........................................................................................................................................... 38
One Button Punch.............................................................................................................................. 39
Punching In ........................................................................................................................................ 39
Record Safe........................................................................................................................................ 40
Rehearse............................................................................................................................................. 40
Auto Punch ........................................................................................................................................ 40

HD24/96 Technical Reference 4
Auto Take .......................................................................................................................................... 41
Record Time Left............................................................................................................................... 41
M
ONITOR
M
ODES
..................................................................................................................... 41
All Input............................................................................................................................................. 42
Auto Input .......................................................................................................................................... 42
Auto Input ON .............................................................................................................................................. 42
Auto Input OFF ............................................................................................................................................ 42
Solo and Mute.................................................................................................................................... 42
M
ETERING
................................................................................................................................43
GUI Meters ........................................................................................................................................ 43
GUI Meter Ballistics – Peak and Average Modes........................................................................................ 43
Clip (Overload) Indicator............................................................................................................................. 44
Front Panel meters ............................................................................................................................. 44
E
DITING
O
PERATIONS
.............................................................................................................. 45
Track and Region Editing Tools........................................................................................................ 45
Selection ............................................................................................................................................ 45
Area Selection (I-Beam Tool) ....................................................................................................................... 45
Region Selection (Hand Tool) ...................................................................................................................... 46
Magnifier ........................................................................................................................................... 47
The Dive Key (Z)............................................................................................................................... 47
Node Tool .......................................................................................................................................... 47
Cursor Location Display.................................................................................................................... 47
Nudge Tools....................................................................................................................................... 47
Nudge Resolution ......................................................................................................................................... 47
Nudge arrows ............................................................................................................................................... 47
Selection Start (left), Selection End (right), Selection (center) boxes........................................................... 48
Scrub Wheel....................................................................................................................................... 48
Edit Clipboard.................................................................................................................................... 48
History List ........................................................................................................................................ 49
Cut...................................................................................................................................................... 49
Delete................................................................................................................................................. 49
Copy................................................................................................................................................... 49
Paste................................................................................................................................................... 50
Paste Repeat....................................................................................................................................... 50
Splice Mode ....................................................................................................................................... 50
Snap and Snap-to Functions .............................................................................................................. 51
Snap Enable.................................................................................................................................................. 51
Snap to Grid ................................................................................................................................................. 51
Snap to Cues................................................................................................................................................. 52
R
EGION
M
ANIPULATION
T
OOLS AND
F
UNCTIONS
................................................................... 52
Split.................................................................................................................................................... 52
Crop ................................................................................................................................................... 52
Moving Regions................................................................................................................................. 52
Insert Time......................................................................................................................................... 53
Fades .................................................................................................................................................. 53
Auto X-Fade (Crossfade)................................................................................................................... 53
Volume Envelope .............................................................................................................................. 54
Region Editor..................................................................................................................................... 55
Region Name ................................................................................................................................................ 55
Start time ...................................................................................................................................................... 56
End Time ...................................................................................................................................................... 56

HD24/96 Technical Reference 5
Region Length .............................................................................................................................................. 56
Fade In and Fade Out .................................................................................................................................. 56
Envelope Active ............................................................................................................................................ 57
Region Looping ............................................................................................................................................ 57
Region Lock.................................................................................................................................................. 57
S
YSTEM
S
ETUP
.......................................................................................................................... 58
General............................................................................................................................................... 58
Mouse Speed................................................................................................................................................. 58
Waveform colors........................................................................................................................................... 58
Footswitch and Footswitch Remote.............................................................................................................. 58
Date and Time .............................................................................................................................................. 58
Window Frames............................................................................................................................................ 58
FTP Server ......................................................................................................................................... 58
Digital I/O .......................................................................................................................................... 59
Locator-MMC – Tempo Map and Tempo settings............................................................................ 59
Sync ................................................................................................................................................... 59
Sample Clock................................................................................................................................................ 59
Sample Rate.................................................................................................................................................. 59
Bit Depth ...................................................................................................................................................... 59
Time Code Source ........................................................................................................................................ 59
Time Code Frame Rate................................................................................................................................. 59
Generate MTC / SMPTE............................................................................................................................... 60
Time Code Offset .......................................................................................................................................... 60
D
ISK
D
IRECTORY
O
RGANIZATION
........................................................................................... 60
Project Files & Folders:..................................................................................................................... 60
System Files & Folders:..................................................................................................................... 61
Project Files & Folders Heirarchy:.................................................................................................... 61
A
PPENDIX
A – M
ENU
T
ABLES
.................................................................................................. 63
GUI Menus......................................................................................................................................... 63
File ............................................................................................................................................................... 63
Edit ............................................................................................................................................................... 65
Options ......................................................................................................................................................... 67
Transport...................................................................................................................................................... 68
Playlist.......................................................................................................................................................... 69
Windows ....................................................................................................................................................... 69
Setup (from the Windows menu)................................................................................................................... 69
Front Panel Setup and Utility Buttons and Menus ............................................................................ 73
DELETE LAST ............................................................................................................................................. 73
TRACK (OPTIONS)...................................................................................................................................... 73
PROJECT (FILES MENU)........................................................................................................................... 74
BACKUP ........................................................................................................................................... 75
DISK UTIL ........................................................................................................................................ 76
SYSTEM............................................................................................................................................ 77
DIGITAL I/O ..................................................................................................................................... 77
SYNC Options ................................................................................................................................... 78
A
PPENDIX
B – L
IST OF
P
ARAMETERS AND
H
OW
T
HEY
’
RE
S
AVED
......................................... 81
Setup Parameters – What’s Saved and When.................................................................................... 81
Global Preferences............................................................................................................................. 81
Project-Based Parameters .................................................................................................................. 82
Project-Unique Parameters with Defaults for New Projects ............................................................. 82
Parameters Saved with the Project AND in the Template................................................................. 82
Parameters Not Saved with a Project................................................................................................. 83

HD24/96 Technical Reference 6
A
PPENDIX
C – N
ETWORKING
(FTP) S
ETUP
............................................................................ 84
Peer to Peer Networking.................................................................................................................... 84
Required Cables and Hardware................................................................................................................... 84
Hardware Interconnection ........................................................................................................................... 85
Computer Software Required ....................................................................................................................... 85
Network Configuration...................................................................................................................... 85
HDR24/96 Settings ............................................................................................................................ 85
Configuring the HDR24/96 FTP Server ............................................................................................ 85
System #2 Settings (second computer or other Ethernet device) ...................................................... 86
Configuring TCP/IP:.................................................................................................................................... 86
TCP/IP Is Not Listed .................................................................................................................................... 87
FTP Client Configuration .................................................................................................................. 87
Networking Glossary ......................................................................................................................... 88
TCP/IP.......................................................................................................................................................... 88
FTP............................................................................................................................................................... 88
IP Address .................................................................................................................................................... 89
Hub............................................................................................................................................................... 89
10BaseT vs. 100BaseT.................................................................................................................................. 89
A
PPENDIX
D – S
YNCHRONIZATION
.......................................................................................... 90
What Makes the HDR24/96 (and Other Devices Like it) Tick? ....................................................... 90
How can you Sync to Word Clock and Time Code at the Same Time?............................................ 92
Jam Sync....................................................................................................................................................... 92
Trigger Sync ................................................................................................................................................. 93
More about Time Code...................................................................................................................... 93
Video Synchronization ...................................................................................................................... 95
Working with Time Code .................................................................................................................. 97
A Word or Three about Pull-Ups and Pull-Downs............................................................................ 99
Safe Synchronization ....................................................................................................................... 101
A
PPENDIX
E – MIDI I
MPLEMENTATION
C
HART
.................................................................. 103
A
PPENDIX
F – S
PECIFICATIONS
............................................................................................. 104
Physical............................................................................................................................................ 104
Electrical .......................................................................................................................................... 104
Motherboard/CPU............................................................................................................................ 104
CPU I/O ........................................................................................................................................... 104
Hard Drive ....................................................................................................................................... 104
Video................................................................................................................................................ 104
Analog (with AIO-8 cards) .............................................................................................................. 104
I/O Options ...................................................................................................................................... 105
Synchronization ............................................................................................................................... 105

HD24/96 Technical Reference 7
Foreword
Welcome Aboard! Thank you for choosing the Mackie Designs HDR24/96 Hard Disk Recorder -
- a benchmark in affordable professional multitrack audio recording. Occupying only 4U of rack
mount space, the HDR combines the familiarity of a multitrack tape recorder with a powerful,
built-in DAW-style editor.
About This Manual/How To Use This Guide
Your HDR24/96 instruction manual comes in three parts. The Quick Start Guide is intended
to help you get your HDR24/96 installed, interfaced to your console, and configured so you
can start recording quickly. The Applications Guide walks you step-by-step through the
processes of recording, overdubbing, and editing, showing you the HDR24/96’s way of
doing familiar tasks and introducing you to the power features that bring it capabilities far
beyond those of a conventional multitrack recorder.
Finally, this Technical Reference gives detailed explanations of all the controls, displays,
and menus. Keep it handy while you’re learning your way around. Here you’ll find more
detailed information on controls, indicators, and functions, files and file management, the
complexities of clocking, synchronization, and interfacing unique to the world of digital
recording. Here you’ll find some shortcuts to frequently and infrequently used features.
If you haven’t already done so, break open the Quick Start Guide, hook up your recorder,
connect the optional monitor, keyboard, or remote controller, and get rolling. This is a
hands-on process.
Conventions
Text Conventions
The following conventions are used throughout this guide:
Keyboard Keys – SHIFT, A, a
Key combinations – CTRL+SHIFT+6
Functions – Record
Names of GUI objects (buttons, arrows) or panel controls – TC CHASE
Window Navigation Conventions
This manual uses a shortcut notation that will lead you to a window in which a described
operation is performed or a parameter is viewed. The various levels leading to the desired
window are separated by a vertical bar “|”. For example: Windows | Setup | Locator-MMC
means: Select Windows from the top level menu, then Setup from that list, then Locator-
MMC from the Setup dialog box.

HD24/96 Technical Reference 8
Hardware Overview
The HDR24/96 has two user interfaces. The front panel controls are designed so that you can
operate it just like any other multitrack recorder. Other than the naming of projects to assist
you with session record keeping, if you’re familiar with multitrack recorders, there are very few
unfamiliar operations. Using only the front panel controls, you can perform all of the normal
recording, playback, backup, and file management operations. There’s more to the HDR24/96
than straightforward recording, however.
Adding a standard computer keyboard and monitor brings the power of a Graphical User
Interface (GUI) to the HDR24/96. This is where you’ll find the editing tools as well as
convenience features such as named locate points for quickly jumping around within your
project.
Optional remote controllers bring the front panel controls closer to your console workspace and
add a few more features. In addition, the HDR24/96 responds to MIDI Machine Control (MMC),
so you can perform many operations from another user interface such as a sequencer or
mixing console that sends MMC commands.
Front Panel User Interface Conventions
Most of the buttons on the front panel need no explanation (don’t worry, we’ll explain them
anyway). The display (LCD) and the buttons immediately below it control the computer
that’s at the heart of the HDR24/96. Once you understand the functions, you’ll find them to
be intuitive.
Originally we plopped all of the controls onto the HDR front panel and found that after a
while, it was entirely filled with buttons. So we decided to lose a few along the way, and hide
the ones that were used less frequently (as often as you visited Aunt Sadie) somewhere
under an LCD menu. To make up for missing buttons and the need for a road map, we
stuck in a few Go Here and Go There buttons and here's what we came up with:
System Control Buttons
Most of the group of buttons immediately above the transport (“tape deck”) controls
open menus in the LCD. These are the entry points to the LCD menus and are called
System Control buttons.
Page Left and Page Right Buttons
The large < and > buttons are page navigators. If a menu consists of more than one
page, the top line on the 24 character by 4 line LCD readout will display a ← or → in the
upper left or upper right corner to indicate the direction in which you may page to find
more choices within that menu.
Select Buttons
The four SELECT buttons under the LCD are aligned under text describing the choices
available within that menu. Examples include Exit, confirmation (OK), increment or
decrement a number, scroll through choices, or advance through operational tier buttons
("follow the signs, you won't get lost"). Select buttons soft buttons whose function
changes depending on the operation you’re performing.

HD24/96 Technical Reference 9
Pairs of SELECT buttons with << >> displayed above them are used to select
among choices or move a cursor v through a text field. The (-)DEC and (+)INC
(decrement and increment) buttons scroll through choices in the active field. Sometimes
they duplicate the << >> buttons, and at other times, they interact, where the << >>
buttons select the character which will be changed by the DEC and INC buttons.
Pressing the SELECT button labeled “OK” in the display performs the menu operation in
process. There’s usually a button labeled “Cancel” should you decide not to complete an
operation. Pressing any menu button will also back out without performing the operation.
Front Panel Display and Controls
The (-)DEC and (+)INC (decrement and increment) buttons are used to modify an
alphabetical or numerical parameter displayed in the LCD such as Project Name or Time
Code Offset. If the red LEDs above the buttons are glowing, they’re active. Generally you
can tell that a character can be edited with the (-)DEC and (+)INC buttons if it’s sitting above
a pair of << >> characters. The Select buttons below the << >> characters move a v
cursor along numeric field, indicating which character will be changed by pressing the (-
)DEC and (+)INC buttons.
Any time you’re working in a menu, LED’s will illuminate above any button that does
something within that menu. Some operations, particularly those which could be disastrous
like deleting data which can’t be recovered, will offer you a Cancel option, allowing you to
quit without changing anything.
Depending on the menu and how many layers it has, Exit or Cancel may bring you back to a
previous menu or all the way back to the top. You can also leave the menu by pressing the
button that got you there (its red LED will be on to remind you where you are), or by
pressing the left < button when the ← symbol isn’t displayed. You need not completely exit
one menu before moving to another, just press another menu button to jump into a new
menu.
Transport Controls
Transport operating controls are described in detail in other sections of this manual, so
they won’t be repeated here. This section describes the front panel displays and the
setup and system function buttons located below the LCD.
Current Time Display
Current transport time is displayed in either hours:minutes:seconds:frames (SMPTE
time) or musical score position in bars:beats:ticks (BBT). If you want the BBT display, it
must be selected through the GUI. Display of musical score position is, by nature, based
on either a known tempo (default of 120 BPM) or a tempo map derived from a standard
MIDI file. Since the tools for managing tempo are only available within the GUI, we’ve
left the display section there, too.
In BBT mode, the front panel display only shows tick numbers when the transport is
stopped. When running, the Ticks field contains hyphens (- -). Leading spaces in the
Bars field are also filled with hyphens, as: - - 73:04:45. Bar numbers greater than 999
are displayed as hyphens, however the display still counts beats (01 through 04) while
the transport is running.
NOTE: Other display options of samples and milliseconds are not available on the front panel
time code display. When those options have been selected from the GUI, the front panel
displays SMPTE time.

HD24/96 Technical Reference 10
Status LEDs
The group of LEDs to the left of the time code display indicates the state of several of
the current setup options.
44.1k, 48k and 96k LEDs indicate the selected sample rate.
VARI indicates that the sample rate is controlled by an external word clock
source or video sync signal.
16 BIT and 24 BIT indicate the selected word length.
ERROR indicates a clock or synchronization error, for example, a word clock frequency
that is out of range.
TC indicates that the transport is receiving acceptable time code. This LED is only
active when the HDR24/96 is set to chase time code. The LED blinks when time code is
expected but is either not present or at the incorrect frame rate. When everything is in
order with time code synchronization, it will be on.
CLOCK indicates that a proper data clock signal is being received. It blinks if the
HDR24/96 is expecting an external clock and it’s not present. If all is well, when Internal
clock is selected, the CLOCK LED should be on.
Front Panel Alphanumeric Display (LCD)
The front panel LCD, when not performing a setup or utility operation, is an informative
summary of the current project. A screen saver blanks the display after ten minutes of
display inactivity. To re-activate it, press one of the large < > buttons or any menu
button.
Project Information Display
The following information is displayed on the HDR hardware front panel display after
boot-up and whenever any front panel operation is exited.
PROJECT: [Name of the currently loaded project]
PLAYLIST: [The currently loaded playlist version]
DRIVE: [The disk drive containing the Project - Internal or External]
AVAIL: [The amount of recording time left on the disk]
Menu / Status Display
The LCD indicates menu choices and displays status information when a time-
consuming operation, such as disk formatting or file copy is in process. The large <
and > buttons scroll through the menu horizontally if there are more choices within the
current level menu than can be displayed in the available display area. An arrow <-- or
--> at the top corner of the display indicates that more choices are available, and in
which direction to scroll in order to view them.
NOTE: Whether or not a “Cancel” or “Exit” prompt appears above a SELECT button, it’s
okay to jump directly to one of the other top level menus without responding to a prompt.
It’s a quick “bail out” in case you’ve discovered that you’re in the wrong menu for what
you want to accomplish. Skipping an OK, Cancel, or Exit prompt will not harm or hang
the HDR24/96.
The menu table in the appendix shows the menu structure for all of the front panel setup
and utility controls.

HD24/96 Technical Reference 11
All the other controls have been addressed in the Quick Start Guide. Refer to that guide
for their descriptions.
Rear Panel
The I/O slots and connectors for the remote, footswitch, keyboard, mouse, and monitor are
explained in the Quick Start Guide. Here are a few more details about what you’ll find on the
rear panel.
BNC Termination Switch
The Termination switch on the Sync card selects whether the BNC input is bridging
(high impedance) or terminated (75 ? input impedance). Press the Termination switch in
if the HDR24/96 is the last device in the clock chain. If a clock is connected to other
devices, leave the Termination switch out and terminate the last device in the chain.
MIDI Connector
The MIDI IN and OUT ports terminate in a 9-pin D-Subminiature connector on the rear
of the MIDI Interface card. The pinout for this connector complies with the convention
used for MIDI connections to the game port of a standard sound card. The adapter from
this connector to a pair of standard 5-pin MIDI connectors is readily available at
computer stores. Some sound cards use a 15-pini D-Subminiature connector, so be
sure that you purchase the correct adapter.
Ethernet Jack
This is for connection to a 100 BaseT Ethernet network. See Appendix C for detailed
networking setup information. Note that the same connector type is used for the optional
remote controllers for the HDR24/96. Don’t mistake these two connectors!
Accessory Slots
Of course we left room for future expansion. Stay tuned.
Graphical User Interface (GUI) Overview
After plugging the keyboard, monitor and mouse into the rear panel connectors and booting up
the HDR, you'll find most of the MackieOS GUI is pretty darn similar to the rest of the
computing music world. Typical paradigms of left and right mouse clicking, menu bars with
pop-up or pull-down menus, dialog boxes, scroll bars and high resolution graphics all make for
a familiar interface.
The GUI layout is easy to learn and is designed with minimal layering of windows and functions.
The Menu bar atop the screen contains everything that can be accessed within the interface.
Mouse click on the menu item, pull down, select and release (or re-click) will kick things into
action or call up another window or dialog box. For the power users, keyboard shortcuts to most
GUI menu items are available and are listed in the menu as a reminder for next time.
Right-clicking with the mouse is context sensitive in many areas of the screen. While
everything is available with a left-click, right-clicking frequently offers short cuts to operations
you’re likely to need to perform next. While exploring the GUI, right-click and see what
happens. It’ll probably give you just the choices you’re looking for. Left click actions are usually
dictated by which one of the 4 tool choices is currently selected.

HD24/96 Technical Reference 12
The top portion of the screen contains the Tools/Meters panel and Transport Controls. The
transport control buttons will be used throughout all project operations, whereas Meters are
typically used during Tracking and Tools are typically used during Edit operations. This is why
that portion of the screen is shared between the two functions.
The Transport Control section is always visible (unless covered by a floating window) and acts
as the general location display, reading either SMPTE time code
(hours:minutes:seconds:frames), BBT (bars:beats:ticks based on the preset tempo), or, for the
serious propellerheads, time in hours:minutes:seconds:milliseconds or number of samples.
Clicking on the two graphic 'folder tabs' at the top right corner of the Tools/Meters window
selects which of the two screens is displayed.
One very handy bit of information relevant to tracking is the virtual gas gage. This tells you how
much recording time you have left on the disk and is found both in the Tools window and on the
bottom line of the HDR24/96 front panel LCD. While Editing doesn't take up much hard disk
space, tracking sure does - so take a peek at this readout from time to time to be sure you don’t
run out in the middle of the killer take. Notice that the “Time Available” follows the number of
channels you’ve selected for recording, the sample rate, and bit depth. Clever!
The major action on the GUI screen is the Tracks window, an expandable 24 track view of the
recorded regions. The tracks are bordered on the left by the 'Track Info, Record and Monitor'
panel. This contains the track numbers 1 through 24, Record Ready buttons, the virtual track
(“take”) expansion button, the active take selector, and Solo and Mute monitor buttons.
Clicking on the Take number button brings up a list from which you can select the active take
for recording or playback. Clicking on the take expansion button (→) displays the eight virtual
tracks for the selected track. Clicking it again collapses the display to the single active take for
each track.
The track display is bordered on the right by the retractable List panel. When opened with the
stubby ← at the right of the track display, the List panel displays the Regions, Cues (including
Locate points) and History List of editing operations. Clicking on the graphic 'folder tabs' at the
top of the List panel selects the displayed list. Clicking on the stubby → puts away the List
panel and extends the tracks to the full screen width.
Floating windows (normally closed and out of view) are opened from the Windows menu.
Floating windows include the multifunction Setup window, Region Editor, the Shortcut list and
the infamous About Box, which tells you what version of software you're using and who the
heck is responsible for much of this wunderbox.
If you’ve never used a GUI before, the following section explains the basics of operation of the
mouse, keyboard, and how to make selections. If you’re already familiar with computer GUI
operation, there’s nothing new here other than to remind you that clicking in the top right hand
corner closes HDR24/96 windows. A left corner click to close a window has gone out the
window.
If you’re comfortable with GUI operations, feel free to jump ahead to the good stuff about
Project Information and HDR features and functions. Otherwise, here are some GUI basics:

HD24/96 Technical Reference 13
GUI Conventions
Mouse Clicking
Left click
Most of the time when we say “click”, we mean left-click, that is, a single click of the
left mouse button when the cursor is pointing to the text or object you want to
change or move.
Text menu items are selected with a single point-and-click operation. Time fields
such as locate points and the time code display can be edited by clicking on a
numeric field and dragging the mouse pointer up or down. Alternatively, when the
field is highlighted with a single click, a direct entry can be typed in from the
keyboard. Clicking once on any button will toggle the button’s function on or off or
perform the button’s function (split, loop, etc.).
Region operations (selecting and moving) are performed with a combination of
holding the left mouse button and dragging the cursor. The operation performed
depends on the type of cursor selected.
Multiple items (for example regions or record-ready buttons) can be selected by
holding the Ctrl or Shift key while clicking. Shift-click on the first and last item in a
list selects the contiguous group of items, Ctrl-click selects multiple items from a list
which need not be contiguous.
Double clicks are usually reserved for selecting an entire word in a line of text.
Double clicking is also used to shortcut an operation without the follow-up need to
click on the specific action button (like 'Open'). For example, to open a listed project
in the Open Project window, double clicking on a Project name inside of the dialog
list opens the project and skips the need to click on the Open button.
A further fun fact is that holding the Ctrl control key and clicking on any of the four
LOC time boxes will capture the current time (the big display) into the LOC box - a
nice feature for capturing punch and loop points, even on the fly.
Right click
Right-clicking the mouse usually brings up a menu of appropriate actions for
whatever you’re doing. When the menu pops up, left-click is used to select from the
menu. For example, right-clicking on in the Current Time display brings up a menu
to select the time units. Right-click on different areas of the screen to familiarize
yourself with the pop-up menus - they are aplenty.
Double click
Double-clicking is the shortcut to select and perform the action. Most functions of the
HDR24/96 can be performed with a double-click.
Drag
Dragging is the process of selecting an object with a left-click, then moving the
object to a new location by moving the mouse while holding the left button.
Window and Dialog Box Paradigms
Much of the MackieOS windowing scheme will be familiar to personal computer users.
The Menu or title bar on an open window can be double clicked to 'window shade' the
rest of the window. This will keep the title bar of a floating window visible so it will be
handy, but clear the deck to give you a better view of your work area. Clicking and

HD24/96 Technical Reference 14
dragging the title bar allows the window to be placed elsewhere within the confines of
the screen. Most windows will float and can be condensed to only the title bar with the
exception of the 'window-like' Lists.
In some windows, you’ll find a Zoom box on the title bar which expands the window to
maximum screen size, and a resize tab (lower right hand corner) to tailor the size to your
liking.
Scroll bars with arrows and a list location scroll 'thumb' are found in list windows if the
quantity of items exceeds the current allotted window length. A Close button ( the
triangle in the upper right corner) puts the window to bed. You can also close a window
using the ESC key.
If you have more than one window open on the screen, one will be the topmost, or
“active” window. The title bar of the active window will appear solid and you’ll see the
Close button in its upper right corner. Inactive windows, whether fully open or partially
closed (“window shade”) will have their titles grayed-out. Clicking on the title bar of any
inactive window makes it the active one.
The Tab key as well as the mouse pointer can be used to navigate between fields within
the active window. Either way, when a field is highlighted, usually indicated by a
surrounding box, the field will be updated when you press the Enter key, close the
window, or click outside the window, making it inactive.
Lists
Any window that contains a list needs a selection mechanism or two. As
aforementioned, clicking on a list item selects it. After selecting on one list item,
Shift + click on another item selects those two items and all items in between. Ctrl +
click allows for selection of multiple list items. Double clicking an item is usually a
shortcut and directly performs the expected operation, such as opening a Project or
Playlist. Tab navigates between the window operation buttons; once a button is tab-
highlighted, pressing the 'Enter' key performs the button’s action.
Menus
Pulldown menus are used for choosing among two or more items. Drag the mouse
pointer to the desired selection, and let of the mouse button to nail the selection.
Menus with 'depth', i.e. multiple choices leading to multiple choices, usually open
horizontally from a menu item that's tagged with a '>' indicating that you're to drag or
click on the choice to the right, which offers more choices. Intrigued?
Radio Buttons
Radio buttons are used to make mutually exclusive selections, for instance selecting
the active take within a given track (there can be only one active at a time). Clicking
a radio button turns its function on, and turns off the previously selection.
Keyboard
Tab key
Navigating between text boxes and/or time fields can also be accomplished by using
the tab key. Shift-tabbing navigates in a backwards fashion. 'Enter' is used to
complete a text or time setting entry or modification, and exits the fields as such.

HD24/96 Technical Reference 15
Shortcuts (modifiers)
Shortcuts are made up of key combinations with the shift, control, and alt keys
leading the pack for 'buddy' keys - the keys that need to pal along with pressing
some other key in order to accomplish some operation without having to click and
drag. For example, pressing the Ctrl plus the 'N' key will start a New Project
operation. See the shortcuts list in the appendix.
Numeric Keypad
The numeric keypad is used for quick Cue point entry and location. To jump directly
to Cues 00 through 99, type the Cue number on the numeric keypad and press
Enter. (You must enter two digits - e.g. 05 - in order to get to the cue you really
want) To jump to the next or previous Cue in the Cue List, press the + or – keys on
the numeric keypad or the regular keyboard.
GUI Track Display and Controls
The following section introduces the different areas of the GUI screen and the various
screen navigation controls. References are made to certain items with which you may not
yet be familiar such as Regions and Virtual Takes. Don’t worry, they’ll be described further
on.
Project Information Display
The following project information is displayed in the upper right corner of the main
screen:
Drive: [Internal/External] Project Name Version Time
Current Time Display
The Current Time display shows the time of the current transport position in SMPTE
time (Hours, Minutes, Seconds, Frames) or in musical terms of Bars or measures, Beats
and Ticks (BBT). The displayed time is correlated with the time shown on the Time Bar
and the position of the Current Time line.
Since the transport position is ultimately related to absolute time, BBT is calculated for
the purpose of display based on a known tempo. The default tempo is 120 beats per
minute, but this can be adjusted from the Windows | Setup | Locator-MMC window. The
working tempo is stored along with the Project.
A tempo map can also be extracted from a Standard MIDI file, and the BBT display will
change dynamically to follow the MIDI file’s tempo changes. Tempo maps are loaded
from the floppy disk using the LOAD button in the Windows | Setup | Locator-MMC
window.
Units for the time display are selectable from the GUI only, from the
Options | Time Units window. A shortcut is to right-click on any time display window. A
popup menu will allow you to change units directly. This is a global change - changing
time units from ANY time display will change the time units in ALL time displays.
Time Bar / Marker Bar Overview
The strip immediately above the track area is split horizontally into the Marker (top) and
Time (bottom) bars. The Marker Bar contains graphic icons representing cues, punch or
loop points. The Time bar line contains the time scale, with major and minor divisions
spaced according to the chosen SMPTE / BBT view and/or the defined resolution.

HD24/96 Technical Reference 16
Time Bar
At the highest resolution, the display is approximately 12 milliseconds wide, or about half
a video frame. At the lowest resolution, full scale of the display is 24 hours, the
maximum recording time of the HDR24/96. The left and right arrow buttons to the left of
the time/marker bar expand and contract the track display in time. Use high resolution
when editing samples or small regions, use lower resolution to get the big picture of your
project.
Tip: Track area overviews may be stored and recalled using the F5 to F12 keys. This is
useful for jumping between high and low resolution views or switching between
displaying the single active take or multiple takes. These keys store the track zoom level
and the positioning and expansion of takes, but of course the content of the tracks
changes with editing and recording. The current track and region content is always
displayed with the parameters of the stored view. Ctrl-F(n) stores the view, F(n) recalls
the stored view.
Time selection is made by clicking and dragging the I-Beam tool along the marker/time
strip. This creates a selection area across all tracks, but does not specifically define any
regions within the selection area. Regions on individual tracks may be selected
afterwards. See Track and Region Tools for the details.
A single click on the Time bar using any one of the tools places the current time bar at
the clicked-on time and sets this time into the main transport time display.
Right clicking on the Time / Marker bar pops up a shortcut menu with choices that
include time units display, loop selection and snap-to options. All of these functions
have been described elsewhere.
Song Offset
When the HDR24/96 is set to display in BBT, the Song Offset can be used to slide the
entire time bar horizontally so that playback coincides with Bar 1. This does not affect
anything other than the time display in the Time Bar, and has no effect when the
transport position is displayed in SMPTE time.
To adjust the Song Offset, open the Setup Window (Windows | Setup or Ctrl+1) and
select Locator-MMC. The value displayed in the Song Offset window can be adjusted
by clicking and dragging on the number fields, clicking and entering a number from the
keyboard, or transferring the current time into the window by holding the Ctrl key and
clicking in the Song Offset window.
Neat Trick: To set the beginning of the song to BBT 1:1:000, set the Current Time to the
beginning of the song, then Ctrl-Click in the Song Offset window.
Marker Bar and Markers
The Marker Bar contains draggable icons for Cues and LOC points that serve as jump-
to points in a playlist. Markers for Cues may be re-labeled, while LOC markers, since
they have dedicated functions, have fixed labels. Dragging any marker will update the
time field relevant to that marker. See the sections on Cue List, Punch, Loop, and
Recording Operations for more details.
Track Area
The track area, where all the audio action is, has three separate work areas. At the left is
the Track Control area, the center section contain the graphical display of recorded tracks,

HD24/96 Technical Reference 17
virtual takes, and regions. The right section, which can be opened or closed, depending on
what you want to see at the moment, contains the List Panel (see page 20).
Track Area Scrolling Conventions
The vertical and horizontal scroll bars that frame the track area are standard GUI tools.
Scroll thumb buttons (resembling console fader knobs) appear along the scroll bar
whenever the track screen is expanded so that there are more tracks than are visible on
the screen. Click and drag these buttons to bring another group of tracks or regions into
view.
Small + and - buttons at the lower right corner of the track area (one pair on each axis)
adjust the horizontal and vertical magnification of the track area. They duplicate the
larger arrow buttons at the left edge of the Time/Marker bar.
Track View Controls
The Zoom Arrows at the left end of the time bar are used for adjusting the horizontal
and vertical scale of the track view. When the track is expanded to display Virtual takes,
the eight takes follow the action of these buttons in the same manner as the single
(collapsed) track view.
The Up and Down arrows change the vertical magnification, resizing so that the desired
number of tracks are displayed on screen. A minimum of 2 and maximum of 24 track
spaces may be displayed. Tracks are displayed contiguously (you can’t display just
tracks 3, 8, 17 and 22), and the track display can be scrolled vertically through all the
tracks (when fewer than 24 are visible) by using the scroll button at the right end of the
track area.
The Left and Right Zoom arrows expand or contract the time scale. The horizontal
scroll button at the bottom of the display moves the tracks horizontally along the time
scale.
Zoom Tricks
The Z (Dive) key is used to perform a quick zoom at the current cursor location. It only
zooms while the key is held down.
The magnifier buttons (the small + and - buttons) on the scroll bars framing lower right
corner of the track area act in the same manner as the Zoom arrows. They are placed
for convenience and as a normal GUI windowing convention.
A keyboard shortcut to the zoom arrows is Ctrl + any of the keyboard arrow keys.
A keyboard shortcut to the scroll buttons is the Alt + any of the keyboard arrow keys.
The Magnifier icon in the Tools panel changes the cursor into a magnifying glass. This
Magnifier cursor can be dragged over the area of interest to zoom in to a highly detailed
view of a small area.
Auto Scroll
When Auto-scroll is enabled, the current time line jumps to the center of the screen and
the tracks scroll behind it as the transport plays. When disabled, the track area remains
fixed on the screen and the current time cursor moves along the tracks as the transport
plays. At lower resolutions, with Auto-Scroll off, when the current time cursor reaches
the right edge of the screen, it jumps back to the left edge, the track area jumps one
screen width, and the cursor makes another sweep. At high zoom resolution, the cursor

HD24/96 Technical Reference 18
will play off screen and remain out of view. The Auto Scroll button blinking indicates that
a zoom level has been selected that the auto-scroll function cannot track.
Screen Drag (Special Scroll) Mode
Holding the D key down when the cursor is in the track area temporarily changes the
cursor into a hand icon with which to drag the screen in any direction, to the extent of
the minimum or maximum axis values. This time-saver can be used to pull the screen
view omnidirectionally rather than using the scroll bars, which move the screen area
under the cursor in one axis direction only.
Track Control Area
The Track Control area, the portion to the left of the main track area, includes the following
controls and indicators:
Track Number button
Tracks are numbered 1 through 24. Clicking on a track number button (or the track
itself) activates that track for editing operations and illuminates the track number button.
Multiple tracks can be enabled by clicking with the Shift and Ctrl keys as described
previously.
When a selection area is made by dragging the I-Beam Tool over the Time bar, initially
all track number buttons are illuminated. Clicking on a track number button activates the
selection area for that track and deactivates the remaining track number buttons. The
selection area can be applied to other tracks by Ctrl- or Shift-clicking on their track
number buttons.
Double-clicking on a track number button with either the Hand or I-Beam tool selects the
entire track.
A Paste is performed on the track with the illuminated number button.
IMPORTANT: If multiple track number buttons are illuminated, the Paste is performed
on the lowest numbered track of the group.
Tip: The active take on multiple tracks may be changed by first selecting a group of
tracks. Use the I-Beam tool and Ctrl-click on each track or Shift-click to select a range
of tracks. Then Ctrl-click on the take number button on any of the selected tracks to
make that the active take on all the tracks in the group. Handy when you have 10 tracks
of drum kit overdubs.
Record Ready buttons
The red R is the track arming button, which enables tracks for recording. These buttons
on the GUI screen correspond directly to their counterparts on the HDR24/96 front
panel. Clicking on an R button arms the track for recording. The button blinks until the
transport is placed in the Record mode, either by clicking on the RECORD button in the
GUI transport control area, or by pressing the PLAY and RECORD buttons on the front
panel.
As with the front panel controls, you can also start recording on a track by clicking on
the master RECORD button, then clicking on the individual track’s R button.
NOTE: If the record controls don’t operate as expected, Record Safe may be enabled.

HD24/96 Technical Reference 19
Take View and Active Take Number Buttons
The Active Take is the one that you’ll hear in playback or to which you’ll record. Since
only one virtual take can be active at a time, the number displayed in the Active Take
button indicates which of the eight takes is currently active. Clicking on a track’s Active
Take button pops up a list box allowing you to select the active take. The number within
the button changes accordingly to match the selected take.
The Take View and Take Number buttons work hand in hand. When clicking on the
Take View button, the track expands downward so that all takes are displayed. Clicking
on a take’s ACTIVE button makes that the active take. Each take has the boring default
name of “Take ‘n’”, but this can be modified by clicking on the yellow Take Name field
when the takes are visible on screen.
When the virtual takes are expanded, the Take Number button to the left of the ACTIVE
button functions in the same manner as the Track Number button. For example, clicking
on a Take Number button selects that Take as the destination for a Paste operation.
When collapsing back to the one-take-pre-track view, the currently selected active take
is displayed in the track region.
Note: The active take selection is only updated when the transport is stopped. You can’t
jump among takes on the fly.
Tip: The active take on multiple tracks may be changed by first selecting a group of
tracks. Use the I-Beam tool and Ctrl-click on each track or Shift-click to select a range
of tracks. Then Ctrl-click on the take number button on any of the selected tracks to
make that the active take on all the tracks in the group. Handy when you have 10 tracks
of drum kit overdubs.
Solo and Mute buttons
Track Solo and Mute (the S and M buttons) are output monitor functions. Mute turns off
the output of the selected track. Solo mutes everything but the selected track. Clicking
on these buttons activates the function and highlights the button. Note that when one
track is placed in Solo, all the other tracks are placed in Mute. These are toggle buttons
- click them to turn the function on or off. See the Monitor section (page 41) for further
details.
Track Name
The rightmost field in the Track Control area contains the name of the track. Default
names out of the box are simply “Track N”, where N is the track number. Tracks can be
renamed using conventional text entry procedures - click and type, then press the Enter
key or click outside the field to complete the entry.
Regions within a track inherit the name of the track at the time they are recorded. If you
label a track “Lead Guitar” before you record the lead guitar part, its regions will carry
that name. If you record with the name “Track 19” and then think to change it afterward,
your initial lead guitar recording (that’s always the one that’s the best) will have a
number, not a name.
Your pet track names can be saved as a template using the
File | Save as a New Template
command from the main menu. Once a template is saved, the next time you open a new
project, its tracks will carry the saved names. This is a useful feature if you regularly

HD24/96 Technical Reference 20
record the same tracks (name them for your band members or instruments) or are
creating a new project for each song in a live session. If you work on a variety of
projects, however, you’ll probably have different track names for every project, so you
might as well retain the old, boring defaults and enter new names as you work.
Lists Panel
The List panel is opened and closed by clicking on the List View arrow at the right end of
the Time/Marker bar, by selecting one of the three lists from the pull-down Windows menu,
or by using the keyboard shortcuts:
Regions List = Ctrl-4
Cues List = Ctrl-5
History List = Ctrl-6
Whenever the list panel is open, clicking on one of the three tabs at the top of the panel
selects which list is displayed.
Region List
The Region List contains a listing of the region names that have been created by the
following operations:
Recording into tracks
Capturing regions on existing track regions
Importing regions into the current project
Rendering tracks
Cue List
The Cue List is a list of all cues set in the Project. The three columns of the list are the
Number, Name, and Time. Clicking on the NEW button at the top of the list creates a
new cue at the current transport time. Double clicking on a cue number jumps the
transport current time to the time of that Cue.
Cues are numbered sequentially as they’re entered, and have the default name “Cue”.
Cues can be renamed within this list by double clicking on the name field and entering
new text. The time (location) of the cue can be edited by clicking on the time field,
highlighting the digits you wish to change, and either dragging the number with the
mouse pointer or directly entering a new number from the keyboard. Pressing the Enter
key or clicking outside the field completes the entry.
Cue names and times are interactive with the Cue pointers on the Marker Bar. When a
cue name is edited in the Cue List, its name changes on the Marker Bar. When the Cue
time is edited in the Cue List, the pointer on the Marker Bar moves to the new location.
When a Cue pointer is dragged to a new location on the Marker Bar, its time changes in
the Cue List.
Cues appear on the list in order by time. As you drag a cue pointer along the Marker
Bar, you’ll see its time change in the Cue List, and the entry will move up or down the list
if its new time places it past or before another cue.
Clicking on the DELETE button removes the highlighted cue from the list. This leaves a
hole in the cue number sequence, but the Cue List doesn’t care. Use Shift-click or Ctrl-
click to highlight a group of cues to be deleted.
Page is loading ...
Page is loading ...
Page is loading ...
Page is loading ...
Page is loading ...
Page is loading ...
Page is loading ...
Page is loading ...
Page is loading ...
Page is loading ...
Page is loading ...
Page is loading ...
Page is loading ...
Page is loading ...
Page is loading ...
Page is loading ...
Page is loading ...
Page is loading ...
Page is loading ...
Page is loading ...
Page is loading ...
Page is loading ...
Page is loading ...
Page is loading ...
Page is loading ...
Page is loading ...
Page is loading ...
Page is loading ...
Page is loading ...
Page is loading ...
Page is loading ...
Page is loading ...
Page is loading ...
Page is loading ...
Page is loading ...
Page is loading ...
Page is loading ...
Page is loading ...
Page is loading ...
Page is loading ...
Page is loading ...
Page is loading ...
Page is loading ...
Page is loading ...
Page is loading ...
Page is loading ...
Page is loading ...
Page is loading ...
Page is loading ...
Page is loading ...
Page is loading ...
Page is loading ...
Page is loading ...
Page is loading ...
Page is loading ...
Page is loading ...
Page is loading ...
Page is loading ...
Page is loading ...
Page is loading ...
Page is loading ...
Page is loading ...
Page is loading ...
Page is loading ...
Page is loading ...
Page is loading ...
Page is loading ...
Page is loading ...
Page is loading ...
Page is loading ...
Page is loading ...
Page is loading ...
Page is loading ...
Page is loading ...
Page is loading ...
Page is loading ...
Page is loading ...
Page is loading ...
Page is loading ...
Page is loading ...
Page is loading ...
Page is loading ...
Page is loading ...
Page is loading ...
Page is loading ...
Page is loading ...
Page is loading ...
Page is loading ...
Page is loading ...
Page is loading ...
-
 1
1
-
 2
2
-
 3
3
-
 4
4
-
 5
5
-
 6
6
-
 7
7
-
 8
8
-
 9
9
-
 10
10
-
 11
11
-
 12
12
-
 13
13
-
 14
14
-
 15
15
-
 16
16
-
 17
17
-
 18
18
-
 19
19
-
 20
20
-
 21
21
-
 22
22
-
 23
23
-
 24
24
-
 25
25
-
 26
26
-
 27
27
-
 28
28
-
 29
29
-
 30
30
-
 31
31
-
 32
32
-
 33
33
-
 34
34
-
 35
35
-
 36
36
-
 37
37
-
 38
38
-
 39
39
-
 40
40
-
 41
41
-
 42
42
-
 43
43
-
 44
44
-
 45
45
-
 46
46
-
 47
47
-
 48
48
-
 49
49
-
 50
50
-
 51
51
-
 52
52
-
 53
53
-
 54
54
-
 55
55
-
 56
56
-
 57
57
-
 58
58
-
 59
59
-
 60
60
-
 61
61
-
 62
62
-
 63
63
-
 64
64
-
 65
65
-
 66
66
-
 67
67
-
 68
68
-
 69
69
-
 70
70
-
 71
71
-
 72
72
-
 73
73
-
 74
74
-
 75
75
-
 76
76
-
 77
77
-
 78
78
-
 79
79
-
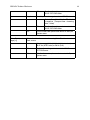 80
80
-
 81
81
-
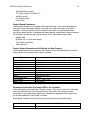 82
82
-
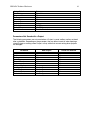 83
83
-
 84
84
-
 85
85
-
 86
86
-
 87
87
-
 88
88
-
 89
89
-
 90
90
-
 91
91
-
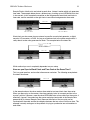 92
92
-
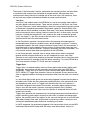 93
93
-
 94
94
-
 95
95
-
 96
96
-
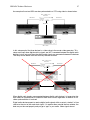 97
97
-
 98
98
-
 99
99
-
 100
100
-
 101
101
-
 102
102
-
 103
103
-
 104
104
-
 105
105
-
 106
106
-
 107
107
-
 108
108
-
 109
109
-
 110
110


Mackie Home Theater Server HDR 24/96 User manual
- Type
- User manual
Ask a question and I''ll find the answer in the document
Finding information in a document is now easier with AI
Related papers
Other documents
-
BakkerElkhuizen OYSTER User manual
-
 Jinga PASS Hard reset manual
-
cymatic audio Live Player LP-16 User manual
-
Pioneer CDJ-1000 Owner's manual
-
Alesis Point Seven Owner's manual
-
DoreMidi MTC-10 Operating instructions
-
Fostex MTC1 Owner's manual
-
CTS CID-Software V4.02 Quick start guide
-
Tascam DA-38 Quick Tips
-
