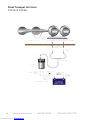
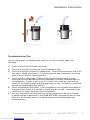
MARINCO 10106 air horn is a powerful signaling device designed for boats. It features dual trumpets that produce a loud and attention-grabbing sound, ensuring your boat is heard in various conditions. The horn is easy to install with the included mounting hardware and requires a 12-volt power source and 20-amp fuse for operation. Its compact size and downward-pointing trumpets minimize water spray accumulation, making it suitable for marine environments. The horn also comes with a compressor that should be mounted close to the horn for optimal performance.
MARINCO 10106 air horn is a powerful signaling device designed for boats. It features dual trumpets that produce a loud and attention-grabbing sound, ensuring your boat is heard in various conditions. The horn is easy to install with the included mounting hardware and requires a 12-volt power source and 20-amp fuse for operation. Its compact size and downward-pointing trumpets minimize water spray accumulation, making it suitable for marine environments. The horn also comes with a compressor that should be mounted close to the horn for optimal performance.


-
 1
1
-
 2
2
-
 3
3
-
 4
4
-
 5
5
-
 6
6
-
 7
7
-
 8
8


MARINCO 10106 air horn is a powerful signaling device designed for boats. It features dual trumpets that produce a loud and attention-grabbing sound, ensuring your boat is heard in various conditions. The horn is easy to install with the included mounting hardware and requires a 12-volt power source and 20-amp fuse for operation. Its compact size and downward-pointing trumpets minimize water spray accumulation, making it suitable for marine environments. The horn also comes with a compressor that should be mounted close to the horn for optimal performance.
Ask a question and I''ll find the answer in the document
Finding information in a document is now easier with AI
Other documents
-
VCC LED Mounting Clip For T1-3-4 5mm LEDs Operating instructions
-
Guest 4006, 4008, 4012 and 4018 DYNAPLATES User manual
-
 ParkPower 701CHRV User manual
-
Guest 729828-P User manual
-
Guest 729825 User manual
-
Guest 729489 User manual
-
 PROGRESSIVE INDUSTRIES EMS-PT30X User manual
-
West Marine 147454 Owner's manual
-
-

