Haier GWT800AW User manual
- Category
- Washing machines
- Type
- User manual
This manual is also suitable for

GWT800AW
WD-8888-92 Edition: 2006.06.27
Full automatic washing machine
Models
HLT364XXQ
SERVICE MANUAL

CONTENTS
1. Contents 1
2.
3. Specifications
4.
5. 5
6. Net dimension 6
7. 6
8.Operating instructions 8
9. Maintenance service and trouble shooting 14
10. Wiring diagram 18
11. 19
Features 2
3
Safety precautions 4
Warning and cautions
Installation and accessory parts
How to disassemble washing machine
1

FEATURES
Haier frenquency-cenvsion and double drive
blanket washing easily
Shift washing, shift spinning
VFD Display
Cold & warm water inlet selection
Drain up function
Cabinet with the door open in the front:
Super capacity for more clothes
Pulsator type for wash efficiency, twist free and low wear
2

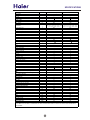
SPECIFICATIONS
Model HLT364XXQ GWT800AW
Free standing
Built under ××
EAN code --- ---
Energy efficiency class
Technical data
Was h capac ity kg 10.0 10.0
Spin capacity kg 10.0 10.0
Level/Vol ume
L
1/28L 2/36L 3/49L 4/54L 5/61L 6/67L
7/73L 8/79L 9/89L 10/95L
1/28L 2/36L 3/49L 4/54L 5/61L
6/67L 7/73L 8/79L 9/89L 10/95L
Residual dampness % 94% 94%
Voltage/ frequ ency V/Hz 120V/60Hz 120V/60Hz
Energy consumtpion kWh
Wat er cons umtpi on L
Was h power W 400 400
Spin power W 300 300
Voice p ower of was hing dB 53 53
Voice power of spinning
dB
Net weig ht
kg about79 about79
Gross weight
kg about
about
Contral mode l
Timer
××
contr aller ××
Normal comput erized
Fuzzy computerized
Frequen cy conver sion
Service features
Programs 86
Short cycle
Inlet h eating s elect
washin g and ri nse water temperu re selec tion
Spinning cycle (selector)
Spinning cycle (variable)
Start/Pause
Preset H 2~24 2~24
Automatic balancing
Aesthetics(V.L.H.S.H.T)
Cabinet material P=Plastic/Z=Zincking/C=Cold ) ZZ
r drum (stainl. steel=s / plastic=p) SS
Drain type
U=drain up D= drain down Drain up Drain up
Door (g lass= g / plas tic= p)
Adjus table f eet
Special function
inner cycle
Feet wheel ××
Double driver
Two-in-one with rinse and spin
Disinfect
Dimensions (measurements)
Height / built under mm 1080 1080
Width mm 686 686
Depth / with open door mm 686 686
Dimensions packed ( measurements packed)
Height mm 1180 1180
Width
mm 766 766
Depth
mm 756 756
20'Container load Sets 21 21
40’Container load Sets 45 45
40H’Container load
Sets 90 90
NOTE: "
" FOR AVALIABLE, "×" FOR NOT AVALIABLE “-”FOR NOT AVAILABLE,"-"FOR BE APPLICABLE,"V"FOR SQURE HIGH
HEAD,"H"FOR HAIF HIGH HEAD,"L"FORSQURE FLAT HEAD,"S"FORARC HIGH HEAD,"F"FOR ARC FLAT HEAD,"T"FOR TRANSPARENT
VIEW WINDOW.
3

SAFETY PRECAUTIONS
If the power cord is bad, to avoid risk it is required to replace it by the technicians
of our special shop or the after-sale service department. Keep the pin of the power
plug clean.
Do not share one receptacle with other
electric appliances. Do not use it in
case that the power plug is damaged
or the inserting into the receptacle is
loose.
Earth
Do not wash water-proof laundries such
as the raincoat, bicycle shelter etc. To
avoid abnormal vibration during spinning.
If the power cord is bad, to avoid risk it is required to replace it by the technicians
of our special shop or the after-sale service department. Keep the pin of the power
plug clean.
Be sure to earth the earthing wire reliably.
Do not put the machine at damp place like
the bathroom. Never wash it with water.
Do not let the machine share one receptacle
with other electric appliances. If the power
plug is damaged, or the plugging into the
receptacle is loose, do not use the plug any
more.
Do not install or store the washer where
it will be exposed to the weather.
The power cord plug should be convenient
to be pluged in or pluged out with hand
while the washing machine runs normally.
Be sure to pull the plug out and close the
water tap when the machine is idle,when
moving the machine,or when cleaning
the machine.Do not use wet hand to ins-
ert or pull out the power plug.
4

WARNING AND CAUTIONS
Do not decompose, repair or alter the
machine by yourself.
Do not stretch hands into the working
machine. It is dangerous even if the
rotation is slow. Take special care of
the children.
Do not put any hot or heavy items (such
as the kettle with hot water ) on the
washing machine.
The handicapped or children without
care shall not use the machine.
Under certain conditions, hydrogen gas may be produced in a hot water system that has
not been used for 2 weeks or more. HYDROGEN GAS IS EXPLOSIVE. If the hot water
has not been used for such a period, before using the washing machine, turn on all hot
faucets and let the water flow from each for several minutes.
This will release any accumulated hydrogen gas. As the gas
is flammable, do not smoke or use an open flame during this time.
Keep the machine away from direct
sunlight and heat source like the heater.
Do not wash articles that have been
previously cleaned in, washed in, soaked
in, or spotted with gasoline, dry-cleaning
solvents, other flammable, or explosive
substances as they give off vapors that
could ignite or explode. Do not add
gasoline, dry-cleaning solvents, or other
flammable, or explosive substances to
the wash water. These substances give
off vapors that could ignite or explode.
Petrol
Thinn
er
5

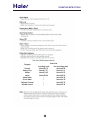
Unit mm
NET DIMENSION
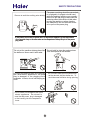
INSTALLATION AND ACCESSORY PARTS
The largest allowed slope of the shank base of the machine is 2 . The slanting or rough ground will
result in unstable running or stoppage of the machine. Please adjust it with following methods:
Confirm it's horizontal
Hang the plumb to confirm it's horizontal.
Adjust the adjustable feet
1) To twist the adjustable foot, please first lift up
the side of the foot slightly, and twist the foot.
2) Fasten the nut after adjustment.
Adjust the Installation position
High
Low
Adjustable foot
<2
Please install and adjust the machine according to the requirement of the manual.
It is very important to your security and correct operating the machine.
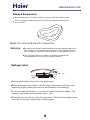
Shiping bar
Pull out
Pull the shipping bar out to avoid
damage to your washing machine
before your first use of it.
686
1080
686

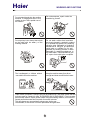
INSTALLATION AND ACCESSORY PARTS
Usage of the drain hose
Hang the outer drain hose on the proper place
before washing( do not use it toppled down
on the ground).
Attend that the outlet of drain hose shall be higher
than the water level in washtub to avoid siphon
phenomenon.
1.0m<h<1.5m
Connect the water inlet hoses
Figure 2
Figure 1
C
H
1. Attach the water inlet hoses to the hot water faucet and the cold water
faucet. Using pliers, tighten the coupling. ( As figure 1)
4. Check for leaks
(1). Swing the water inlet hose gently to confirm if it is suitable.
(2). Turn on the water faucets and check for leaks. A small amount of water might
enter the washers. You will drain this later.
3. Attach the hose connected with hot water faucet to the HOT water inlet valve(sign
with "H'). Attach the hose connected with cold water faucet to the COLD water
valve(sign with C ). ( As figure 2)
NOTE: Do not over-tighten.
2. Run water through both faucets and inlet hoses, into a bucket or laundry tub, to get
rid of particles in the water lines that might clog the inlet valves screens.
Install the drain hose
Outer drain hose
component
Drain hose neck
Drain hose joint
Drain hose hoop
First install the drain hose hook on the parts of
outer drain hose component.
Put the drain hose clamp on the outer drain hose,
insert the outer drain hose into the joint for it, and
then clutch tightly with drain hose hoop.

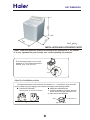
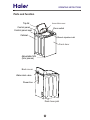
Parts and function
Bleach injection inlet
Cabinet
Control panel
Control panel seat
Top lid
Adjustable foot
(four pieces)
Door switch
Front door
Inner tub cover
Power line
Water inlet valve
Drain hose joint
Back cover
OPERATING INSTRUCTIONS

OPERATING INSTRUCTIONS
Water level indicator will shut off if only Spin is selected.
Soak or Pre-wash will not work in the Cycles: Hand Wash,Quick Wash, Delicate
Casual and Wrinkle Control.

OPERATING INSTRUCTIONS
Including soak Not including soak
Normal About54-78 About44-58
Heavy Duty About57-91 About47-61
Whites About53-89 About43-59
colors About50-86 About40-56
Hand Wash / About26-38
Quick Wash / About24-30
Delicate Casual / About25-35
Wrinkle control / About25-34
Program
Total time

OPERATING INSTRUCTIONS
Bleachdispenser is located on front corner under the loading door.
Pour in recommended amount of bleach into dispenser during the
first wash fill.
Note:Use only liquid bleach in dispenser.
Warning:
Softener inlet
Please follow softener instructions for dose usage.
Before washing put the softener into the filling entrance(can be found on the
balancing ring by rotating the inner tub, as
illustrated in the drawing).
Please do not use softener in the following cases Selected rinsing times more
than two; Choosing rinse/spin two-in-one program.
Softener inlet
SOFTENER
Try to avoid adding softener in, if you do not intend to wash immediately. The
softener may harden and may cause a poor flow.
Use the manufacturer s chart,on product container for
recommended use of liquid or powder bleach.
Be careful not to spill undiluted bleach on the washer cabinet or
your clothes. As it is a storng chemical, it may damage some of
your clothes or the finish of the washer if not properly diluted.
Bleach Dispenser:

OPERATING INSTRUCTIONS
Normal Operating Sounds
The following sounds are normally heard during the operation
Of the washer:
Tumbling sounds: This is normal as the heavy wet clothes in
the Washer are continuously being lossed around.
Air rushing noise: This happens when the Washer tub spins at
very high RPM.
Wash and Rinse cycles going on and off will also make clicking
sounds.
Note: Use only liquid bleach in dispenser.
Warning: Be careful not to spill undiluted bleach on the washer
cabinet or your clothes. As it is a strong chemical, it
may damage some of your clothes or the finish of the
washer if not properly diluted.
Use the manufacturer s chart, on product container
for recommended use of liquid or powder bleach.

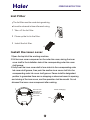
Take off the lint filter.
The lint filter must be used during washing.
It must be cleaned in time after each using.
Clean up the lint in the filter.
Install the lint filter.
1
2
3
Section I enlarging
Push
1.Open the top lid of the washing machine.
2.Put the inner cover component on the outer tub cover, aiming the inner
cover shaft to the installation hole of the corresponding outer tub cover
shaft groove.
3.Firstly insert the inner cover shaft of one side into the corresponding outer
tub cover shaft groove, then push the another inner cover shaft into the
corresponding outer tub cover shaft groove. Please install to designated
position to guarantee there are no dropping or abnormal sound in opening
and closing of the inner cover, and the operation shall be smooth. Do not
dismount the inner cover component after washing.
Inner cover
Inner cover shaft
Outer tub cover
Outer tub cover
shaft groove
Lint Filter
Install the inner cover
OPERATING INSTRUCTIONS

MAINTENANCE SERVICE AND TROUBLE SHOOTING
If you replace the computer sequencer without checking the other components carefully,
the computer sequencer may be damaged again. Therefore, please first check
if the other components working normally before replacing the sequencer in maintenance.
C
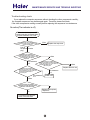
Trouble-shooting charts
No action(The indicator is off)
Confirm that there's no power failure,
and the power plug is inserted reliably.
The power switch is at "On" mode.
Measure the voltage
of the two ends of the power input
of the sequencer.
Measure the resistance
between the white wire terminal
in the white plug on top of the wire unit
and the N pin on the power
receptacle.
Replace the sequencer.
Replace the
power cord.
Replace the wire unit.
Replace the computer
sequencer.
Connect the fuse and the
wires of the two ends.
The resistance
is 0.
The resistance
is 0.
The resistance
is 0.
Infinite
Infinite
Yes
Infinite
No
Pull off
the power
plug
Not exist
Exist
Check if the connection
between the fuse and the wires
of the two ends are well?
Measure the resistance
between the brown wire terminal
in the white plug on top of the wire
unit and the brown wire of
the lower part.
Measure the resistance
between the light blue wire terminal
in the red plug on top of the wire unit
and the light blue wire of
the lower part.

MAINTENANCE SERVICE AND TROUBLE SHOOTING
No draining
No
No
After insert the plug, turn the
sequencer knob to the drain location
Check the inset is normal
and measure the voltage of two ends of
the drain pump
Check the inset is normal
and measure the voltage of two ends of
the drain motor
Replace the drain pump
Check if the drain pump acts.
Check if the drain motor is normal
Check if the wire unit is normal
No
Yes
No
No
Check if the wire unit is normal?
Replace the sequencer
Replace the sequencer
Repair or replace the wire unit
Yes
Yes
Yes
Keep filling water
Open the water faucet without switching on the power.
If the water can fill into the water inlet valve.
check if the gas guide system such
as gas cell leaks gas
Replace the water inlet valve.
Replace the water level sensor.
It leaks gas. Please check and repair the gas guide system.
Please smear 801 glue in installation of the connecting pipe.
Please smear 801 glue in installation of the gas cell cover.
No
No
Exist
Exist
Exist

The washing and
draining are normal.
Check the On/Off point of the
microswitch and stop switch.
Check if the clutch pawl
is pulled enough.
Replace the microswitch
or stop switch.
Replace the drain motor.
Replace the retarder clutch.
At this time please check
if the drain motor is well.
No On/Off point
No
Yes
Normally
8. Analysis Of The Common Breakdown
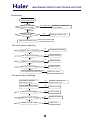
MAINTENANCE SERVICE AND TROUBLE SHOOTING
Too much noise in spinning
No
No
Yes
Yes
Yes
Yes
No
No
No
If the washing machine is set horizontally.
If the noise of the gear case is large.
If the hanger is wrongly used.
If the noise of the motor is too much.
If the motor is fastened tightly.
Set the machine horizontally.
Replace the retarder
Replace the hanger.
Replace the motor.
Fasten the motor.
No
No
Yes
Yes
Yes
Too much noise in washing
If the noise of the motor is too much.
If the pulsator is rubbing the
bottom of the inner tub.
If the motor fastened tightly.
If the noise of the retarder is too large.
If the belt is too tight or loose.
Fasten the motor.
Replace the retarder.
Adjust the belt.
Replace the motor.
Adjust the gap between the
pulsator and inner tub
No spinning

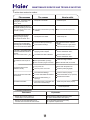
MAINTENANCE SERVICE AND TROUBLE SHOOTING
It is the water remained in the factory
inspection of performance.
Common phenomena
Phenomena Explanation
The program is setting the drain time. Some
time is needed before it starts spinning.
There may be some water flowing out of
the drain hose in the first use of the machine.
Press the "Process " button to
select "Spin", but it doesn't work.
In pre-wash , the washer stops
running,t
he numeral tube
shows E0
The safety switch acts. The
spinning can not work (after
amending twice automatically)
The numeral tube shows E3
Not supplying water
The numeral tube shows E4
or the speed
is too slow the suitable water
level doesn't research about 15
minutes.
The draining does not work, or
the speed of draining is too slow
,
The numeral tube shows E1
(exclude in peedy).
The machine stops running In
washing ,rinsing or spinning.
The numeral tube shows E2
Is the power off?
Does the power cord loose?
Does soft wash program selected?
The top lid is not closed.
The top lid is not closed.
Close the top lid.
Close the top lid.
Are the laundries put slantingly?
Re-order the laundries. Close the
top lid.
The water faucet is not open or
supplying water is stoped.
The water inlet valve is blocked.
Clean the water inlet valve .
Push the "Start/Pause" button.
Open the water faucet.
Push the "Start/Pause" button.
Is the drain hose blocked by foreign
material?
Is the spout blocked by foreign
Clean the foreign material.
Select the soft wash ,it's normal.
Is the machine slanting?
Is some metal inside the washer?
Are the laundries slanting in
spinning?
Is the jointer screw of the water inlet
hose loose or twisted awry?
Insert the power plug tightly.
Use it when the power is on.
Level the machine properly.
Re-order the laundries.
Fasten the fastener or zip up the zip.
Fasten the jointer screw properly.
The water faucet leaks.
The machine does not act.
(Indicators are off.)
The waterfall current is poor or
out.
There's abnormal sound inside
the machine.
Is the machine slanting?
Level the machine in right position.
Open and close the top lid once.
Phenomenan The reason How to settle
C
Trouble alarm and solve method
T
Open and close the top lid once.
The numeral tube shows F2
Please contact the after-sales
service department.
Overflow alarm
17

WIRING DIAGRAM
There is overload protector installed in the motor. In case that the motor is overload or meets
breakdown in working, the protector will act and stop the motor. When the breakdown is
removed, the motor will resume normal working.
18

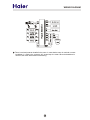
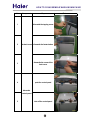
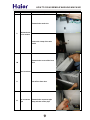
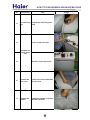
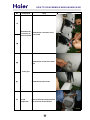
HOW TO DISASSEMBLE WASHING MACHINE
19
No Component Step Picture
1 dismantle the tapping screw
2 dismantle the fasten button
3
dismantle the screw of the
back cover
4 push the control panel
5 take off the control panel
The back cover
dismantle
control panel
Page is loading ...
Page is loading ...
Page is loading ...
Page is loading ...
Page is loading ...
Page is loading ...
-
 1
1
-
 2
2
-
 3
3
-
 4
4
-
 5
5
-
 6
6
-
 7
7
-
 8
8
-
 9
9
-
 10
10
-
 11
11
-
 12
12
-
 13
13
-
 14
14
-
 15
15
-
 16
16
-
 17
17
-
 18
18
-
 19
19
-
 20
20
-
 21
21
-
 22
22
-
 23
23
-
 24
24
-
 25
25
-
 26
26


Haier GWT800AW User manual
- Category
- Washing machines
- Type
- User manual
- This manual is also suitable for
Ask a question and I''ll find the answer in the document
Finding information in a document is now easier with AI
Related papers
Other documents
-
 Lewis Tools 7118565 Installation guide
-
Pyle PUCWM11 User manual
-
Telefunken TTL-700 User manual
-
Uncategorized CANDY Full Automatic Washing Machine User manual
-
Signature TEL85TL User manual
-
RAMTONS RW/125 User manual
-
Palsonic PAL800TT Owner's manual
-
Daewoo DWF-806 User manual
-
Glastender DR-OC45 Datasheet
-
