Vantec NST-600NU User manual

Category
Networking cards
Type
User manual

This manual is also suitable for

Vantec NST-600NU is a versatile and powerful storage device that allows you to easily share files, media, and printer access across your network. Its Gigabit Ethernet LAN port provides blazing fast speeds for data transfer, while its USB ports let you connect various storage devices and printers. With FTP and SMB server capabilities, you can securely store and share your files, making them accessible from any computer or device on your network.

Vantec NST-600NU is a versatile and powerful storage device that allows you to easily share files, media, and printer access across your network. Its Gigabit Ethernet LAN port provides blazing fast speeds for data transfer, while its USB ports let you connect various storage devices and printers. With FTP and SMB server capabilities, you can securely store and share your files, making them accessible from any computer or device on your network.

Copyright © 2010 Vantec Thermal Technologies. All Rights Reserved.
User’s Manual
Package Contents:
1 NextStar FX Gigabit NAS Adapter x1
2 AC Adapter x1
3 Installation Guide x1
4 Rubber Feet x4
5 User’s CD x1
6 Ethernet Cable x1
7 User’s Manual x1
1
2
3
4
5
6
7
TRADEMARKS
MS-DOS, Xbox, Microsoft, Windows NT/2000/XP/Vista/7 are trademarks of Microsoft Corporation.
PS3 and Playstation are trademarks of Sony Corporation.
Apple, iTunes, Macintosh and Mac are trademarks of Apple Computer.
NexStar is a registered trademark of Vantec Thermal Technologies.
*All other third-party brands and names are the property of their respective owners.
1
Table of Contents
1. Product Introduction / Features
2. Parts Layout
3. NexStar FX NAS Manager
4. NexStar FX NAS GUI
5. SAMBA Server (SMB)
6. FTP Server
7. Media Server Connection-Xbox / PS3
8. Printer Server
9. Mac Installation (Mac 10.5.4 or above)
10. Mapping Network Drives
11. Q&A
12. Warranty
13. Contact
02
03
04
06
12
16
19
22
26
31
32
34
34
2
1. Product Introduction / Features
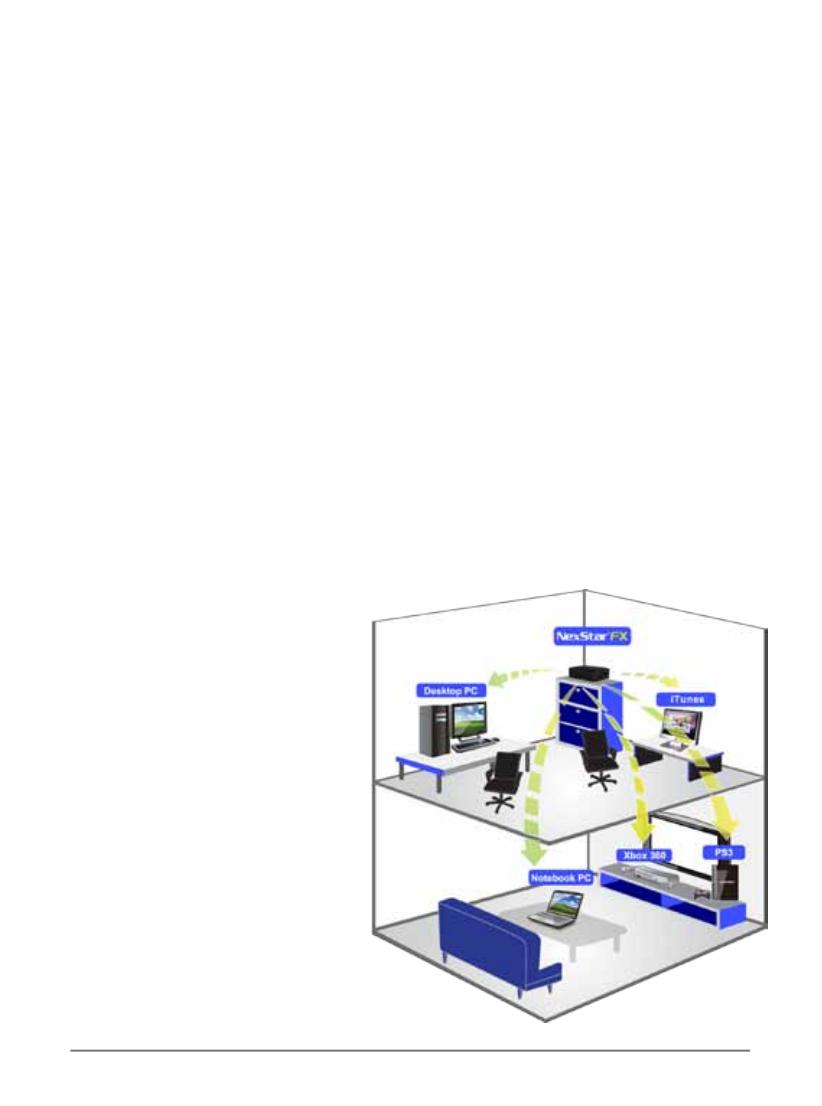
Thank you for purchasing NexStar FX Gigabit NAS Adapter. Now you can easily install the
NexStar FX Gigabit NAS Adapter into your network environment. Before using this device,
please read the Key Features below.
Key Features
- Supports One USB Storage Device
- Gigabit Ethernet LAN For Blazing Fast Speeds
- Share Your Printer Over Home Or Ofce Network
- Easy To Use User Interface
- FTP & SMB Server To Store And Share Your Files
- Media Server To Stream Files On Network
- Cross Platform Friendly: PS3 & Xbox 360 & Media Centers
- Share Your Mp3s Over iTunes
- User Friendly Control Interface
- Add Storage To Any Network – Quick And Easy
The NexStar FX Gigabit NAS Adapter is a exible, economical and powerful unit for your
network. Please follow the instructions below which will help you to connect, to set up, and
to congure the device.
Network environment
There are 3 different setup conditions you can choose:
1. Setup NexStar FX Gigabit
NAS Adapter as DHCP Client:
If your NexStar FX Gigabit
NAS Adapter operates under
a built-in DHCP server router
(ex. Internet Sharing Hub), it will
obtain an IP address from the
DHCP Server automatically.
2. Setup NexStar FX Gigabit
NAS Adapter as DHCP Server:
If your operating environment
does not support DHCP server,
NexStar FX Gigabit NAS
Adapter will immediately act as
DHCP server and assign an IP
for installation.
3. In Static IP environment:
You need to rst congure
the IP for NexStar FX Gigabit
NAS Adapter to operate in
the static IP environment. For
conguration details, please
refer to “LAN Cong” setup
page.
3
2. Parts Layout
LAN Connection
Operation System
Power Indicator
Connect to LAN
Reset Button
Connect to USB Storage
Connect Power Adapter
Connect to USB Printer
4
3. NexStar FX NAS Manager
3.1 Search NexStar FX Gigabit NAS Adapter by SearchDisk
1. Run the Utility CD enclosed in package and navigate to the “Search Utility” folder. Run
“SDisk.jar”.
2. Select “Search Next” and when the NexStar FX is found, click “Connect”.
3. The default login is “admin” for both user name and password, click “OK” to enter con-
gurations.
5
3.2 Search NexStar FX Gigabit NAS Adapter by using
Windows Internet Explorer.
1. Open IE browser and type in the default host name “NST-600NU” in the search bar.
2. The default login is “admin” for both user name and password, click “OK” to enter
congurations.
6
4. NexStar FX NAS GUI
NexStar FX NAS supports multi-language user interface. Please click on the respective
ags to select your language.
4.1 Hard Disk format
For rst time installation, you need to format the hard disk into FAT32 le system. This
procedure can be done by clicking on the format button.
Note: All existing data will be deleted from the format.
7
4.2 Status
This tab provides the basic information for the NexStar FX Gigabit NAS Adapter. Users can check
r m w a re version and available hard d r i v e c a p a c i t y o n t h i s p a g e .
4.3 Administration
You can change and modify your host & group name, and password from this page. Click
“Apply” to save the settings.
-
Host Name: This is used to identify your device on the network. If you prefer a different
name, type in the new name and click “Apply” to save setting.
-
Group Name: This should be same as your workgroup. In general, the default
WORKGROUP” will be OK. But if your workstation belongs to a different workgroup, type in
the correct group name to modify.
In Windows OS, right click on “
My Computer”, choose “Properties”, and go to the
computer name tab to see your current workgroup.
For Mac OS to join Windows workgroup, open the directory access utility (under Applications->
Utilities), select SMB and click congure to modify the settings (Administrator access is required
to access this option.)
8
Note: We strongly suggest you to change the password as soon as you logged in to prevent
unauthorized access.
4.4 Date/Time setting
You can change time setting from this page. Click “Apply” to save the setting. By default, SNTP
is in network time service, your can also select “Synchronize to PC”. If internet access is avail-
able, we recommended setting SNTP to Network time service instead.
4.5 LAN Cong
By default, the “IP Setting” is set to “Automatic IP”. This is the recommended setting and will
allow the NexStar FX Gigabit NAS Adapter to obtain its IP address automatically. If you prefer
setting it manually, select the static IP option, enter your own value and click apply to conrm the
new setting.
Setting manually is useful when you have a static IP address in order to mount the network drive
or setup port forwarding.
9
4.5.1 PPPoE Setting
PPPoE (Point-to-Point Protocol over Ethernet) is an internet connection protocol allowing users
to connect to the internet without a router. All local users can share one PPPoE connection to
access the internet.
If you want to congure the setting of PPPoE for your NAS, click the “Set” button.
Status: Display PPPoE connection status.
Service Name: This is an optional eld. You can enter the name you desire which could help
you remember the conguration.
Account Name: Enter your user name provided by your ISP.
Password: Enter your password provided by your ISP.
Service on Demand: The router will ONLY connect itself to your ISP when there’s internet
request demanded by any LAN user and disconnect itself when the transaction is done.
Idle Time (Seconds): Idle time means the storage will disconnect itself from the ISP after
being idle for a specic time. If the time is set to 0, the storage will not disconnect itself.
Max Connection Time (Hours): A specic time that indicate how long the storage can
stay connected with ISP.
IP Address Negotiation: IP Address and Subnet Mask should be assigned within the
same network as the PPPoE-enabled DSL modem.
Fixed IP Address: Use to assign an IP address manually.
AC Name: This is an optional eld. Use it to congure an Access Concentrator (AC) name on
the PPPoE interface.
WAN IP: This shows what the current Storage IP address.
10
4.6 Disk Tool
In this page, you can manage the hard disk setting.
- Format: For the rst time installation, you need to format the hard disk into FAT32 system le,
this procedure applies to both new or used hard disk.
- Scan Disk: After the scan, it will show the number of le content and health status for the
hard disk.
11
4.7 Maintenance
This page allows you to update the NexStar FX NAS rmware, to go back to the default settings,
or to reboot the NAS system.
- Firmware update: Follow the steps below to update the loader and rmware for the
NexStar FX NAS.
Obtain the latest rmware from www.vantecusa.com.
Store the rmware le on to your computer and decompress it if necessary.
Browse your system and locate the rmware (BIN le).
Click on “update”.
Conrm the pop-up message to start the update.
Wait and DO NOT power off or remove the device during the rmware update. This might take
a few minutes.
Once the update is complete, it will prompt you to reboot the device.
Click on “Reboot” to restart the device.
Wait for about one minute and then go to the status page to conrm that the update is
successful.
- Factory defaults: Forgot your admin password? Click “Reset” under the factory defaults
and it will revert back to the default password setting. SAMBA/FTP account setting will still
remain in the NexStar FX NAS, other settings will be restored to factory default.
- System reboot: This can be used to restart the network drive after a rmware update.
12
5. SAMBA Server (SMB)
SMB server allows you to share data or les through LAN environment. A default “guest”
folder is created and shared to all users from under the same network as the NexStar FX
NAS.
Note: Use only “English alphabet” for folder names and no special characters when
creating new folders.
5.1 How to create User account.
Click on the “Add” button. Type new account name, password and click “OK”.
13
Here, we name the account “User1” to demonstrate, enter password and click “Next” to enter
share management.
You can “Run” from Windows start button, type “\\” and follow by the NexStar FX’s IP address
(eg:\\192.168.1.10), and click “OK” to continue.
Type “
User1” and password to login.
14
Now you have successfully set up the folder that you wish to share on your NexStar FX NAS.
This folder can be accessed from other computers on your local network.
15
5.2 How to modify user account password
Select the account name (“User1”) and than click “Modify”.
Enter new password and click “Apply” to save setting.
5.3 How to delete a user account
Select an account you wish to delete, click “Delete” to proceed. Please note that all the data
inside the folder will be lost after the delete.
16
6. FTP Server
Remember to “Enable” the FTP service on the status page, when you plan on using FTP server.
FTP Server Conguration: The standard port for FTP service is 21. If required, you can
change it into any port ranging from 1025-6550. But in general, we recommended using the default
port of 21.
File Language Support: By default, the encoding is set to English. If you want to store or
transfer les with a different encoding (different language), choose the corresponding language
from the drop down list. In order to transfer and view the les correctly, it is important
that you select the correct language!
Anonymous: By default an anonymous user name has been created, it allows FTP users to
login without username and password. For security reasons, it is best to add a password!
Note: To be able to share FTP resource via internet, you need a router to assign the external IP to
your NexStar FX NAS. Please refer to your router’s instructions on how to assign the external IP.
17
6.1 How to create FTP account
FTP server allows you to share your data through internet, so an internet resource and router is
required before setting up FTP server.
Select FTP server and clicks “
Add” button and enter a name and password for the new FTP
account and click “OK” to continue.
In the account list, you can see an overview of the existing accounts and status. For FTP le
transfers, we recommend to use other dedicated FTP client software e.g. SyncQuick FTP, Cute
FTP etc.
18
Note: When creating FTP accounts, please use ONLY English alphabet and no special charac-
ter or space for FTP account name.
6.2 How to delete FTP account
In the “Account List”, you can see an overview of the existing accounts and status; you can
change them at any time by selecting the account and modifying, disabling or deleting it.
Note: Deleting a folder will also erase all the les stored inside that folder.
  • Page 1 1
  • Page 2 2
  • Page 3 3
  • Page 4 4
  • Page 5 5
  • Page 6 6
  • Page 7 7
  • Page 8 8
  • Page 9 9
  • Page 10 10
  • Page 11 11
  • Page 12 12
  • Page 13 13
  • Page 14 14
  • Page 15 15
  • Page 16 16
  • Page 17 17
  • Page 18 18
  • Page 19 19
  • Page 20 20
  • Page 21 21
  • Page 22 22
  • Page 23 23
  • Page 24 24
  • Page 25 25
  • Page 26 26
  • Page 27 27
  • Page 28 28
  • Page 29 29
  • Page 30 30
  • Page 31 31
  • Page 32 32
  • Page 33 33
  • Page 34 34
  • Page 35 35
  • Page 36 36

Vantec NST-600NU User manual

Category
Networking cards
Type
User manual
This manual is also suitable for

Vantec NST-600NU is a versatile and powerful storage device that allows you to easily share files, media, and printer access across your network. Its Gigabit Ethernet LAN port provides blazing fast speeds for data transfer, while its USB ports let you connect various storage devices and printers. With FTP and SMB server capabilities, you can securely store and share your files, making them accessible from any computer or device on your network.

Ask a question and I''ll find the answer in the document

Finding information in a document is now easier with AI