Page is loading ...

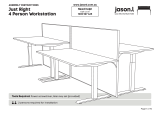
Desk based mounted
Privacy screen
Sizes: 1200/1400/1600/1800 mm wide
Need help!
Call us on
1300 527 665
www.jasonl.com.au
Page 1 of 4
ASSEMBLY INSTRUCTIONS

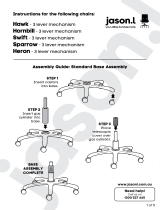
STEP 01
Please leave 25mm gap between table tops (A) so we can drop the desk mounted screen in between the two tops.
Now please insert 2 rod brackets that will hold each screen to the desks on either side.
Desk based mounted
Privacy screen
Sizes: 1200/1400/1600/1800 mm wide
Need help!
Call us on
1300 527 665
www.jasonl.com.au
25 mm
AA
Page 2 of 4
ASSEMBLY INSTRUCTIONS

Desk based mounted
Privacy screen
Sizes: 1200/1400/1600/1800 mm wide
Need help!
Call us on
1300 527 665
www.jasonl.com.au
A
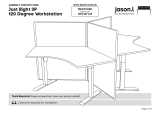
STEP 02
Page 3 of 4
Second person to drill 4 holes into the brackets holes with provided wood screws into the underneath desktop. Please check the position of the
rod brackets and bracket holes again before drilling the screws all the way through. Please tighten all the wood screws.
Once the 2 rod brackets are screwed in, you can slide the screen down until it fully rest over the brackets, standing between both table tops.
ASSEMBLY INSTRUCTIONS

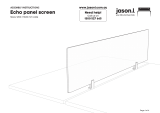
STEP 03
ASSEMBLY INSTRUCTIONS
Desk based mounted
Privacy screen
Sizes: 1200/1400/1600/1800 mm wide
Need help!
Call us on
1300 527 665
www.jasonl.com.au
Using an Allen key remove top 2 caps from screens uprights. The two partitions should be next to each other.
Please slide the 2 way connector rod - down between the two screen uprights.
Page 4 of 4
If you purchased a 2, 4 or 6
person bench workstations.
/