Symmons 453RH Installation guide
- Category
- Wall & ceiling mounts accessories
- Type
- Installation guide
This manual is also suitable for

Canterbury®
Model Numbers Specification
Warranty
Limited Lifetime - to the original end purchaser in
consumer installations.
5 Years - for commercial installations.
Refer to www.symmons.com/warranty for complete
warranty information.
Accessory Suite
Operation & Maintenance Manual
453RH, 453TB-18, 453TB-24, 453TP, 453TR
Note: Append appropriate -sufx to model number.
Modifications
-STN Satin Nickel finish
453RH Robe Hook
453TB-18 18" Towel Bar
453TB-24 24" Towel Bar
453TP Toilet Paper Holder
453TR Towel Ring
All premium accessories constructed from metal materials,
plated in standard polished chrome nish.
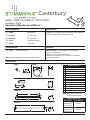
Measurements
A Ø 2-1/8", 54 mm
B 4-5/8", 117 mm
C 6", 152 mm
D 6-15/16", 176 mm
E 3-9/16", 90 mm
F 6-7/8", 175 mm
G 4-3/16", 106 mm
H 3-7/8", 98 mm
I 18", 457 mm
J 20-1/8", 511 mm
K 2-1/8", 54 mm
L 24", 610 mm
M 26-1/8", 664 mm
Replacement Parts
Description Part Number
Mounting
Hardware Kit
Less Bracket
RA-017
Mounting
Hardware Kit
With Bracket
RA-018
Dimensions
AA
KK
G
G
I
I
J
J
C
C
D
D
E
E
F
F
E
E
E
E
B
B
H
H
453RH
453TB-18
KK
L
L
M
M
453TB-24
453TP
453TR
Note: Dimensions subject to
change without notice.

Symmons Industries, Inc. ■ 31 Brooks Drive ■ Braintree, MA 02184 ■ Phone: (800) 796-6667 ■ Fax: (800) 961-9621
Copyright © 2019 Symmons Industries, Inc. ■ symmons.com ■ [email protected] ■ ZV-3097 REV A ■ 083019
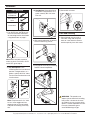
Installation
1)
For 453TB-18 & 453TB-24 only,
measure and mark centerlines
for mounting bracket installation
using dimensions on page 1.
Note: Make sure both centerline
marks are level. For 453RH, 453TR
and 453TP go to step 2a.
Care and Cleaning
Tools Required
Phillips Head
Screwdriver
Allen Wrench
2mm
Power drill
4) Hang top of accessory on mounting
bracket. Lower into position.
2
1
2b) Stud Option: Center bracket on
centerline.
Using brackets as a
guide, carefully drill 1/8" holes
into wall.
1
2
3) With mounting brackets in position,
secure to wall using screws.
5) Secure with set screw.
1
2
2a) Dry Wall Option:
Place
mounting brackets into desired
position. Using brackets as a
guide, carefully drill 5/16" holes
into wall. Remove brackets and
install anchors.
1
3
3
2
Note:
For plaster walls 1/2" thick
or less, insert toggle tool into
toggle anchor to secure behind
wall prior to installing accessory
trim.
WARNING: This product can
expose you to chemicals including
lead, which is known to the state
of California to cause cancer, birth
defects, or other reproductive harm.
For more information, go to
www.P65Warnings.ca.gov.
1)
Clean nished trim area with a
soft cloth using mild soap and
water or a non-abrasive cleaner
and then quickly rinse with water.
-
 1
1
-
 2
2


Symmons 453RH Installation guide
- Category
- Wall & ceiling mounts accessories
- Type
- Installation guide
- This manual is also suitable for
Ask a question and I''ll find the answer in the document
Finding information in a document is now easier with AI
Related papers
-
Symmons 453TP Installation guide
-
Symmons 363TB-18-STN User manual
-
-
Symmons 553TB18BBZ Installation guide
-
-
Symmons 413TB-18 Installation guide
-
Symmons 533TB-24-STN Installation guide
-
-
-