Page is loading ...

Information for users in the UK
(Not applicable outside the UK)
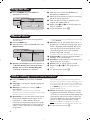
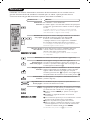
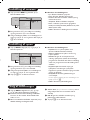
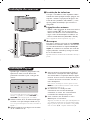
Positioning the TV
For the best results, choose a position where light does not fall directly on the screen, and at some
distance away from radiators or other sources of heat. Leave a space of at least 5 cm all around
the TV for ventilation, making sure that curtains, cupboards etc. cannot obstruct the air flow
through the ventilation apertures.
The TV is intended for use in a domestic environment only and should never be operated or
stored in excessively hot or humid atmospheres.
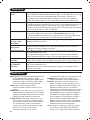
General Points
Please take note of the section 'Tips' at the end of this booklet.
Interference
The Department of Trade and Industry operates a Radio Interference Investigation Service to help
TV license holders improve reception of BBC and IBA programmes where they are being spoilt by
interference.
If your dealer cannot help, ask at a main Post Office for the booklet "How to improve Television
and Radio Reception".
Mains connection
Before connecting the TV to the mains, check that the mains supply voltage corresponds to the
voltage printed on the type plate on the rear panel of the TV. If the mains voltage is different, con-
sult your dealer.
Important
Should it become necessary to replace the mains fuse, this must be replaced with a fuse of the
same value as indicated on the plug.
1. Remove fuse cover and fuse.
2. The replacement fuse must comply with BS 1362 and have the ASTA approval mark.
If the fuse is lost, make contact with your retailer in order to verify the correct type.
3. Refit the fuse cover.
In order to maintain conformity to the EMC directive, the mains plug on this product must not be
removed.
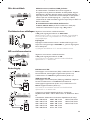
Connecting the aerial
The aerial should be connected to the socket marked x at the back of the set. An inferior aerial is
likely to result in a poor, perhaps unstable picture with ghost images and lack of contrast. Make-
shift or set-top aerials are unlikely to give adequate results.
Your dealer will know from experience the most suitable type for your locality.
Should you wish to use the set in conjunction with other equipment, which connects to the aerial
socket such as TV games, or a video camera, it is recommended that you consult your dealer on
the best method of connection.
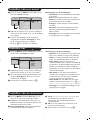
Stand (if provided)
Use only the stand provided with the set, making sure that the fixings are properly tightened.A dia-
gram showing how to assemble the stand is packed with the stand. Never use a make-shift stand, or
legs fixed with woodscrews.
info uk 2005 28-01-2005 13:48 Pagina 1

1
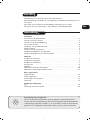
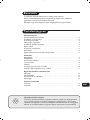
Introduction
Ta b le of Contents
Thank you for purchasing this television set.
This handbook has been designed to help you install and operate your TV set.
We would strongly recommend that you read it thoroughly.
We hope our technology meets entirely with your satisfaction.
Installation
Presentation of the LCD Television . . . . . . . . . . . . . . . . . . . . . . . . . . . . . . . . . . . . .2
The keys on the TV set . . . . . . . . . . . . . . . . . . . . . . . . . . . . . . . . . . . . . . . . . . . . . .2
Remote control keys . . . . . . . . . . . . . . . . . . . . . . . . . . . . . . . . . . . . . . . . . . . . . . .3
Video recorder or DVD keys . . . . . . . . . . . . . . . . . . . . . . . . . . . . . . . . . . . . . . . . .4
Installing your television set . . . . . . . . . . . . . . . . . . . . . . . . . . . . . . . . . . . . . . . . . .5
Quick installation . . . . . . . . . . . . . . . . . . . . . . . . . . . . . . . . . . . . . . . . . . . . . . . . . .5
Program sort . . . . . . . . . . . . . . . . . . . . . . . . . . . . . . . . . . . . . . . . . . . . . . . . . . . . . .6
Manual store . . . . . . . . . . . . . . . . . . . . . . . . . . . . . . . . . . . . . . . . . . . . . . . . . . . . . .6
Other settings in the Install menu . . . . . . . . . . . . . . . . . . . . . . . . . . . . . . . . . . . . .6
Operation
Picture settings . . . . . . . . . . . . . . . . . . . . . . . . . . . . . . . . . . . . . . . . . . . . . . . . . . . .7
Sound adjustments . . . . . . . . . . . . . . . . . . . . . . . . . . . . . . . . . . . . . . . . . . . . . . . . .7
Feature settings . . . . . . . . . . . . . . . . . . . . . . . . . . . . . . . . . . . . . . . . . . . . . . . . . . . .7
Screen Formats . . . . . . . . . . . . . . . . . . . . . . . . . . . . . . . . . . . . . . . . . . . . . . . . . . . .8
Teletext . . . . . . . . . . . . . . . . . . . . . . . . . . . . . . . . . . . . . . . . . . . . . . . . . . . . . . . . . .9
Using in PC monitor mode . . . . . . . . . . . . . . . . . . . . . . . . . . . . . . . . . . . . . . . . . .10
Using in HD (High Definition) Mode . . . . . . . . . . . . . . . . . . . . . . . . . . . . . . . . . .11
Peripherals
Video recorder . . . . . . . . . . . . . . . . . . . . . . . . . . . . . . . . . . . . . . . . . . . . . . . . . . .12
Other equipment . . . . . . . . . . . . . . . . . . . . . . . . . . . . . . . . . . . . . . . . . . . . . . . . .13
Side connections . . . . . . . . . . . . . . . . . . . . . . . . . . . . . . . . . . . . . . . . . . . . . . . . . .13
Computer . . . . . . . . . . . . . . . . . . . . . . . . . . . . . . . . . . . . . . . . . . . . . . . . . . . . . . .13
Practical information
Tips . . . . . . . . . . . . . . . . . . . . . . . . . . . . . . . . . . . . . . . . . . . . . . . . . . . . . . . . . . . .14
Glossary . . . . . . . . . . . . . . . . . . . . . . . . . . . . . . . . . . . . . . . . . . . . . . . . . . . . . . . .14
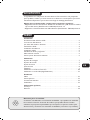
°
Recycling
The materials used in your set are either reusable or can be recycled.
To minimise environmental waste, specialist companies collect used appliances
and dismantle them after retrieving any materials that can be used again (ask
your dealer for further details).
FR
NL
DE
IT
DK
NO
SU
SF
RU
ES
PT
GR
TR
HU
PL
CZ
SK
GB

2
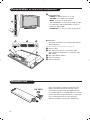
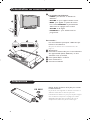
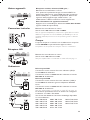
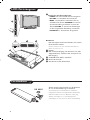
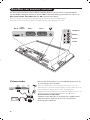
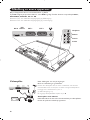
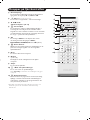
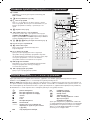
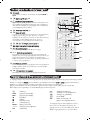
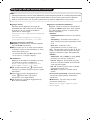
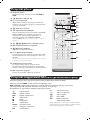
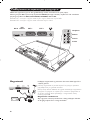
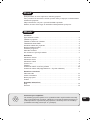
Presentation of the LCD Television
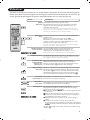
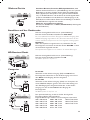
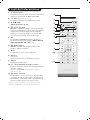
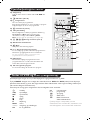
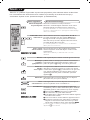
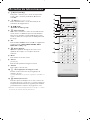
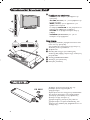
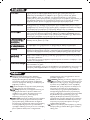
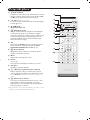
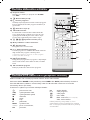
Remote control
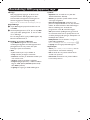
&
Television keys:
•
POWER: to switch the TV on or off.
•
VOLUME -/+: to adjust sound level.
•
MENU: to access or close menus.
The PROGRAM -/+ keys can be used to select
an adjustment and the VOLUME -/+ keys to
make that adjustment.
•
PROGRAM -/+ (- P +): to select programmes.
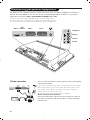
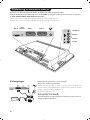
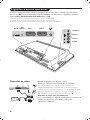
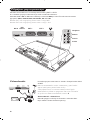
Rear of set :
The main connections are made at the bottom
of the television.
For more details on connections see page 12.
é Power socket
“ DVI and audio input for connecting a HD
(high definition) equipment or computer with
DVI output.
‘ EXT1 and EXT2 sockets
( TV aerial socket
§ Side connections
Pull out the plastic insulation sheet from the
battery, this will activate the remote control.
The battery supplied with the appliance does
not contain mercury or nickel cadmium so as to
protect the environment. Please do not discard
your used batteries, but use the recycling
methods available (consult your distributor).
CR 2025

3
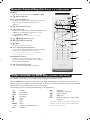
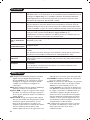
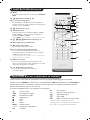
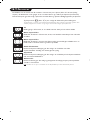
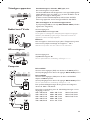
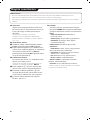
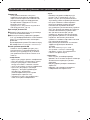
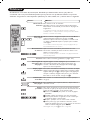
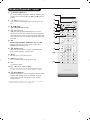
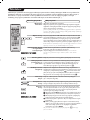
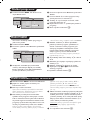
Remote Control Keys for LCD TV Functions
1) . (STANDBY)
To set the TV to standby mode.To switch the TV set on
again, press P –/+, 0 to 9 or AV keys.
2)
x Pixel + (depending on version)
Switches the Pixel + demonstration mode on or off.
3)
· ¢ Ê Æ ∫
Video recorder (page 14)
4)
Q Surround Sound
To activate / deactivate the surround sound effect. In
stereo, this gives the impression that the speakers are
further apart. For models equipped with Virtual Dolby
Surround*, you can experience Dolby Surround Pro
Logic sound effects.
5) AV
To display Source List to select TV or peripheral
equipment connected to EXT1, EXT2/S-VHS2,
AV/S-VHS3, PC or HD (p. 12).
6)
h Active control
Optimizes the picture quality depending on the quality
of the incoming signal and the ambient light conditions.
7) MENU
To call up or exit the TV menus.
8) Cursor (
<>≤≥)
These 4 keys are used to move around the menus.
9) Volume
To adjust the sound level.
10)
ª m Smart picture and sound
Used to access a series of predefined picture and sound
settings.
The personal position relates to settings selected from the
menus.
11)
Ë Screen information
To display / remove the programme number, the time,
the sound mode and the time remaining on the timer.
Hold down for 5 seconds to permanently display the
programme number on the screen.
* Manufactured under license from Dolby Laboratories.“Dolby”
and the double-D symbols are trademarks of Dolby
Laboratories.
1)
2)
3)
4)
5)
6)
7)
8)
9)
10)
11)

4
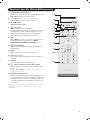
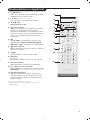
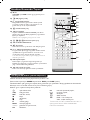
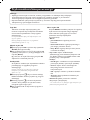
Remote Control Keys for LCD TV Functions
12) Mode
Press this key to switch between TV, DVD or AUX.
13)
œ PIP on/off (p. 10)
14)
ı List of programmes
To display / clear the list of programmes. Use the keys
<> to select a programme and the key ≥ to
display it.
15)
∏ Screen Format (p. 8)
16)
ù Sound mode
Used to force programmes in Stereo and Nicam Stereo
to Mono or, for bilingual programmes, to choose
between Dual I or Dual II.
The Mono indication is red when in forced position.
17)
Ÿ Å Ó ¤Teletext (p. 9)
18) Not applicable for TV mode.
19)
[ Mute
To mute or restore the sound.
20) P -/+ Selecting TV programmes
To move up or down a programme.
The number and the
sound
mode are displayed for a few seconds.
For some TV programmes the title of the programme
appears at the bottom of the screen.
21) 0/9 Numerical keys
For direct access to programmes. For a 2 digit
programme number, the 2
nd
digit must be entered
before the dash disappears.
22)
Á Previous programme
To access the previously viewed programme.
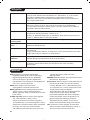
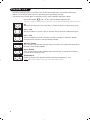
The remote control lets you control the main functions of the VCR or DVD.
Press the
MODE key to select the required mode : DVD or AUX (video recorder).The remote control
indicator lights up to display the selected mode. It switches off automatically after 20 seconds if left idle.
The remote control automatically returns to TV mode.
The following keys are operational, depending on the equipment :
. standby,
l¢ fast rewind,
∫l fast forward,
· recording,
∆ pause,
Ê stop,
Æ play,
MENU menu,
<>≤≥ navigation and adjustments,
OK validation,
0/9 digit keys,
P -/+ programme selection,
ù audio selection,
Ë OSD menu,
Á DVD :T-C function / VCR : index
function.
The remote control is compatible with all video
recorders using the RC5 standard and all DVDs
using the RC6 standard.
(12
(13
(14
(15
(16
(17
(18
(19
(20
(21
(22
Video recorder or DVD keys (mode selector)

5
Quick installation
When you turn on the TV set for the first time,
a menu is displayed on screen.This menu
prompts you to select the country and language
for the menus:
If the menu is not displayed, press the
MENU key
to display the menu.
& Use the
<> keys on the remote control to
select your country and validate with
≥.
If your country does not appear in the list, select
choice “. . .”
é Next select your language using the
<> keys
and validate with
≥.
“ The search starts automatically.All the available
TV programmes and radio stations will be
stored. This operation takes a few minutes.The
display shows the progress of the search and
the number of programs found. At the end of
the search, the menu disappears.
To exit or interrupt the search, press MENU. If no
programme is found, consult the possible solutions p. 14.
‘ If the transmitter or cable network sends the
automatic sort signal, the programs will be
numbered correctly. In this case, the installation
is complete.
( If this is not the case, you need to use the Sort
menu to number the programs correctly.
Some transmitters or cable networks broadcast their
own sort parameters (region, language, etc.). In this
case, indicate your choice using the
<> keys and
validate with
≥.
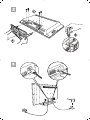
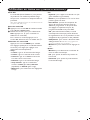
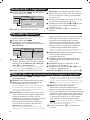
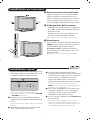
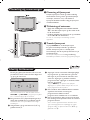
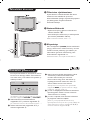
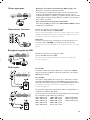
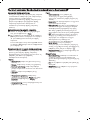
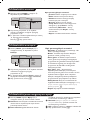
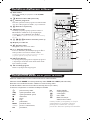
& Positioning the television set
Place your TV on a solid stable surface. To avoid
danger do not expose the TV to water, or a heat
source (e.g. lamp, candle, radiator). Do not
obstruct the ventilation grid at the rear.
é
Connecting the aerials
• Use the aerial connection lead supplied and
connect the
: socket situated at the bottom
of the TV to your aerial socket.
• Connect the power lead to the television and the
mains plug into the wall socket (220-240 V/50 Hz).
For connecting other appliances see page p.12.
“
Switching on
To switch on the set, press the POWER key. A
green indicator comes on and the screen lights
up. Go straight to the Quick Installation chapter.
If the TV remains in standby mode(red indicator),
press the
P -/+ key on the remote control.
The indicator will flash when you use the remote control.
Installing your television set
Plug’n’Play
Country
GB
Language
English

6
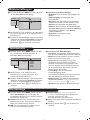
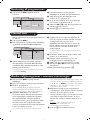
Manual store
Other settings in the Install menu
This menu is used to store the programmes
one at a time.
& Press the
MENU key.
é With the cursor, select the Install menu then
Manual store:
“ System: select
Europe (automatic detection*)
or
Western Europe (BG standard), Eastern
Europe (DK standard), United Kingdom
(I standard) or France (LL’ standard).
* Except for France (LL’ standard), you must select
choice France.
‘ Search: press
≥.The search starts. Once a
programme is found, the scanning stops and its
name is displayed (when available). Go to the
next step. If you know the frequency of the
required programme, this can be entered
directly using the
0 to 9 keys.
If no picture is found, consult the possible solutions (p. 14).
( Program No.: enter the required number
with the
≤≥ or 0 to 9 keys.
§ Fine Tune: if the reception is not satisfactory,
adjust using the ≤≥ keys.
è Store: press
≥.The program is stored.
! Repeat steps ‘ to è for each programme to
store.
ç To quit the menus, press Ë.
& Press the MENU key and select the Install
menu:
é Language: to change the display language for
the menus.
“ Country: to select your country (GB for
Great Britain).
This setting is used for the search, automatic
programme sort and teletext display. If your country
does not appear in the list, select “. . .”
‘ Auto Store: to start automatic search for all
programmes available in your region. If the
transmitter or cable network sends the
automatic sort signal, the programmes will be
numbered correctly. If this is not the case, you
need to use the Sort menu to renumber the
programmes.
Some transmitters or cable networks broadcast
their own sort parameters (region, language, etc.). In
this case, indicate your choice using the
<> keys
and validate with ≥.To quit or interrupt the search,
press MENU. If no picture is found, consult the
possible solutions (p. 14).
( Name:
If required, you can give a name to the
programmes and external connectors. Use the
≤≥ keys to move around the name display area
(5 characters) and the
<> keys to select the
characters.When the name has been entered,
use the
≤ key to exit.The name is stored.
Note: on installation, the programs are named
automatically when an identification signal is sent.
§ To quit the menus, press
Ë.
TV Menu
Picture
Sound
Features
Install
Manual Store
System
Search
Program No.
Fine Tune
Store
Europe
Program sort
& Press the MENU key. The TV Menu is
displayed on the screen.
é With the cursor, select the Install menu
followed by the Sort menu.
“ Select the programme you want to move using
the
<> keys and press ≥.
‘ Then use the
<> keys to select the new
number and validate with
≤.
( Repeat steps “ and ‘ for each program you
wish to renumber.
§ To quit the menus, press
Ë.
TV Menu
Picture
Sound
Features
Install
Install
Language Æ •
Country Æ •
Auto Store Æ •
Manual Store Æ •
Sort Æ •
Name Æ •
0
1
2
3
4
5

7
Picture settings
Sound adjustments
& Press MENU then ≥.The Picture menu is
displayed:
é Use the
<> keys to select a setting and the
≤≥ keys to adjust.
“ Once the adjustments have been made, select
Store and press ≥ to store them. Press Ë
to exit.
Description of the adjustments:
• Brightness: this changes picture brilliance.
• Colour: this changes the intensity of the colour.
• Contrast: this changes the difference
between the light and dark tones.
•
Sharpness: this changes the picture definition.
• Colour Temp.: this changes the colour
rendering:
Cold (bluer), Normal (balanced)
or
Warm (redder).
• Store: to store the picture adjustments and
settings.
& Press MENU, select Sound (>) and press ≥.
The
Sound menu is displayed:
é Use the
<> keys to select a setting and the
≤≥ keys to adjust.
“ Once the adjustments have been made, select
Store and press
≥ to store these changes.
‘ To quit the menus, press
Ë.
Description of the settings:
• Equalizer: to adjust the sound tone (from
bass: 120 Hz to treble: 10 kHz).
• Balance: this balances the sound on the left
and right speakers.
• Delta Volume: this is used to compensate
any volume discrepancies between the
different programs or EXT sockets.This
setting is available for programs 0 to 40 and
the EXT sockets.
• AVL (Automatic Volume Leveller): this is
used to limit increases in sound, especially on
program change or advertising slots.
• Dolby Virtual:To activate / deactivate the
surround sound effect.You can also access
these settings with key Q.
• Store: this is used to store the sound settings.
Feature settings
& Press MENU, select Features (>) and
press
≥.You can adjust:
é Contrast +: automatic adjustment of the
picture contrast which permanently sets the
darkest part of the picture to black.
“ NR: attenuates picture noise (snow) in difficult
reception conditions.
‘ Sleep (Only available on certain versions): to
select an automatic standby period.
( PIP: to adjust the size and position of the PIP
screen.
§ To quit the menus, press
Ë.
TV Menu
Picture
Sound
Features
Install
Picture
Brightness
Colour
Contrast
Sharpness
Colour Temp.
Store
39
TV Menu
Picture
Sound
Features
Install
Sound
Equalizer Æ •
Balance Æ •
Delta Volume Æ •
AVL Æ •
Dolby Virtual Æ •
Store Æ •
120 Hz
500 Hz
1500 Hz
5 KHz
10 KHz

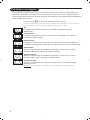
8
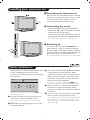
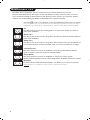
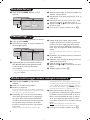
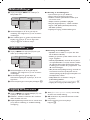
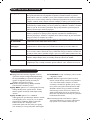
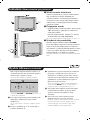
Screen Formats
The pictures you receive may be transmitted in 16:9 format (wide screen) or 4:3 format
(conventional screen). 4:3 pictures sometimes have a black band at the top and bottom of the screen
(letterbox format).This function allows you to optimise the picture display on screen.
Press the
∏
key (or ≤≥) to select the different modes:
This TV set is also equipped with automatic switching which will select the correct-screen
format, provided the specific signals are transmitted with the programmes.
4:3
The picture is reproduced in 4:3 format and a black band is displayed on either side
of the picture.
Movie Expand 14:9
The picture is enlarged to 14:9 format, a thin black band remains on both sides of
the picture.
Movie Expand 16:9
The picture is enlarged to 16:9 format.This mode is recommended when displaying
pictures which have black bands at the top and bottom (letterbox format).
Subtitle Zoom
This mode is used to display 4:3 pictures using the full surface of the screen leaving
the sub-titles visible.
Superzoom
This mode is used to display 4:3 pictures using the full surface of the screen by
enlarging the sides of the picture.
Widescreen
This mode restores the correct proportions of images transmitted in 16:9.
Note:
If you display a 4:3 picture in this mode, it will be enlarged horizontally.

9
Teletext
Press :
You will obtain :
Teletext is an information system broadcast by certain channels which can be consulted like a
newspaper. It also offers access to subtitles for viewers with hearing problems or who are not familiar
with the transmission language (cable networks, satellite channels, etc.).
Teletext call
Selecting a
page
This is used to call or exit teletext mode.The summary
appears with a list of items that can be accessed. Each
item has a corresponding
3 digit page number.
If the channel selected does not broadcast teletext, the
indication 100 will be displayed and the screen will remain
blank (in this case, exit teletext and select another channel).
Enter the number of the page required using the 0 to 9
or P -/+ keys. Example: page 120, enter 120.
The number is displayed top left, the counter turns and
then the page is displayed. Repeat this operation to view
another page.
If the counter continues to search, this means that the page is
not transmitted. Select another number.
Direct access
to the items
Coloured areas are displayed at the bottom of the screen.
The 4 coloured keys are used to access the items or
corresponding pages.
The coloured areas flash when the item or the page is not yet
available.
Contents
This returns you to the contents page (usually page 100).
Stop
sub-page
acquisition
Double page
teletext
Certain pages contain sub-pages which are automatically
displayed successively.This key is used to stop or resume
sub-page acquisition.The indication
_ appears top left.
To activate or deactivate the double page teletext display
mode.The active pa
ge is di
splayed on the left and the
following page is displayed on the right. Press
Ó
if you want
to hold a page (i.e. the contents page).The active page is then
displayed on the right.To return to normal mode, press
Å
.
Hidden
information
Enlarge a
page
Favourite
pages
To display or hide the concealed information (games
solutions).
This allows you to display the top or bottom part of the
page and then return to normal size.
Instead of the standard coloured areas displayed at the bottom of
the screen, you can store 4 favourite pages on the first
40 channels which can then be accessed using the coloured keys
(red, green, yellow, blue). Once set, these favourite pages will
become the default every time teletext is selected.
& Press the MENU key to change to favourite pages mode.
é Display the teletext page that you want to store.
“ Press the coloured key of your choice for 3 seconds.The
page is now stored.
‘ Repeat the operation with the other coloured keys.
( Now when you consult teletext, your favourite pages will
appear in colour at the bottom of the screen.To
temporarily retrieve the standard items, press MENU.
To clear everything, and return the standard items as the
default, press
Ë for 5 seconds.

10
Using in PC monitor mode
PC Mode
Your TV can be used as a computer monitor.
The PIP function lets you display a
superimposed image to watch the TV channels
at the same time.
The PIP function only works if your PC has a digital
output.
You must first of all connect the computer and
adjust the resolution (see p.13).
Choosing PC mode
& Press the
AV key on the remote control to
display the
Source List.
é Use the cursor </> key to select
PC and
then press the cursor ≥ key to switch the TV
to PC mode (
DVI In).
To return to TV mode, press the AV key, select
TV and validate with ≥ key.
Using PIP
While in PC mode you can call up a window
for TV channels.
Attention
: the PIP feature is only available if a
computer is connected to the DVI In (see p. 13).
& Press the
œ key to display the PIP screen.
The television image is reproduced in a small
superimposed window.
é Subsequent presses of the
œ key changes
the size of the window, switches to dual
screen and turns PIP off.
“ Use the
P –/+ keys to change the programmes
of the PIP screen.
Using the PC menus
Press the
MENU key to access the specific
settings of the PC monitor mode. Use the
cursor to adjust them (the settings are
automatically saved):
• Picture:
-
Brightness / Contrast : to adjust the
brightness and contrast.
-
Horizontal / Vertical*: to adjust the
horizontal and vertical placing of the image.
-
Adjust Colour: to adjust the colours (cold,
normal or warm).
• Audio Selection: to choose the sound
reproduced on the TV (PC or TV).
• Features:
-
Phase/Clock*: eliminates the horizontal
(
Phase) and vertical (Clock) interfering lines.
-
Format : to choose between full screen or
native format of the PC screens.
-
PIP: to adjust the size and position of the
PIP screen.
-
Auto Adjust*: position is set automatically.
• Reset To Factory Setting: to return to the
factory settings (default settings).
*These adjustments are not available when a
computer is connected to the
DVI In.
NOTE
– When using the LCD TV as a PC monitor, slight diagonal interference lines may be observed when it is
operated under electromagnetic interference environment but will not affect the performance of this product.
– For better performance, good quality VGA cable with good noise isolation filter is recommended.

11
Using in HD (High Definition) Mode
HD Mode
The HD (High Definition) mode allows you to
enjoy clearer and sharper pictures through the
DVI inputs if you are using a HD
receiver/ equipment that can transmit high
definition programming.
You must first of all connect the HD equipment
(see p.13).
Choosing HD mode
& Press the
AV key on the remote control to
display the
Source List.
é Use the cursor </> key to select
HD and
then press the cursor key to switch the TV to
HD mode.
To return to TV mode, press the
AV key, select
TV and validate with ≥ key.
Using the HD menus
Press the
MENU key to access the specific
settings of the HD mode. Use the cursor to
adjust them (the settings are automatically
saved):
Picture:
• Brightness: this changes picture brilliance.
• Colour: this changes the intensity of the
colour.
• Contrast: this changes the difference
between the light and dark tones.
•
Sharpness: this changes the picture definition.
• Colour Temp.: this changes the colour
rendering:
Cold (bluer), Normal (balanced)
or
Warm (redder).
• Store: to store the picture adjustments and
settings.
Sound:
• Equalizer: to adjust the sound tone (from
bass: 120 Hz to treble: 10 kHz).
• Balance: this balances the sound on the left
and right speakers.
• Delta Volume: this is used to compensate
any volume discrepancies between the
different programs or EXT sockets.This
setting is available for programs 0 to 40 and
the EXT sockets.
• AVL (Automatic Volume Leveller): this is
used to limit increases in sound, especially on
program change or advertising slots.
• Dolby Virtual:To activate / deactivate the
surround sound effect.You can also access
these settings with key Q.
• Store: this is used to store the sound
settings.
Features:
• S
leep (Only available on certain versions): to
select an automatic standby period.
•
PIP: to adjust the size and position of the
PIP screen.
• Horizontal Shift: to adjust the horizontal
placing of the image.

12
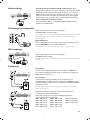
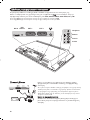
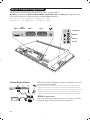
Connecting peripheral equipment
Carry out the connections shown opposite, using a good quality
euroconnector cable.
If your video recorder does not have a euroconnector socket, the only
connection possible is via the aerial cable.You will therefore need to
tune in your video recorder's test signal and assign it programme
number 0 (refer to manual store, p. 6).
To reproduce the video recorder picture, press
0 key.
Video recorder with decoder
Connect the decoder to the second euroconnector socket of
the video recorder.You will then be able to record scrambled
transmissions.
The television has 2 external sockets situated at the back of the set (EXT1 and EXT2) and sockets on
the side. Press the
AV key on the remote control to display Source List and select TV or peripheral
equipment connected to
EXT1, EXT2/SVHS2, AV/SVHS3, PC or HD.
The EXT1 socket has audio, CVBS/RGB inputs and audio, CVBS outputs.
The EXT2 socket has audio, CVBS/S-VHS inputs and audio, CVBS outputs.
The side connections has audio inputs, CVBS/S-VHS inputs, headphone out.
Video recorder
DVI In
DVI
Audio In
EXT 2 EXT 1
Headphon
e
Audio In
Video In
S-Video

13
Satellite receiver, decoder, CDV, games, etc.
Carry out the connections shown opposite.
To optimise picture quality, connect the equipment which
produces the RGB signals (digital decoder, games, etc.) to EXT1,
and the equipment which produces the S-VHS signals (S-VHS and
Hi-8 video recorders, certain DVD drives) to EXT2 and all other
equipment to either EXT1 or EXT2.
To select connected equipment
Press the
AV key to select EXT1, EXT2/S-VHS2 (S-VHS signals
from the EXT2 socket).
Make the connections as shown opposite.
With the
AV key, select AV/S-VHS3.
For a mono set, connect the sound signal to the AUDIO L (or AUDIO R)
input.The sound automatically comes out of the left and right speakers
of the set.
Headphones
When headphones are connected, the sound on the TV set will be
cut.The
VOLUME -/+
keys are used to adjust the volume level.
The headphone impedance must be between 32 and 600 Ohms.
Make the connections as shown opposite.
With the
AV key, select HD.
For more information on using HD mode see page 11.
Other equipment
Side connections
HD equipment
Computer
PC with DVI
Connect the monitor output (DVI) of your computer to the
DVI-I In of the LCD TV. Connect the sound output Audio out of
the computer to the input DVI Audio in of the LCD TV.
PC with VGA
Connect the monitor output (VGA) of your computer via a
VGA/DVI adaptor to the DVI In of the TV. Connect the sound
output Audio out of the computer to the input DVI Audio in of
the LCD TV.
For more information on using PC mode see page 10.
Configure the computer on 1024 x 768, 60 Hz for
optimum resolution.
Here is the list of the different display resolutions available on
your TV:
640 x 480, 60 Hz 800 x 600, 56 Hz 1024 x 768, 60 Hz
640 x 480, 67 Hz 800 x 600, 60 Hz 1024 x 768, 70 Hz
640 x 480, 72 Hz 800 x 600, 72 Hz 1024 x 768, 75 Hz
640 x 480, 75 Hz 800 x 600, 75 Hz
720 x 400, 70 Hz 832 x 624, 75 Hz

14
Glossary
DVI (Digital Visual Interface):A digital interface
standard created by the Digital Display
Working Group (DDWG) to convert analog
signals into digital signals to accommodate
both analog and digital monitors.
VGA (Video Graphics Array): a common standard
graphics display system for PCs.
RGB signals : These are the three video signals,
Red Green Blue, which make up the picture.
Using these signals improves picture quality.
S-VHS Signals: These are 2 separate Y/C video
signals from the S-VHS and Hi-8 recording
standards.The luminance signals Y (black and
white) and chrominance signals C (colour) are
recorded separately on the tape.This provides
better picture quality than with standard video
(VHS and 8 mm) where the Y/C signals are
combined to provide only one video signal.
NICAM sound: Process by which digital sound
can be transmitted.
System: Television pictures are not broadcast in
the same way in all countries.There are
different standards: BG, DK, I, and L L’.The
System setting (p. 6) is used to select these
different standards.This is not to be confused
with PAL or SECAM colour coding. Pal is used
in most countries in Europe, Secam in France,
Russia and most African countries.The United
States and Japan use a different system called
NTSC.The inputs EXT1 and EXT2 are used to
read NTSC coded recordings.
16:9: Refers to the ration between the length
and height of the screen.Wide screen
televisions have a ration of 16/9, conventional
screen TV sets have a ration of 4/3.
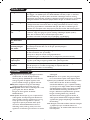
Tips
Poor reception
No picture
No sound
PC and PIP modes
don’t work ?
Remote control
Standby
Cleaning the set
Still no results?
The proximity of mountains or high buildings may be responsible for ghost
pictures, echoing or shadows. In this case, try manually adjusting your picture: see
Fine Tune (p. 6) or modify the orientation of the outside aerial. If you are using an
indoor aerial, reception may be difficult in certain conditions.You can improve
reception by rotating the aerial. If the reception remains poor, you will need to
use an external aerial
Have you connected the aerial socket properly? Have you chosen the right
system? (p. 6). Poorly connected euroconnector cables or aerial sockets are often
the cause of picture or sound problems (sometimes the connectors can become
half disconnected if the TV set is moved or turned). Check all connections.
If on certain channels you receive a picture but no sound,this means that you do not have
the correct TV system.Modify the
System
setting (p. 6).
The amplifier connected to the TV does not deliver any sound? Check that you
have not confused the audio output with the audio input.
Check that you have configured the computer on a compatible display resolution
(see p. 10).
The TV set does not react to the remote control; the indicator on the set no
longer flashes when you use the remote control? Replace the battery.
If the set receives no signal for 15 mins, it automatically goes into standby mode.
To save power, your set is fitted with components that give it a very low power
consumption when in standby mode (less than 1 W).
Only use a clean, soft and lint-free cloth to clean the screen and the casing of your
set. Do not use alcohol-based or solvent-based products.
Disconnect the mains plug of the TV for 30 seconds then reconnect it.
If your TV set breaks down, never attempt to repair it yourself: contact your
dealer's after-sales service.
Page is loading ...
Page is loading ...
Page is loading ...
Page is loading ...
Page is loading ...
Page is loading ...
Page is loading ...
Page is loading ...
Page is loading ...
Page is loading ...
Page is loading ...
Page is loading ...
Page is loading ...
Page is loading ...
Page is loading ...
Page is loading ...
Page is loading ...
Page is loading ...
Page is loading ...
Page is loading ...
Page is loading ...
Page is loading ...
Page is loading ...
Page is loading ...
Page is loading ...
Page is loading ...
Page is loading ...
Page is loading ...
Page is loading ...
Page is loading ...
Page is loading ...
Page is loading ...
Page is loading ...
Page is loading ...
Page is loading ...
Page is loading ...
Page is loading ...
Page is loading ...
Page is loading ...
Page is loading ...
Page is loading ...
Page is loading ...
Page is loading ...
Page is loading ...
Page is loading ...
Page is loading ...
Page is loading ...
Page is loading ...
Page is loading ...
Page is loading ...
Page is loading ...
Page is loading ...
Page is loading ...
Page is loading ...
Page is loading ...
Page is loading ...
Page is loading ...
Page is loading ...
Page is loading ...
Page is loading ...
Page is loading ...
Page is loading ...
Page is loading ...
Page is loading ...
Page is loading ...
Page is loading ...
Page is loading ...
Page is loading ...
Page is loading ...
Page is loading ...
Page is loading ...
Page is loading ...
Page is loading ...
Page is loading ...
Page is loading ...
Page is loading ...
Page is loading ...
Page is loading ...
Page is loading ...
Page is loading ...
Page is loading ...
Page is loading ...
Page is loading ...
Page is loading ...
Page is loading ...
Page is loading ...
Page is loading ...
Page is loading ...
Page is loading ...
Page is loading ...
Page is loading ...
Page is loading ...
Page is loading ...
Page is loading ...
Page is loading ...
Page is loading ...
Page is loading ...
Page is loading ...
Page is loading ...
Page is loading ...
Page is loading ...
Page is loading ...
Page is loading ...
Page is loading ...
Page is loading ...
Page is loading ...
Page is loading ...
Page is loading ...
Page is loading ...
Page is loading ...
Page is loading ...
Page is loading ...

чÌÌ˚Â Ó ÔÓËÁ‚‰ÂÌÌÓÏ ÂÏÓÌÚÂ:
чڇ ÔÓÒÚÛÔÎÂÌËfl ‚ ÂÏÓÌÚ: _________________________
чڇ ÓÍÓ̘‡ÌËfl ÂÏÓÌÚ‡:____________________________
‹ Í‚Ëڇ̈ËË:______________________________________
Çˉ ÌÂËÒÔ‡‚ÌÓÒÚË:_________________________________
__________________________________________________
èÓ‰ÔËÒ¸
òÚ‡ÏÔ Ò‚ËÒ-ˆÂÌÚ‡
чڇ ÔÓÒÚÛÔÎÂÌËfl ‚ ÂÏÓÌÚ: _________________________
чڇ ÓÍÓ̘‡ÌËfl ÂÏÓÌÚ‡:____________________________
‹ Í‚Ëڇ̈ËË:______________________________________
Çˉ ÌÂËÒÔ‡‚ÌÓÒÚË:_________________________________
__________________________________________________
èÓ‰ÔËÒ¸
òÚ‡ÏÔ Ò‚ËÒ-ˆÂÌÚ‡
‹ Ú‡ÎÓ̇ (Card #)
êéëëàü
ÅõíéÇÄü ùãÖäíêéçàäÄ
ÉÄêÄçíàâçõâ íÄãéç
(warranty card)
àáÑÖãàÖ (item)
åéÑÖãú (type/version) ___________/ ________________
ëÖêàâçõâ ‹ (serial #) _____________________________
ÑÄíÄ èêéÑÄÜà (date of purchase) ___________________
îàêåÄ-èêéÑÄÇÖñ (seller) __________________________
èéÑèàëú èêéÑÄÇñÄ (seller’s signature)_______________
èÖóÄíú èêéÑÄÇñÄ (seller’s stamp) ___________________
ç‡ÒÚÓfl˘ËÈ Ú‡ÎÓÌ ‰ÂÈÒÚ‚ËÚÂÎÂÌ ÚÓθÍÓ ÔË Ì‡Î˘ËË
Ô˜‡ÚË Ë Á‡ÔÓÎÌÂÌËfl ‚ÒÂı Ô˂‰ÂÌÌ˚ı ‚˚¯Â „‡Ù.
(This card is only valid when all information is filled in
and the stamp is present.)
èéäìèÄíÖãú (buyer) _______________________________
ÄÑêÖë (address) ___________________________________
íÖãÖîéç (telephone) _______________________________
Page is loading ...
Page is loading ...
Page is loading ...

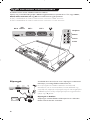
3
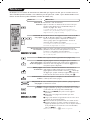
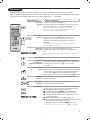
ä·‚Ë¯Ë ÔÛθڇ ‰ËÒڇ̈ËÓÌÌÓ„Ó ÛÔ‡‚ÎÂÌËfl
1) . ÑÂÊÛÌÓ ÒÓÒÚÓflÌËÂ
èÓÁ‚ÓÎflÂÚ Ô‚ÂÒÚË ÚÂ΂ËÁÓ ‚ ‰ÂÊÛÌÓÂ
ÒÓÒÚÓflÌËÂ. ÑÎfl ‚Íβ˜ÂÌËfl ÚÂ΂ËÁÓ‡ ̇ʇڸ ̇
Í·‚Ë¯Û P –/+, 0/9 ËÎË AV.
2) x îÛÌ͈Ëfl Pixel + (‚ Á‡‚ËÒËÏÓÒÚË oÚ ‚ÂÒËË)
ÑÎfl ‚Íβ˜ÂÌËfl / ‚˚Íβ˜ÂÌËfl ‰ÂÏÓÌÒÚ‡ˆËÓÌÌÓ„Ó
ÂÊËχ Ó·‡·ÓÚÍË Pixel +.
3) · ¢ Ê Æ ∫
ÇˉÂÓχ„ÌËÚÓÙÓÌ (ÒÚ.14)
4) Q éÍÛʇ˛˘ËÈ Ó·˙ÂÏÌ˚È Á‚ÛÍ
ÑÎfl ‚Íβ˜ÂÌËfl / ÓÚÍβ˜ÂÌËfl ˝ÙÙÂÍÚ‡ ÓÍÛʇ˛˘Â„Ó
Ó·˙ÂÏÌÓ„Ó Á‚Û˜‡ÌËfl. Ç ÒÚÂÂÓÙÓÌ˘ÂÒÍÓÏ ÂÊËÏÂ
ÒÓÁ‰‡ÂÚÒfl ‚Ô˜‡ÚÎÂÌËÂ, ˜ÚÓ „ÓÏÍÓ„Ó‚ÓËÚÂÎË
‡ÒÔÓÎÓÊÂÌ˚ ‰Û„ ÓÚ ‰Û„‡ ̇ ·Óθ¯Ëı ‡ÒÒÚÓflÌËflı
˜ÂÏ Ì‡ Ò‡ÏÓÏ ‰ÂÎÂ. Ç ÏÓ‰ÂÎflı, Ëϲ˘Ëı ÙÛÌÍˆË˛
Virtual Dolby Surround *, ÒÓÁ‰‡ÂÚÒfl ˝ÙÙÂÍÚ Ú˚ÎÓ‚˚ı
„ÓÏÍÓ„Ó‚ÓËÚÂÎÂÈ ÒËÒÚÂÏ˚ Dolby Surround Pro Logic.
5) AV
ÑÎfl ‚˚‚Ó‰‡ ÒÔËÒ͇ ËÒÚÓ˜ÌËÍÓ‚ àÒÚÓ˜ÌËÍ ‰Îfl ‚˚·Ó‡
TB ËÎË ÔÂËÙÂËÈÌÓ„Ó Ó·ÓÛ‰Ó‚‡ÌËfl, ÔÓ‰Íβ˜ÂÌÌÓ„Ó
Í ‚ıÓ‰‡Ï EXT1, EXT2/S-VHS2, AV/S-VHS3, PC ËÎË HD
(ÒÏ. ÒÚ. 12).
6) h AÍÚË‚Ìo yÔpa‚ÎÂÌËÂ
OÔÚËÏË˝ËpyÂÚ
Ía˜ÂcÚ‚o Ë˝o·paÊÂÌËfl ‚
˝a‚ËcËÏocÚË oÚ Ía˜ÂcÚ‚a ÔpËfiÏa Ë cocÚoflÌËfl
oÍpyÊa˛˘Â„o oc‚¢ÂÌËfl.
7) åÂÌ˛
ÑÎfl ‚˚ÁÓ‚‡ ÏÂÌ˛ ËÎË ‚˚ıÓ‰‡ ËÁ ÏÂÌ˛.
8) äÛÒÓ
(<>≤≥)
ùÚË 4 ÍÌÓÔÍË Ó·ÂÒÔ˜˂‡˛Ú ÔÂÂÏ¢ÂÌË ‚ ÏÂÌ˛.
9) ÉÓÏÍÓÒÚ¸
àÒÔÓθÁÛÂÚÒfl ‰Îfl „ÛÎËÓ‚ÍË ÛÓ‚Ìfl „ÓÏÍÓÒÚË
Á‚Û͇
10) ª m è‰ÛÒÚ‡ÌÓ‚ÍË ËÁÓ·‡ÊÂÌËfl Ë Á‚Û͇
é·ÂÒÔ˜˂‡ÂÚ ‰ÓÒÚÛÔ Í ÌÂÒÍÓθÍËÏ Ô‰‚‡ËÚÂθÌ˚Ï
̇ÒÚÓÈÍ‡Ï ËÁÓ·‡ÊÂÌËfl Ë Á‚ÛÍÓ‚Ó„Ó ÒÓÔÓ‚ÓʉÂÌËfl.
èÛÌÍÚ ÏÂÌ˛ èÂÒÓ̇Î. ÒÓÓÚ‚ÂÚÒÚ‚ÛÂÚ Ì‡ÒÚÓÈ͇Ï,
ÍÓÚÓ˚ ‚˚ÔÓÎÌÂÌ˚ Ò ÔÓÏÓ˘¸˛ ÏÂÌ˛.
11) Ë àÌÙÓχˆËfl ̇ ˝Í‡ÌÂ
ÑÎfl ͇ÚÍÓ‚ÂÏÂÌÌÓ„Ó ‚˚‚Ó‰‡ ̇ ˝Í‡Ì/Ò ˝Í‡Ì‡
ÌÓχ ËÎË ‚ÂÏÂÌË, Á‚ÛÍÓ‚Ó„Ó ÂÊËχ Ë
ÓÚÒÚ‡˛˘Â„ÓÒfl ‚ÂÏÂÌË Ú‡Èχ. ç‡ÊËχڸ ‚ Ú˜ÂÌËÂ
5 ÒÂÍ. ‰Îfl ÔÓÒÚÓflÌÌÓ„Ó ‚˚‚Ó‰‡ ̇ ˝Í‡Ì ÌÓχ
ÔÓ„‡ÏÏ˚.
* àÁ„ÓÚÓ‚ÎÂÌÓ ÔÓ ÎˈÂÌÁËË ÍÓÏÔ‡ÌËË Dolby Laboratories.
“Dolby” Ë ÒËÏ‚ÓÎ ‰‚ÓÈÌÓ„Ó -D - ˝ÚÓ ÚÓ‚‡Ì˚ Á̇ÍË
ÍÓÏÔ‡ÌËË Dolby Laboratories.
1)
2)
3)
4)
5)
6)
7)
8)
9)
10)
11)
Page is loading ...
Page is loading ...
Page is loading ...
Page is loading ...
Page is loading ...
Page is loading ...
Page is loading ...
Page is loading ...
Page is loading ...
Page is loading ...
Page is loading ...
Page is loading ...
Page is loading ...
Page is loading ...
Page is loading ...
Page is loading ...
Page is loading ...
Page is loading ...
Page is loading ...
Page is loading ...
Page is loading ...
Page is loading ...
Page is loading ...
Page is loading ...
Page is loading ...
Page is loading ...
Page is loading ...
Page is loading ...
Page is loading ...
Page is loading ...
Page is loading ...
Page is loading ...
Page is loading ...
Page is loading ...
Page is loading ...
Page is loading ...
Page is loading ...
Page is loading ...
Page is loading ...
Page is loading ...
Page is loading ...

3
∆∆·· ÏÏ‹‹ÎÎÙÙÚÚ·· ÙÙÔÔ˘˘ ÙÙËËÏϯ¯ÂÂÈÈÚÚÈÈÛÛÙÙËËÚÚ››ÔÔ˘˘
1) .
AAÓÓ··ÌÌÔÔÓÓ‹‹
EÈÙÚ¤ÂÈ Ó· ı¤ÛÂÙ ÙË Û˘Û΢‹ Û·˜ Û ı¤ÛË ·Ó·ÌÔÓ‹˜.
°È· Ó· ·ÓÔ›ÍÂÙ ÙËÓ ÙËÏÂfiÚ·ÛË È¤ÛÙ ٷ Ï‹ÎÙÚ· P
–/+,0/9 ‹ AV
2) x Pixel +
(·Ó¿ÏÔÁ· ÌÂ Ù‡Ô)
°È· Ó· ÂÓÂÚÁÔÔ›ËÛÂÙ / ·ÂÓÂÚÁÔÔ›ËÛÂÙ ÙËÓ
‰È·‰Èηۛ· ÏÂÈÙÔ˘ÚÁ›·˜ ›‰ÂÈ͢ Pixel +.
3) · ¢ Ê Æ ∫
™™˘˘ÛÛÎ΢˘‹‹ BB››ÓÓÙÙÂÂÔÔ ((ÛÛÂÂÏÏ.. 1144))
4)
Q
HH¯¯ÔÔ˜˜ ssuurrrroouunndd
°È· ÙËÓ ÂÓÂÚÁÔÔ›ËÛË/·ÂÓÂÚÁÔÔ›ËÛË ÙÔ˘
·ÔÙÂϤÛÌ·ÙÔ˜ ·‡ÍËÛ˘ Ù˘ ¤ÓÙ·Û˘ ÙÔ˘ ‹¯Ô˘. ™Â
stereo, Ù· ˯›· ÂÌÊ·Ó›˙ÔÓÙ·È ÈÔ Ì·ÎÚÈ¿ ÙÔ ¤Ó· ·fi ÙÔ
¿ÏÏÔ. ™ÙȘ ÂΉfiÛÂȘ Ô˘ ‰È·ı¤ÙÔ˘Ó Virtual Dolby
Surround *, ¤¯ÂÙ ٷ ·ÔÙÂϤÛÌ·Ù· ÙÔ˘ ‹¯Ô˘ Dolby
Surround Pro Logic.
55)) AAVV
°È· Ó· ÂÌÊ·ÓÈÔÙ› Ë
¶¶ËËÁÁ‹‹
Î·È Ó· ÂÈϤÍÂÙ TV ‹ fiÔÈ·
ÂÚÈÊÂÚÂȷ΋ Û˘Û΢‹ ¤¯ÂÙÂ Û˘Ó‰¤ÛÂÈ ÛÙ·
EXT1,
EXT2/S-VHS2, AV/S-VHS3, PC
‹ HD (ÛÂÏ. 12).
6) h Active Control
BÂÏÙÈÒÓ› ÙËÓ ÔÈfiÙËÙ· Ù˘ ÂÈÎfiÓ·˜ ·Ó¿ÏÔÁ· Ì ÙËÓ
ÔÈfiÙËÙ· Ï‹„˘ Î·È ÙËÓ Î·Ù¿ÛÙ·ÛË ÙÔu ÂÚÈ‚¿ÏÏÔÓÙÔ˜
ʈÙÈÛÌÔ‡.
7)
ªªÂÂÓÓÔÔ‡‡
°È· ÙËÓ ÂÌÊ¿ÓÈÛË ÙˆÓ ÌÂÓÔ‡ ‹ ÙËÓ ¤ÍÔ‰Ô ·fi ·˘Ù¿.
8)
∫∫¤¤ÚÚÛÛÔÔÚÚ··˜˜
(
<>≤≥)
∞˘Ù¿ Ù· 4 Ï‹ÎÙÚ· ÂÈÙÚ¤Ô˘Ó ÙËÓ ÏÔ‹ÁËÛË ÛÙ·
ÌÂÓÔ‡.
9)
ŒŒÓÓÙÙ··ÛÛËË ‹‹¯¯ÔÔ˘˘
°È· ÙË Ú‡ıÌÈÛË ÙÔ˘ ÂȤ‰Ô˘ ÙÔ˘ ‹¯Ô˘.
10) ª m
¶¶ÚÚÔÔ--ÚÚ˘˘ııÌÌ››ÛÛÂÂÈȘ˜ ÂÂÈÈÎÎfifiÓÓ··˜˜ Îη·ÈÈ ‹‹¯¯ÔÔ˘˘
∂ÈÙÚ¤ÂÈ ÙËÓ ÚfiÛ‚·ÛË Û ̛· ÛÂÈÚ¿ ÚÔ-Ú˘ı̛ۈÓ
ÂÈÎfiÓ·˜ Î·È ‹¯Ô˘.
∏ ı¤ÛË
¶ÚoÛˆÈÎ
·ÓÙÈÛÙÔȯ› ÛÙȘ Ú˘ıÌ›ÛÂȘ Ô˘
Á›ÓÔÓÙ·È Ì¤Û· ÛÙ· ÌÂÓÔ‡.
11) Ë
¶¶ÏÏËËÚÚÔÔÊÊÔÔÚÚ››Â˜˜ ÔÔııfifiÓÓˢ˜// ÛÛÙÙ··ııÂÂÚÚfifi˜˜ ··ÚÚÈÈııÌÌfifi˜˜
°È· Ó· ÂÌÊ·ÓÈÛÙ›/Û‚‹ÛÂÈ Ô ·ÚÈıÌfi˜ ÙÔ˘ ÚÔÁÚ¿ÌÌ·ÙÔ˜,
Ë ÒÚ·, Ë ÏÂÈÙÔ˘ÚÁ›· ‹¯Ô˘ Î·È Ô ¯ÚfiÓÔ˜ Ô˘ ·Ô̤ÓÂÈ
ÛÙÔ ¯ÚÔÓԉȷÎfiÙË. ¶È¤ÛÙ ÁÈ· 5 ‰Â˘ÙÂÚfiÏÂÙ· ÒÛÙÂ
Ó· ÂÓÂÚÁÔÔÈ‹ÛÂÙ ÙË ‰È·Ú΋ ÂÌÊ¿ÓÈÛË ÙÔ˘ ·ÚÈıÌÔ‡
ÛÙËÓ ÔıfiÓË.
* ∫·Ù·Û΢¿˙ÂÙ·È Ì ÙËÓ ¿‰ÂÈ· Ù˘ Dolby
Laboratories.“Dolby” Î·È ÙÔ Û‡Ì‚ÔÏÔ ‰ÈÏfi-D ›ӷÈ
Û‹Ì·Ù· Ù˘ Dolby Laboratories.
1)
2)
3)
4)
5)
6)
7)
8)
9)
10)
11)
Page is loading ...
Page is loading ...
Page is loading ...
Page is loading ...
Page is loading ...
Page is loading ...
Page is loading ...
Page is loading ...
Page is loading ...
Page is loading ...
Page is loading ...
Page is loading ...
Page is loading ...
Page is loading ...
Page is loading ...
Page is loading ...
Page is loading ...
Page is loading ...
Page is loading ...
Page is loading ...
Page is loading ...
Page is loading ...
Page is loading ...
Page is loading ...
Page is loading ...
Page is loading ...
Page is loading ...
Page is loading ...
Page is loading ...
Page is loading ...
Page is loading ...
Page is loading ...
Page is loading ...
Page is loading ...
Page is loading ...
Page is loading ...
Page is loading ...
Page is loading ...
Page is loading ...
Page is loading ...
Page is loading ...
Page is loading ...
Page is loading ...
Page is loading ...
Page is loading ...
Page is loading ...
Page is loading ...
Page is loading ...
Page is loading ...
Page is loading ...
Page is loading ...
Page is loading ...
Page is loading ...
Page is loading ...
Page is loading ...
Page is loading ...
Page is loading ...
Page is loading ...
Page is loading ...
Page is loading ...
Page is loading ...
Page is loading ...
Page is loading ...
Page is loading ...
Page is loading ...
Page is loading ...
Page is loading ...
Page is loading ...
Page is loading ...
Page is loading ...
Page is loading ...
Page is loading ...
Page is loading ...
Page is loading ...
Page is loading ...
Page is loading ...
Page is loading ...
Page is loading ...
Page is loading ...
Page is loading ...
Page is loading ...
-
 1
1
-
 2
2
-
 3
3
-
 4
4
-
 5
5
-
 6
6
-
 7
7
-
 8
8
-
 9
9
-
 10
10
-
 11
11
-
 12
12
-
 13
13
-
 14
14
-
 15
15
-
 16
16
-
 17
17
-
 18
18
-
 19
19
-
 20
20
-
 21
21
-
 22
22
-
 23
23
-
 24
24
-
 25
25
-
 26
26
-
 27
27
-
 28
28
-
 29
29
-
 30
30
-
 31
31
-
 32
32
-
 33
33
-
 34
34
-
 35
35
-
 36
36
-
 37
37
-
 38
38
-
 39
39
-
 40
40
-
 41
41
-
 42
42
-
 43
43
-
 44
44
-
 45
45
-
 46
46
-
 47
47
-
 48
48
-
 49
49
-
 50
50
-
 51
51
-
 52
52
-
 53
53
-
 54
54
-
 55
55
-
 56
56
-
 57
57
-
 58
58
-
 59
59
-
 60
60
-
 61
61
-
 62
62
-
 63
63
-
 64
64
-
 65
65
-
 66
66
-
 67
67
-
 68
68
-
 69
69
-
 70
70
-
 71
71
-
 72
72
-
 73
73
-
 74
74
-
 75
75
-
 76
76
-
 77
77
-
 78
78
-
 79
79
-
 80
80
-
 81
81
-
 82
82
-
 83
83
-
 84
84
-
 85
85
-
 86
86
-
 87
87
-
 88
88
-
 89
89
-
 90
90
-
 91
91
-
 92
92
-
 93
93
-
 94
94
-
 95
95
-
 96
96
-
 97
97
-
 98
98
-
 99
99
-
 100
100
-
 101
101
-
 102
102
-
 103
103
-
 104
104
-
 105
105
-
 106
106
-
 107
107
-
 108
108
-
 109
109
-
 110
110
-
 111
111
-
 112
112
-
 113
113
-
 114
114
-
 115
115
-
 116
116
-
 117
117
-
 118
118
-
 119
119
-
 120
120
-
 121
121
-
 122
122
-
 123
123
-
 124
124
-
 125
125
-
 126
126
-
 127
127
-
 128
128
-
 129
129
-
 130
130
-
 131
131
-
 132
132
-
 133
133
-
 134
134
-
 135
135
-
 136
136
-
 137
137
-
 138
138
-
 139
139
-
 140
140
-
 141
141
-
 142
142
-
 143
143
-
 144
144
-
 145
145
-
 146
146
-
 147
147
-
 148
148
-
 149
149
-
 150
150
-
 151
151
-
 152
152
-
 153
153
-
 154
154
-
 155
155
-
 156
156
-
 157
157
-
 158
158
-
 159
159
-
 160
160
-
 161
161
-
 162
162
-
 163
163
-
 164
164
-
 165
165
-
 166
166
-
 167
167
-
 168
168
-
 169
169
-
 170
170
-
 171
171
-
 172
172
-
 173
173
-
 174
174
-
 175
175
-
 176
176
-
 177
177
-
 178
178
-
 179
179
-
 180
180
-
 181
181
-
 182
182
-
 183
183
-
 184
184
-
 185
185
-
 186
186
-
 187
187
-
 188
188
-
 189
189
-
 190
190
-
 191
191
-
 192
192
-
 193
193
-
 194
194
-
 195
195
-
 196
196
-
 197
197
-
 198
198
-
 199
199
-
 200
200
-
 201
201
-
 202
202
-
 203
203
-
 204
204
-
 205
205
-
 206
206
-
 207
207
-
 208
208
-
 209
209
-
 210
210
-
 211
211
-
 212
212
-
 213
213
-
 214
214
-
 215
215
-
 216
216
-
 217
217
-
 218
218
-
 219
219
-
 220
220
-
 221
221
-
 222
222
-
 223
223
-
 224
224
-
 225
225
-
 226
226
-
 227
227
-
 228
228
-
 229
229
-
 230
230
-
 231
231
-
 232
232
-
 233
233
-
 234
234
-
 235
235
-
 236
236
-
 237
237
-
 238
238
-
 239
239
-
 240
240
-
 241
241
-
 242
242
-
 243
243
-
 244
244
-
 245
245
-
 246
246
-
 247
247
-
 248
248
-
 249
249
-
 250
250
-
 251
251
-
 252
252
-
 253
253
-
 254
254
-
 255
255
-
 256
256


Ask a question and I''ll find the answer in the document
Finding information in a document is now easier with AI
in other languages
- italiano: Philips 32 pf 5320 Manuale utente
- français: Philips 32 pf 5320 Manuel utilisateur
- español: Philips 32 pf 5320 Manual de usuario
- Deutsch: Philips 32 pf 5320 Benutzerhandbuch
- Nederlands: Philips 32 pf 5320 Handleiding
- português: Philips 32 pf 5320 Manual do usuário
- slovenčina: Philips 32 pf 5320 Používateľská príručka
- dansk: Philips 32 pf 5320 Brugermanual
- polski: Philips 32 pf 5320 Instrukcja obsługi
- čeština: Philips 32 pf 5320 Uživatelský manuál
- Türkçe: Philips 32 pf 5320 Kullanım kılavuzu
- svenska: Philips 32 pf 5320 Användarmanual
- suomi: Philips 32 pf 5320 Ohjekirja