Page is loading ...

HDSD9545DLY-PRO
Profanity Bypass Delay System
Instruction Manual
© Copyright 2004 - 2011
EVERTZ MICROSYSTEMS LTD.
5292 John Lucas Drive,
Burlington, Ontario,
Canada,
L7L 5Z9
Phone: 905-335-3700
Sales Fax: 905-335-3573
Service Fax: 905-335-7571
Internet: Sales: [email protected]
Tech Support: [email protected]om
Web Page: http://www.evertz.com
Version 1.3.7, February 2011
The material contained in this manual consists of information that is the property of Evertz Microsystems and is intended solely for
the use of purchasers of the Profanity Bypass Delay System. Evertz Microsystems expressly prohibits the use of this manual for
any purpose other than the operation of these units.
All rights reserved. No part of this publication may be reproduced without the express written permission of Evertz Microsystems
Ltd. Copies of this guide can be ordered from your Evertz products dealer or from Evertz Microsystems.


IMPORTANT SAFETY INSTRUCTIONS
The lightning flash with arrowhead symbol within an equilateral triangle is
intended to alert the user to the presence of uninsulated “Dangerous voltage”
within the product’s enclosure that may be of sufficient magnitude to constitute a
risk of electric shock to persons.
The exclamation point within an equilateral triangle is intended to alert the user
to the presence of important operating and maintenance (Servicing) instructions
in the literature ac-companying the product.
• Read this information
• Keep these instructions.
• Heed all warnings.
• Follow all instructions.
• Do not use this apparatus near water
• Clean only with dry cloth.
• Do not block any ventilation openings. Install in accordance with the manufacturer’s instructions.
• Do not install near any heat sources such as radiators, heat registers, stoves, or other apparatus
(including amplifiers) that produce heat.
• Do not defeat the safety purpose of the polarized or grounding type plug. A polarized plug has two
blades with one wider than other. A grounding type plug has two blades and a third grounding
prong. The wide blade or the third prong are provided for your safety. If the provided plug does
not fit into your outlet, consult an electrician for replacement of the obsolete outlet.
• Protect the power cord from being walked on or pinched particularly at plugs, convenience
receptacles and the point where they exit from the apparatus.
• Only use attachments/accessories specified by the manufacturer
• Unplug this apparatus during lightning storms or when unused for long periods of time.
• Refer all servicing to qualified service personnel. Servicing is required when the apparatus has
been damaged in any way, such as power-supply cord or plug is damaged, liquid has been spilled
or objects have fallen into the apparatus, the apparatus has been exposed to rain or moisture,
does not operate normally, or has been dropped.
WARNING
TO REDUCE THE RISK OF FIRE OR ELECTRIC – SHOCK, DO NOT EXPOSE THIS APPARATUS
TO RAIN OR MOISTURE.
WARNING
DO NOT EXPOSE THIS EQUIPMENT TO DRIPPING OR SPLASHING AND ENSURE THAT NO
OBJECTS FILLED WITH LIQUIDS ARE PLACED ON THE EQUIPMENT.
WARNING
TO COMPLETELY DISCONNECT THIS EQUIPMENT FROM THE AC MAINS, DISCONNECT THE
POWER SUPPLY CORD PLUG FROM THE AC RECEPTACLE.
WARNING
THE MAINS PLUG OF THE POWER SUPPLY CORD SHALL REMAIN READILY OPERABLE.

INFORMATION TO USERS IN EUROPE
NOTE
This equipment with the CE marking complies with bother the EMC Directive (89/336/EEC) and the Low
Voltage Directive (73/23/EEC) issued by the Commission of the European Community.
Compliance with these directives implies conformity to the following European standards:
• EN60065 Product Safety
• EN55103-1 Electromagnetic Interference Class A (Emission)
• EN55103-2 Electromagnetic Susceptibility (Immunity)
This equipment has been tested and found to comply with the limits for a Class A digital device, pursuant
to the European Union EMC directive. These limits are designed to provide reasonable protection against
harmful interference when the equipment is operated in a commercial environment. This equipment
generates, uses, and can radiate radio frequency energy and, if not installed and used in accordance with
the instruction manual, may cause harmful interference to radio communications. Operation of this
equipment in a residential area is likely to cause harmful interference in which case the user will be
required to correct the interference at his own expense.
INFORMATION TO USERS IN THE U.S.A.
NOTE
FCC CLASS A DIGITAL DEVICE OR PERIPHERAL
This equipment has been tested and found to comply with the limits for a Class A digital device, pursuant
to Part 15 of the FCC Rules. These limits are designed to provide reasonable protection against harmful
interference when the equipment is operated in a commercial environment. This equipment generates,
uses, and can radiate radio frequency energy and, if not installed and used in accordance with the
instruction manual, may cause harmful interference to radio communications. Operation of this equipment
in a residential area is likely to cause harmful interference in which case the user will be required to correct
the interference at his own expense.
WARNING
Changes or Modifications not expressly approved by Evertz Microsystems Ltd. could void the user’s
authority to operate the equipment.
Use of unshielded plugs or cables may cause radiation interference. Properly shielded interface cables
with the shield connected to the chassis ground of the device must be used

HDSD9545DLY - PRO Profanity Bypass Delay Manual
REVISION HISTORY Revision 1.3.7
REVISION HISTORY
REVISION DESCRIPTION DATE
0.1 Quick Reference Guide Aug 2004
0.2 Preliminary Manual Oct 2004
0.3 Updated Transition Menu item, remove Remote Panel section Nov 2004
0.4 Updated Front & Rear panel drawings, and sections relating to Video out D & E Nov 2004
1.0 First Release - updated FTP Firmware Update, Dec 2004
Remove sections related to DARS reference, remove GPIO Setup Menu items
1.1 Updated Block Diagram, Jan 2005
Add PGM BLURR and SAFE BLURR menu items
1.2 Added block diagrams for HD40 option Mar 2005
1.3 Corrected block diagram, added support for 50 Hz standards, Aug 2005
Updated Transition list to match existing software, other typos fixed.
1.3.1 Updated specs Jan 2006
1.3.2 Removed all references to the rack mount Remote Panel. Feb 2007
1.3.3 Added React. Time BYP menu item Jun 2007
1.3.4 Added ‘blank video sw’ and ‘h blank video sw’ controls to section 3.8.2. Aug 2007
1.3.5 Updated electrical specifications Apr 2010
1.3.6 Updated information in Saving the Configuration to a User Preset section Sept 2010
1.3.7 Added note regarding on-air path to overview section Feb 2011
Information contained in this manual is believed to be accurate and reliable. However, Evertz assumes no responsibility for the use thereof nor for
the rights of third parties, which may be affected in any way by the use thereof. Any representations in this document concerning performance of
Evertz products are for informational use only and are not warranties of future performance, either expressed or implied. The only warranty offered
by Evertz in relation to this product is the Evertz standard limited warranty, stated in the sales contract or order confirmation form.
Although every attempt has been made to accurately describe the features, installation and operation of this product in this manual, no warranty is
granted nor liability assumed in relation to any errors or omissions unless specifically undertaken in the Evertz sales contract or order confirmation.
Information contained in this manual is periodically updated and changes will be incorporated into subsequent editions. If you encounter an error,
please notify Evertz Customer Service department. Evertz reserves the right, without notice or liability, to make changes in equipment design or
specifications.

HDSD9545DLY - PRO Profanity Bypass Delay Manual
Revision 1.3.7 REVISION HISTORY
This page left intentionally blank

HDSD9545DLY - PRO Profanity Bypass Delay Manual
CONTENTS Revision 1.3.7 i
TABLE OF CONTENTS
IMPORTANT SAFETY INSTRUCTIONS..................................................................................................1-3
1. OVERVIEW ...................................................................................................................................... 1-1
1.1. HOW TO USE THIS MANUAL................................................................................................1-3
1.2. GLOSSARY............................................................................................................................. 1-3
2. INSTALLATION................................................................................................................................ 2-1
2.1. REAR PANEL OVERVIEW ..................................................................................................... 2-1
2.1.1. Digital Video Connections............................................................................................2-1
2.1.2. Reference Video Connections......................................................................................2-2
2.1.3. AES AUDIO Connections............................................................................................. 2-2
2.1.4. Ethernet Network Connections.....................................................................................2-2
2.1.5. Serial I/O and GPI/O Connections ............................................................................... 2-3
2.1.6. Power Connections...................................................................................................... 2-4
2.2. MOUNTING ............................................................................................................................. 2-4
2.3. POWER REQUIREMENTS...................................................................................................... 2-4
2.4. CONNECTING THE VIDEO..................................................................................................... 2-5
2.4.1. Video Inputs .................................................................................................................2-5
2.4.2. Video Outputs ..............................................................................................................2-5
2.4.3. Video Timing Reference............................................................................................... 2-6
2.5. CONNECTING THE AUDIO.................................................................................................... 2-6
2.5.1. Connecting Program (‘Live’) Audio...............................................................................2-6
2.5.2. Connecting Backup (‘Safe’) Audio................................................................................ 2-6
2.5.3. Connecting the Audio Outputs..................................................................................... 2-6
2.6. CONNECTING TO AN ETHERNET NETWORK..................................................................... 2-7
2.7. CONNECTING THE GENERAL PURPOSE INPUTS AND OUTPUTS .................................. 2-8
2.7.1. Connecting the General Purpose Inputs......................................................................2-8
2.7.2. Connecting the General Purpose Outputs................................................................. 2-10
3. OPERATION..................................................................................................................................... 3-1
3.1. OVERVIEW OF THE FRONT PANEL DISPLAY AND CONTROLS ...................................... 3-1
3.1.1. Trigger Key Group........................................................................................................3-1
3.1.2. Preset Key Group.........................................................................................................3-2
3.1.3. Setup Key Group..........................................................................................................3-2
3.1.4. Front Panel Display Messages.....................................................................................3-2
3.2. OVERVIEW OF OPERATION ................................................................................................. 3-3
3.3. FRONT PANEL SETUP MENU............................................................................................... 3-4
3.4. NAVIGATING THE SETUP MENU.......................................................................................... 3-5
3.5. SETUP MENU – TOP LEVEL MENU...................................................................................... 3-5
3.6. CONFIGURING THE VIDEO AND AUDIO OUTPUTS............................................................ 3-6
3.6.1. Configuring the Video Outputs.....................................................................................3-7
3.6.2. Configuring the Audio Outputs.....................................................................................3-7

HDSD9545DLY - PRO Profanity Bypass Delay Manual
ii Revision 1.3.7 CONTENTS
3.7. CONFIGURING THE ON SCREEN DISPLAY ........................................................................3-7
3.7.1. Enabling the On Screen Displays.................................................................................3-8
3.8. CONFIGURING THE TRANSITION ACTIONS ....................................................................... 3-8
3.8.1. Setting the Active State of the GPI Inputs....................................................................3-8
3.8.2. Setting the Functions of the GPI Input, GPO Outputs and Trigger Buttons .................3-8
3.9. CONFIGURING THE TRANSITION TIMING.........................................................................3-11
3.9.1. Setting the Operator Reaction Time...........................................................................3-11
3.9.2. Setting the Reaction Time Bypass.............................................................................3-11
3.9.3. Setting the Merge Time..............................................................................................3-11
3.9.4. Setting the Video Delay Time.....................................................................................3-12
3.9.4.1. Setting the Program Video Delay Time .......................................................3-12
3.9.4.2. Setting the Safe Video Delay Time..............................................................3-12
3.9.5. Setting the Program Audio Delay Time......................................................................3-12
3.9.6. Setting the Safe Audio Delay Time ............................................................................3-12
3.10. CONFIGURING THE VIDEO................................................................................................. 3-13
3.10.1. Setting the Video Standard ........................................................................................ 3-13
3.10.2. Setting up the Video Reference ................................................................................. 3-14
3.10.3. Setting Up the Video Output Timing...........................................................................3-14
3.10.3.1. Setting the Vertical Phase of the Output Video...........................................3-14
3.10.3.2. Setting the Horizontal Phase of the Output Video.......................................3-15
3.10.4. Setting the Video Bypass Mode.................................................................................3-15
3.10.5. Enabling Safe Capture Mode.....................................................................................3-15
3.10.6. Setting the Amount of Blur on the Program Delayed Video .......................................3-16
3.10.7. Setting the Amount of Blur on the Safe Delayed Video..............................................3-16
3.11. CONFIGURING THE AUDIO................................................................................................. 3-16
3.11.1. Enabling the AES Audio SoftSwitch™ for Clean Audio Switches...............................3-17
3.11.2. Enabling the Embedded Audio SoftSwitch™ For Clean Audio Switches ................... 3-17
3.12. SAVING AND RECALLING CONFIGURATION PRESETS .................................................3-17
3.12.1. Recalling a Preset Configuration................................................................................3-18
3.12.2. Saving the Configuration to a User Preset.................................................................3-18
3.13. MANAGING THE FIRMWARE..............................................................................................3-18
3.13.1. Viewing the Firmware Version....................................................................................3-19
3.13.2. Viewing the Maximum Delay......................................................................................3-19
3.13.3. Updating the Firmware Version..................................................................................3-19
4. TECHNICAL DESCRIPTION............................................................................................................4-1
4.1. SPECIFICATIONS...................................................................................................................4-1
4.1.1. Serial Digital Video Inputs............................................................................................ 4-1
4.1.2. Serial Digital Video Outputs .........................................................................................4-1
4.1.3. Video Reference...........................................................................................................4-1
4.1.4. DARS Reference (not implemented at the time of writing)........................................... 4-2
4.1.5. AES Audio Inputs.........................................................................................................4-2
4.1.6. AES Audio Outputs ......................................................................................................4-2
4.1.7. GPI Control Port...........................................................................................................4-2
4.1.8. Remote Control Port.....................................................................................................4-2
4.1.9. Functional.....................................................................................................................4-2
4.1.10. Electrical.......................................................................................................................4-3
4.1.11. Physical........................................................................................................................4-3
4.2. SERVICING INSTRUCTIONS .................................................................................................4-3

HDSD9545DLY - PRO Profanity Bypass Delay Manual
CONTENTS Revision 1.3.7 iii
4.2.1. Changing the Fuses..................................................................................................... 4-3
4.2.2. JUMPERS....................................................................................................................4-4
4.2.2.1. Configuring the Unit for a DARS Reference
(DARS reference not implemented at the time of writing)............................. 4-4
4.2.2.2. Configuring the Module for Firmware Upgrades
using the Serial Port Method......................................................................... 4-4
4.3. UPGRADING FIRMWARE ...................................................................................................... 4-4
4.3.1. Upgrading the Firmware using FTP ............................................................................. 4-5
4.3.1.1. Step 1 – Determine the IP Addresses...........................................................4-5
4.3.1.2. Step 2 – Establishing a Valid Network Connection .......................................4-6
4.3.1.3. Step 3 – Upgrading the Application Code ..................................................... 4-7
4.3.1.4. Step 4 – Completing the Upgrade.................................................................4-8
4.3.2. Upgrading the Firmware using RS-232 Serial Cable ...................................................4-8
4.3.2.1. Step 1 – Setup............................................................................................... 4-8
4.3.2.2. Step 2 – Invoke Upload Mode from the Terminal Program ........................... 4-9
4.3.2.3. Step 3 – Uploading the New Firmware..........................................................4-9
4.3.2.4. Step 4 – Completing the Upgrade...............................................................4-10
Figures
Figure 1-1: Standard Delay Unit Block Diagram ...................................................................................1-2
Figure 1-2: Delay Unit with HD40 option (Embedded Audio Mode) Block Diagram..............................1-2
Figure 2-1: Rear Panel Layout..............................................................................................................2-1
Figure 2-2: General Purpose I/O Schematic.........................................................................................2-9
Figure 2-3: Powering the General Purpose Input Opto-Isolators from the HDSD9545DLY-PRO.......2-10
Figure 2-4: Powering the General Purpose Input Opto-Isolators from an External Power Supply......2-10
Figure 3-1: Front Panel Layout..............................................................................................................3-1
Figure 3-2: Operational Overview .........................................................................................................3-3
Figure 3-3: Overview of the Setup Menu...............................................................................................3-4
Figure 3-4: Transition Activation Example.............................................................................................3-9
Tables
Table 2-1: Remote CTL Port Pin Definitions.........................................................................................2-3
Table 2-2: GPI/O Port Pin Definitions....................................................................................................2-4
Table 2-3: Video Input Formats.............................................................................................................2-5
Table 2-4. Standard RJ45 Wiring Color Codes.....................................................................................2-7

HDSD9545DLY - PRO Profanity Bypass Delay Manual
iv Revision 1.3.7 CONTENTS
This page left intentionally blank

HDSD9545DLY - PRO Profanity Bypass Delay Manual
OVERVIEW Revision 1.3.7
CHAPTER 1: OVERVIEW
TABLE OF CONTENTS
1. OVERVIEW ...................................................................................................................................... 1-1
1.1. HOW TO USE THIS MANUAL................................................................................................ 1-3
1.2. GLOSSARY............................................................................................................................. 1-3
Figures
Figure 1-1: Standard Delay Unit Block Diagram ...................................................................................1-2
Figure 1-2: Delay Unit with HD40 option (Embedded Audio Mode) Block Diagram..............................1-2

HDSD9545DLY - PRO Profanity Bypass Delay Manual
Revision 1.3.7 OVERVIEW
This page left intentionally blank

HDSD9545DLY - PRO Profanity Bypass Delay Manual
OVERVIEW Revision 1.3.7 Page 1-1
1. OVERVIEW
In live shows there is always the risk that certain actions, on the part of an artist or an intruder, might be
offensive to certain viewers. The Evertz HDSD9545DLY-PRO Profanity Protection device is designed to
give an operator complete control over the program content being broadcast to air.
The HDSD9545DLY-PRO enables the operator to insert the desired time delay, via a front panel control
and a display panel. There are two program paths that are HD and SD compatible. The main program
feed will usually be focused on the main detailed action. The secondary back-up path will generally offer a
wide angle shot, or some suitable alternative picture to the main content. Both channels are delayed by
the same amount of time. If an unscheduled, offensive event occurs, the operator has only to hit one
remote button to cause the program video and audio output to be clean switched to the alternative back-
up channel. When the offensive material is no longer present, the output can be returned to the main
detailed image, without the audience noticing that an edit has occurred.
On the standard unit the delay can be adjusted up to a maximum of 24 seconds for HDTV or SDTV. The
user can allocate this maximum delay to primary and secondary paths. Typically it is set for max 12
seconds primary and max 12 seconds secondary. When the –HD40 option is added, the delay can be
adjusted up to a maximum of 40 seconds for HDTV or 240 seconds for SDTV.
The HDSD9545DLY-PRO includes a built-in HD/SD quad split output that shows all four pictures on one
monitor. The four pictures are as follows:
• Program
• Delayed Program
• Safe
• Delayed Safe
Features:
• HD or SD SDI compatible – SMPTE 292M (1.5 Gb/s) and SMPTE 259M (270Mb/s) video signals
• Embedded Audio and Discrete (4ch AES) Audio Support
• Monitoring outputs of delayed program and delayed backup can be provided
• Selectable quad split monitoring outputs
• Clean transition between program and backup feed
• SoftSwitch™ audio
• Clean switch video
• Video and audio input relay bypass for power failure bypass protection
• Delay memory is solid state (no moving parts) - no hard drive to fail or maintain
• GPI control inputs for bypass triggering
• Programmable pre-trigger reaction time
• Optional dual power supplies

HDSD9545DLY - PRO Profanity Bypass Delay Manual
Page 1-2 Revision 1.3.7 OVERVIEW
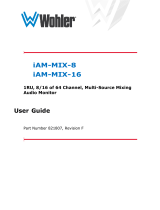
** Soft mutes only function when embedded audio softswitch is enabled
++ Hard mutes only function when delayed sources are selected
Video ADJUSTABLE
DELAY
Embedded
Audio only
soft mute
2x1 Video
Switch with:
Glitchless
Output and
Embedded
Audio
Cross-Fade
Relay
Bypass
Genlock
Quad Split
Resolution follows
program input Output Config
Safe Delay
Panic Input
Live Feed
A
(Bypass protected)
HD/SD
Safe Shot
HD/SD
Program Shot
(Live Talent)
Video
ADJUSTABLE
DELAY
Safe
PGM Delay
PGM HD/SD
Outputs
B
Relay
Bypass
C
D
E
A
**Audio
soft
mute
without
source
switch
DARS/Genlock
Relay
Bypass
2x1 AES
Switch
with Audio
Softswitch
ADJUSTABLE
DELAY
ADJUSTABLE
DELAY
Live Program
Audio
4 AES/Dolby E
Safe Audio
4 AES/Dolby E
++Hard
Mute/Pass
++Hard
Mute/Pass
Output
Config
Audio Output A
AES (1-4)
(Bypass Protected)
4
4
Audio Output B
AES (1-4)
Audio Output C
AES (1-4)
4
4
4
++Hard
Mute/Pass
4
Figure 1-1: Standard Delay Unit Block Diagram
Video ADJUSTABLE
DELAY
Embedded
Audio only
soft mute
2x1 Video
Switch with:
Glitchless
Output and
Embedded
Audio
Cross-Fade
Relay
Bypass
Genlock
Quad Split
Resolution follows
program input Output Config
Safe Delay
Panic Input
Live Feed
A
(Bypass
protected)
HD/SD
Safe Shot
HD/SD
Program Shot
(Live Talent)
Video
ADJUSTABLE
DELAY
Safe
PGM Delay
PGM HD/SD
Outputs
B
Relay
Bypass
C
D
E
A
Figure 1-2: Delay Unit with HD40 option (Embedded Audio Mode) Block Diagram

HDSD9545DLY - PRO Profanity Bypass Delay Manual
OVERVIEW Revision 1.3.7 Page 1-3
"
The on-air path routes through a 2x1 video switch that allows you to select between the
program chain Input A 'live' video (and audio) and the Input B 'safe' video/audio source
in the event that objectionable content is seen or heard. Therefore, the 'on air' output
provides the switched output between delayed program and delayed safe video so that
alternate video (and audio) can be switched to air after you have seen or heard the
objectionable content but before your viewers have.
Program and safe outputs are duplicates of the program and safe inputs, and delayed
program/delayed safe are delayed outputs of the respective inputs. A delay program
output will always be the same signal as the program input, but delayed by the amount
dialled in.
1.1. HOW TO USE THIS MANUAL
This manual is organised into 4 chapters: Overview, Installation, Operation, and Technical Description.
This chapter contains a quick summary of the features and a glossary to define concepts and terms used
throughout the remainder of the manual.
Chapter 2 provides a detailed description of the rear panel connectors, and how the unit should be
connected into your system.
Chapter 3 provides a detailed description of the operation of the front panel controls, starting with an
overview of the pushbuttons and front panel indicators.
Chapter 4 provides the specifications, instructions on how to update the firmware in the unit and other
technical issues.
The exclamation point within an equilateral triangle is intended to alert the user to
the presence of important safety related operating and maintenance (Servicing)
instructions in the literature accompanying the product.
" This symbol is intended to alert the user to important operating instructions.
1.2. GLOSSARY
CCIR-601 (This document now known as ITU-R601). An international standard for component digital
television from which was derived SMPTE 125M and EBU 3246-E standards. CCIR-601
defines the sampling systems, matrix values and filter characteristics for Y, B-Y, R-Y and RGB
component digital television signals.
SERIAL DIGITAL Digital information that is transmitted in serial form. Often used informally to refer to
serial digital television signals.
4Fsc: Four times sub-carrier sampling rate uses in composite digital systems. In NTSC this is 14.3
MHz. In PAL this is 17.7 MHz.

HDSD9545DLY - PRO Profanity Bypass Delay Manual
Page 1-4 Revision 1.3.7 OVERVIEW
4:2:2 A commonly used term for a component digital video format. The details of the format are
specified in the CCIR-601 standard. The numerals 4:2:2 denote the ratio of the sampling
frequencies of the luminance channel to the two colour difference channels. For every four
luminance samples, there are two samples of each colour difference channel.
SDI An abbreviation for serial digital interface, this acronym is most commonly used to refer to
Standard definition serial digital television video signals up to 540 Mb/s.
HDTV An abbreviation for high definition television, this acronym is most commonly used to refer to
High definition serial digital television video signals at 1.485 Gb/s.
AES: (Audio Engineering Society): A professional organization that recommends standards for
the audio industries.
AES/EBU: Informal name for a digital audio standard established jointly by the Audio Engineering
Society and the European Broadcasting Union organizations.
ANALOG: An adjective describing any signal that varies continuously as opposed to a digital signal
that contains discrete levels representing digits 0 and 1.
A-TO-D CONVERTER (ANALOG-TO-DIGITAL): A circuit that uses digital sampling to convert an
analog signal into a digital representation of that signal.
BIT: A binary representation of 0 or 1. One of the quantized levels of a pixel.
BIT PARALLEL: Byte-wise transmission of digital video down a multi-conductor cable where each
pair of wires carries a single bit. This standard is covered under SMPTE 125M, EBU 3267-
E and CCIR 656.
BIT SERIAL: Bit-wise transmission of digital video down a single conductor such as coaxial cable. May
also be sent through fibre optics. This standard is covered under SMPTE 259M and CCIR
656.
BIT STREAM: A continuous series of bits transmitted on a line.
BYTE: A complete set of quantized levels containing all the bits. Bytes consisting of 8 to 10 bits
per sample are typical in digital video systems.
CABLE EQUALIZATION: The process of altering the frequency response of a video amplifier to
compensate for high frequency losses in coaxial cable.
CCIR (International Radio Consultative Committee): An international standards committee. (This
organization is now known as the ITU.)
CCIR-601: (This document now known as ITU-R601). An international standard for component digital
television from which was derived SMPTE 125M and EBU 3246-E standards. CCIR-601
defines the sampling systems, matrix values and filter characteristics for Y, B-Y, R-Y and
RGB component digital television signals.
CCIR-656: (This document now known as ITU-R656). The physical parallel and serial interconnect
scheme for CCIR-601. CCIR-656 defines the parallel connector pinouts as well as the
blanking, sync and multiplexing schemes used in both parallel and serial interfaces. It
reflects definitions found in EBU Tech 3267 (for 625 line systems) and SMPTE 125M
(parallel 525 line systems) and SMPTE 259M (serial 525 line systems).

HDSD9545DLY - PRO Profanity Bypass Delay Manual
OVERVIEW Revision 1.3.7 Page 1-5
CLIFF EFFECT: (also referred to as the ‘digital cliff’) This is a phenomenon found in digital video systems
that describes the sudden deterioration of picture quality due to excessive bit errors, often
caused by excessive cable lengths. The digital signal will be perfect even though one of its
signal parameters is approaching or passing the specified limits. At a given moment,
however, the parameter will reach a point where the data can no longer be interpreted
correctly and the picture will become totally unrecognisable.
COMPONENT ANALOG: The non-encoded output of a camera, video tape recorder, etc., consisting of
the three primary colour signals: red, green, and blue (RGB) that together convey all
necessary picture information. In some component video formats these three components
have been translated into a luminance signal and two colour difference signals. For
example: Y, B-Y, R-Y.
COMPONENT DIGITAL: A digital representation of a component analog signal set. This is most often
Y, B-Y, R-Y. The encoding parameters are specified by CCIR-601. CCIR-656 and SMPTE
125M specify the parallel interface.
COMPOSITE ANALOG: An encoded video signal such as NTSC or PAL video that includes
horizontal and vertical synchronizing information.
COMPOSITE DIGITAL: A digitally encoded video signal, such as NTSC or PAL video that includes
horizontal and vertical synchronizing information.
D1: A component digital video recording format that uses data which conforms to the CCIR-601
standard. Records on 19 mm magnetic tape (often used incorrectly to refer to component
digital video).
D2: A composite digital video recording format that uses data which conforms to SMPTE 244M.
Records on 19 mm magnetic tape (often used incorrectly to refer to composite digital
video).
D3: A composite digital video recording format that uses data which conforms to SMPTE 244M.
Records on 1/2" magnetic tape.
EBU (European Broadcasting Union): An organization of European broadcasters that, among other
activities, provides technical recommendations for the 625/50 line television systems.
EBU TECH 3267-E: The EBU recommendation for the parallel interface of 625 line digital video signal.
This is a revision of the earlier EBU Tech 3246-E standard that was in turn derived from
CCIR-601.
EDH: Error Detection and Handling (EDH) is defined in SMPTE RP-165 as a method of
determining when bit errors have occurred along the digital video path. According to
RP-165, two error detection checkwords are used, one for active picture samples, and the
other on a full field of samples. Three sets of flags are used to convey information
regarding detected errors to facilitate identification of faulty equipment or cabling. One set
of flags is associated with each checkword, and the third is used to evaluate ancillary data
integrity. The checkwords and flags are combined into a special error detection data packet
that is included as ancillary data in the serial digital signal.
EMBEDDED AUDIO: Digital audio is multiplexed onto a serial digital video data stream.

HDSD9545DLY - PRO Profanity Bypass Delay Manual
Page 1-6 Revision 1.3.7 OVERVIEW
ITU: The United Nations regulatory body governing all forms of communications. ITU-R
(previously CCIR) regulates the radio frequency spectrum, while ITU-T (previously CCITT)
deals with the telecommunications standards.
ITU-R601: See CCIR601
PIXEL: The smallest distinguishable and resolvable area in a video image. A single point on the
screen. In digital video, a single sample of the picture. Derived from the words picture
element.
RESOLUTION: The number of bits (four, eight, ten, etc.) determines the resolution of the signal. Eight
bits is the minimum resolution for broadcast television signals.
4 bits = a resolution of 1 in 16.
8 bits = a resolution of 1 in 256.
10 bits = a resolution of 1 in 1024.
SERIAL DIGITAL: Digital information that is transmitted in serial form. Often used informally to refer to
serial digital television signals.
SMPTE (Society of Motion Picture and Television Engineers): A professional organization that
recommends standards for the film and television industries.
SMPTE 125M: The SMPTE standard for bit parallel digital interface for component video signals.
SMPTE 125M defines the parameters required to generate and distribute component
video signals on a parallel interface.
SMPTE 244M: The SMPTE standard for bit parallel digital interface for composite video signals. SMPTE
244M defines the parameters required to generate and distribute composite video signals
on a parallel interface.
SMPTE 259M: The SMPTE standard for 525 line serial digital component and composite interfaces.
SMPTE 292M: The SMPTE standard for HDTV 1.5 Gb/s serial digital high definition video interfaces.
SMPTE 299M: The SMPTE standard for embedding AES audio into SMPTE 292M serial digital high
definition video.
SMPTE 292M: The SMPTE standard for HDTV 1.5 Gb/s serial digital high definition video interfaces.
TRS-ID: Abbreviation for "Timing Reference Signal Identification". A reference signal used to
maintain timing in composite digital systems (it is four words long).

HDSD9545DLY - PRO Profanity Bypass Delay Manual
INSTALLATION Revision 1.3.7
CHAPTER 2: INSTALLATION
TABLE OF CONTENTS
2. INSTALLATION................................................................................................................................ 2-1
2.1. REAR PANEL OVERVIEW ..................................................................................................... 2-1
2.1.1. Digital Video Connections............................................................................................ 2-1
2.1.2. Reference Video Connections...................................................................................... 2-2
2.1.3. AES AUDIO Connections.............................................................................................2-2
2.1.4. Ethernet Network Connections..................................................................................... 2-2
2.1.5. Serial I/O and GPI/O Connections ...............................................................................2-3
2.1.6. Power Connections...................................................................................................... 2-4
2.2. MOUNTING ............................................................................................................................. 2-4
2.3. POWER REQUIREMENTS...................................................................................................... 2-4
2.4. CONNECTING THE VIDEO..................................................................................................... 2-5
2.4.1. Video Inputs .................................................................................................................2-5
2.4.2. Video Outputs ..............................................................................................................2-5
2.4.3. Video Timing Reference............................................................................................... 2-6
2.5. CONNECTING THE AUDIO.................................................................................................... 2-6
2.5.1. Connecting Program (‘Live’) Audio............................................................................... 2-6
2.5.2. Connecting Backup (‘Safe’) Audio................................................................................ 2-6
2.5.3. Connecting the Audio Outputs ..................................................................................... 2-6
2.6. CONNECTING TO AN ETHERNET NETWORK..................................................................... 2-7
Figures
Figure 2-1: Rear Panel Layout..............................................................................................................2-1
Tables
Table 2-1: Remote CTL Port Pin Definitions.........................................................................................2-3
Table 2-2: GPI/O Port Pin Definitions....................................................................................................2-4
Table 2-3: Video Input Formats.............................................................................................................2-5
Table 2-4. Standard RJ45 Wiring Color Codes.....................................................................................2-7

HDSD9545DLY - PRO Profanity Bypass Delay Manual
Revision 1.3.7 INSTALLATION
This page left intentionally blank
/