Page is loading ...

ACCUCRAFT UK LTD
Unit 8, Mynd Industrial Estate
Church Stretton, Shropshire.
SY6 6EA
Tel: 01694 723799
www.accucraft.uk.com
OPERATING INSTRUCTIONS
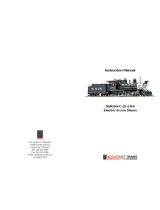
GWR 61XX PRAIRIE TANK LOCOMOTIVE No 6106
SAFETY FIRST
All our locomotives are safe to run, and will give many hours of pleasure,
providing the following safety procedures are followed: -
1. Please read all the instructions thoroughly before running for the
first time.
2. Never let the engine run out of water.
3. When refilling the gas, do not have any naked flame present, and NO
SMOKING!
4. Do not pick up the engine by the bodywork, chimney or boiler,
especially when hot.
5. Only pick up the engine by the buffer beams and, when hot, use the
gloves provided or a cloth.
6. Do not stand over the chimney. Ejected boiling water or steam may
cause serious injury.
7. Do not open the smoke box door while the engine is alight.
8. Constant supervision of the boiler water level is imperative as the gas
CAN outlast the water. Failure to do so will be treated as misuse and
is not covered by the warranty. The boiler will require topping up
about every 10 minutes.
9. Failure to properly control the gas will result in over-heating the loco
and will cause damage to the mechanics and the paintwork and will
not be covered by warranty.

2
General Hints
As with all operating machinery, whether model or full size, wear will occur. In the
model steam locomotive much can be done to help prolong its life and decrease the
amount of time required in the workshop for servicing.
Keep the engine as clean as possible, and the motion free from dirt and garden debris.
The valve gear, axles and crank pins should be oiled sparingly with light oil, e.g. “3-
in -1 Oil”. Over-oiling attracts dirt and grit, which will increase wear.
Regularly check that all screws and motion bolts are firm. Do not over-tighten, as
this strips threads and shears bolts. When filling the lubricator, always use a high
temperature steam oil; this is available from your dealer. FAILURE TO USE
THE CORRECT GRADE OF OIL CAN LEAD TO BLOCKED STEAM
PIPES, AND WILL INVALIDATE THE GUARANTEE.
When running your engine avoid excessive speed and acceleration, both will cause
premature wear in the valve gear
Positions of Fillers and Drains etc.
The cab roof lifts up then tilts over sideways to give access to the water and
lubricator fillers.
The gas inlet valve is on the top of the gas tank filler turret. The gas control valve is
in the bunker attached to the gas filler turret. Both are accessed by lifting out the coal
load.
The lubricator is in the offside of the cab. The filler cap has a “T” bar in it to aid
removal. The waste water is removed at the end of the run with the small syringe
supplied with the small piece of plastic tube fitted. To drain, you must make sure
there is no residual steam pressure in the steam line between the lubricator and the
cylinders, as this could result in a steam blow back when the cap is removed. Close
the steam regulator and put the loco into gear, this should allow any left-over steam
to escape through the cylinders. Remove the cap, use the syringe suck out all
condensed water and refill with the correct grade steam oil, and then replace the cap.
The boiler water filler is on top of the steam turret on the boiler in the middle of the
cab. Undo the knurled cap to fill with water. The loco is also supplied with an
additional Boiler Top up System Filler Cap (Goodall valve). This one has a non
return valve on the underside and is used when filling the boiler when in steam. The
main steam regulator valve is in the offside cab door and can be operated using the
special tool provided.

3
The direction control is the lever forward of the nearside cab door. To operate push
the lever gently inwards, and move to the desired direction. The control is “gated”,
and will therefore hold itself in the full forward or reverse position.
Preparation for Running
The 6100 is fitted with a water gauge; this allows the driver to keep the model in
steam continuously for longer periods of time. This is done using the Boiler Top-up
valve supplied with your loco. We have only supplied the valve as many customers
now possess a pump bottle. Should you need a pump bottle you should be able to
purchase one from your dealer.
Always service the engine in the following order; first gas, then oil then water.
Although we recommend Butane gas, the system will also work with, and is safe for
Butane/Propane mix gas.
To fill the gas tank: invert the gas can and apply the nipple to the gas inlet valve on
the top of the tank turret. It is advisable to support the loco under the gas tank whilst
filling, to prevent the engine tipping backwards. You will know when the tank is full;
gas will blow back from the inlet valve in a strong jet. A small amount of gas and air
will escape during filling, but the difference between this and when the tank is full is
always clear. Always keep the gas can vertical when filling the gas tank.
Filling the lubricator: As you will read in the instructions for the end of the run, the
lubricator should be empty of oil and water. Remove the lubricator filler cap. We
have supplied a long tool with a ‘T’ bar handle to aid in the removal of the lubricator
cap; it has a cut out shape in the bottom end which fits over the ‘T’ bar on the
lubricator cap. Fill up the lubricator with steam oil to about ¼ of an inch below the
top. Leave the filler cap off for the present, so that any trapped air can escape. It can
be refitted after you have filled up the boiler.
To fill the boiler: remove the filler cap. Fill up the boiler to about ¾ full on the
gauge glass – ideally use filtered rainwater or distilled water using the large syringe
provided. Replace the boiler filler cap, check that the lubricator does not need
topping up, and then replace its filler cap also. Filler caps should be firm finger tight.
They are sealed with a trapped ‘O’ ring and, therefore should not be over-tightened.
Lighting Up
Pull open the smokebox door. Light your lighter/match etc. and gently open the gas
control valve until a gentle hiss is heard in the burner. Apply your light into the
smokebox and the flame should ‘pop’ down the fire tube and ignite the burner inside
the fire tube.
If the gas valve is opened too much the flame will not pop back; it will either fail to
ignite, will roar in flame out of the smokebox, or there will be a ball of flame around
the front of the engine, which will then blow the whole fire out (after giving the
driver a fright)!

4
When the fire sound has stabilised, after about 30 seconds the gas can be turned up
until a gentle burner sound is heard. The smoke box door may be shut after about two
minutes. Now leave the locomotive to raise steam and let the locomotive raise at
least 50 p.s.i.
Burner Air Control Ring
This is an adjustable air volume control which is set at the factory. However
variances in gas can give the need to either reduce or increase the air volume. To
obtain a quieter softer flame use the nut spinner supplied, and move the ring forward
slightly to reduce the air mix.
Running
When the engine has raised about 50 psi you are ready to start running. It is advisable
to run the engine in reverse first; it clears the condensed water from the cylinders best
this way. Before commencing your first run of the day, it is advisable to put a cloth
loosely over the chimney for a few minutes, as condensed water will be ejected from
the chimney. This is quite normal; the motion of the engine will be jerky until all
condensate has been ejected. DO NOT stand over the chimney as ejected boiling
water/steam could cause serious scalding.
Place the direction lever into the reverse position, and then open the main steam
valve. The engine should start to move off in the reverse direction. When starting
from cold it will be jerky, this is normal, as it has to clear the condensate from the
system. The more the main steam valve is opened, the faster the engine will go; our
advice is to start slowly and learn the road with your engine
After a minute or so, remove the cloth and continue running. In running it is correct
practice to balance the boiler pressure against the load being pulled and the track
conditions. With a light load and level track the pressure may need to be only 30-40
p.s.i. therefore, turn the gas control down to keep this pressure. When running a
heavy train with steep gradients, increase the pressure by turning up the gas.
The ideal running pressure can be learnt by experience and is one of the pleasures of
running a live steam engine. There is no need to have the safety valve constantly
blowing off (it is what its name implies – a safety vent for excess steam pressure).
When the gas runs out a complete gas, oil and water service must be done (remember
GOW, also remember to shut the gas regulator before refilling, and DO NOT refill
with gas near any other live steam loco).
When the locomotive slows as the pressure falls at the end of a run, stop the engine.
With the reverse lever in forward position so as to let any residual pressure in the
steam pipes escape, make sure the steam regulator is fully shut, then gently open the
lubricator filler cap and with the small syringe with the plastic tube on it suck out the
condensed water. If you intend to continue running a complete fill of the lubricator
will be required.

5
Continuous Running
Running for longer periods of time than the normal, requires the use of the Boiler
Filling System. This consists of a pump bottle with tube attached and a replacement
boiler filler cap, which has a non-return valve on its underside. For the first fill
service in the normal way. Then run for about 10 minutes, now have a look at the
water level. You will probably need to pump some water into the boiler. Lift up the
cab roof to uncover the filler cap, place the tube in the hole and holding it in firmly,
pump water into the boiler until the gauge glass is showing about ¾ full. Keep an eye
on the water gauge and try to run between ⅓ and ¾ of a glass.
After another 10 minutes running you will need to refill the lubricator and top up the
gas tank. Also check the water level and top up if necessary. Stop the loco in a
convenient location, away from other locomotives and turn off the gas. Ensure the
fire is completely out and then top up the gas tank. Blow around the engine so there is
no residual gas about, then re-light the fire. To re-fill the lubricator, follow the
instructions at the beginning of page 3. Keep an eye on the water level at all times
and try to refill the gas tank and lubricator every 20 minutes to half an hour.
End of Run
The locomotive should be allowed to cool and all boiler pressure to go down. When
cool, gently release the water filler cap by about 2 turns to allow the boiler to have
free breathing space and not to create a vacuum as it cools. Now clean the engine,
check the motion and oil if necessary. The locomotive should always be put away in
a clean condition as it attracts less dust and is always ready for the next run (or to be
shown to an admiring friend). Always leave the lubricator and boiler filler caps loose
and the main steam valve open so that the boiler will not be strained if subject to any
temperature change. It is advisable to store the locomotive where any residual drips
of oil or water do not matter.
Blocked Gas Jets
If the gas jet becomes blocked with particles of dirt within the gas, the jet will have to
be removed and cleaned. With a spanner or pliers carefully undo the pipe union on
the gas control valve. Remove the pipe and jet holder assembly from the burner.
Holding the jet holder gently in a vice, unscrew the jet. To clear, place the jet nozzle
against the inverted gas can nozzle and clear the jet with a blast of gas. Under no
circumstances use a pricker wire, this will damage the jet hole. Replace the jet in the
jet holder, ideally using a thread sealant sparingly on the threads. Ensure it is
tightened up firmly. Replace the assembly into the burner and re-connect the pipe to
the control valve. Ensure this is done up tightly, test CAREFULLY for gas leaks,
first with a 50/50 mixture of washing up liquid and water, and then if no bubbles are
showing, with a flame and the gas “just on”. Tighten if required.

6
As with all comprehensive models, we strongly recommend a full demonstration
(by our agents) before purchase, enabling you to get the best out of your model right
from the start. If this is not possible we recommend you join your local steam group
of G1MRA where there will be many friendly members who will want to show you
all the niceties of running your new locomotive.
HAPPY STEAMING!
WARNING! Please ensure that your dealer supplies you with both the inner (red)
and outer (cardboard) boxes and all the associated packaging when you purchase an
Accucraft model and that if warranty work should be required the model is re-packed
accordingly before our carriers collect it. Failure to do this will attract a charge for
any repairs not covered by the warranty as well as the cost of any additional
packaging to ensure a safe return.
Identification of Controls and Fillers.
1. Steam regulator
2. Reverse lever
3. Gas regulator
4. Lubricator filler cap
5. Boiler water filler/boiler top up valve
6. Gas tank filler valve
7. Burner air control ring
8. Pressure gauge
9. Water gauge

7
Identification of Accessories.
A. Protective gloves
B. Boiler filling syringe
C. Small syringe with tubing for lubricator
D. Special tool for the steam regulator when it gets hot!
E. Hex nut spinners for 2mm and 3mm hex bolts
F. Allen keys and spare nuts and bolts (not normally required but included by the
factory).
The Accucraft GWR 61XX Tank Locomotive, Historical Notes.
The Great Western Railway’s 61XX 2-6-2T design can trace its origins to
Churchward’s ground-breaking family of designs produced at the start of the 20th
century which included the large ‘prairie’ tank engine number 99. Ideally suited for
suburban and branch line work, thirty-nine more locomotives based on this design
were in traffic by 1906 and batches continued to be produced until the class
numbered 290. The first forty (including No. 3100, the renumbered prototype) were
absorbed into the 51XX series in the 1927 re-numbering scheme, the additional
members of which enjoyed small design improvements under Charles Collett’s
supervision. Having used all the 51XX numbers, further locos were numbered in the
41XX series. The 61XX variant was introduced in 1931 and was little different from
the others apart from boasting a boiler pressure increased to 225psi. A number of
51XX and 41XX examples have been preserved but only No. 6106 was saved from
the last batch and this can be found at Didcot, home of the Great Western Society.
Our un-numbered models can carry 41XX, 51XX or 61XX number plates since the
61XX were visually the same as the earlier versions. You can order these plates from
after-market suppliers such as John Lythgoe. Suitable transfers can be obtained from
Fox Transfers.
/