Sharp PV300 Owner's manual

Category
Mobile phones
Type
Owner's manual

This manual is also suitable for

Sidekick
LX
2009
Reference Guide
PV300 Rev. K - January 30, 2009
Copyright © 2009 Danger, Inc. All rights reserved.
Contents
Welcome! 6
Open & Close the Display 8
Prior to Using Your Device 9
Remove and Replace the Back Cover 9
Insert and Remove the SIM Card 10
Insert and Remove the Memory Card 10
Formatting the Memory Card 11
Insert and Remove the Battery 11
Charge the Battery 12
Register Your Device 14
Change Locale/Language 17
T-Mobile Sidekick Help 18
Device Controls 19
Phone Controls 22
Volume Controls 23
Wireless Controls 24
Display Controls 24
Mini Media Player Controls 25
Setting Up Your Device 26
Bluetooth
®
Technology Setup 26
Themes 27
Font Size 28
Backlighting 28
Device Privacy Code 29
Key Guard Mode 29
Sound Profiles 30
Alarm Clock 30
2 Contents
Location Based Services 31
Application Customization 32
The Device Interface 33
The Jump Screen 33
Indicators 34
Menus 36
Quick Jump 36
Quick Find 37
Empty Trash 37
Type and Edit Text 38
Navigate in Text Boxes 38
Delete Text 38
Cut, Copy, Paste, Undo 38
Check Spelling 39
AutoText & Spelling 39
Type Special Characters 41
The Desktop Interface 42
Desktop Interface Jump Page 43
Using the Applications 44
myFaves
®
Add a Contact to myFaves 44
Communicate with a myFaves Contact 44
Assign an Icon to a myFaves Contact 45
Phone
Make a Phone Call 46
Use Bluetooth Hands-Free Headset or Car Kit 46
Answer a Phone Call 47
Add a Number to Your Speed Dial List 47
Checking Your Voice Mail 47
Change Your Phone Ringtone 48
Import Contacts from Your SIM Card 49
Contents 3
Text Messaging
Send a Text Message 49
Picture Messaging
Send a Multimedia Message 50
Send an Audio Postcard 51
Web Browser
Browse the Web 52
Bookmark a Web Page 53
Copy Text on a Web Page 53
View and Save Web Page Images 54
Web Page Layouts 54
Mini Page 55
Email
Send an Email Message 56
Fetch Email from External Accounts 56
About Tabs 57
Add an External Account 57
Edit External Email Account 59
Fetch Email Using Your Devices Web Browser 60
Attach a Media File or vCard to an Email Message 61
Address Book
Add a Contact to the Address Book 62
Assign a Contact as a “Favorite” 63
Address Book Tabs 63
Communicate with a Contact 64
Import Address Book Contacts 65
Set and Send “My vCard” 65
Send any Contact’s vCard 66
Calendar
Add an Event to Calendar 66
4 Contents
Notes
Create a Note 67
Send a Note via Email 67
To Do
Add a Task 68
Camera
Albums 69
Take a Photo 69
Capture Video 71
Send Media Files via Bluetooth, Email or MMS Message 71
Use Photo for Caller ID or Key Guard Background 72
Media Player
Copy Music or Video to the Memory Card 73
Play Music or Video Using the Media Player 74
Streaming Video 75
Listen Using Stereo Bluetooth Headset 75
Create a Playlist 75
Download Catalog
Download Items from the Catalog 76
Manage Your Downloaded Items 77
Instant Messaging
Sign On 78
Send an Instant Message 78
Switch Between IM Conversations 78
Keyboard Shortcuts 80
Troubleshooting 81
Handling and Safety Precautions 86
Regulatory and Compliance Information 91
Legal Information 94
Contents 5
Welcome!
Thank you for buying the Sidekick LX
2009. Your Sidekick will
open up a whole new way of communicating, staying organized
and connecting to your world.
Designed to seamlessly connect to wireless 3G networks, your
Sidekick LX 2009 delivers information to you faster than ever. An
intuitive phone interface and Bluetooth compatibility are only the
beginning. Effortlessly exchange instant messages, browse the
Internet, and send multimedia messages. Capture the moments
of your life with the 3.2 megapixel camera and video recorder. A
fully functional media player lets you take your favorite tunes and
videos along for the ride while video streaming capability allows
you to check out those videos your friends are all talking about.
Personal information management (PIM) applications keep you
organized and on track while a huge selection of downloadable
entertainment applications bring on the fun.
The Desktop Interface (DI) is a personal web portal available at
t-mobile.com. The DI gives you access to all of the information on
your device and ensures that it’s safely backed up. Click the Help
link on the DI to find this guide online and learn more about your
new Sidekick.
6 Welcome
Heres what you’ll find in the box:
Sidekick device
SIM card*
Removable battery
MicroSD Card
*
USB cable
Battery charger (wall adapter)
Hands-free stereo headset
Protective sleeve
n Start Guide
n Reference Guide (on CD-ROM)
n Limited Warranty (Terms & Conditions)
n Recycle bag
If any of these items are missing, please contact T-Mobile’s Customer Care
department.
*May not be included with all models.
Welcome 7
Open & Close the Display
To open the display, press your left thumb on the lower-left corner of the
display and gently push up in a clockwise direction. Alternatively, use your
right index finger to push down gently on the upper-right corner of the
display. The display will spring smoothly into the open position.
The normal operating position of the device is horizontal, with the trackball
on the right, as shown above.
To close the display, reverse the motion to pivot the display counter-
clockwise and snap it into the closed position.
Always carry your device in the sleeve to protect the display from
scratches!
8 Open & Close the Display
Prior to Using Your Device
Before you use your Sidekick LX 2009, do the following:
n Insert the SIM Card
n Insert and charge the Battery
n Register Your Device
The following sections walk you through the above actions in addition to
providing other information about these elements.
This section also contains instructions on how insert the memory card and
how to change your locale after registration.
Remove and Replace the Back Cover
In order to access the SIM card, memory card and battery, you must
remove the back cover of the device. To do this, turn the device over.
With the camera at the top, slide the battery cover to the right by carefully
pressing the raised dotted lines on the cover with your left thumb. Lift the
cover to remove it.
To replace the back cover, align the back cover with the body of the
Sidekick and slide it into place. Take the reverse steps to remove the back
cover.
Prior to Using Your Device 9
Insert and Remove the SIM Card
The SIM card slot is located just to the left of the battery slot. To access it,
do the following:
1 If the battery is installed, remove the battery by following the steps in
“Insert and Remove the Battery” on page 11.
2 Hold card with gold contacts facing down and card notch facing to the
upper right. Slide the card into the slot and push to lock in place.
3
To remove the SIM card, use your finger to press down gently and slide
the card right. When it’s free of the slot, lift the card to remove it.
Insert and Remove the Memory Card
Your device includes a slot for a Micro Secure Digital (microSD
) flash
memory card. The memory card is not required for the device to function
and can be inserted at any time.
The memory card slot is located next to the battery as shown below.
10 Prior to Using Your Device
1 To insert the memory card, hold the card with the gold contacts facing
down and the card notch facing to the right. Insert the card into the slot
and push to lock into place.
2 To remove the memory card, push the card in slightly and release; the
card should spring partly out of the slot. Pull the card free of the device.
! Forcing the memory card out before pushing to release it may cause the
card or slot to break.
Formatting the Memory Card
For optimal performance, it is recommended that you format the memory
card on the device . Please note that formatting the card will permanently
erase all items that are on the card.
1 Press JUMP . to go to the Jump screen. Press MENU to open the
menu, then select Settings >Memory Card.
2 The Memory Card screen displays the card space and format. You can
use the Card Name field to give the card a unique identifier.
3 Select the Format Now button to format the card. This action will erase
all card contents.
Insert and Remove the Battery
To replace your rechargeable battery, or if you need to insert or remove
your SIM card, first you will need to remove the installed battery. Begin by
powering down your device:
1 Press and hold the power button for three seconds to power down.
2 Remove the back cover following the steps on page 9.
Prior to Using Your Device 11
3 Push the battery in slightly (1) using protrusion at the lower right hand
corner of the battery, then lift the battery (2) from that same edge to
remove it.
4 Insert the battery with the notched edge first (the edge with the gold
contacts) and then push the battery down to lock into place.
5 Replace the back cover.
Charge the Battery
Your device comes with a removable, rechargeable lithium-ion battery.
When you first receive your device, it is important that you fully charge the
battery as described below.
! Only use the charger and battery provided with your device or approved
by T-Mobile, or you risk damaging your device.
! Do not insert battery chargers from previous Sidekick models into the
stereo headset jack.
If you attach your device to your computer via USB, be aware that the
power received may not be enough to charge your device. For example,
when computers are in “sleep” mode, only a trickle charge may be
supplied via USB. In this situation you could lose more power than you
gain. To connect the device to your computer, insert the USB plug into your
device’s USB port with the icon on the top of the plug.
12 Prior to Using Your Device
(1)
(2)
1 Locate the battery charger that came in the box with your device. Insert
the charger’s USB plug into your device’s USB port, which is next to the
power button. Make sure the icon is on the top of the plug.
Now plug the power cord into a standard electrical wall outlet.
An orange charge indicator light will go on and a lightning bolt icon
will appear over the battery icon in the title bar, indicating the charger
is connected and the battery is charging. If your device has discharged
completely, it may take up to 15 minutes before you see any indication
of charging on the screen. When the battery is fully charged, the
indicator turns green. If any error occurs when charging, the indicator
turns red.
2 Put the device in a safe place and let the battery charge for at least four
hours with the device powered on.
As the device is charging, the bars in the battery icon fill repeatedly
from left to right. When your device is fully charged, the lightning bolt
icon will disappear and the bars will stop moving and remain in the
filled position.
It is recommended that you charge your device nightly. If you plan
to leave it unattended for an extended period of time, be aware that the
battery may discharge within a few days if it is turned on and not attached
to the charger.
Prior to Using Your Device 13
Register Your Device
Before you can start using your Sidekick LX 2009, you must register for
data services. This section is for new users only. Returning users can sign
in using their username/password.
When you see the Welcome screen, youre ready to register:
1 Press the trackball to select the New User button and advance to the
next screen. On subsequent screens, select the Next button to advance.
2 Type your first name and last name.
Use the keyboard to type your First name, then roll the trackball down
to highlight the Last name field. Type your last name, scroll down to
highlight the Next button, then press the trackball to advance to the
next screen.
3 Select a username.
The username you type will become the first part of your email address
(for example, [email protected]). Before you select a username,
read the following:
n Usernames must start with an alphabetic character (A-Z) and can
include numbers (0-9), dashes (-), periods (.), and underscores (_),
but no other punctuation. Although you can use periods within a
username, do not use a period at the beginning or end of the name,
and do not use two periods (..) in a row.
n Usernames must be at least 2 but no more than 32 characters long.
n Usernames are not case-sensitive. For example, if your username is
“jamie”, you will be authenticated if you sign in by typing “Jamie”,
“JAMIE”, or any combination of upper or lowercase letters.
14 Prior to Using Your Device
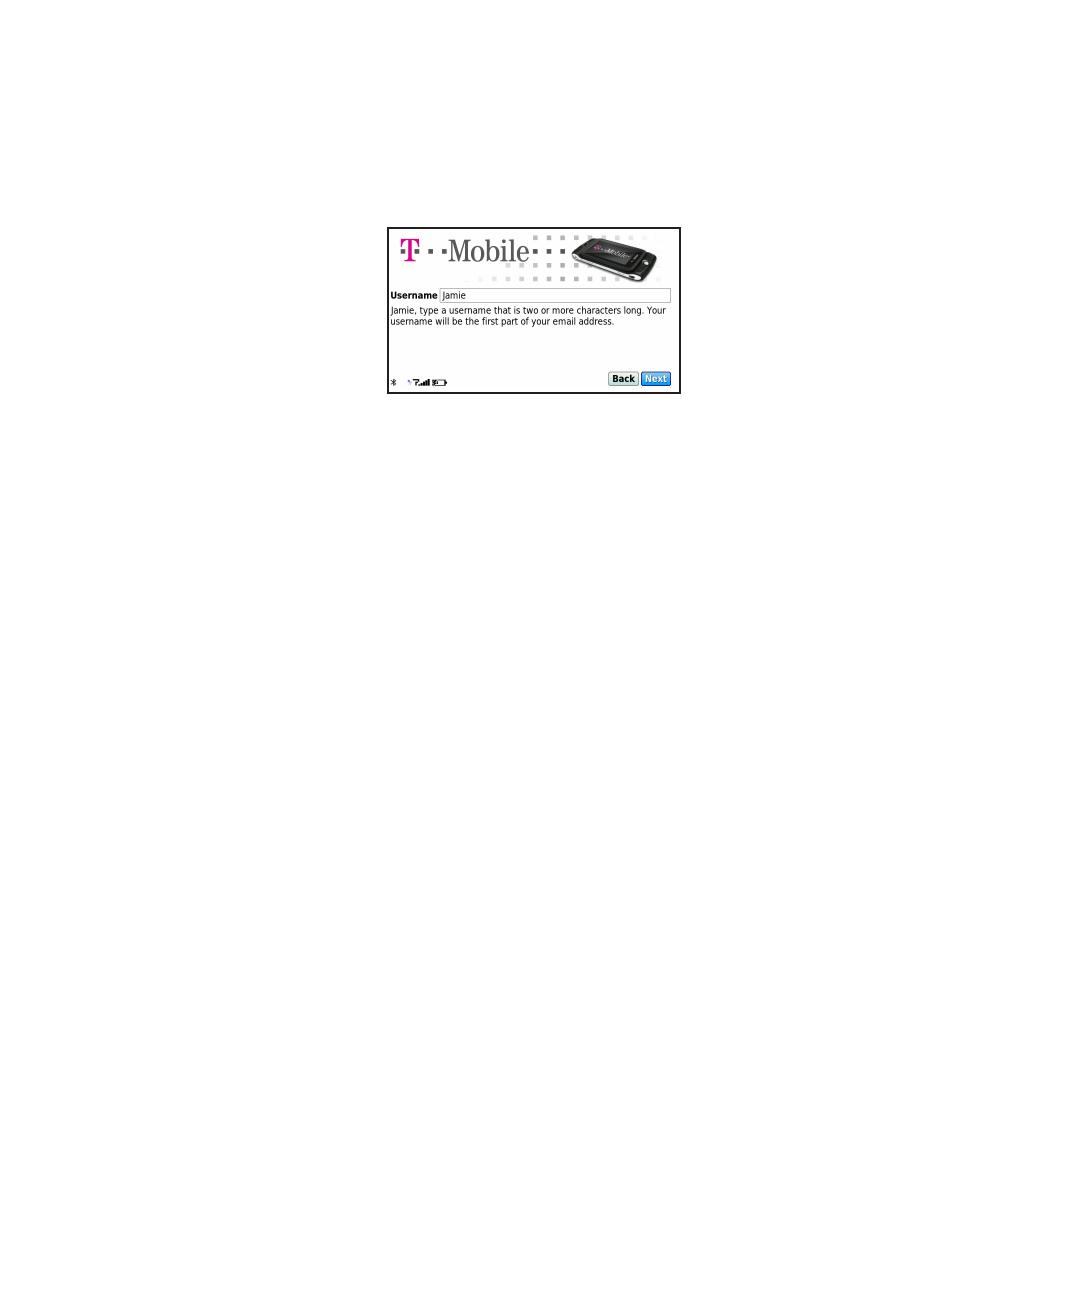
Once you decide on a username, type it in the text box, then select
Next.
4 Select a password.
Select a secure password that follows the rules below:
n Passwords cannot be the same as your username.
n Passwords must contain 4-15 characters, can include both letters and
numbers, but no spaces, single quotes ('), semicolons (;), backslashes
(\), or percent signs (%).
n
For enhanced security, do not choose an actual word that appears in
any language dictionary. Do not choose a proper name, such as the
name of a child, local sports team, pet’s name, or city of birth. Do not
choose adjacent letters on your keyboard or a sequential or repeating
combination of letters or characters, such as “12345678”, “222222”,
“abcdefg”.
n For enhanced security, do choose a password that is more than seven
characters long, mixes letters and numerals, and uses upper- and
lower-case letters.
n Passwords are case-sensitive. For example, if you set your password
to be “Hard2Guess”, then you will not be authenticated if you sign in
by typing “hard2guess”.
Type the password in the text box, then type it again to confirm. You will
see feedback on how secure your password is.
5 Select a challenge question and type your answer.
If you ever forget your password and need to call the T-Mobile Customer
Care department, for security purposes you will be asked to provide
an answer to the challenge question you select on this screen. Press
the trackball to open the Question pop-up menu, scroll to highlight a
Prior to Using Your Device 15
16 Prior to Using Your Device
question, then press the trackball to select it.
Roll the trackball down to highlight the Answer field, then type your
answer. When finished, select Next to continue.
6 Select your time zone.
Open the pop-up menu to see a list of time zones. Select yours from the
list, then select Next.
7 Read and agree to the end-user license agreement.
Before you can finish registration, you must read and agree to the end-
user license agreement. You can read it by selecting the on-screen View
Agreement link or from the Desktop Interface. Once you read the end-
user agreement, select the Next button to indicate your acceptance and
transmit your registration data.
8 Wait while data transmits.
Wait while the data you entered in the Registration screens transmits
to T-Mobile. The service will check to see if your username already has
been taken. If it has, you will be offered alternatives. You can select
one of these alternatives or type a different username. Note that if you
are out of network coverage, you’ll be asked to “try again” to resume
registration.
9 Congratulations!
Once your account has been set up,
you’ll see the
Congratulations
screen:
Select the Start button to begin!
Prior to Using Your Device 17
Change Locale/Language
To change the language your device uses, do the following:
1 Press JUMP . to go to the Jump screen. Press MENU to open the
menu, then select Settings >Locale. The Locale screen appears.
2 Language Select your language of choice.
3 To commit your changes, press DONE
T-Mobile Sidekick Help
Your Sidekick LX 2009 includes a T-Mobile Sidekick Help application
that contains links to helpful information. Press JUMP to go to the
Jump screen. Scroll to highlight T-Mobile Sidekick Help, then press the
trackball.
My Account - Check your account information including minute allowance
and balance, and your rate plan.
Troubleshooting - Points you toward more information on using your
Sidekick effectively.
Sidekick News - Access exciting topics related to your Sidekick.
18 T-Mobile Sidekick Help
Device Controls
MENU button Press MENU to open a list of actions you can take on
the current screen.
JUMP button Press JUMP to go back to the Jump screen, your
starting point for launching all the device applications.
CANCEL button Press CANCEL to dismiss any changes you have
made to a screen or dialog box.
DONE button Press DONE to go back through the screens you were
previously viewing, until you reach the Jump screen. On a screen or in a
dialog box, press DONE to save your changes and dismiss the screen or
dialog box. Press and hold DONE to enter power-saving keyguard mode.
SEND/END buttons When the buttons are lit, use them to initiate/end a
call. When unlit, press to page up or to page down.
TRACKBALL Press the trackball to select a highlighted item or press
and hold to open a pop-up menu. Roll the trackball to reverse or advance
the current selection through the “selectable” items on a screen. Rolling
the trackball left or right with a folder highlighted opens/collapses folder
contents. Adjust trackball speed and acceleration from the Jump Menu >
Settings > Trackball & D-Pad screen. Read what the trackball colors mean
during sleep in “Trackball light indicators” on page 35.
Device Controls 19
JUMP
MENU
CANCEL
END
TRACKBALL
SEND
DONE
RIGHT SHOULDER
BUTTON
LEFT SHOULDER
BUTTON
POWER ON / OFF
BUTTON
VOLUME
BUTTONS
D-PAD
+
USB /
POWER PORT
STEREO
HEADSET JACK
LEFT and RIGHT SHOULDER buttons The function of these buttons
depends on which application you’re using. For example, while using the
Camera, the right shoulder button captures a photo and when pressed half,
it focuses. While using the Phone, the left shoulder button toggles Mute
and the right shoulder button toggles Speakerphone. While in the Email
and MMS Messaging compose screens, the right shoulder button opens
your photo albums so you can select a photo to attach to the message, and
the left shoulder button opens the voice recorder.
DIRECTIONAL PAD (D-Pad) Press up, down, left, or right to scroll or move
within text fields and navigate in the browser or games. By default, the D-
Pad navigates folders and screens, jumping over individual items. You can
make the D-Pad navigate the same as the trackball (moving item-by-item)
from the Jump Menu > Settings > Trackball & D-Pad settings screen.
STEREO HEADSET JACK
Always connect the headset to your device
before making/receiving a call. P
ress the headset button once to answer a
call and again to end it. To answer a second incoming call, press the button
once to put the active call on hold and answer the incoming call.
VOLUME buttons Press and hold + or to step through your Sound
Profiles or to increase/decrease the volume on the phone or music player.
To silently mute your device, press and hold .
20 Device Controls
  • Page 1 1
  • Page 2 2
  • Page 3 3
  • Page 4 4
  • Page 5 5
  • Page 6 6
  • Page 7 7
  • Page 8 8
  • Page 9 9
  • Page 10 10
  • Page 11 11
  • Page 12 12
  • Page 13 13
  • Page 14 14
  • Page 15 15
  • Page 16 16
  • Page 17 17
  • Page 18 18
  • Page 19 19
  • Page 20 20
  • Page 21 21
  • Page 22 22
  • Page 23 23
  • Page 24 24
  • Page 25 25
  • Page 26 26
  • Page 27 27
  • Page 28 28
  • Page 29 29
  • Page 30 30
  • Page 31 31
  • Page 32 32
  • Page 33 33
  • Page 34 34
  • Page 35 35
  • Page 36 36
  • Page 37 37
  • Page 38 38
  • Page 39 39
  • Page 40 40
  • Page 41 41
  • Page 42 42
  • Page 43 43
  • Page 44 44
  • Page 45 45
  • Page 46 46
  • Page 47 47
  • Page 48 48
  • Page 49 49
  • Page 50 50
  • Page 51 51
  • Page 52 52
  • Page 53 53
  • Page 54 54
  • Page 55 55
  • Page 56 56
  • Page 57 57
  • Page 58 58
  • Page 59 59
  • Page 60 60
  • Page 61 61
  • Page 62 62
  • Page 63 63
  • Page 64 64
  • Page 65 65
  • Page 66 66
  • Page 67 67
  • Page 68 68
  • Page 69 69
  • Page 70 70
  • Page 71 71
  • Page 72 72
  • Page 73 73
  • Page 74 74
  • Page 75 75
  • Page 76 76
  • Page 77 77
  • Page 78 78
  • Page 79 79
  • Page 80 80
  • Page 81 81
  • Page 82 82
  • Page 83 83
  • Page 84 84
  • Page 85 85
  • Page 86 86
  • Page 87 87
  • Page 88 88
  • Page 89 89
  • Page 90 90
  • Page 91 91
  • Page 92 92
  • Page 93 93
  • Page 94 94
  • Page 95 95
  • Page 96 96
  • Page 97 97
  • Page 98 98
  • Page 99 99
  • Page 100 100
  • Page 101 101
  • Page 102 102
  • Page 103 103
  • Page 104 104
  • Page 105 105
  • Page 106 106

Sharp PV300 Owner's manual

Category
Mobile phones
Type
Owner's manual
This manual is also suitable for

Ask a question and I''ll find the answer in the document

Finding information in a document is now easier with AI