Page is loading ...

DIGITAL CAMERA
Instruction
Manual
Getting to know your
camera better
Quick Start Guide
This manual will help you get
started using your camera
right away.
Button operations
Menu operations
Printing pictures
Using OLYMPUS Master
( Thank you for purchasing an Olympus digital camera. Before you start to use your new camera, please read
these instructions carefully to enjoy optimum performance and a longer service life. Keep this manual in a
safe place for future reference.
( We recommend that you take test shots to get accustomed to your camera before taking important
photographs.
( In the interest of continually improving products, Olympus reserves the right to update or modify information
contained in this manual.
( The screen and camera illustrations shown in this manual were produced during the development stages
and may differ from the actual product.
Appendix
SP-570UZ
d4364_e_00_unified_bookfile.book Page 1 Friday, December 28, 2007 4:06 PM

2 EN
Contents
Quick Start Guide P.3
Camera diagram P.11
Learn the names of the camera parts
and get a general grasp of the
camera’s functions. Use this section
as reference for the functions.
Button operations P.16
Test out the functions of the camera
buttons by following the illustrations
and trying them out on the camera.
Operations using the control panel P.29
Learn how to use the control panel to
perform basic operations, and then try
them out.
Menu operations P.32
Learn everything about the menus,
from basic operations to the functions
of each menu and their various
settings.
Printing pictures P.59
Learn how to print pictures you have
taken.
Using OLYMPUS Master P.64
Learn how to transfer and save
pictures to a computer.
Getting to know your camera better P.68
Find out more about your camera and
learn what to do when you have a
question regarding operations.
Appendix P.81
Read about convenient functions and
safety precautions on how to use your
camera more effectively.
d4364_e_00_unified_bookfile.book Page 2 Friday, December 28, 2007 4:06 PM

EN 3
Quick Start Guide
Gather these items (box contents)
Pull the strap tight so that it does not come loose.
c
k Start Guide
Digital Camera StrapLens Cap
Lens Cap String
AA Batteries (four) USB cable AV Cable OLYMPUS Master 2
CD-ROM
Items not shown: Instruction Manual (this manual), warranty card.
Contents may vary depending on purchase location.
Attach the strap and the lens cap
3
4
• Attach the strap to the other eyelet
in the same manner.
d4364_e_00_unified_bookfile.book Page 3 Friday, December 28, 2007 4:06 PM

4 EN
Quick Start Guide
Prepare the camera
a. Load batteries into the camera
1
2
3
5
6
7
4
Slide the battery compartment
lock from ) to = and ensure
that the battery compartment
cover is securely locked (7).
Failure to do so may cause the
battery compartment cover to
open during shooting and the
batteries to fall out, resulting in
loss of image data.
Battery compartment
lock
d4364_e_00_unified_bookfile.book Page 4 Friday, December 28, 2007 4:06 PM

EN 5
Quick Start Guide
Prepare the camera
b. Insert the (optional) xD-Picture Card into the camera
This camera allows you to take pictures without using an optional xD-
Picture Card™ (hereinafter called the card). When taking pictures
without the card, pictures will be stored in the internal memory.
For details on the card, please refer to “The card” (P.85).
4
5
3
2
1
Card cover
Notch
Contact area
Make sure the card is correctly
oriented and insert it straight into
the card slot.
Insert the card until it clicks into place.
To remove the card, push it all the way
in, release it slowly and remove.
d4364_e_00_unified_bookfile.book Page 5 Friday, December 28, 2007 4:06 PM

6 EN
Quick Start Guide
Turn the camera on
This explains how to turn on the camera in shooting mode.
a. Set the mode dial to h.
Still picture shooting modes
b. Remove the lens cap and set the camera’s power
switch to ON.
To turn off the camera, set the power switch to OFF.
h The camera determines the optimum settings for the shooting conditions
automatically.
P
The camera automatically sets the optimum aperture value and shutter speed.
A This function allows you to change the aperture manually.
S This function allows you to change the shutter speed manually.
M This function allows you to change the aperture and shutter speed manually.
r This function allows you to set each shooting function manually and use as
your original shooting mode.
s This function allows you to shoot pictures by selecting a scene according to
the shooting condition.
g This function allows you to set the target items by following the shooting
guide displayed on the screen.
When shooting movies
(shooting mode)
When shooting
still pictures
(shooting mode)
When viewing pictures
(playback mode)
• When the date and time have
not yet been set, this screen
will appear.
X
YM
YMD
D TIME
---- -- -- -- --
MENU
CANCEL
Power switch
Tips
The directions of the arrow pad are indicated with
124 3 in this manual.
43
2
1
d4364_e_00_unified_bookfile.book Page 6 Friday, December 28, 2007 4:06 PM

EN 7
Quick Start Guide
Set date and time
a. Press the 1 z button and the 2Y button to
select [Y].
The first two digits of [Y] are fixed.
b. Press the 3# button.
c. Press the 1 z button and the
2Y button to select [M].
About the date and time setting screen
Y-M-D (Year-Month-Day)
Exits a setting.
Minute
Date formats (Y/M/D, M/D/Y, D/M/Y)
Hour
X
YM
YMD
D TIME
---- -- -- -- --
MENU
CANCEL
1 z button
2Y button
2008
-- -- -- --
X
YM
YMD
D TIME
MENU
CANCEL
3# button
2008 08
-- -- --
X
YM
YMD
D TIME
MENU
CANCEL
d4364_e_00_unified_bookfile.book Page 7 Friday, December 28, 2007 4:06 PM

8 EN
Quick Start Guide
Set date and time
d. Press the 3# button.
e. Press the 1 z button and the
2Y button to select [D].
f. Press the 3# button.
g. Press the 1 z button and the
2Y button to select the hours
and minutes.
The time is displayed in the 24-hour
format.
h. Press the 3# button.
i. Press the 1 z button and the
2Y button to select [Y/M/D].
j. After all items have been set,
press the o button.
For precise time setting, press the o button as the time signal
strikes 00 seconds.
2008 08 26
-- --
X
YM
YMD
D TIME
MENU
CANCEL
2008 08 26 12 30
OK
X
YM
YMD
D TIME
MENU
CANCEL SET
2008 08 26 12 30
OK
X
YMD
TIME
MENU
CANCEL SET
Y
Y
M
M
D
D
o button
10
M
10
M
4
4
IN
AUTO
N
ORM
N
ORM
The number of remaining still
pictures is displayed.
d4364_e_00_unified_bookfile.book Page 8 Friday, December 28, 2007 4:06 PM

EN 9
Quick Start Guide
Take a picture
a. Hold the camera
b. Focus
The AF target mark lights in green when the focus and exposure
are locked. The shutter speed and aperture value are displayed.
If the AF target mark blinks in red, the focus is not adjusted
properly. Try locking the focus again.
c. Shoot
a. Press the u button.
b. While looking through the
viewfinder, rotate the diopter
adjustment dial little by little.
When you can see the icons in the
viewfinder clearly, adjustment is
complete.
10
M
10
M
4
4
IN
AUTO
N
ORM
N
ORM
Horizontal grip Vertical grip
Shutter button
AF target mark
1/400
1/400
F3.5
F3.5
AUTO
(Pressed
Halfway)
Shutter button
The card access lamp blinks.
(Pressed
Completely)
Adjusting the viewfinder’s focus using the diopter
Diopter adjustment dial
u button
Viewfinder
d4364_e_00_unified_bookfile.book Page 9 Friday, December 28, 2007 4:06 PM

10 EN
Quick Start Guide
View pictures
a. Set the mode dial to q.
a. Press the 4& button and the 3# button to display
the picture you want to erase.
b. Press the f/S button.
c. Press the 1 z button to select [YES], and press
the o button to erase the picture.
Arrow pad
Next Picture
Prev. Picture
Mode Dial
1
1
IN
10
M
10
M
2008.08.26
2008.08.26
12:30
12:30
100-0001
100-0001
N
ORM
N
ORM
Erase pictures
ERASE
ERASE
OK
IN
N O
NO
YES
SETCANCEL
MENU
f/S button
3# button
4& button
1 z button
o button
IN
ERASE
ERASE
NO
Y E S
YES
OK
SETCANCEL
MENU
d4364_e_00_unified_bookfile.book Page 10 Friday, December 28, 2007 4:06 PM

EN 11
Camera diagram
Camera
Flash (P.23, P.43)
Microphone
Strap Eyelet (P.3)Lens
Shutter Button
(P.9, P.21)
F Button (Exposure
Compensation) (P.22)
Strap Eyelet (P.3)
AF/MF Switch
(P.24)
j Button (Drive)
(P.24)
#UP Button (Flash Pop-up)
(P.23)
Connector Cover
(P.56, P.59, P.65)
Multi-connector
(P.56, P.59, P.65)
DC-IN Jack
(P.86)
Card Cover (P.5)
Card Slot (P.5)
Self-Timer Lamp/AF Illuminator
(P.28, P.38, P.42)
d4364_e_00_unified_bookfile.book Page 11 Friday, December 28, 2007 4:06 PM

12 EN
Zoom Ring
(P.21)
Hot Shoe
(P.82)
Mode Dial
(P.6, P.16)
Control Dial
(P.22)
Power Switch
(P.6, P.16)
Tripod Socket
Speaker
Battery Compartment
Cover (P.4)
Battery Compartment
Lock (P.4)
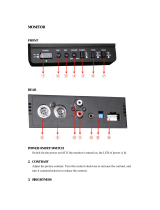
Monitor
(P.13, P.54)
DISP./E Button
(P.26)
m Button
(P.25)
f/S Button
(Shadow Adjustment
Technology/Erase)
(P.25)
Arrow Pad (P.27)
o Button
(OK/FUNC)
(P.28)
u Button (Monitor/Viewfinder)
(P.22)
AEL AFL/m Button
(AE Lock, AF Lock/Sequential
Playback) (P.23)
q/P Button
(Playback/Print)
(P.25, P.61)
Viewfinder (P.9)
Diopter Adjustment Dial
(P.9)
z Button (Custom)
(P.27)
# Button (Flash)
(P.23)
Y Button
(Self-timer) (P.28)
& Button (Macro)
(P.27)
Card Access Lamp
(P.9, P.67, P.73)
d4364_e_00_unified_bookfile.book Page 12 Friday, December 28, 2007 4:06 PM

EN 13
( Shooting mode
Monitor Symbols & Icons
Item Indication Ref. Page
1 Shooting mode P, c, B, F, U, A, etc. P.6, P.16,
P.37
2 Flash mode !, #, H, $, etc. P.23
3 Silent mode j P.45
4 Digital image stabilization h P.42
5 Macro mode
Super macro mode
&
%
P.27
6 Shadow Adjustment Technology f P.25
7 Noise reduction T P.44
8 AE lock mark B P.23
9 Battery check Z = full power, [ = low power P.76
10 AF lock mark
Manual focus
AF predict
^
a
{
P.23
P.24
P.42
11 Flash standby
Camera movement warning/Flash
charge
# Lit
# Blinks
P.68
12 Flash intensity control w -2.0 - +2.0 P.42
13 Saturation 6 -5 - +5 P.44
14 Sharpness N -5 - +5 P.44
15 Contrast J -5 - +5 P.44
16 Conversion lens 1 P.45
17 Sound record R P.50
18 Dual time l P.55
19 Alarm k P.55
20 Number of storable still pictures
Remaining recording time
4
00:34
P.8
P.72
Movie
Still picture
10
M
10
M
+2.0
+2.0
1/400
1/400
F3.5
F3.5
+2.0
+2.0
+2
+2
+2
+2
+2
+2
4
4
IN
ISO
1600
ISO
1600
AFL
NR
AEL
+2.0
+2.0
12s12 s
F
INE
F
INE
C
1
10
11
12
13
14
15
16
17
18
19
20
212425 2326
32
33
31
30
29
28
27
2 54 96 7 83
22
+2.0
+2.0
IN
00:34
00:34
VGA
VGA
15
15
12s12 s
1
17
18
20
19
22
212326
33
31
29
28
27
2 54 93
d4364_e_00_unified_bookfile.book Page 13 Friday, December 28, 2007 4:06 PM

14 EN
21 Current memory B: Pictures are recorded to the internal
memory
No indication: Pictures are recorded to the
card
P.85
22 AF target mark R P.9,
P.21,
P.41
23 Self-timer Y, W P.28
24 Aperture value F2.8 to F8.0 P.17
25 Shutter speed 15", 1/2, 1/400, 1/2000, BULB, etc. P.17
26 Exposure compensation -2.0 - +2.0 P.22
27 Image quality
Compression
Frame rate
P, Q
M (Normal), L (Fine)
O (15 frames/sec.), N (30 frames/sec.)
P.34
P.34
P.35
28 Image size F, H, D, C, etc. P.34
29 Spot metering n, J P.41
30 ISO ISO 100, ISO 800, ISO 1600 etc. P.40
31 White balance 5, 3, 1, w - y, V P.39
32 Drive j, c, d, g, i, 7 P.24, P.40
33 White balance compensation B1 - B7, R1 - R7 P.43
Item Indication Ref. Page
d4364_e_00_unified_bookfile.book Page 14 Friday, December 28, 2007 4:06 PM

EN 15
( Playback mode
Item Indication Ref. Page
1 Silent mode j P.45
2 Print reservation/Number of prints <x10 P.62
3 Sound record H P.50
4Protect 9 P.50
5 Sequential Playback/Sequential Pictures
Auto Playback
s P.20
6 Battery check Z = full power, [ = low power P.76
7 Shutter speed 15", 1/2, 1/60, 1/1000, etc. P.17
8 Aperture value F2.8 to F8.0 P.17
9 Exposure compensation -2.0 - +2.0 P.22
10 White balance WB AUTO, 5, 3, 1, w - y, V P.39
11 Image size F, H, D, C, etc. P.34
12 File number M100-0004 P.54
13 Frame number
Playing time/Total recording time
4
00:14/00:34
—
P.19
14 Current memory B: Playing back the picture in the internal
memory
No indication: Playing back the picture in the
card
P.85
15 Image quality
Compression
Frame rate
P
M (Normal), L (Fine)
O (15 frames/sec.), N (30 frames/sec.)
P.34
P.34
P.35
16 ISO ISO 100, ISO 800, ISO 1600 etc. P.40
17 Date and time 2008.08.26 12:30 P.7, P.54
MovieStill picture
2008.08.26
2008.08.26
12:30
12:30
100-0004
100-0004
00:14
/
00:34
00:14
/
00:34
IN
VGA
VGA
15
15
12
17
10
11
13
15
3
4 61
14
10
M
10
M
2008.08.26
2008.08.26
12:30
12:30
4
4
+2.0
+2.0
F3.5
F3.5
10
10
IN
x
x
100-0004
100-0004
N
ORM
N
ORM
1/1000
1/1000
ISO 1
600
ISO 1
600
2
11
12
10
8
7
9
13
3
4 651
17
141516
d4364_e_00_unified_bookfile.book Page 15 Friday, December 28, 2007 4:06 PM

16 EN
Button operations
Button operations
Set the mode dial to the desired shooting or playback mode.
• Some functions cannot be set depending on the position of the mode dial.
g “Functions available in shooting modes” (P.79)
The camera determines the optimum settings for the shooting conditions automatically.
Settings in the [CAMERA MENU] such as WB and ISO sensitivity cannot be changed.
The camera automatically sets the optimum aperture value and shutter speed for the brightness of
the subject.
Settings in the [CAMERA MENU] such as WB and ISO sensitivity can be changed.
1 Power switch
Turning the camera on and off
Power on: Shooting mode
• Monitor turns on
• Lens extends
Playback mode
• Monitor turns on
2 Mode dial
Switching between shooting and playback modes
h Shooting pictures with full automatic settings
P Set the optimum aperture value and shutter speed
Playback
mode
Shooting mode
Shooting mode
Flash mode
Drive mode
Macro mode/
Super macro mode
10
M
10
M
P
4
4
IN
N
ORM
N
ORM
1/400
1/400
F3.5
F3.5
12
s
12
s
Self-timer
c
d
e
fg
78
125
36
4
9
a
b
The number of
remaining still pictures is
displayed.
h0
j
i
k
d4364_e_00_unified_bookfile.book Page 16 Friday, December 28, 2007 4:06 PM

EN 17
Button operations
Turn the control dial. Press F to switch between the aperture value and the shutter speed.
To take long exposure (bulb) shots
Turn the control dial toward G to set the shutter speed to BULB. The shutter remains open as long
as the shutter button is pressed. (Bulb shooting is only possible when [ISO] is set to [64] (maximum
time: 8 minutes).)
A Changing the aperture value for shooting pictures
Turn the control dial. The camera automatically sets the shutter
speed.
Aperture value
: Turning toward U increases the aperture value.
: Turning toward G decreases the aperture value.
When the correct exposure cannot be obtained, the aperture value
is displayed in red.
S Changing the shutter speed for shooting pictures
Turn the control dial. The camera automatically sets the aperture
value.
Shutter speed
: Turning toward U sets the shutter speed faster.
: Turning toward G sets the shutter speed slower.
When the correct exposure cannot be obtained, the shutter speed
is displayed in red.
M Changing the aperture value and shutter speed for shooting pictures
Exposure differential
When this range has been exceeded ±3.0EV, the exposure
differential is displayed in red.
Aperture value
: Turning toward U increases the aperture value.
: Turning toward G decreases the aperture value.
Shutter speed
: Turning toward U sets the shutter speed faster.
: Turning toward G sets the shutter speed slower.
1/1000
1/1000
F4.0
F4.0
A
10
M
10
M
4
4
IN
N
ORM
N
ORM
Adjustment range
W : F2.8 to F8.0
T : F4.5 to F8.0
1/100
1/100
F2.8
F2.8
S
10
M
10
M
4
4
IN
N
ORM
N
ORM
Adjustment range
1/2 to 1/1000
(When [NOISE REDUCT.] is set
to [ON]: up to 4 sec.)
1/1000
1/1000
F2.8
F2.8
+2.0
+2.0
M
10
M
10
M
4
4
IN
N
ORM
N
ORM
Adjustment range
Aperture value: F2.8 to F8.0
(The aperture value varies
depending on the zoom position.)
Shutter speed: 15" to 1/2000 (The
shutter speed varies depending
on the aperture value.)
d4364_e_00_unified_bookfile.book Page 17 Friday, December 28, 2007 4:06 PM

Button operations
18 EN
This mode allows you to set the shooting functions, save up to 4 shooting modes manually, and use
them as your original shooting modes.
g “MY MODE SETUP
Setting and saving shooting-related functions
” (P.57)
Use the function menu or control panel to switch the registered My Mode.
g “My 1/2/3/4
Switching the registered original shooting mode
” (P.28)
“Switching My Mode” (P.31)
You can shoot pictures by selecting a scene mode according to the situation.
Select a scene mode/Change to another scene mode
• Press m and select [SCN] from the top menu.
• By switching to another scene mode, most settings will be changed to the default settings of the
new scene mode.
g “s (Scene)
Shooting pictures by selecting a scene according to the situation
” (P.37)
Shooting pictures by comparing previews of different effects
When [R] (movies) is set to [ON], audio is recorded with the movie.
• When recording with sound, only the digital zoom can be used. To use the optical zoom, set [R]
(movies) to [OFF]. To zoom in when recording with sound, set [DIGITAL ZOOM] to [ON].
g “R (movies)
Recording sound with movies
” (P.45)
“DIGITAL ZOOM
Zooming in on your subject
” (P.41)
r Shooting pictures with your own original modes
s Shoot pictures by selecting a scene mode according to the situation
g Follow the shooting guide to take better pictures
This function allows you to set the target items by following the
shooting guide displayed on the screen.
• Press m to display the shooting guide again.
• To change the setting without using the shooting guide, select
another shooting mode.
• Functions set using the shooting guide will revert to the default
settings when m is pressed or when the shooting mode is
changed.
Select one of the [1 Shoot w/ effects preview.] options from the
[SHOOTING GUIDE] menu to preview a live, multi-frame window
on the monitor showing different levels of the selected shooting
effect. You can use the four preview frames to compare the desired
settings/effects.
• Use the arrow pad to select the frame with the desired settings,
and press o. The camera automatically switches to shooting
mode and allows you to shoot with the selected effect.
n Recording movies
1
2
3
4
5
OK
SET
SHOOTING GUIDE
Shoot w/ effects preview.
Brightening subject.
Shooting into backlight.
Set particular lighting.
Blurring background.
Use 43 to change the display.
When [Exposure effects.] is
selected
0.0
0.0
+0.3
+0.3
+0.7
+0.7
+1.0
+1.0
Exposure effects.
d4364_e_00_unified_bookfile.book Page 18 Friday, December 28, 2007 4:06 PM

EN 19
Button operations
• When [IMAGE STABILIZER] is set to [ON], continuous movie recording for a long period will
cause the camera’s internal temperature to rise and the camera may stop operation
automatically. Remove the battery and allow the camera to cool down for some time before you
begin shooting again. Or you can set [IMAGE STABILIZER] to [OFF].
In addition, the temperature of the camera’s exterior also rises during usage. This is not a
malfunction.
The last picture taken is displayed.
• Press the arrow pad to view other pictures.
• Use the control dial to switch between close-up playback, index display and calendar display.
g “Control dial
Index display/Calendar display/Close-up playback
” (P.22)
Playing back movies
Select a movie in the playback mode and press o to play.
Operations during movie playback
• Press o to pause the playback.
This icon lights red during movie recording.
The remaining recording time is displayed.
When the remaining recording time reaches 0, recording will stop
automatically.
q Viewing pictures you have taken/Selecting playback mode
00:34
00:34
REC
REC
2008.08.26
2008.08.26
12:30
12:30
100-0004
100-0004
4
4
IN
MOVIE PLAY
OK
2008.08.26
2008.08.26
12:30
12:30
100-0004
100-0004
00:12
/
00:34
00:12
/
00:34
IN
1 : Increases the volume.
2 : Reduces the volume.
3 : Each time you press the button, the playback speed changes in the following
order: 2×; 20×; and back to 1×.
4 : Plays the movie in reverse. Each time you press the button, the playback speed
changes in the following order: 1×; 2×; 20×; and back to 1×.
Playing time/Total recording time
d4364_e_00_unified_bookfile.book Page 19 Friday, December 28, 2007 4:06 PM

Button operations
20 EN
Operations during pause
• To resume the movie, press o.
• To cancel the playback of the movie in the middle of it or during pause, press m.
Viewing panoramic pictures taken with [COMBINE IN CAMERA 1] [COMBINE IN
CAMERA 2] (Panorama playback)
• Use the arrow pad to select a panoramic picture, and then press
o. Scrolling from left to right or from bottom to top starts
automatically.
• Turn the control dial to zoom in or out while a picture is scrolling.
Use the arrow pad to change the scrolling direction of a zoomed
in picture.
• To stop or resume scrolling in the original magnification, press
o.
• To exit panorama playback, press m.
g “PANORAMA Taking and combining panoramic pictures”
(P.36)
Displaying pictures that have been shot continuously in index view (Sequential
Playback) / Auto playing back of pictures that have been shot continuously
(Sequential Pictures Auto Playback)
Only the first frame will be displayed for pictures that have been shot continuously using the
following options.
[j] [c] [d] [i] [BKT] [TIMELAPSE] [AUCTION] [SHOOT & SELECT1] [SHOOT &
SELECT2] [SMILE SHOT]
• Select the pictures with s icon and press AEL AFL/m to play back in index view (Sequential
Playback). Press AEL AFL/m again to return to the first frame.
• Select the pictures with s icon and press o to play back automatically (Sequential Pictures
Auto Playback).
• This function is only available for pictures taken with this model.
• When the first frame is displayed, changes to any of the following functions will be applied to all
the sequential pictures in the series:
0/y/PRINT ORDER/ERASE
To configure settings to individual pictures, press AEL AFL/m to display the pictures in index
view first before configuring.
2008.08.26
2008.08.26
12:30
12:30
100-0004
100-0004
00:14
/
00:34
00:14
/
00:34
IN
/
1 : Displays the first frame.
2 : Displays the last frame.
3 : Displays the next frame.
4 : Displays the previous frame.
2
2
IN
EXPAND
100-0002
100-0002
10
M
10
M
2
2
IN
BACK
AEL AFL/m
d4364_e_00_unified_bookfile.book Page 20 Friday, December 28, 2007 4:06 PM
/