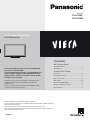
Panasonic TXL32C3ES Quick start guide
- Category
- LCD TVs
- Type
- Quick start guide
This manual is also suitable for
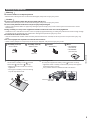
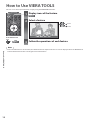
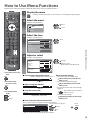
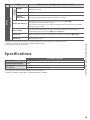
Panasonic TXL32C3ES is a high-quality LCD television designed to provide an immersive viewing experience. With its advanced features, you can enjoy stunning visuals, crystal-clear audio, and a wide range of entertainment options. Connect your favorite devices, such as DVD players, gaming consoles, or streaming sticks, to access a vast library of content. The intuitive VIERA TOOLS interface makes it easy to navigate menus and find your desired programs. Additionally, the TV's sleek and stylish design complements any living space, making it a perfect choice for modern homes.
Panasonic TXL32C3ES is a high-quality LCD television designed to provide an immersive viewing experience. With its advanced features, you can enjoy stunning visuals, crystal-clear audio, and a wide range of entertainment options. Connect your favorite devices, such as DVD players, gaming consoles, or streaming sticks, to access a vast library of content. The intuitive VIERA TOOLS interface makes it easy to navigate menus and find your desired programs. Additionally, the TV's sleek and stylish design complements any living space, making it a perfect choice for modern homes.


-
 1
1
-
 2
2
-
 3
3
-
 4
4
-
 5
5
-
 6
6
-
 7
7
-
 8
8
-
 9
9
-
 10
10
-
 11
11
-
 12
12
-
 13
13
-
 14
14
-
 15
15
-
 16
16
-
 17
17
-
 18
18
-
 19
19
-
 20
20


Panasonic TXL32C3ES Quick start guide
- Category
- LCD TVs
- Type
- Quick start guide
- This manual is also suitable for
Panasonic TXL32C3ES is a high-quality LCD television designed to provide an immersive viewing experience. With its advanced features, you can enjoy stunning visuals, crystal-clear audio, and a wide range of entertainment options. Connect your favorite devices, such as DVD players, gaming consoles, or streaming sticks, to access a vast library of content. The intuitive VIERA TOOLS interface makes it easy to navigate menus and find your desired programs. Additionally, the TV's sleek and stylish design complements any living space, making it a perfect choice for modern homes.
Ask a question and I''ll find the answer in the document
Finding information in a document is now easier with AI