Page is loading ...
1
2
3
4
5
6
7
8
9
0
1
2
3
4
5
6
7
8
9
0
1
2
3
4
5
6
7
8
9
0
1
2
3
4
5
6
7
8
9
0
6010 K
Glaskeramik-Kochfeld
Ceramic Glass Hob
Gebrauchsanweisung
Montageanweisung
Operating Instructions
Installation Instructions

22
Dear Customer,
Please read these operating instructions through carefully.
Above all, please take note of the “Safety” section on the first few
pages. Please keep these operating instructions for future reference.
Pass them on to any subsequent owner of the appliance.
1
The warning triangle and/or specific words (Warning!, Caution!,
Important!) are used to highlight instructions that are important for
your safety or for the function of the appliance. It is imperative that
these instructions are observed.
0 1. This symbol guides you step by step when operating the appliance.
2. ...
3. ...
3
Next to this symbol you receive additional information and practical
tips on using the appliance.
2
Tips and information about the economical and ecological use of the
machine are marked with a cloverleaf.
Before calling out an engineer to a fault please read the chapter „What
to do if...“ as you may be able to resolve the problem yourself.
For further assistence contact your local AEG Service Force Centre, see
the chapter „Service“.
Printed on paper manufactured with environmentally sound processes.
He who thinks ecologically acts accordingly ...

Contents
23
CONTENTS
Operating Instructions . . . . . . . . . . . . . . . . . . . . . . . . . . . . . . . . . . . . 24
Safety . . . . . . . . . . . . . . . . . . . . . . . . . . . . . . . . . . . . . . . . . . . . . . . . . . . . . . . . 24
Disposal . . . . . . . . . . . . . . . . . . . . . . . . . . . . . . . . . . . . . . . . . . . . . . . . . . . . . . 26
Appliance Description . . . . . . . . . . . . . . . . . . . . . . . . . . . . . . . . . . . . . . . . . . 27
Features of the hob . . . . . . . . . . . . . . . . . . . . . . . . . . . . . . . . . . . . . . . . . . . . 27
Control Panel . . . . . . . . . . . . . . . . . . . . . . . . . . . . . . . . . . . . . . . . . . . . . . . . . 27
Before Using for the First Time . . . . . . . . . . . . . . . . . . . . . . . . . . . . . . . . . 28
Initial Cleaning . . . . . . . . . . . . . . . . . . . . . . . . . . . . . . . . . . . . . . . . . . . . . . . . . 28
Suitable Pans . . . . . . . . . . . . . . . . . . . . . . . . . . . . . . . . . . . . . . . . . . . . . . . . . 28
Using the Cooking Zones . . . . . . . . . . . . . . . . . . . . . . . . . . . . . . . . . . . . . . . 29
Control Knobs . . . . . . . . . . . . . . . . . . . . . . . . . . . . . . . . . . . . . . . . . . . . . . . . . 29
Cooking on the Zones . . . . . . . . . . . . . . . . . . . . . . . . . . . . . . . . . . . . . . . . . . 29
Switching on the Dual Cooking Zone . . . . . . . . . . . . . . . . . . . . . . . . . . . . . . 30
Residual Heat Indicators . . . . . . . . . . . . . . . . . . . . . . . . . . . . . . . . . . . . . . . . . 30
Usage, Tables, Tips . . . . . . . . . . . . . . . . . . . . . . . . . . . . . . . . . . . . . . . . . . . . . 31
Pans . . . . . . . . . . . . . . . . . . . . . . . . . . . . . . . . . . . . . . . . . . . . . . . . . . . . . . . . . . 31
Tables . . . . . . . . . . . . . . . . . . . . . . . . . . . . . . . . . . . . . . . . . . . . . . . . . . . . . . . . 32
Typical Heat Settings . . . . . . . . . . . . . . . . . . . . . . . . . . . . . . . . . . . . . . . . . 32
Cleaning and Care . . . . . . . . . . . . . . . . . . . . . . . . . . . . . . . . . . . . . . . . . . . . . 33
Ceramic Glass . . . . . . . . . . . . . . . . . . . . . . . . . . . . . . . . . . . . . . . . . . . . . . . . . . 33
The Hob Frame . . . . . . . . . . . . . . . . . . . . . . . . . . . . . . . . . . . . . . . . . . . . . . . . . 34
What to do, if ... . . . . . . . . . . . . . . . . . . . . . . . . . . . . . . . . . . . . . . . . . . . . . . 35
Installation Instructions . . . . . . . . . . . . . . . . . . . . . . . . . . . . . . . . . . . 36
Technical Data . . . . . . . . . . . . . . . . . . . . . . . . . . . . . . . . . . . . . . . . . . . . . . . . . 36
Regulations, Standards, Directives . . . . . . . . . . . . . . . . . . . . . . . . . . . . . . . . . 37
Safety Instructions for the Installer . . . . . . . . . . . . . . . . . . . . . . . . . . . . . . . . 38
Electrical Connection . . . . . . . . . . . . . . . . . . . . . . . . . . . . . . . . . . . . . . . . . . . 39
UK only . . . . . . . . . . . . . . . . . . . . . . . . . . . . . . . . . . . . . . . . . . . . . . . . . . . . 40
Service . . . . . . . . . . . . . . . . . . . . . . . . . . . . . . . . . . . . . . . . . . . . . . . . . . . . . . 41
Installation . . . . . . . . . . . . . . . . . . . . . . . . . . . . . . . . . . . . . . . . . . . . . . . . . 42

Operating Instructions
24
OPERATING INSTRUCTIONS
1 Safety
The safety aspects of this appliance comply with accepted technical
standards and the German Appliance Safety Law. However, we also
consider it our obligation as a manufacturer to make you aware of the
following safety information.
Electrical Safety
• The new appliance may only be installed and connected up by quali-
fied personnel, according to the manufacturers instructions and to
the relevant country standards.
Please observe this instruction, otherwise the warranty will not cover
any damage that may occur.
• Repairs to the appliance should only be carried out by approved ser-
vice engineers. Improper repairs can cause injury or significant mal-
function. If your appliance needs repairing, please contact your local
AEG Service Force Centre.
• If your appliance malfunctions or fractures and cracks or splits
appear:
– switch off all cooking zones,
– Disconnect the hob from the electricity supply.
Child Safety
The cooking zones will become hot when the hob is in use. Therefore,
always keep small children away.
The hob is designed to be operated by adults. Do not allow children to
play near or with the hob
Safety During Use
• This appliance is intended for domestic cooking only. It is not
designed for commercial or industrial purposes
• Do not use the hob to heat the room.
• Take care when plugging electrical appliances into mains sockets near
the hob. Connecting leads must not come into contact with the hot
surface.
• Overheated fats and oils catch fire quickly. You should supervise
cooking when preparing foods in fat or oil (e.g. chips).
• Switch the cooking zones off after use.

Operating Instructions
25
Safety When Cleaning
• For safety reasons do not clean the appliance with a steam jet or high
pressure cleaner.
• Clean the hob in accordance with the maintenance and cleaning
instructions in this manual.
How to Avoid Damage to Your Appliance
• Do not use the hob as a work surface or for storage.
• Do not use the cooking zones with empty pans, or without pans.
• Ceramic glass is insensitive to temperature shock and very robust,
however it is not unbreakable. Hard and sharp objects, in particular,
can damage the cooking surface if they fall on it.
• Do not use cast iron pans or pans with damaged bases that are rough
or burred. Scratching may occur when the pans are slid.
• Do not place any pans on the hob frame. Scratching may occur or the
paint damaged.
• Ensure that liquids containing acids, e.g. vinegar, lemon or scale
remover do not come into contact with the hob frame, otherwise
matt spots will appear.
• If sugar or a dish containing sugar comes into contact with a hot
cooking zone and then melts, remove the soiling immediately whilst
still hot using a scraper. If it cools, damage to the surface may occur
on removal.
• Keep all items and materials that can melt away from the ceramic
glass surface, e.g. plastics, aluminium foil, or oven foils. If something
of this nature should melt onto the ceramic glass surface, it must also
be removed immediately using the scraper.
• If you wish to use special types of pan (e.g. a pressure cooker, sim-
mering pan, wok, etc.), please observe the manufacturer's instruc-
tions.
• Avoid boiling pans dry. The bases could be irreparably damaged in the
process and the glass ceramic cooking surface also damaged.
Operating Instructions
26
2 Disposal
Disposing of Packaging Materials
• All packaging can be recycled, sheet and hard foam parts are appro-
priately marked. Please dispose of packaging material and any old
appliance with due regard to safety and the environment.
Information on disposal
• The appliance must not be disposed of in the household rubbish.
• You can obtain information about collection dates or public tips from
your local Council or Environmental Health Office.
• Warning! Before disposing of old appliances make them inoperable.
Cut off the mains cable.
Appliance Description
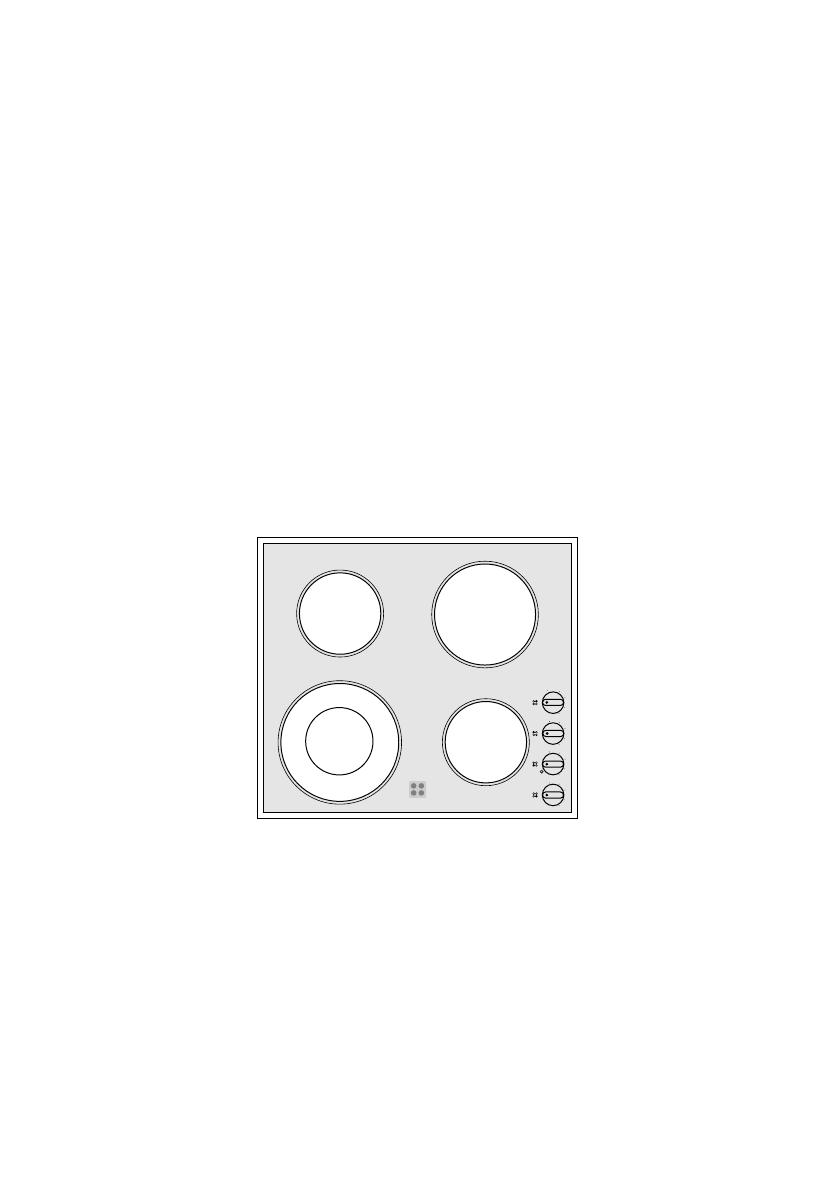
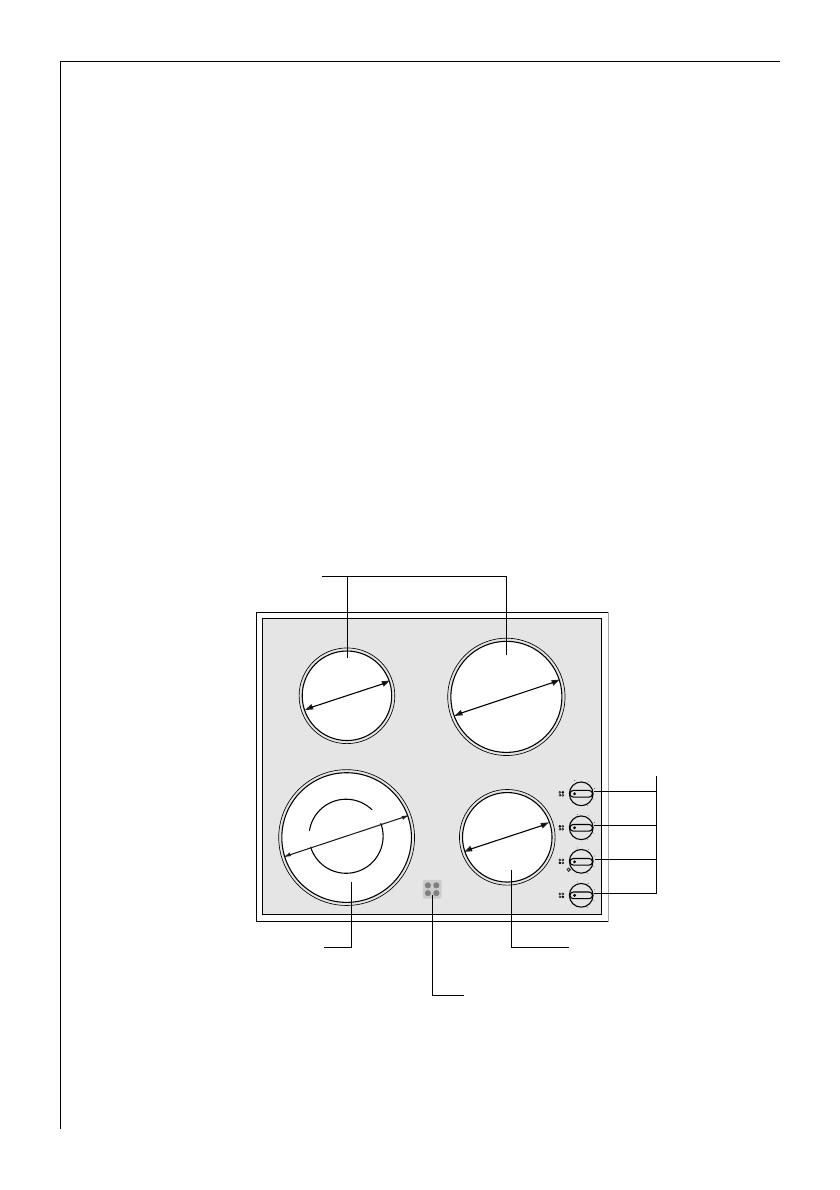
Features of the hob
145 mm
180 mm
145 mm
120/210 mm
1
2
3
4
5
6
7
8
9
0
1
2
3
4
5
6
7
8
9
0
1
2
3
4
5
6
7
8
9
0
1
2
3
4
5
6
7
8
9
0
Single Cooking
Zones
Dual Cooking
Zone
Four Residual Heat Indicators
(separate for each zone)
Control Knobs
Single Cooking
Zone
Operating Instructions
27
Control Panel
Initial Cleaning
0 Wipe the ceramic glass cooking surface with a damp cloth to remove
any traces left from manufacturing.
1
Important: Do not use any caustic, abrasive cleaners! The surface could
be damaged.
Suitable Pans
• By using suitable pans, you avoid damage to the appliance.
• The base should be as thick and flat as possible. Rough bases may
scratch the cooking surface.
• Pans made of cast iron or with rough edges and burrs can leave per-
manent scratches.
1
• Important: Avoid pans boiling dry. The bases could be irreparably
damaged in the process and the glass ceramic cooking surface dam-
aged.
1
2
3
4
5
6
7
8
9
0
1
2
3
4
5
6
7
8
9
0
1
2
3
4
5
6
7
8
9
0
1
2
3
4
5
6
7
8
9
0
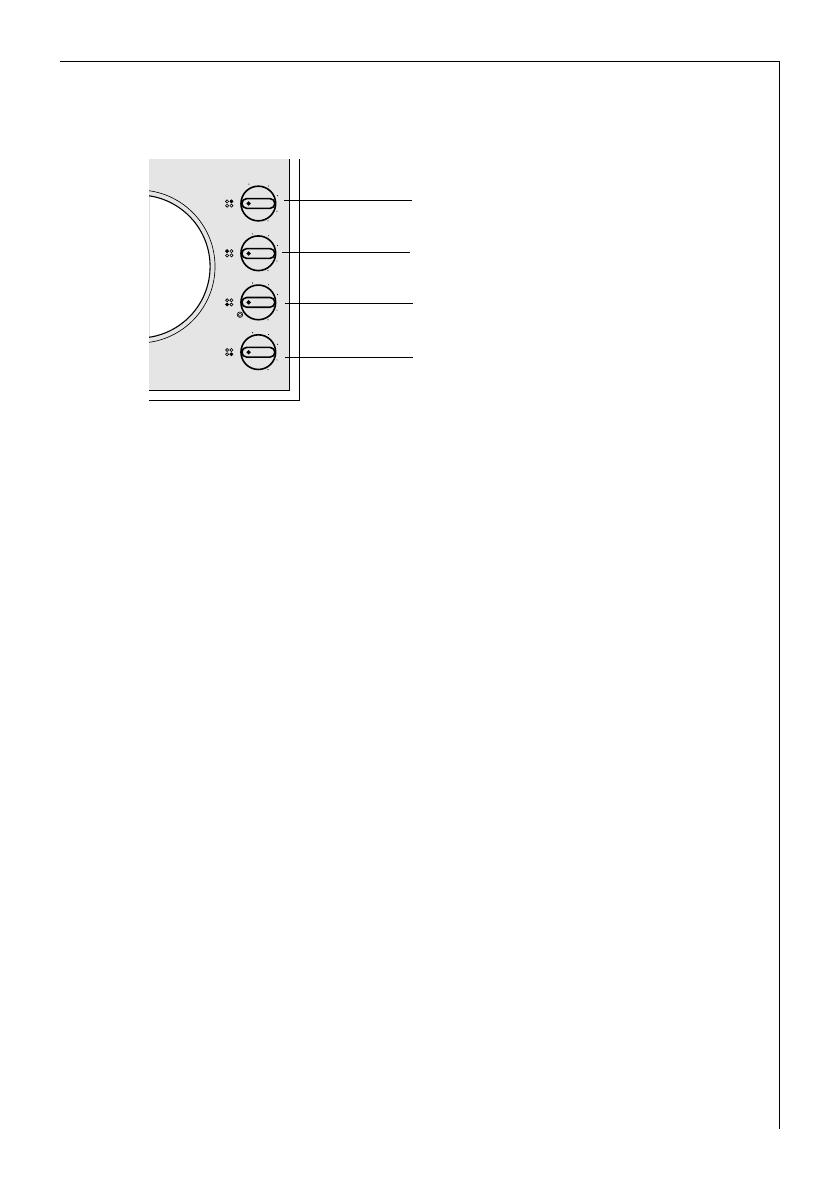
Control Knobs
for Rear Right Cooking Zone
for Rear Left Cooking Zone
for Front Right Cooking Zone
for Front Left Cooking Zone

Operating Instructions
28
Using the Cooking Zones
3
When the cooking zones are switched on, they may hum briefly. This is
a characteristic of all ceramic glass cooking zones and does not impair
either the function or the life of the appliance.
Ring Switches
• The heat settings are continuously variable
between settings 1-9.
1 = lowest power
9 = highest power
K = double ring switching
Cooking on the Zones
0 1. Select a high setting for heating up / browning.
2. As soon a steam starts to form or the oil is hot, turn
back to the heat setting necessary for further cook-
ing.
3. To stop cooking, turn back to the zero position.
2
Switch off the cooking zone approx. 5-10 minutes
before the end of the cooking to make use of the
residual heat. By this means you can save electricity.
1
2
3
4
5
6
7
8
9
0
1
2
3
4
5
6
7
8
9
0
1
2
3
4
5
6
7
8
9
0

Operating Instructions
29
Switching on the Dual Cooking Zone
1
The switch for the dual cooking zone is switched on by turning clock-
wise and must not be turned past the stop!
0 1. Turn the switch for the dual cooking zone clockwise.
Turn past position 9 through light resistance at the
symbol, to a clearly noticeable stop.
2. Then turn back to the required heat setting for
cooking.
3. To stop cooking, turn back to the off position.
3
The next time the dual cooking zone is required,
repeat the above procedure.
Residual Heat Indicators
An indicator is assigned to each cooking zone. This illumi-
nates when the temperature of the cooking zone reaches
80° C
1
Important! As long as the residual heat indicator is illu-
minated, there is a risk of burns.
Even when the cooking zone is switched off, the corresponding indica-
tor will remain on until the temperature falls below 80° C.
2
You can use the residual heat for melting and for keeping food warm.
1
2
3
4
5
6
7
8
9
0

Operating Instructions
30
Usage, Tables, Tips
Pans
The better the pan, the better the results.
• You can recognise good pans by their bases. The base should be thick
and as flat as possible.
• Pans with aluminium or copper bases can leave
metal discoloration on the glass ceramic surface
that is very difficult or impossible to remove.
• Do not use cast iron pans or pans with damaged
bases that are rough or burred. Permanent
scratching may occur when the pans are slid.
• When cold, pan bases are normally bowed slightly
inwards (concave). They should under no circum-
stances be bowed outwards (convex).
2
Tips on Saving Energy
You will save valuable energy if you observe the following tips:
• Always place pans on the cooking zone before switching on.
• Soiled cooking zones and pan bases increase the
electricity consumption.
• If possible, always fit pans with a lid.
• Switch off the cooking zones before the end of
cooking to make use of the residual heat, e.g. to
keep food warm or for melting.
• The pan base and cooking zone should be the
same size.
When purchasing pans, pay attention to the
diameter of the base. Manufacturers often state
the diameter of the top of the pan
• Cooking times are reduced by up to 50% when a
pressure cooker is used.
Operating Instructions
31
Tables
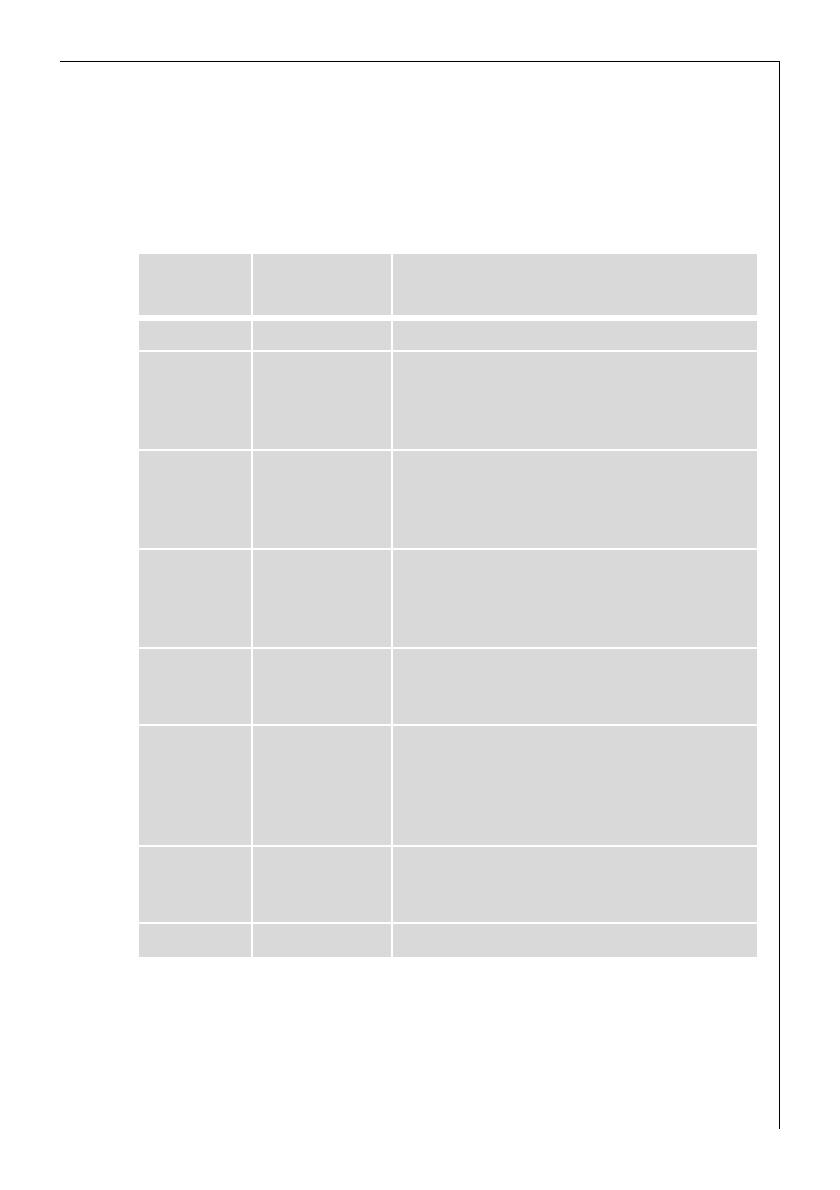
Typical Heat Settings
The information given in the following tables is for guidance only. The
heat setting necessary for cooking is dependent on the quality of the
pans, and the type and quantity of the food.
3
When heating up or frying, we recommend heat setting “9“ and then
continue cooking foods at an appropriate lower heat setting.
Switch
Setting
Cooking Process/
Setting
Suitable for
9 Heating Up Heating up large amounts of water, boiling pasta
7-9
Fast
Frying
Frying chips,
browning meat, e.g. goulash,
frying, e.g. potato pancakes
frying pieces of loin, steaks
6-7
Slow
Frying
Frying meat, schnitzels, cordon bleu
cutlets, rissoles, sausages, liver roux,
mild frying of
eggs, omelettes, frying doughnuts
4-5 Boiling
Boiling larger quantities of food,
stews and soups,
steaming potatoes,
boiling meat stock
3-4
Steaming,
Braising
Braising vegetables,
braising meat
cooking rice pudding
2-3 Simmering
Simmering rice and milk dishes
(stir occasionally),
Steaming smaller quantities of potatoes or
vegetables,
warming ready meals
1-2 Melting
Omelette, egg garnish, hollandaise sauce,
keeping dishes warm,
melting butter, chocolate, gelatine
0 Residual heat, off position
Operating Instructions
32
Cleaning and Care
Ceramic Glass
1
Important: Cleaners must not come into contact with the ceramic
glass when hot! All cleaners must be removed with plenty of clean
water after cleaning as they may have a caustic effect when the rings
are next heated!
Do not use any aggressive cleaners, such as e.g. grill or oven sprays,
coarse scouring cleaners or pan cleaners that cause scratches.
3
Clean the ceramic glass surface after each use when it is hand warm or
cold. By this means you will avoid soiling becoming burnt on.
Remove scale and water marks, fat spots and metallic shimmering dis-
coloration with a commercially available ceramic glass or stainless steel
cleaner, e.g. with “Stahl-Fix“ or “Vitroclen“.
Light Soilage
1. Wipe the ceramic glass surface with a damp cloth and a little washing
up liquid.
2. Then rub dry with a clean cloth. No residues of cleaner must be left on
the surface.
3. Once a week, thoroughly clean the entire ceramic glass surface with a
commercially available ceramic glass cleaner such as “Vitroclen“.
4. Then wipe the ceramic glass surface with plenty of clean water and rub
dry with a clean fluff-free cloth.
Stubborn Soilage
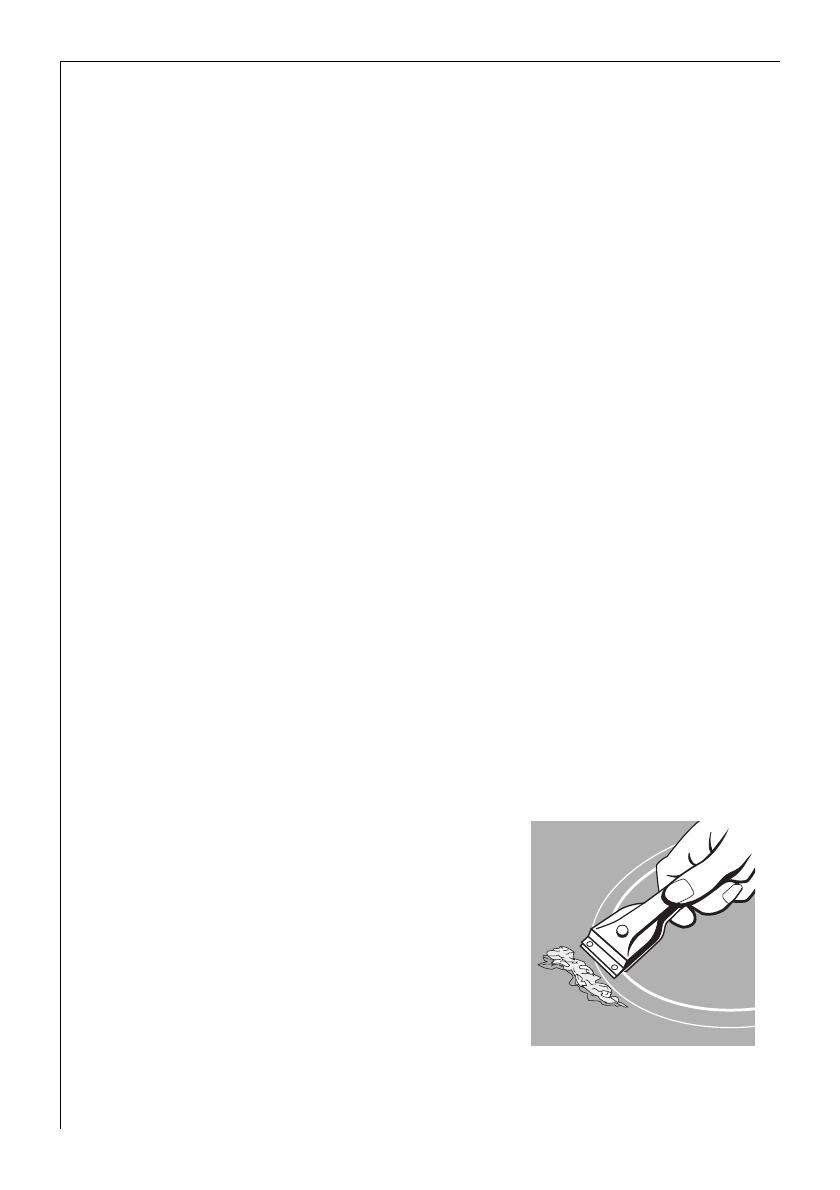
0 1. To remove food that has boiled over or
burnt on spots, use a glass scraper.
2. Place the glass scraper at an angle to the
glass ceramic surface.
3. Remove soiling by sliding the scraper.
3
You can obtain glass scrapers and
ceramic glass cleaners from your special-
ist retailers.

Operating Instructions
33
1 Burnt on Soilage
0 1. Remove burnt on sugar, melted plastic,
aluminium foil or other melted materials
immediately, while the hob is still hot,
using a glass scraper.
1
Important: When using the glass scraper
on the hot cooking zone, there is a risk of
burns!
2. Clean the cooking surface as normal once
it is cold.
3
If the cooking zone has cooled down
already prior to the soilage being removed, warm it up again for clean-
ing.
Scratches or dark marks on the ceramic glass surface, which have been
caused by a pan base with sharp edges, cannot be removed. However,
they do not impair the function of the cooking surface.
The Hob Frame
1
Important! Do not put vinegar, lemons or scale removers on the hob
frame, otherwise mat spots will appear.
0 1. Wipe the frame with a damp cloth and a little washing up liquid.
2. Soften dried dirt with a wet cloth. Then wipe off and rub dry.

Operating Instructions
34
What to do, if ...
... the cooking zones do not work?
0 Check whether
• the corresponding cooking zone is switched on.
• the switch is set to the correct heat setting.
• in the case of multi-ring cooking zones: the required heating circuit
is switched on.
• the mains fuse (fuse box) has blown.
If this information does not provide you with the necessary assis-
tance, please seek specialist advice.
1
Warning: Repairs to the appliance may only be carried out by approved
service engineers. Improper repairs can cause injury or serious malfunc-
tion. If your appliance needs repairing, please contact your local AEG
Service Force Centre.

35
INSTALLATION INSTRUCTIONS
1 Important! This appliance must be installed by qualified personnel,
according to the manufacturer’s instructions and to the relevant coun-
try standards.
Please observe this instruction, otherwise the warranty will not cover
any damage that may occur.
Technical Data
Appliance Dimensions
Width 570 mm
Depth 500 mm
Height 49 mm
Cut-Out Dimensions
Width 560 mm
Depth 490 mm
Corner radius R3
Power Consumption
Front left Dual cooking zone 2200 W
Rear left cooking zone 1200 W
Rear right cooking zone 1800 W
Front right cooking zone 1200 W
Heater Element Voltage 230 V ...240 V
Total Electrical Load Max. 6.4 kW
Fuse Rating 30 Amp

Installation Instructions
36
Regulations, Standards, Directives
This appliance meets the following standards:
• EN 60 335-1 and EN 60 335-2-6
in respect of the safety of electrical appliances for household use and
similar purposes and
• DIN 44546 / 44547 / 44548
in respect of properties of electric cookers for the household.
• EN 55014-2 / VDE 0875 part 14-2
• EN 55014 / VDE 0875 part 14/12.93
• EN 61000-3-2 / VDE 0838 part 2
• EN 61000-3-3 / VDE 0838 part 3
in respect of basic electromagnetic compatibility (EMC) requirements.
;
This appliance complies with the EU Directives
• 73/23/EWG dated 19.02.1973 (Low Voltage Directive)
• 89/336/EWG dated 03./05.1989 (EMC Directive
including Directive Amendment 92/31/EWG).

Installation Instructions
37
1 Safety Instructions for the Installer
• This hob must be installed by qualified personnel, according to the
manufacturer’s instructions and to the relevant country standards.
• In respect of fire protection, this appliance corresponds to type Y (IEC
335-2-6). Only this type of appliance may be installed with a high
cupboard or wall on one side.
• It is not permitted to fit drawers below the cooking surface.
• Protection against electric shock must be provided by the installation.
• The kitchen unit in which the appliance is fitted must satisfy the
requirements of DIN 68930 in respect of stability.
• Built-in ovens and cooking surfaces are fitted with special connector
systems. They may only be combined with appliances with a matching
system.
• All cut surfaces are to be sealed with a suitable sealant for protection
against moisture.
• On tiled work surfaces, the joints in the area where the hob sits on
the surface must be completely filled with grout.
• On natural, artificial stone, or ceramic tops, the snap action springs
must be bonded in place.
• Ensure that the seal is correctly seated in the frame and that it is
seated against the work surface without leaving any gaps. Additional
silicon sealant must not be applied, this will make removal more diffi-
cult in the event of the need for service.
• To remove the hob, it must be pressed out from below.
Installation Instructions
38
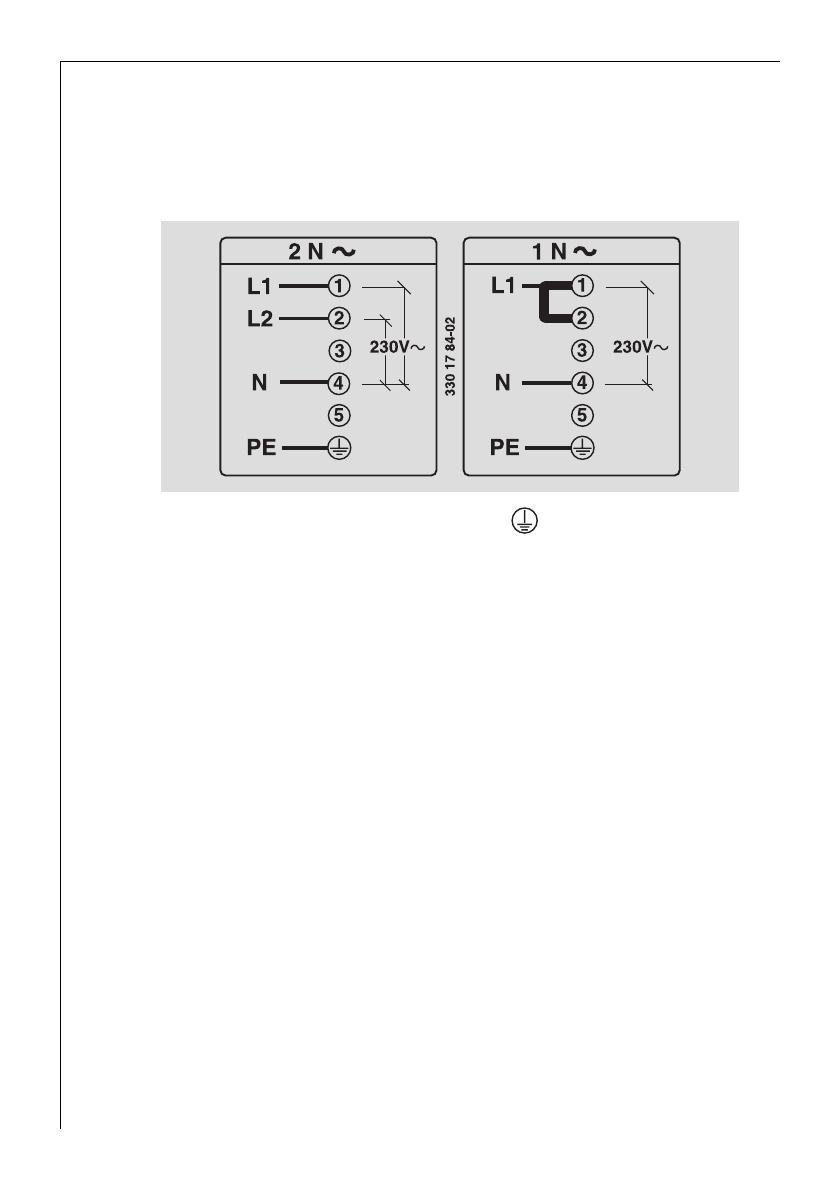
Electrical Connection
• The mains connection terminals are on the underside of the appli-
ance, behind a cover. The hob is to be connected in accordance with
the connection diagram as a function of the mains supply present...
• The earth conductor is connected to the terminal, the earth wire
must be longer than the current carrying wires. If necessary, the
bridges on the terminal block must be changed as appropriate.
• The cable connections must be made in accordance with regula-
tions and the terminal screws fully tightened.
• The connecting cable is then to be secured using the strain relief
clamp.
1
• Following connection to the mains supply, all cooking zones are to be
switched on, at the maximum setting, one after the other for approx.
30 seconds to check that they function correctly.

Installation Instructions
39
UK only
1
Any electrical work required to install this hob should be carried
out by a qualified electrician or competent person, in accordance
with the current regulations.
1
This hob must be earthed.
The manufacturer declines any liability should these safety measures
not be observed.
This hob is designed to be connected to a 230-240 50 HZ AC electrical
supply.
Before switching on, make sure the electricity supply voltage is the
same as that indicated on the hob rating plate. The rating plate is
located on the bottom of the hob.
The hob is supplied without supply cable. A 3 core flexible supply cable
must be fitted, in accordance with the specifications given in the table.
The hob must be connected to a double pole switch with a minimum
gap of 3 mm. Between the switch contacts and of a type suitable for
the required load in compliance with the current electric regulations.
The switch should be sited within 2 m of the hob and be easily accessi-
ble upon completion of the installation.
The switch must not break the yellow and green earth cable at any
point.
Connection via Min. size Cable/Flex Cable/Flex Type Fuse
Cooker Control Cir-
cuit
6mm
2
PVC / PVC twin and
earth
30 Amp

Service
41
SERVICE
In the “What to do, if …” section a number of malfunctions are listed
that you can rectify yourself. In the event of a malfunction, look there
first.
Is it a technical malfunction?
Then please contact your customer service centre. (You will find
addresses and telephone numbers in the "Customer Service Centres"
list.)
Always take the time to prepare yourself for the call. By this means you
will make diagnosis of the problem easier and also make it easier to
decide if a customer service visit is necessary:
Please determine as accurately as
possible:
• How is the malfunction notice-
able ?
• Under what circumstances does
the malfunction occur?
Prior to the telephone call it is imperative that you make a note of the
following appliance code numbers that are given on the rating plate:
• PNC Code (9 digits),
• S-No Code (9 digits).
We recommend you to record the code numbers here so that you
always have them at hand:
PNC . . . . . . . . .
S-No . . . . . . . . .
When will you be charged, also during the warranty period?
• when you could have rectified the malfunction with aid of the Table
of Malfunctions (see “What to do, if ...” section),
• if the customer service engineer has to make several calls because he
was not given important information prior to his visit, and therefore,
e.g., had to fetch replacement parts. You can avoid multiple calls if
you prepare yourself well for the telephone call, as described above.
/