Page is loading ...

KODAK D4000 Duplex Photo Printer
November 2011
Photo Printer
User’s Guide for the Calibration Application
D4000 Duplex Photo Printer
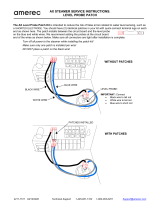
Rewind/Unload
Advance/Load

Eastman Kodak Company
Rochester, New York 14650
© Eastman Kodak Company, 2011
Kodak and XtraLife are trademarks of Eastman Kodak Company.
Portions of this software may contain intellectual property owned
or licensed by X-Rite, Incorporated, or one of its affiliates.
P/N 4J7914

November 2011 iii
Table of Contents
1 Getting Started
About the Printer Calibration Application ................................................................................................ 1-1
System Requirements.....................................................................................................................................1-2
Additional Information for Using an X-RITE i1PRO Device...................................................................1-2
Installing the Calibration Application.........................................................................................................1-3
Uninstalling the Calibration Application .................................................................................................. 1-4
WINDOWS XP Operating Systems ....................................................................................................1-4
WINDOWS 7 Operating Systems ....................................................................................................... 1-4
2 Starting the Calibration Application
Starting the Application from the Printer Driver .....................................................................................2-1
Starting the Application from the Desktop..............................................................................................2-2
3 Using the Calibration Application
Using the Visual Calibration Mode.............................................................................................................3-1
Using the Visual Calibration Mode for Simplex Printers ................................................................3-1
Using the Visual Calibration Mode for the KODAK D4000 Duplex Photo Printer ................3-3
Using the Instrumented Calibration Mode ..............................................................................................3-5
Using the Instrumented Calibration Mode for Simplex Printers..................................................3-5
Using the Instrumented Calibration Mode for Duplex Printers ...................................................3-7
4 Troubleshooting
Error Messages ............................................................................................................................................... 4-1
Launching the Calibration Application from the Printer Driver ................................................... 4-1
Calibration Errors ..................................................................................................................................... 4-1
Instrumented Calibration Errors...........................................................................................................4-2
Non-recoverable Errors ..........................................................................................................................4-2


November 2011 1-1
1
Getting Started
Welcome to the KODAK Photo Printer Calibration Application for
WINDOWS, a tool for calibrating KODAK Thermal Printers using
visual or instrumented calibration techniques.
The following KODAK Printer models are supported by the
calibration application:
• KODAK D4000Duplex Photo Printer
• KODAK 8810 Photo Printer
• KODAK Photo Printer 8800/9810
• KODAK 7000/7010/7015 Photo Printer
• KODAK Photo Printer 6800/6850
• KODAK Photo Printer 605
NOTE: Instrumented calibration is not supported with the
KODAK Photo Printer 6800/6850 and the KODAK Photo
Printer 605.
To use the instrumented calibration capability of the application,
you must have an X-RITE i1PRO spectrophotometer and the latest
i1PRO device driver software from X-RITE. If you have an X-Rite
i1Pro device, “Additional Information for Using an X-RITE i1PRO
Device” on page 1-2.
About the Printer Calibration Application
The KODAK Photo Printer Calibration Application (Calibration
Application) lets your Kodak printer produce the best possible
color. Calibration adjusts the response of the printer so that a
specific data input value yields a specific color density output.
The printer is shipped with default factory calibration settings.
You can set up your printer and print right away without having to
calibrate the printer. However, if you are dissatisfied with the color
of your prints, you should calibrate your printer.

1-2 November 2011
Getting Started
System Requirements
You must have the following:
The minimum requirement is the system configuration that
MICROSOFT requires for use with WINDOWS XP or
WINDOWS 7.
NOTE: 64-bit Intel Itanium-based systems are not supported.
The Calibration Application requires:
• a functional USB 2.0 port to communicate with the printer.
NOTE: If your equipment only supports the USB 1.1 protocol, data
communication to the printer is slower and may affect
calibration performance.
• .NET FRAMEWORK 4 from MICROSOFT to be installed on
your computer prior to installing the Calibration Application.
NOTE: If .NET FRAMEWORK 4 is not installed on your system,
the Calibration Application installer provides the
opportunity to download and install it before proceeding
with the installation of the Calibration Application. To
download .NET FRAMEWORK 4, you must be connected
to the internet. If you do not install .NET FRAMEWORK 4
when prompted, the calibration installation will not be
completed.
Additional Information for Using an X-RITE i1PRO Device
The X-RITE i1PRO uses software components that belong to the
X-RITE Corporation. Users should ensure that they have the most
up to date software for their i1PRO devices by contacting X-RITE
Corporation for support.
The X-RITE i1PRO device does not have a sound generator. The
i1PRO uses sound produced by the system board or sound card of
your computer. At the time of the release of the KODAK Photo
Printer Calibration Application, the X-RITE i1PRO device drivers
did not support sound on 64-bit WINDOWS Operating Systems.
Operating System Minimum Service Pack
WINDOWS XP Home SP3
WINDOWS XP Professional SP3
WINDOWS XP Professional
(x64 Edition)
SP2
WINDOWS 7 N/A
WINDOWS 7 (x64) N/A

Getting Started
November 2011 1-3
If your computer does not have a sound card and/or speakers, or
you are running a 64-bit Operating System, when you are
prompted to 'wait for the beep' during the instrumented
calibration:
1. Wait for the light below the reading probe of the X-RITE i1PRO
device to illuminate.
2. Hold the button for 3 seconds and then begin scanning the
strip on the calibration target.
IMPORTANT: If you try to scan a strip before the lamp has
stabilized, an error appears indicating an incorrect
number of patches were read. If this error occurs,
re-scan the strip after holding the button for 3
seconds prior to starting the scan.
Installing the Calibration Application
IMPORTANT: Before installing the software:
• Have .NET FRAMEWORK 4 installed.
• Have “Administrator” privileges.
If your system has an older version of calibration software
(KODAK Visual Printer Calibration Utility) installed, the installer
configures the Visual Calibration Utility to launch the new
Calibration Application.
1. Go to www.kodak.com/go/ enter your printer model number
For example: www.kodak.com/go/D4000
NOTE: Valid printer models are: D4000, 8810, 8800, 7000,
7010, 7015, 6800, 6850, and 605
2. Select the Standalone Printer tab.
3. Select the Technical Resources link for your printer model and
download the KODAK Photo Printer Calibration Application
for WINDOWS.
4. Locate the file that you downloaded to your hard drive and
double-click the file.
5. When the WinZip Self-Extractor screen appears, browse to a
folder location that is easy to access, such as your computer's
desktop. Click Unzip.
An Installer folder is created containing all of the files.
6. Double-click the Installer folder.
7. Double-click the setup.exe file.
NOTE: The installer checks to see if you have .NET FRAMEWORK
4 installed. If it is not installed, you are prompted to
download it from the MICROSOFT Web site and install it.
When the .NET FRAMEWORK 4 installation is complete,
you return to the Calibration Application installer.

1-4 November 2011
Getting Started
8. Follow the on-screen instructions to install the Calibration
Application.
NOTE: With some WINDOWS Operating Systems, a system
restart is required after installing .NET. If a restart is
required, the calibration application installer prompts you
to restart your system at the end of the installation of both
.NET and the Calibration Application.
Uninstalling the Calibration Application
To remove the calibration application software from your
computer, you must have “Administrator” privileges.
WINDOWS XP Operating Systems
1. From the Control Panel, open Add or Remove Programs.
2. Select “Kodak Photo Printer Calibration Application.”
3. Click Remove.
4. Click Ye s at the message prompt.
WINDOWS 7 Operating Systems
1. From the Control Panel, click Programs and Features.
2. Select “Kodak Photo Printer Calibration Application.”
3. Click Uninstall.
4. Click Ye s at the message prompt.

November 2011 2-1
2
Starting the Calibration Application
Starting the Application from the Printer Driver
1. For your operating system, do the following:
2. Click the KODAK Photo Printer that you would like to
calibrate.
3. Select Printer Properties.
4. Select the Printer Calibration tab.
5. Click Launch Calibration
The KODAK Photo Printer Calibration dialog box opens. The
name of the printer and the paper installed appear in the
upper section of the dialog box.
WINDOWS XP WINDOWS 7
Select Start > Printers and
Faxes.
Select Start > Control Panel >
Devices and Printers.

2-2 November 2011
Starting the Calibration Application
Starting the Application from the Desktop
You can launch the application from the desktop in one of two
ways:
• Double-click the shortcut for the Photo Printer Calibration
Application.
OR
• Select Start>Programs>KODAK Photo Printer> Calibration
Application.
The KODAK Photo Printer Calibration Application dialog box
opens. The name of the printer and the paper installed appear
in the upper section of the dialog box.

November 2011 3-1
3
Using the Calibration Application
Calibrate your printer whenever the color of the prints is not what
you expect. You may also want to calibrate the printer after it has
been serviced.
You can calibrate using the visual calibration mode or the
instrumented calibration mode.
NOTE: To use the instrumented calibration mode, you must have:
• an X-RITE i1PRO Device connected to your computer.
• the X-RITE i1PRO software installed on your computer.
IMPORTANT: Never print from another application during a
calibration session. This could leave the printer
calibration in an unknown state.
Using the Visual Calibration Mode
Use the visual calibration mode to calibrate KODAK simplex
(single-sided) or duplex (double-sided) Printers.
Using the Visual
Calibration Mode for
Simplex Printers
1. At the “KODAK Photo Printer Calibration Application” dialog
box, select:
• your printer model
• the printer name and serial number
• the starting calibration setting:
– Current printer settings—use the current printer
settings as the starting point.
– Default printer settings—use the default printer settings
as the starting point.
• Visual for the Calibration Method
2. Click Start Printer Calibration.

3-2 November 2011
Using the Calibration Application
The printer prints a calibration target.
3. Determine the most neutral gray patch on the calibration
target.
4. Click the arrows to enter the patch number that corresponds
with the most neutral patch on the calibration target.
5. If it is necessary to make your overall prints lighter or darker,
make a selection from the drop-down menu to adjust the
highlights.
NOTE: Only do this step if you want to adjust the highlights so
that your prints meet your personal preference. After
adjusting the highlights, check your prints to make sure
that they look the way you want.
6. Click Update Printer Calibration.
The calibration application calculates and downloads a new
calibration table and updates any adjustment you made to the
highlights.
7. Calibration is complete. Click Ye s if you would like to verify
the calibration on the same printer, or calibrate another
printer. Click No to exit the Calibration Application.

Using the Calibration Application
November 2011 3-3
8. To verify the calibration results:
• Select Current printer settings as a starting calibration
setting.
•Click Start Printer Calibration to make another test print.
9. Do Steps 3-8 until patch 25 is the most neutral gray.
Using the Visual
Calibration Mode for the
KODAK D4000 Duplex
Photo Printer
1. At the “KODAK Photo Printer Calibration Application” dialog
box, select:
• your printer model.
• the printer name and serial number.
• the starting calibration setting
– Current printer settings—use the current printer
settings as the starting point.
– Default printer settings—use the default printer settings
as the starting point.
• Visual for the Calibration Method.
2. Click Start Printer Calibration.
The printer prints two calibration targets—one with the letter
A, and one with the letter B appearing above Patch 1.
3. Determine the most neutral gray patch on the Side A
calibration target.
4. Click the arrows to enter the patch number for Side A that
corresponds with the most neutral patch on the calibration
target.

3-4 November 2011
Using the Calibration Application
5. Determine which patch on Side B matches the patch selected
for Side A.
6. Click the arrows to enter the patch number for Side B that
corresponds with the most neutral patch selected on Side A.
7. If it is necessary to make the overall prints lighter or darker,
make a selection from the drop-down menu to adjust the
highlights.
NOTE: Only do this step if you want to adjust the highlights so
that your prints meet your personal preference. After
adjusting the highlights, check your prints to make sure
that they look the way you want.
8. Click Update Printer Calibration.
The calibration application calculates and downloads a new
calibration table and updates any adjustment you made to the
highlights.
9. Calibration is complete. Click Ye s if you would like to verify
the calibration on the same printer, or calibrate another
printer. Click No to exit the Calibration Application.

Using the Calibration Application
November 2011 3-5
10. To verify the calibration results:
• Select Current printer settings as a starting calibration
setting.
•Click Start Printer Calibration to make another test print.
11. Do Steps 3-10 until patch 25 is the most neutral gray and
match on both Side A and Side B calibration targets.
Using the Instrumented Calibration Mode
Use the instrumented calibration mode to calibrate simplex
(single-sided) or duplex printers. The instrumented calibration is
not supported for the following printers:
• KODAK Photo Printer 6800/6850
•KODAK 605 Photo Printer
NOTE: To use the instrumented calibration mode, you must have:
• an X-RITE i1PRO Device connected to your computer.
If there is not an X-RITE i1Pro Device connected, the
calibration application defaults to the visual calibration
method.
• the X-RITE i1PRO software installed on your computer.
IMPORTANT: Never print from another application during a
calibration session. This could leave the printer
calibration in an unknown state.
Using the Instrumented Calibration Mode for Simplex Printers
1. Launch the KODAK Photo Printer Calibration Application.
2. At “KODAK Photo Printer Calibration Application”, select:
• your printer model.
• the printer name and serial number.
• the starting calibration setting
– Current printer settings—use the current printer
settings as the starting point.
– Default printer settings—use the default printer settings
as the starting point.
• Instrumented for the Calibration Method.

3-6 November 2011
Using the Calibration Application
3. Click Start Printer Calibration.
4. Place X-Rite i1PRO Device in its base to calibrate the device.
Make sure that it is fully seated in the base.
5. Click and release the button on the device to calibrate it.
Once the X-Rite i1PRO Device is calibrated, the printer prints a
calibration target.
6. Secure the calibration target into the tray clip of the X-RITE
i1PRO scanning tray.
7. Align the scanning guide over the first row of patches on the
target.
8. Place the X-RITE i1PRO Device on the scanning guide.
9. Position the X-RITE i1PRO Device in the white area next to the
first row of patches on the target strip.
10. Click and hold the button. Wait for the device to beep.
NOTE: If your computer does not have a sound card and/or
speakers, there will not be an audible beep. Wait for the
light below the reading probe of the X-RITE i1PRO device
to illuminate. Wait an additional 3 seconds for the lamp to
stabilize before you start to scan.
11. Continue to hold the button and slowly move the X-RITE
i1PRO Device completely across the patches on the target and
into the white area at the end of the row of patches.
12. Release the button.

Using the Calibration Application
November 2011 3-7
The status appears on the screen.
13. Repeat Steps 7-12 for each row of patches on the calibration
target.
When all of the rows of patches are successfully read, the new
calibration table is automatically generated and sent to the
printer.
14. Calibration is complete. Click Ye s if you would like to calibrate
another printer. Click No to exit the Calibration Application.
Using the Instrumented
Calibration Mode for
Duplex Printers
1. Launch the KODAK Photo Printer Calibration Application.
2. At “KODAK Photo Printer Calibration Application”, select:
• your printer model.
• the printer name and serial number.
• the starting calibration setting
– Current printer settings—use the current printer
settings as the starting point.
– Default printer settings—use the default printer settings
as the starting point.
• Instrumented for the Calibration Method.

3-8 November 2011
Using the Calibration Application
3. Click Start Printer Calibration.
4. Place X-Rite i1PRO Device in its base to calibrate the device.
Make sure that it is fully seated in the base.
5. Click and release the button on the device to calibrate it.
Once the X-Rite i1PRO Device is calibrated, the printer prints a
calibration target with the letter A on one side, and the letter
B on the other side.
6. Secure the calibration target into the tray clip of the X-RITE
i1PRO scanning tray with Side A up.
7. Align the scanning guide over the first row of patches on the
target.
8. Place the X-RITE i1PRO Device on the scanning guide.
9. Position the X-RITE i1PRO Device in the white area next to the
first row of patches on the target strip.
10. Click and hold the button. Wait for the device to beep.
NOTE: If your computer does not have a sound card and/or
speakers, there will not be an audible beep. Wait for the
light below the reading probe of the X-RITE i1PRO device
to illuminate. Wait an additional 3 seconds for the lamp to
stabilize before you start to scan.
11. Continue to hold the button and slowly move the X-RITE
i1PRO Device completely across the patches on the target and
into the white area at the end of the row of patches.
12. Release the button.

Using the Calibration Application
November 2011 3-9
The status appears on the screen.
13. Repeat Steps 7-12 for each row of patches on Side A of the
calibration target.
14. Secure the calibration target into the tray clip of the X-RITE
i1PRO scanning tray with Side B up.
15. Repeat Steps 7-12 for the additional Side B target strips.
When all of the rows of patches are successfully read, the new
calibration table is automatically generated and sent to the
printer.
16. Calibration is complete. Click Ye s if you would like to calibrate
another printer. Click No to exit the Calibration Application.

/