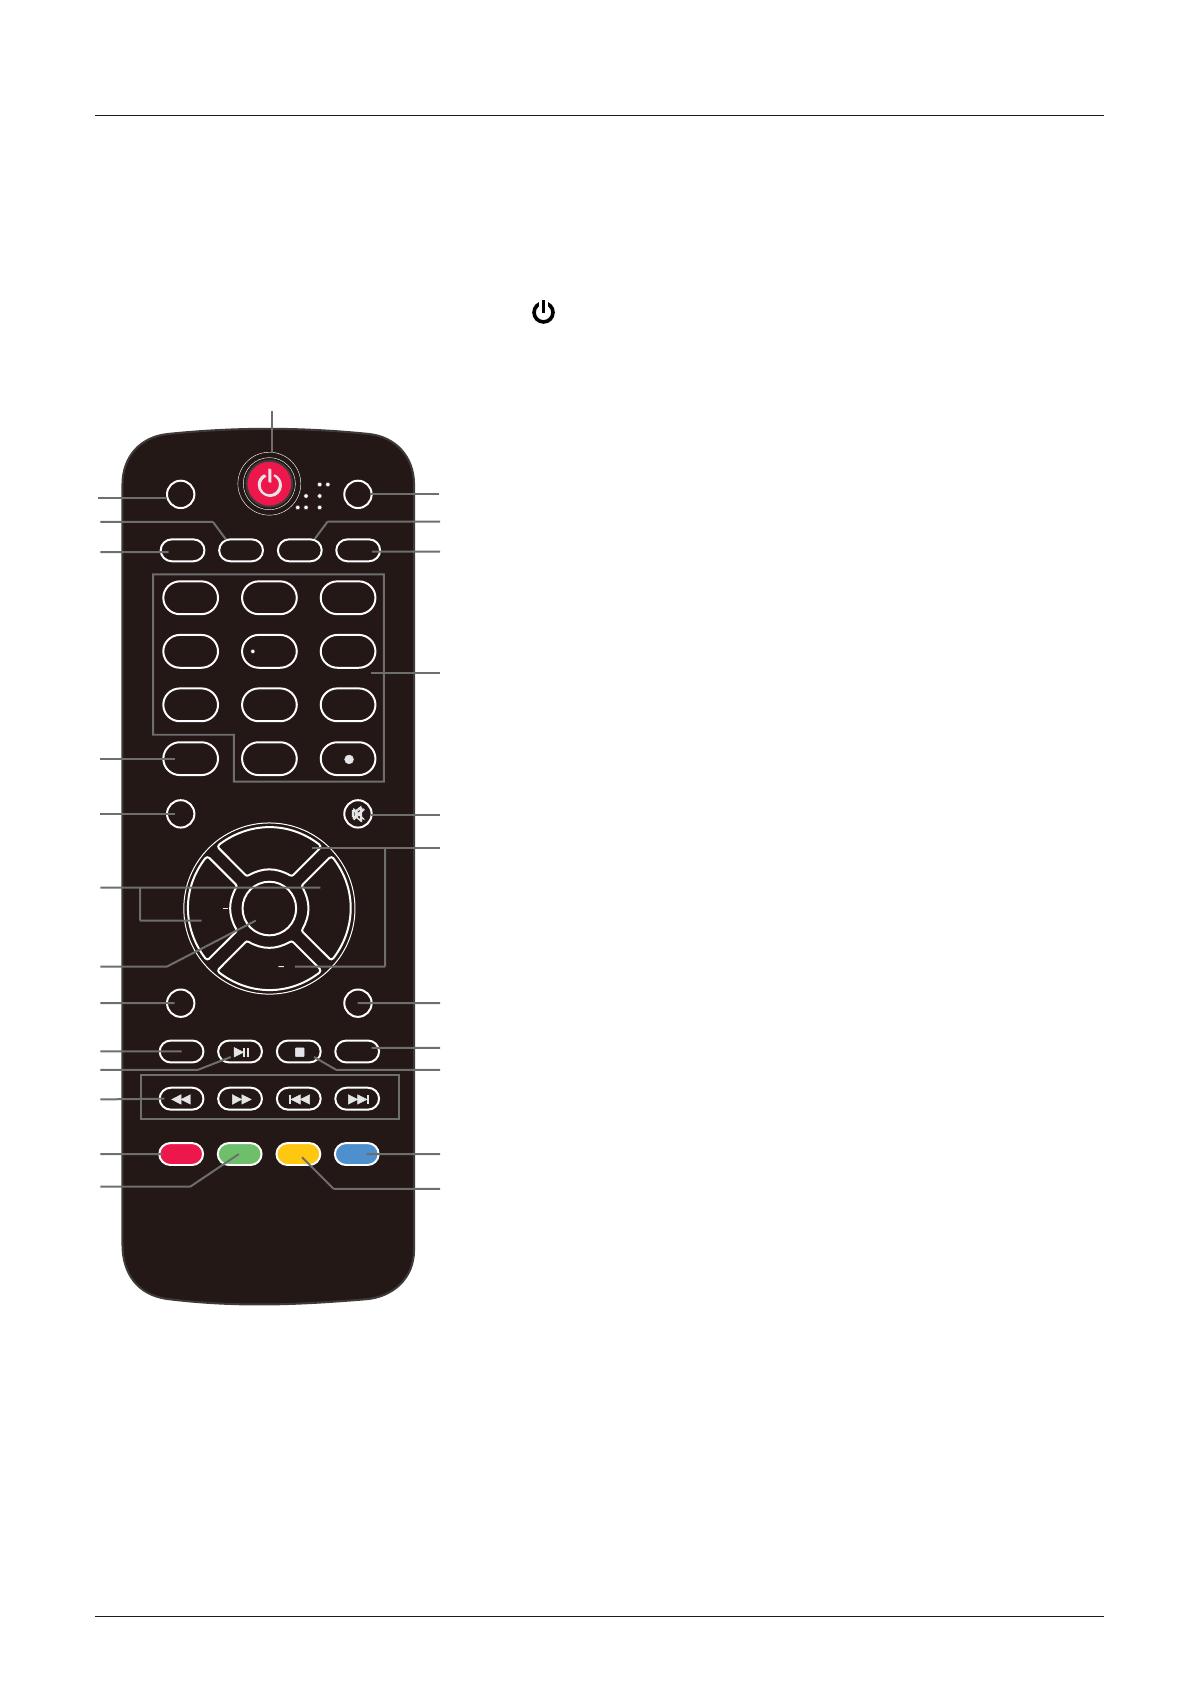
Haier LE55B1381 Owner's manual

Category
LCD TVs
Type
Owner's manual

Haier LE55B1381 is a feature-rich TFT-LCD TV that combines excellent picture quality with an array of connectivity options to enhance your home entertainment experience. With its sleek design and user-friendly interface, this TV will seamlessly integrate into any living space. Immerse yourself in vivid visuals thanks to its impressive picture quality, complemented by dynamic audio that brings your favorite shows, movies, and games to life. Connect your external devices effortlessly via multiple HDMI ports, allowing you to enjoy content from Blu-ray players, gaming consoles, and more.

Haier LE55B1381 is a feature-rich TFT-LCD TV that combines excellent picture quality with an array of connectivity options to enhance your home entertainment experience. With its sleek design and user-friendly interface, this TV will seamlessly integrate into any living space. Immerse yourself in vivid visuals thanks to its impressive picture quality, complemented by dynamic audio that brings your favorite shows, movies, and games to life. Connect your external devices effortlessly via multiple HDMI ports, allowing you to enjoy content from Blu-ray players, gaming consoles, and more.

Please READ this manual carefully before
operating your TV, and retain it for future
reference.
TFT-LCD TV
OWNER S MANUAL'
MODELS:
LE55B1381
R
2
Safety Instructions
This equipment has been tested and found to comply with the limits for a Class B digital device, pursuant to Part 15 of the
FCC Rule. These limits are designed to provide reasonable protection against harmful interference in a residential
installation. This equipment generates, use and can radiate radio frequency energy and, if not installed and used in
accordance with the instructions, may cause harmful int
erference to radio communications. However there is no
guarantee that interference will not occur in particular installation. If this equipment does cause harmful interference
to radio or television reception, which can be determined by turning the equipment off and on, the user is encourage to
try to correct the interference by one or more of the following measures:
*Reorient or relocate the receiving antenna.
*Increase the separation between the equipment and receiver.
*Connect the equipment into an outlet on a circuit different from that to which the receiver is connected.
*Consult the dealer or an experienced radio/TV technician for help.
This device compiles with Part 15 of the FCC Rules. Operation is subject to the following two conditions:
(1) This dev
ice may be not cause harmful interference.
(2)
this device must accept any interference received, including interference that may cause undesired
operation.
FCC CAUTION:
To assure continued compliance and possible undesirable interference, the provided ferrite cores must be
used when connecting this display to video equipment; and maintain at least 15.7” spacing to other
peripheral device.
CANADIA
NNOTICE:
This Class B digital apparatus compiles with Canadi
an ICES-003.
FCC STATEMENT
SAVE THESE INSTRUCTIONS
yourThank you for purchasing a Haier product. This easy-to-use manual will guide you in getting the best use of
product. Remember to record the modeland serial number. They are on label on the back of the unit.
Model number
serial number
Date of purchase
Staple your receipt to your manual. You will need it to obtain warranty service.
3
Safety Instructions
the
Contents
Warning
Safety Instructions
Unit and Accessories
Product Features
Introduction
1. Front View
2. Rear View
4. Base Stand Assembly Instructions
Connection
Basic Operation
OSD Menu
1. Picture menu
2. Audio menu
3. Time menu
4. Setup menu
5. Lock menu
6. Channel menu
Simple Troubleshooting
Warranty
1
2-3
5
5
6-10
6
7
9
11-13
14
15-22
15
16
17
18
19
20-21
7. USB mode 22
23
24
3. Wall Mount Instructions 8
Contents
5. Remote Control
10-11
Unit and Accessories and Product Feature
Unit and Accessories
User's manual
Remote control
Batteries: 2xAAA
Product Features
´PHDVXUHGGLDJRQDOO\ZLGHVFUHHQIRUDFRPSOHWHKRPHWKHDWHUH[SHULHQFH
[QDWLYHUHVROXWLRQIRU)XOO+'SSHUIRUPDQce
,QWHJUDWHG$76&79WXQHUIRU+'79EURDGFDVWUHFHSWLRQ
[+'0,LQSXWIRUWUXHGLJLWDOFRQQHFWLRQV
9*$SRUWIRUFRQQHFWLRQWR3&
2
4
6
7 
EN7ER
PRE9
',6PLAY
FA9OR,7E
&+.L,67
NEX7
9OL+
&++
9OL
&+
P,&7URE
AU',O
AR&
&&'
076/6AP
6LEEP
,NPU7
0ENU 0U7E
EX,7
RE&ALL
U6B
PLAY/PAU6E
67OP
REPEA7
RE9 FW'
*U,'E
$&SRZHUFRUG
79VHW
Introduction
Introduction
1. Front View
1). (IR) Infrared Receiver: Receives IR signals from the remote control.
(Power on/Standby)LED Indicator: Press POWER to turn on and off.
Indicator on(Red) Standby mode
Indicator on(Green) Power on mode
2).
The functions of the buttons:
INPUT: Press to change the input source.
MENU: Press to display the OSD (on screen display) menu,
press again to exit the menu.
VOL+/-: Press to adjust the volume.
The effective receiving range for the signal is up to 30 feet from the front of the remote
control window, and 30
0
to the left or right side and 20
0
above or below the remote control
window.
POWER/STANDBY:Turn on/off (standby) the
TV set.
CH / : Press to scan through channels.
6
Led Indicator
Remote Control window
(Keep clear)
CH
VOLINPUT MENU
Introduction
2. Rear View
AC POWER IN
: Connect the power cable to a wall outlet.
USB: Insert USB storage device to the USB port to view JPEG photos, or listen to MP3 music.
This port is also used for software updates.
HDMI1/2/3 : Connect the source(s) for digital video such as a Blu-ray player, video game console,
or set top box through this all digital connector.
VGA: Connect a VGA (D-sub 15) cable from the 15-pin VGA connector on your PC.
PC audio: Connect an audio cable from the audio output or headphone jack of your PC.
Component
AV IN (Composite)
Coax: Digital audio output.
Headphone: Connect headphones. When it is inserted to the jack, the integrated speakers will
be muted.
YPbPr: Connect the component video cables from a device, such as a DVD Player or cable box.
Use red for Pr, blue for Pb, and green for Y.
VIDEO: Connect the cable for composite video from a device, such as a DVD player, VCR, or
camcorder.
RF: Connect to an antenna or digital cable (out-of-the-wall, not from Cable Box) for Digital TV.
R/L in: Connect the audio cables from the component video device. Use red for right audio (R)
and white for left audio (L).
R/L in: Connect the audio cables from the composite video device. Use red for right audio (R)
and white for left audio (L).
AUDIO OUT R/L: Connect the audio cables to an external audio device, such as a sound bar or
stereo system. Use red for right audio (R) and white for left audio (L).
7
USB
AC POWER IN
Introduction
8
- We suggest that you keep your TV at least 2.36 inches (60 mm) from the wall to
prevent cable interference.
- Before mounting your TV on the wall, you need to remove the base if you attached it.
- For your safety, please use only with UL listed wall mount brackets with minimum
weight of the TV without stand (33lbs).
3. Instruction for Wall Mount
A wall mount kit (purchased separately) will allow you to mount your TV on the wall.
For detailed information on installing the wall mount, refer to the instructions provided
by the wall mount manufacturer. It is strongly recommended to contact a technician
for professional assistance for wall mount installation.
HAIER is not responsible for any damage to the product or injury to yourself or others
resulting from wall-mounting.
- This TV is compatible with a 400mm x 400mm mounting hole pattern.
- Do not mount your TV at more than a 15 degree tilt.
- Always use at least two people to mount the TV to a wall.
- Do not install your Wall Mount Kit while your TV is turned on. It may result in
personal injury due to electric shock.
- 4 pcs of type M6 screws are required for installing the wall mount bracket to
your TV. Do not use screws that are longer than 12 mm. Screws that are too
long may cause damage to the inside of the TV set.
- Do not fasten the screws too tight for this may damage the TV or cause the
TV to fall, resulting in personal injury. HAIER is not liable for these kinds of
incidents
Dimensions for Mounting Hole Pattern
400mm
400mm
Introduction
4. Remote Control Installing Batteries
1. Open the battery compartment cover on the back of the remote control.
2. Insert two 1.5V AAA size batteries observing the polarity markings inside the battery
compartment. Don’t mix di
Step 1 Step 2 Step 3
fferent types or used batteries with new ones.
3. Close the cover.
- The remote control should be operated within 30 feet (7m) and 30
0
to the left and right of the
IR receiver at the front of the TV.
- Used batteries should be disposed of properly.
HTR-D06A
Battery
Compartment
Cover
HTR-D06A
2 x AAA Battery
HTR-D06A
9
Base Stand Assembly Instructions Note: the pictures below are only for reference
The parts needed for installing the stand (supplied: Part1, Part2, Part3, Part4, Part5, Part6, Part7)
Setps:
2
3
4
6
7
1. Put the part2 to the part1, and
fix them with the screws
supplied as the picture showns.
2. Put the part3 and part4 to the
part 2.
3. Put the part6 an part7 to the
part5.
4. Put the part5 (including part6
and part7) to the part2
(including part3 and part4).
5. Fixing the part2, part 3, part 4
part5, part6, part7 with the
screws supplied as the picture
showns.
Screws:
4xB4x16
3
4
5
6
7
Screws:
6xB4x12
Step 1
Step 2
Step 3
Step 4
Step 5
1
Batteries shall not be exposed to excessive heat such as direct sunlight or fire.
Introduction
4. Remote Control
The remote control is using infrared (IR) signals. Point it towards the front of the
TV. The remote
control may not work correctly if it is operated out of range (see previous page).
10
5
6
7
2
3
4
8
9
10
13
14
15
17
18
21
22
23
11
12
16
19
20
24
25
12
3
4
5
6
789
0
ENTER
PREV
DISPLAY
FAVORITE
CH.LIST
NEXT
VOL+
CH+
VOL
CH
PICTURE
AUDIO
ARC
CCD
MTS/SAP
SLEEP
INPUT
MENU MUTE
EXIT
RECALL
USB
PLAY/PAUSE
STOP
REPEAT
REV FWD
GUIDE
1
1. POWER(red button): Turn the TV on/off (standby).
22. DISPLAY : Press to show the information about the input source, such as TV channel
information, display resolution, current time, etc.
2. PICTURE: Press to select the available video
picture modes: Standard, Mild, Custom, Vivid, Power Saving.
7. SLEEP: Press to set the sleep timer: (off / 5 / 10 / 15 / 30
/ 45 / 60 / 90 / 120 / 180 / 240 mins). The TV will
automatically turn off (standby mode) after the
selected period of time passes.
24.CH.LIST: Press to display the channel list.
8. Numercal Keys: Press to enter a TV channel number
3UHVVWRFKRRVHWKHVXEFKDQQHO
([DPSOHFKDQQHO3UHVVWKHEXWWRQWKHQSUHVVWKH
ƔEXWWRQZLWKLQVHFRQGVDQGWKHQSUHVVWKHEXWWRQ
within 2 seconds.
9. INPUT: Press to show the input source list. Use the up and
down arrow keys to select a source, and then press
the ENTER key.
11. MUTE: Press to mute the sound. Press again or
press VOL+ to unmute.
13. VOL+/-: Press to adjust the volume.
12. CH ġ /Ģ: Press to scan through the channels.
10. MENU: Press to display the OSD (on screen display) menu.
25. FAVORITE : Press to show the Favorite Channel List. Use the up and down arrow keys to
select a channel, and then press ENTER.
12/13. Arrow Keys(< > ġĢ ): Allows you to navigate the
RQVFUHHQPHQXVDQGDGMXVWWKHV\VWHPVHWWLQJV
14. ENTER : CONFIRM button.
15. EXIT: Press to exit the OSD menu.
18. PLAY/PAUSE
: Press to play/pause music or photo slideshow in USB mode.
20. STOP: Press to stop playing music or to return to the file list while a photo is displayed.
21. Reverse, Fast forward, Preview, Next: Use these buttons to control music/photo playback.
3. CCD: Press to display the closed captions.
4. ARC: Press to select the zoom mode (aspect ratio control):
Normal, Zoom, Wide, Cinema.
6. MTS/SAP: For analog TV, press to switch the sound mode:
Stereo, SAP or Mono. For digital TV, press to
switch the audio language if the TV program
provides an alternative.
5. AUDIO: Press to select the sound mode: Standard, Music,
Theater, Custom.
16. RECALL: Return to the previous channel viewed.
17. USB: Press to enter the USB mode.
19. REPEAT: Press to turn repeat on/off in USB music mode.
23. GUIDE: Press to display the Electronic Program Guide.
Connection
Connection
Antenna (RF) Connection
Power Cord Connection
RF
Coaxial Antenna Cable
Press the INPUT button on the remote control to display the input source menu, use the
Ĥ
ĥ
buttons
to select
TV
and then press the ENTER
- Connect the TV to a wall outlet using the included AC power cord.
- When you connect the power cord, the TV
enters
into standby mode and the LED indicator
on the front of the TV will be is red.
- Turn on the TV by pressing the POWER roVTn theonottub
remote control, and the LED
indicator will become green.
Wall jack with F-Connector
External Antenna
11
Note: It is recommended to unplug the TV if it will not be used for a long time, such as
during a vacation.
button to confirm.You will need to perform a
channel scan to be able to view TV channels. Please see the auto scan section on page 21.
AV Input Connection
Note: All cables shown are not included with the TV.
- Connect the VIDEO and AUDIO output jacks on the DVD player or VCR to the
AV IN jacks on
the TV set using RCA cables.
- Match the jack's colors: Video=yellow, Audio left=White, Audio right=red.
- Turn on the DVD player/VCR, and select “AV” in the input source menu.
RCA Video Cable RCA Audio Cable
RCA Audio Cable
DVD player or VCR
YPbPr (Component) Connection
Note: All cables shown are not included with the TV.
- Connect the YPbPr output jacks on the DVD player or VCR to the
YPbPr input jacks on the TV
set component video (YPbPr) cable.The picture quality is improved compared to the video
(composite) input.
- Match the jacks colors: Y=Green, Pb=Blue, Pr=red.
- Connect the audio output jacks on the DVD player or VCR to the audio input jacks on the back
of the TV with a RCA audio cable.
- Turn on the DVD player or VCR, and select “YPbPr” in the input source menu.
DVD player or VCR
Component Video
(YPbPr) Cable
Y Pb Pr
Connection
12
HDMI Connection
PC Connection
Note: All cables shown are not included with the TV.
DVD player or VCR
- Connect the HDMI port on the DVD player to the HDMI port on the back of the TV with a HDMI
- Turn on the DVD player, and select “HDMI1/2/3” in the input source menu.
A/V
interface that supports uncompressed audio and video
- Connect the VGA port on the PC to the VGA port on the back of the TV with a VGA(D-sub 15)
cable.
- Connect the audio output or headphone jack on the PC to the PC AUDIO jack on the back of
the TV with a 3.5mm audio cable.
- Turn on the PC, and select “VGA” in the input source menu.
- If you are using a sound card,
adjust the PC sound as required.
- Set the video resolution of your
PC to 1024x768, 60Hz on its
original monitor.
It is recommended that you
make the connections between
the TV and your PC,
and then switch on the TV before
booting the PC.
You can now set your preferred
resolution from the choice
supported.
See the table of supported
resolutions on the right.
1920 x 1080, 60Hz
HDMI cable
VGA cable
audio
cable
(3.5mm)
Connection
13
cable.
VGA
USB
Basic Operation
Basic Operation
Power on/off
1. Connect the TV to a wall outlet using the included AC power cord.
2.-To turn on the TV
Press the POWER button on the TV or remote control.
-To turn off the TV
Press the POWER button on the TV or remote control.
Input Source select
Press the INPUT button on the remote control to display
the input source menu, and use the
Ĥ
/
ĥ
the remote control to select the input source. Press the ENTER
button on the remote control to switch to the selected input.
Note: Before you select the input source, make sure the
connections are properly connected.
14
TV
AV
Component
HDMI1
HDMI2
HDMI3
VGA
USB
INPUT SOURCE
buttons on
Basic OSD Menu operation
Main menu
Picture, Audio, Time, Setup, Lock, Channel
Submenu
(Picture menu shown as an example)
Buttons
Use the buttons listed here to navigate the
OSD menu.
Press the MENU button to display the OSD menu as shown below:
Use the
=!
/
?
buttons to select the main menu, and press the
ĥ!
button to enter the submenu.
In the submenu, use the
Ĥ
/
ĥ
buttons to select the function item.
Adjust ("Contrast" shown in above example with the
=!
/
?
buttons;
Select ("Picture Mode" as shown in above example ) with the
=!
/
?
buttons;
Enter the submenu ("Close Caption" item in Setup menu for example) with
?!
button.
* (Press the MENU button to return to the upper menu.)
* (Press the EXIT
button to exit the menu display.)
Note1: Some options can only be accessed in certain modes.
MEMC
Nor ma l
OSD Menu
OSD Menu
1. Picture menu
Picture mode: Select between Standard, Mild, Custom, Vivid and Power saving.
You may select the picture mode directly by pressing the PICTURE button on the remote
control.
Contrast: Control the difference between the bright and dark regions of the picture.
Brightness: Adjust brightness of the picture.
Color: Adjust the amount of color in the picture.
Tint: Adjust the tint (color tone) of the picture.
Sharpness:
Color Temp.: Select between Normal, Cool and Warm.
Description
15
MEMC
Normal
MEMC: Select MEMC from:Normal, Strong and Off .
2. Audio menu
Description
OSD Menu
Sound Mode: Select your desired picture mode as follow: Standard, Music, Theater and Custom.
Bass: Adjust the bass (low frequency audio).
Treble: Adjust the treble (high frequency audio).
Balance: Left and right stereo audio channels balance.
Surround: Activate or deactivate the surround sound function.
SPDIF Type: Select S/PDIF type: PCM or RAW.
Audio Language: Select the audio language.
Sound Mode
Bass
Treble
Balance
Surround
SPDIF Type
Audio Language
Flat
English
50
50
50
Off
PCM
16
3. Time menu
Description
Sleep timer: Set the sleep timer: (off / 5 / 10 / 15 / 30 / 45 / 60 / 90 / 120 / 180 / 240 mins). The
TV will automatically turn off (standby mode) after the selected period of time passes.
Time zone:
Clock: The time is set automatically, and you cannot manually adjust the time.
OSD Menu
17
Daylight Saving Time (Could only be activated in DTV mode): Turn on/off daylight saving time.
Select your time zone: Eastern, Central, Mountain, Pacific, Alaska, or Hawaii.
4. Setup menu
Menu Language: Select the OSD menu language.
Zoom Mode: Select the zoom mode: Normal, Zoom, Wide, or
Cinema.
Noise reduction: Select the noise reduction mode: Weak,
Middle, or Strong.
PC SETUP: If the video input signal comes from your PC, you may
adjust the V-Position, H-Position, Clock, Phase or
perform an
Auto adjustment. Menu shown in the image on the right.
Closed Caption:
CC Mode: Select the CC Mode: On, Off and CC on Mute. Menu
shown in the image on the right.
Basic Selection: Select the analog TV captions:
CC1, CC2, CC3,
CC4, Text1, Text2, Text3 or Text4.
Advanced Selection: Select the digital TV captions
: Service1,
Option: Customize the font, style, color, etc. of the captions.
DLC: Activate / deactivate the automatic dynamic brightness function.
Restore Default: Restore all settings to the factory default settings.
Overs Scan: Turn on/off the over scan function.
Description
OSD Menu
18
Service2, Service3 Service4, Service 5 or Service 6.
1 / 1

Haier LE55B1381 Owner's manual

Category
LCD TVs
Type
Owner's manual

Haier LE55B1381 is a feature-rich TFT-LCD TV that combines excellent picture quality with an array of connectivity options to enhance your home entertainment experience. With its sleek design and user-friendly interface, this TV will seamlessly integrate into any living space. Immerse yourself in vivid visuals thanks to its impressive picture quality, complemented by dynamic audio that brings your favorite shows, movies, and games to life. Connect your external devices effortlessly via multiple HDMI ports, allowing you to enjoy content from Blu-ray players, gaming consoles, and more.

Ask a question and I''ll find the answer in the document

Finding information in a document is now easier with AI

Ask the document