Page is loading ...


Care and Maintenance
Operating Instructions
Automatic Watches
Chronograph Timer
Functions Moveable Bezels
World Timer
Limited Two Year
Warranty
....................................................1
....................................................2
..................................................20
........................................21
..................................................23
..................................................24
.............................................25
.
TABLE OF CONTENTS

Automatic watches should be serviced every 3-5 years to ensure optimal performance.
Routine maintenance includes complete disassembly, cleaning, lubrication of the
movement and reassembly by a professional watch technician. For battery replacement
on quartz watches, consult a professional watch repair center.
Important note: Some watches have screw-in crowns and or pushers that must be
screwed in tightly to prevent moisture from entering the case. Before exposing the watch
to moisture always ensure the crowns and pushers are properly screwed in. The warranty
does not cover damage caused by water infiltration resulting from failure to screw in
crowns or pushers or from leaving the crown out.
Preventative Maintenance
*Avoid placing watch on or near speakers or electrical equipment with magnetic fields.
*Always rinse the watch with warm water after swimming.
*Avoid thermal or other types of shocks, extreme temperatures and steam.
*Avoid direct contact with all chemical products, solvents, detergents, perfumes etc.
since they
may damage the bracelet, leather strap, case or gaskets.
* Clean metal bracelets and water resistant watches with warm water and dry with a soft
cloth.
To preserve the condition of the watch’s leather strap:
*
Avoid contact with water, moisture, cosmetics, and prolonged exposure to sunlight.
*
Under normal conditions, a leather strap should last approximately 12 months.
CARE AND MAINTENANCE
1

OPERATING INSTRUCTIONS
Standard M
Calendar M
CAL GP00
CAL OS10
CAL OS20
CAL OS60
CAL 6P23
CAL 6P27
CAL 8215
CAL VD56B
CAL VD54
CAL VD57
CAL 515.24
CAL 5040 D
CAL 7750
CAL 7753
odel
...................................................................................3
odel
...................................................................................3
..........................................4
............................................5
.....................................6
.............................................7
..................................................8
.....................................................9
............................................11
.....................................................12
......................................................13
......................................................14
........................................................15
......................................................16
...............................................18
...........................................19
Carefully follow the care and maintenance instructions in this manual. Although one watch style is
illustrated per watch movement, the movement and instructions may apply to more than one watch
style. To determine the appropriate watch movement and instructions for your watch, identify the
watch from the manual whose sub dial and day/date functions and positions exactly match those on
the dial of your watch regardless of the design.
2

1. Gently pull crown to position 3.
2. Rotate crown in either direction to the desired time.
3. Push crown back to position 1.
To set the time :
1. Gently pull crown to position 2.
2.
Rotate crown in either direction to the desired time.
3.
Push crown back to position 1.
To set the time :
Note:
Never set the date between 9:30 PM and 3:00 AM.
To set the date:
1. Gently pull crown to position 2.
2. Rotate crown clockwise until the desired date appears in the date window.
3. Push crown back to position 1.
Calendar Model
Standard Model
1
2
3


*If the date is set between the hours of around 9:00 PM and 1:00 AM, the date may not change on the
3. After the date has been set, push the crown back to the normal position.
3. When the crown is pushed back to the normal position, small second hand begins to run.
1st position
2nd position
Minute hand
Button A
Chronograph
second hand
Button B
Small Second hand or Chronograph 1/20 second hand
Calendar
Normal crown position
C) SETTING THE DATE
1. Pull the crown out to the 1st position.
2. Turn the crown counter-clockwise to set the date.
following day.
B) SETTING THE TIME
1. Pull the crown out to the 2nd position.
2. Turn the crown to set hour and minute hands.
Chronograph
minute hand
Hour hand
Chronograph
hour hand
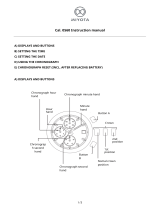
A) DISPLAYS AND BUTTONS
A) DISPLAYS AND BUTTONS
B) SETTING THE TIME
C) SETTING THE DATE
D) USING THE CHRONOGRAPH
E) CHRONOGRAPH RESET (INCL. AFTER REPLACING BATTERY)
CHRONOGRAPH FUNCTION: CENTER SECOND HAND CHRONOGRAPH 1/20 sec.
up to 11 hours 59 minutes 59 seconds 95
BATTERY: SR927W
INSTRUCTION MANUAL FOR MIYOTA WATCH MOVEMENT
CALIBER NO. 0S60
7

INSTRUCTION MANUAL FOR MIYOTA WATCH MOVEMENT
CALIBER NO. 6P23
BATTERY: SR621SW
FEATURES : ANALOG MULTI-HAND QUARTZ WATCH WITH DATE AND 24HOUR
INSTRUCTION MANUAL
A) DISPLAY
B) OPERATION PROCEDURE
C) SETTING THE TIME (HOUR, 24 HOUR, MINUTE, SECOND)
D) SETTING THE DATE (BY QUICK OPERATION)
A) DISPLAY
NORMAL CROWN POSITION
1ST POSITION QUICK OPERATION - DATE (COUNTERCLOCKWISE)
2ND POSITION TIME SETTING (CLOCKWISE)
HOUR HAND
SECOND HAND
MINUTE HAND
NORMAL CROWN POSITION
1ST POSITION
2ND POSITION
24HOUR HAND
DATE
8

B) OPERATION PROCEDURE
1 SETTING THE DAY
SETTING THE TIME (HOUR, 24HOUR, MINUTE and SECOND)
2 SETTING THE DATE
INSTRUCTION MANUAL FOR MIYOTA WATCH MOVEMENT
CALIBER NO. 6P27
BATTERY: SR621SW
A) DISPLAY
NORMAL CROWN POSITION
1ST POSITION QUICK OPERATION - DATE (COUNTERCLOCKWISE)
2ND POSITION TIME/DAY SETTING (CLOCKWISE)
24HOUR HAND
DATE
DAY (OF THE WEEK)
HOUR HAND
SECOND HAND
MINUTE HAND 1ST POSITION
2ND
POSITION
NORMAL CROWN POSITION
FEATURES : ANALOG MULTI-FUNCTION QUARTZ WATCH WITH DAY, DATE AND 24HOUR
INSTRUCTION MANUAL
A) DISPLAY
B) OPERATION PROCEDURE
C) SETTING THE DAY AND TIME (HOUR, 24 HOUR, MINUTE, SECOND)
D) SETTING THE DATE (BY QUICK OPERATION)
9

C) SETTING THE DAY AND TIME (HOUR, 24 HOUR, MINUTE AND SECOND)
The hour, 24 hour, minute, second and day are set by the same operation.
SETTING PROCEDURE
DAY → HOUR & 24HOUR → MINUTE → SECOND
C-1) SETTING THE DAY
Pull the crown out to the 2nd position to stop the second hand at 0 (12 o'clock).
Turn the hour/minute hands in a clockwise direction to set a day
In order to set the day, you must advance the hour hand by 24 hours per day.
NOTE:
* If the day is set by turning the crown counterclockwise, there is the possibility the date will not
change over.
Do not set the day by turning the crown in counterclockwise direction.
* The day changes somewhere between 0:00a.m. and 5:30a.m. or a little later.
C-2) SETTING THE TIME
After setting the day, set the hour (and 24hour) and minute hands.
Turn the hour/minute hands in a clockwise direction to set the time.
To ensure time is set accurately, first turn the minute hand 5 minutes ahead of desired time and
then turn back (in a counterclockwise) to the desired time.
After setting the time, use a time signal to synchronize the watch by pushing crown to the normal
position to start the second hand going.
NOTE:
Make sure you have correctly set AM/PM before setting the time.
INSTRUCTION MANUAL FOR MIYOTA WATCH MOVEMENT
CALIBER NO. 6P27 CONT.
10

date adjustment→day adjustment→hand adjustment
(1) Winding the Mainspring
Automatic winding watch can also be hand winded by turning the crown in “A” position.
Wind 15~20 times. It will start to move naturally after shaking slightly.
(2) Adjusting date
Adjust the date by rotating the crown left in “B” position.
(3) Adjusting day
Adjust the date by rotating the crown right in “B” position. ※Only 8215
(4) Adjusting hand
Rotate the crown in “C” position and set the standard time.
Then check if it is morning or the afternoon and adjust correctly.
Day adjusting ※8215
AB
Time adjusting
Date adjusting
Mainspring winding
C
INSTRUCTION MANUAL FOR MIYOTA WATCH MOVEMENT
CALIBER NO. 8215
11


Chronograph Stopwatch
CAL. VD54 (with date - VD53)
(1 crown/2 pushers)
Time Setting
1. Pull crown out to position 2.
2. Set the time by turning the crown.
3. Push the crown back to position 1.
24-Hour Sub-Dial Setting
The 24-hour hand moves correspondingly with the hour and minute hands. When setting the time be sure to check that the 24-hour hand is
set properly.
Using the Stopwatch
Check the stopwatch minute and second hands to see if they are in the \ 230” position. If not, follow the stopwatch hand adjustment instructions.
Pressing A stops and starts the stopwatch. Pressing B controls the split time and resets.
Stopwatch Hand Adjustment
1. Pull crown out to the position 2.
2. Press A or B at the same time to reset the stopwatch minute and second hands to the “0” position.
3. With each press of A or B (A= forward, B= back), the hands move once clockwise or counter-clockwise. The hands move quickly if the
pushers are kept pressed.
NOTE: If the stopwatch hands move improperly, pull crown out and press A and B at the same time for over 2 seconds. When the pushers
are released, the stop-watch second hand will turn counter-clockwise and return to original position.
4. Push crown back to position 1.
A
B
24-HOUR HAND
MINUTE HAND
SECOND HAND
13


INDICATION: During the calendar jump phase
between 10.30 pm and 00.00 am the date
can be changed. In this case the date of the
following day needs to be set as there will be
no jump at midnight.
Stem position 1
– Home position, watch runs
Stem position 2
– Quick change of the date ( clockwise),
watch runs
– Quick change of 24h indication
( anticlockwise), watch runs
Stem position 3
– Hand-setting, watch stops
– when stem pulled out, save up to 70% energy
Cal. 515.24H, 515.24D
CAL. 515.24H, 515.24D
15

Chronograph Model C (Cal 5040 D)
1. Gently pull crown to position 3.
2. Rotate crown in either direction to the desired time.
3. Push crown back to position 1.
To set the time :
To set the date:
1. Gently pull crown to position 2.
2. Rotate clockwise until the desired date appears in the
date window.
3. Push crown back to position 1.
Using the Chronograph:
Please refer to chronograph functions on page 15.
Chronograph Model C (Cal 5040 D)
Note:
Between the date changing phase of 9:00 PM and 12:00 AM the date must be set to the date of
the following day.
Second hand
30 minute
timer
1/5
second timer
1/10
second timer
A
B
Date
window
1 3
2
16
/