
1 1

2
Trade Marks
The Novation trade mark is owned by Focusrite Audio Engineering Ltd. All other brand, product and
company names and any other registered names or trade marks mentioned in this manual belong to
their respective owners.
Disclaimer
Novation has taken all possible steps to ensure that the information given here is both correct and
complete. In no event can Novation accept any liability or responsibility for any loss or damage to the
owner of the equipment, any third party, or any equipment which may result from use of this manual
or the equipment which it describes. The information provided in this document may be modified
at any time without prior warning. Specifications and appearance may differ from those listed and
illustrated.
Copyright and Legal Notices
Novation is a registered trade mark of Focusrite Audio Engineering Limited. Launchpad Pro is a trade
mark of Focusrite Audio Engineering Plc.
2019 © Focusrite Audio Engineering Limited. All rights reserved.
Novation
A division of Focusrite Audio Engineering Ltd.
Windsor House, Turnpike Road
Cressex Business Park , High Wycombe
Buckinghamshire , HP12 3FX
United Kingdom
Tel: +44 1494 462246
Fax: +44 1494 459920
e-mail: [email protected]
Web: www.novationmusic.com
Caution:
The normal operation of this product may be affected by a strong electrostatic discharge (ESD).
In the event of this happening, simply reset the unit by removing and then replugging the USB
cable. Normal operation should return.

2 3
Contents
1. Introduction ..........................................................................................................................6
1.1 Launchpad Pro Key Features .................................................................................................... 6
1.2 In the Box .................................................................................................................................7
2. Getting Up and Running .......................................................................................................7
2.1.1 If you’re on a Mac: ...............................................................................................................................................................7
2.1.2 If you’re on Windows: .........................................................................................................................................................8
2.2 Launchpad Intro ......................................................................................................................9
2.3 Ableton Live ...........................................................................................................................10
2.4 Using with Other Software .....................................................................................................10
2.5 Using Standalone ...................................................................................................................10
2.6 Having Trouble? .....................................................................................................................10
3. Hardware Overview............................................................................................................11
4. Launchpad Pro Interface .....................................................................................................12
4.1 Modes ....................................................................................................................................12
4.2 Shift ........................................................................................................................................13
5. Session Mode ......................................................................................................................14
5.1 Ableton Live’s Session View ...................................................................................................14
5.2 Session Overview ...................................................................................................................16
5.3 Clip Functions ........................................................................................................................16
5.3.1 Select a clip or empty clip slot .........................................................................................................................................16
5.3.2 Clear a clip .........................................................................................................................................................................17
5.3.5 Quantise a clip ...................................................................................................................................................................17
5.4 Track Controls .........................................................................................................................18
5.4.1 Record Arm ........................................................................................................................................................................19
5.4.2 Mute ...................................................................................................................................................................................19
5.4.3 Solo .....................................................................................................................................................................................19
5.4.4 Volume ...............................................................................................................................................................................19
5.4.5 Pan ......................................................................................................................................................................................19
5.4.6 Send ...................................................................................................................................................................................19
5.4.7 Device.................................................................................................................................................................................19
5.4.8 Stop Clip ............................................................................................................................................................................19
5.4.9 Fader orientation ...............................................................................................................................................................20
5.5 Record Arm & Recording .......................................................................................................20
5.6 Production Controls ...............................................................................................................20
5.6.1 Undo ...................................................................................................................................................................................21
5.6.2 Redo ...................................................................................................................................................................................21
5.6.3 Tap (Tap Tempo) ................................................................................................................................................................21
5.6.4 Click (metronome) .............................................................................................................................................................21
5.7 Momentary View Switching ....................................................................................................21
6. Note mode ..........................................................................................................................22
6.1 Overview ................................................................................................................................22
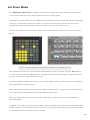
6.2 Chromatic Mode ....................................................................................................................22
6.3 Scale Mode ............................................................................................................................23
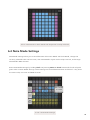
6.4 Note Mode Settings ............................................................................................................... 24
6.5 Overlap...................................................................................................................................25
6.6 Drum Mode ............................................................................................................................26
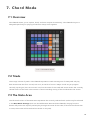
7. Chord Mode ........................................................................................................................ 27

4
7.1 Overview ................................................................................................................................27
7.2 Triads ......................................................................................................................................27
7.3 The Note Area ........................................................................................................................27
7.4 Saving Chords & Playing them back ......................................................................................28
7.5 Sustain control ........................................................................................................................28
8. Custom Modes ....................................................................................................................29
8.1 Overview ................................................................................................................................29
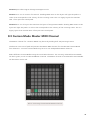
8.2 Default Custom Modes ..........................................................................................................29
8.3 Custom Mode Master MIDI Channel .....................................................................................30
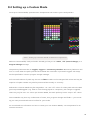
8.4 Setting up a Custom Mode ....................................................................................................31
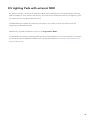
8.5 Lighting Pads with external MIDI ...........................................................................................32
9. Sequencer ...........................................................................................................................33
9.1 Sequencer Overview ..............................................................................................................33
9.2 Steps View ............................................................................................................................. 33
9.2.1 Using the Play Area ...........................................................................................................................................................33
9.2.2 Assigning to steps .............................................................................................................................................................34
9.2.3 Clearing steps ...................................................................................................................................................................34
9.2.4 Duplicating steps ..............................................................................................................................................................34
9.2.5 Playback .............................................................................................................................................................................35
9.2.6 Recording into the sequencer ..........................................................................................................................................35
9.2.7 Setting gate length ...........................................................................................................................................................35
9.2.8 Using multiple sequencer tracks ......................................................................................................................................36
9.2.9 Using the Sequencer with Ableton Live ..........................................................................................................................36
9.3 Patterns View ..........................................................................................................................37
9.3.1 Chaining Patterns .............................................................................................................................................................38
9.3.2 Queuing Patterns ..............................................................................................................................................................38
9.3.3 Clearing a Pattern .............................................................................................................................................................38
9.3.4 Duplicating a Pattern ........................................................................................................................................................38
9.3.5 Instant Pattern Change .....................................................................................................................................................38
9.4 Scenes ....................................................................................................................................39
9.4.1 Assigning to Scenes ..........................................................................................................................................................39
9.4.2 Chaining Scenes ................................................................................................................................................................39
9.4.3 Queuing Scenes ................................................................................................................................................................39
9.4.4 Clearing a Scene ...............................................................................................................................................................40
9.5 Pattern Settings ...................................................................................................................... 40
9.5.1 Pattern Sync Rate ..............................................................................................................................................................40
9.5.2 Pattern Playback Direction ...............................................................................................................................................41
9.5.3 Pattern start and end points .............................................................................................................................................42
9.6 Velocity ...................................................................................................................................42
9.6.1 Step Velocity edit ..............................................................................................................................................................42
9.6.2 Live Recording with Velocity .............................................................................................................................................43
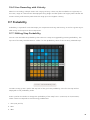
9.7 Probability .............................................................................................................................43
9.7.1 Editing Step Probability ....................................................................................................................................................43
9.7.2 Printing Probability ............................................................................................................................................................44
9.8 Mutation .................................................................................................................................45
9.8.1 Editing Step Mutation .......................................................................................................................................................45
9.8.2 Printing Mutation ..............................................................................................................................................................45
9.9 Micro Steps ............................................................................................................................46
9.9.1 Editing Micro Steps ...........................................................................................................................................................46
9.9.2 Clearing micro steps ........................................................................................................................................................46
9.9.3 Duplicating steps ..............................................................................................................................................................46
9.10 Tempo and Swing .................................................................................................................47

4 5
9.10.1 Editing Tempo and Swing ..............................................................................................................................................47
9.11 Print to Clip ..........................................................................................................................48
9.12 Projects .................................................................................................................................49
9.12.1 Saving your Sequencer Project ......................................................................................................................................49
9.12.2 Backing up your Projects ................................................................................................................................................49
9.13 Sequencer Settings .............................................................................................................50
9.13.1 Accessing Sequencer Settings .......................................................................................................................................50
9.13.2 Track Types ....................................................................................................................................................................... 50
9.13.3 Root Select/Scale Viewer ................................................................................................................................................50
9.13.4 Selecting the Scale ..........................................................................................................................................................51
9.13.5 Setting MIDI Channel ....................................................................................................................................................51
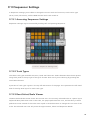
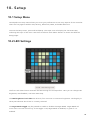
10. Setup ................................................................................................................................52
10.1 Setup Menu .......................................................................................................................... 52
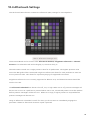
10.2 LED Settings .........................................................................................................................52
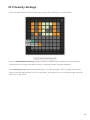
10.3 Velocity Settings ...................................................................................................................53
10.4 Aftertouch Settings ..............................................................................................................54
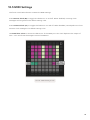
10.5 MIDI Settings ........................................................................................................................ 55
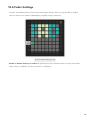
10.6 Fader Settings ......................................................................................................................56
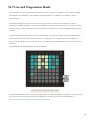
10.7 Live and Programmer Mode ................................................................................................57
10.8 Bootloader Menu .................................................................................................................58
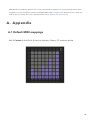
A. Appendix ............................................................................................................................ 59
A.1 Default MIDI mappings ..........................................................................................................59
A.1.1 Custom 1 ........................................................................................................................................................................... 59
A.1.2 Custom 2 ........................................................................................................................................................................... 60
A.1.3 Custom 3 ........................................................................................................................................................................... 60
A.1.4 Custom 4 ........................................................................................................................................................................... 61
A.1.5 Custom 5 ........................................................................................................................................................................... 61
A.1.6 Custom 6 ........................................................................................................................................................................... 62
A.1.7 Custom 7 ........................................................................................................................................................................... 62
A.1.8 Custom 8 ........................................................................................................................................................................... 63
A.1.9 Programmer Mode ........................................................................................................................................................... 63
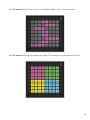
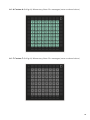
A.2 Overlap Layouts .....................................................................................................................64
A.1.1 Overlap - 5 Finger ............................................................................................................................................................. 64
A.1.2 Overlap - 4 Finger ............................................................................................................................................................. 65
A.1.3 Overlap – Sequential ........................................................................................................................................................ 66

6
1. Introduction
Launchpad Pro is our most powerful grid controller for producing: both in Ableton Live and with your
hardware. It gives you everything you need to create and perform your tracks.
Launchpad Pro is the perfect beating heart of your studio. Use the powerful 32-step sequencer to
create tracks with your hardware and software and create evolving and intricate sequences with
probability and mutation. Get complete control of your studio with Custom Modes and send MIDI to
your hardware via the two MIDI out ports.
Launchpad Pro will allow you to quickly lay down expressive beats, play intricate melodies and launch
Ableton Live clips with the 64 velocity and pressure sensitive pads. Every control is RGB backlit, so
you know exactly which clips you’re launching, which notes you’re playing, or which steps you’re
sequencing.
Launchpad Pro is a fully standalone unit that doesn’t require a computer to operate. Simply plug in
Launchpad Pro with the included wall plug directly to the USB-C port.
This manual will help you to understand every feature of your new Launchpad Pro and show you how
you can use it to push your production and performance to the next level.
1.1 Launchpad Pro Key Features
• Our deepest Ableton Live Integration: play,
record and produce your tracks, all without
touching your mouse
• 64 super-sensitive RGB pads: large velocity
and pressure sensitive pads for playing your
sounds expressively
• Powerful four-track sequencer: 32 step
patterns, scenes for arrangement, and
probability and mutation controls to keep
your tracks evolving
• Chord mode: easily explore, build, save and
play complex chords straight from the grid
and quickly find new harmonies
• Dynamic Note and Scale modes: effortlessly
play perfectly in-key basslines, melodies,
chords and leads. Launchpad Pro even
knows when you’re drumming and shows
your drum rack on the grid
• MIDI In, Out 1, Out 2/Thru: Control anything
MIDI in your studio directly from Launchpad
Pro
• Eight Custom Modes: use Novation
Components to customise MIDI mappings
for your unique performance needs

6 7
• Launchpad Pro
• USB-C to USB-A cable
• USB-C to USB-C cable
• USB-A power adapter
• 3x TRS Minijack to DIN MIDI Adapter
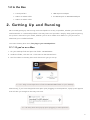
2. Getting Up and Running
We’ve made getting up and running with Launchpad Pro as easy as possible, whether you’re a brand
new beatmaker or a seasoned producer. Our Easy Start Tool provides a step-by-step guide on getting
set up that is tailored to your needs, whether you’ve never made music before or you just want to
download your included software.
To access the Easy Start Tool, first plug in your Launchpad Pro.
2.1.1 If you’re on a Mac:
1. On your Desktop find and open the folder “LAUNCHPAD”.
2. Inside the folder, click the link: “Click Here to Get Started.html”
3. You’ll be taken to the Easy Start Tool where we’ll get you set up.
2.1.1.A – Plug in Launchpad Pro to find the LAUNCHPAD folder on your desktop
Alternatively, if you have Google Chrome open upon plugging in Launchpad Pro, a pop-up will appear
that will take you straight to the easy start tool.
2.1.1.B – Easy Start Tool pop-up upon plugging in Launchpad Pro
1.2 In the Box

8
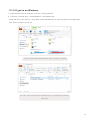
2.1.2 If you’re on Windows:
1. Press the Start button and type “This PC”, then press enter.
2. In This PC, find the drive: “Launchpad Pro”, and double click.
Inside the drive, click the link: “Click Here to Get Started.html” 4. You’ll be taken to the Easy Start
Tool where we’ll get you set up.
2.1.2.A – Open the Launchpad Pro drive to view its contents
2.1.2.B – Click “Click Here To Get Started” to go straight to the Easy
Start Tool

8 9
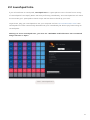
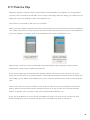
2.2 Launchpad Intro
If you’re brand new to Launchpads, Launchpad Intro is a great place to start. Choose from a variety
of curated packs from Ampify Music and start performing immediately. Your Launchpad Pro will match
the on-screen grid - press pads to launch loops and one-shots to build up your track.
To get there, plug your Launchpad Pro into your computer and visit intro.novationmusic.com/. Your
Launchpad Pro will be automatically detected and you’ll immediately be able to play beats using our
curated packs.
Warning: To access Launchpad Intro, you must use a WebMIDI enabled browser. We recommend
Google Chrome or Opera.
2.2.A – Launchpad Intro

10
2.3 Ableton Live
Ableton Live (often referred to as Live) is a unique and powerful piece of software for music creation.
Ableton Live 10 Lite is provided with your Launchpad Pro, which gives you all the tools you’ll need
to get started with making your own music. Launchpad Pro’s Session Mode is designed to control
Ableton Live’s Session View.
If you’ve never used Ableton Live before, we recommend visiting our Easy Start Tool (see 2. Getting
up and Running) which will walk you through registering your Launchpad Pro and getting your
included copy of Ableton Live 10. You’ll also find videos covering Ableton Live’s core features and
how to get started with making music using your Launchpad Pro.
When you open Live your Launchpad Pro will be automatically detected and it will enter Session
Mode.
More resources on using Ableton Live’s many functions may be found on Ableton’s site at:
www.ableton.com/en/live/learn-live/.
You may register your Launchpad Pro and obtain your Ableton Live 10 Lite license at:
customer.novationmusic.com/register.
2.4 Using with Other Software
If you’re using other music production software, visit support.novationmusic.com for more information
on how to set up your Launchpad Pro. Keep in mind that the information displayed in Session Mode
and Note Mode may vary depending on which software you are using.
2.5 Using Standalone
To use Launchpad Pro standalone, plug the unit in via the included wall-plug with the USB-A to USB-C
cable. Use the included TRS Minijack to DIN MIDI adapters, along with a MIDI cable, to connect to
your external hardware. The Sequencer, Custom Modes, Note Mode, Chord Mode and Programmer
Mode will all send out MIDI data via the MIDI Out ports.
2.6 Having Trouble?
In case you’re having any trouble getting setup, don’t hesitate to contact our support team! You can
find more information and answers to FAQs in the Novation Help Centre at support.novationmusic.
com.

10 11
Navigational buttons
3. Hardware Overview
Session
Navigational buttons Note Mode
8x8 Pad grid Scene Launch & Sequencer Buttons
Chord Mode
Custom Mode Standalone Sequencer Sequencer Projects
Access to Shift functions
2
6
8
11
1
9
4
3
5
7
10
Record & Capture MIDIPlay
13
12
2
10
6
4
3
5
8
16
11
1
9
7
15
14
13
12
18
USB-C Socket
MIDI In, Out 1, Out2/Thru on standard TRS Minijack
Ableton Track ControlsTrack Select Buttons
Setup
15
14
16
17
17
18

12
4. Launchpad Pro Interface
4.1 Modes
Modes are the core of the Launchpad Pro interface. They allow you to switch between views, offering
different functionality in each.
There are five different modes available – Session, Note, Chord, Custom and Sequencer.
4.1.A – Launchpad Pro’s Mode buttons
Press a mode button (above) to enter the respective mode. The currently active mode will be lit pale
green. Currently available modes will be lit white.
Additionally, Projects gives you access to your saved sequencer projects. The Projects page is treated
as a sub-mode of Sequencer.
There are 8 Custom modes available on Launchpad Pro. Custom Modes allow you to control your
hardware and software via MIDI (see 8. Custom Modes for more information). When the Custom
button is pressed you will enter the last Custom Mode used (Custom Mode 1 by default). Access each
of the 8 Custom Modes by pressing the Track Select buttons after the Custom button is pressed. The
Custom Mode lit in pale green is selected, while available ones will be lit dim white. Using Novation
Components, you are able to edit these eight modes and customise them to your needs (see Custom
Modes).

12 13
4.2 Shift
Shift is a consistent control throughout Launchpad Pro [MK3]. Shift functions can be identified by
the small text on the bottom of relevant buttons – see below, where Save is the shift function for the
Projects button.
4.2.A – The Projects button has Save as its Shift function
When Shift is held, available functions will be lit gold, while unavailable functions will be unlit. Toggle
functions that are accessed with Shift (Record Quantise, Continue and Click) will be lit red when
disabled, or green when enabled.
Available functions vary by mode. For example, Save is only available to press when in Sequencer
Mode.

14
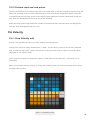
5. Session Mode
5.1 Ableton Live’s Session View
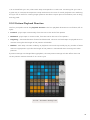
Session mode is designed to control Ableton Live’s Session view, seen below.
If you’ve never used Ableton Live before, we recommend visiting our Easy Start Tool (see page 5).
Here you’ll find your included Ableton Live 10 Lite download code (if you choose to register your
Launchpad Pro), alongside videos covering installing, the software’s basic features, and how to get
started making music with your Launchpad Pro in Ableton Live.
Session view is a grid that consists of clips, tracks (columns) and scenes (rows).
Session mode provides an 8x8 view of your clips in Session view on Launchpad Pro.
Clips are typically loops that contain MIDI notes or audio.
Tracks represent virtual instruments or audio tracks. MIDI clips placed on instrument tracks will play
back on the instrument that is assigned to that track.
Scenes are rows of clips. Launching a scene will launch all clips in that row. This means that you can
arrange clips into horizontal groups (across tracks) to form a song structure, launching scene after
scene to progress through a song.
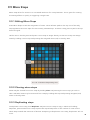
The yellow
column shows a
track, titled “1
Rhodes”
Clip
A row
represents
a scene,
highlighted
is scene “9”

14 15
The ▲▼◄ ► buttons let you navigate session view. The outline in the Session View grid shows the
area currently visible on Launchpad Pro.
• Press a pad to play the corresponding clip in Ableton. The colour will match between the screen and
pads.
• When a pad is pressed it will flash green, indicating that the clip is queued and will soon begin to
play. When a clip is playing, the pad will pulse green.
• Only one clip may play at a time per track. Pressing an empty clip will stop the current one on that
track.
• A horizontal line of clips is called a Scene. Scenes can be triggered using the > (scene launch)
buttons on the right-hand side of Launchpad Pro.
5.1.B – Session View seen in Ableton Live and on Launchpad Pro

16
When a track is record armed, you may use the Session Record button [O] to enable overdub
recording of the currently playing clip.
5.1.C – The Session Record Button, which has Capture MIDI as its shift function
Press Shift and Session Record to access Ableton Live’s Capture MIDI function. Live 10 is always
listening to MIDI input on armed or input-monitored tracks andcapture MIDI lets you retrieve the
material you’ve just played on those tracks. If no clip was playing on the armed track, Ableton Live
will place the MIDI notes into a new clip. If a clip was playing, the MIDI notes will be overdubbed onto
that clip.
Press the Play button to play the currently active clips while they are stopped. Press Play during
playback and playback will stop.
5.2 Session Overview
Access Session Overview by holding Session when in Session Mode. This will display a zoomed-out
version of the Session view grid, with each pad representing an 8x8 block of clips. Pressing a pad
will navigate to that 8x8 block, providing a fast way to navigate large Live sets. Alternatively, the
navigational arrow buttons may be used to navigate the Session Overview.
The currently viewed 8x8 block will be lit light brown, while other blocks are blue. If a clip is playing in
a block that is not being viewed, the block will pulse green.
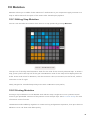
5.3 Clip Functions
Beyond launching and stopping clips, Launchpad Pro provides additional clip functionality that’s great
for production in Live.
5.3.1 Select a clip or empty clip slot
To select a clip without Launching it, hold shift and press the clip. This also works for empty clip slots.
Notice in Live that the selected clip and track will change, and it will become the focused clip. This is
useful for choosing a location to print clips to from the sequencer.

16 17
5.3.2 Clear a clip
Hold clear and press a clip on the 8x8 grid to clear it, deleting it from the Session View grid.
If in Note Mode, pressing Clear will instantly clear the currently selected clip.
5.3.3 Duplicate a clip
Hold duplicate and press a clip on the 8x8 grid to copy it to the clip slot below. This will overwrite
existing clips.
If in Note Mode, pressing Duplicate will instantly duplicate the currently selected clip and select the
newly created duplicate. This is useful when you want to create a new clip that is a variation on a
previous one.
5.3.4 Double a clip’s length
Double may be used to double a clip’s length. For example, a 2-bar clip becomes 4 bars.
• In Session Mode, hold Shift and Duplicate then press a pad to double the corresponding clip’s
length.
• If a clip is selected and playing in either Note or Device Mode, one press of Duplicate while holding
the Shift button will double clip length.
If in Note Mode, pressing Double will instantly double the currently selected clip. This is useful if you
want to create a variation of a loop and overdub it.
5.3.5 Quantise a clip
Hold quantise and press a clip on the 8x8 grid to quantise its contents. The MIDI notes in the clip will
be snapped to the grid to the closest 16th note interval.
5.3.6 Record Quantise
With Record Quantise enabled, any recorded MIDI will be automatically quantised to the grid with the
current quantisation setting.
Hold shift to see if Record Quantise is enabled or disabled. If the Quantise button is lit red, record
quantise is disabled. If it is lit green, Record Quantise is enabled. With shift held, press Quantise to
enabled or disable Record Quantise.
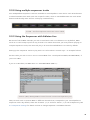
To change the quantisation setting in Live, navigate to the top bar and press Edit, then Record
Quantisation, then select from the available options.

18
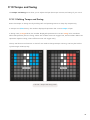
5.3.7 Fixed Length
Fixed Length allows you to define a bar length for any new clips that are recorded. Press Fixed length
to enable or disable this behaviour. The Fixed Length button will be lit white when it is disabled and
lit blue when it is enabled.
The number of bars that will be recorded when Fixed Length is enabled can be defined. Hold
Fixed Length briefly and the Track Select buttons will begin to pulse blue. Each Track Select button
represents one bar – press a track select to determine a bar length from 1 to 8 bars. Recording will
stop automatically once the set number of bars is reached, and the recorded clip will loop.
The left-hand image shows fixed length is set to 1 bar, while the right-hand image shows that it is set
to 4 bars.
5.3.7.A – Setting the number of bars with the Track Select Buttons for Fixed Length. A fixed length
of 1 bar is seen on the left image, and 4 bars on the right.
5.4 Track Controls
Launchpad Pro’s Track Controls allow you to control various track parameters in Ableton Live 10. The
Track Controls are found on the bottom row of Launchpad Pro, beneath the Track Select buttons.
5.4.A – Track Select Buttons & Track Controls on Launchpad Pro
The Track Controls are located on the bottom row of the Launchpad Pro. These functions work in
conjunction with the row of 8 Track Select buttons just above it as well as with the 8x8 area.
Track Select
buttons
Track
Controls

18 19
5.4.1 Record Arm
Overlay the Track Select buttons with Record Arm track toggles. When pressed, the clip in the
corresponding track will stop playing.
5.4.2 Mute
Overlay the Track Select buttons with Mute track toggles. When pressed, the clip in the
corresponding track will stop playing.
5.4.3 Solo
Overlay the Track Select buttons with Solo track toggles. When pressed, the clip in the corresponding
track will stop playing.
5.4.4 Volume
Control the volume levels of the tracks within the currently selected 8x8 area in Session view. Volume
faders are vertical.
5.4.5 Pan
Control the stereo panning of the tracks within the currently selected 8x8 area in Session view. Pans
will show horizontally - the top pan represents the leftmost track, and the bottom represents the
rightmost.
5.4.6 Send
Control the send level of the tracks within the currently selected 8x8 area in Session view to Send A.
Send faders are vertical.
5.4.7 Device
Overlay the row of pads above the mixer function with device select (first to eighth in the track’s
chain). Once a device in the chain is selected, control the value of the 8 macro parameters controls
within the currently selected 8x8 area in Session view. Macro parameters faders are vertical.
5.4.8 Stop Clip
Overlay the Track Select buttons with Stop Clip triggers. When pressed, the clip in the corresponding
track will stop playing at the end of the phrase.

20
5.4.9.A – Faders for track pans (left) and volume (right)
5.5 Record Arm & Recording
When a track is record armed, all empty clips in a column will be dimly lit red. When a clip is pressed
it will flash red to show that it is queued to record (the record button will also flash in unison). The
pad will pulse red once recording begins, with the record button lit bright red. If the record button is
then pressed, the clip will flash red to indicate that it will soon stop recording. If the track is un-armed
during recording, the clip will immediately stop recording.
5.6 Production Controls
Launchpad Pro offers several shortcuts to aid production within Ableton Live.
5.4.9 Fader orientation
Volume, Pan, Sends and Device are each sets of 8 faders. The faders are vertical for Volume, Sends
and Device, whereas they are horizontal for pans (see below). Press a pad to move the fader position
up and down (or left to right).
For Volume and Send faders, tracks are arranged horizontally across the pads. For Pan faders, tracks
are arranged vertically.
Page is loading ...
Page is loading ...
Page is loading ...
Page is loading ...
Page is loading ...
Page is loading ...
Page is loading ...
Page is loading ...
Page is loading ...
Page is loading ...
Page is loading ...
Page is loading ...
Page is loading ...
Page is loading ...
Page is loading ...
Page is loading ...
Page is loading ...
Page is loading ...
Page is loading ...
Page is loading ...
Page is loading ...
Page is loading ...
Page is loading ...
Page is loading ...
Page is loading ...
Page is loading ...
Page is loading ...
Page is loading ...
Page is loading ...
Page is loading ...
Page is loading ...
Page is loading ...
Page is loading ...
Page is loading ...
Page is loading ...
Page is loading ...
Page is loading ...
Page is loading ...
Page is loading ...
Page is loading ...
Page is loading ...
Page is loading ...
Page is loading ...
Page is loading ...
Page is loading ...
Page is loading ...
-
 1
1
-
 2
2
-
 3
3
-
 4
4
-
 5
5
-
 6
6
-
 7
7
-
 8
8
-
 9
9
-
 10
10
-
 11
11
-
 12
12
-
 13
13
-
 14
14
-
 15
15
-
 16
16
-
 17
17
-
 18
18
-
 19
19
-
 20
20
-
 21
21
-
 22
22
-
 23
23
-
 24
24
-
 25
25
-
 26
26
-
 27
27
-
 28
28
-
 29
29
-
 30
30
-
 31
31
-
 32
32
-
 33
33
-
 34
34
-
 35
35
-
 36
36
-
 37
37
-
 38
38
-
 39
39
-
 40
40
-
 41
41
-
 42
42
-
 43
43
-
 44
44
-
 45
45
-
 46
46
-
 47
47
-
 48
48
-
 49
49
-
 50
50
-
 51
51
-
 52
52
-
 53
53
-
 54
54
-
 55
55
-
 56
56
-
 57
57
-
 58
58
-
 59
59
-
 60
60
-
 61
61
-
 62
62
-
 63
63
-
 64
64
-
 65
65
-
 66
66


Focusrite Audio Engineering Launchpad Pro Mk3 User manual
- Type
- User manual
- This manual is also suitable for
Ask a question and I''ll find the answer in the document
Finding information in a document is now easier with AI
Other documents
-
Behringer CMD Micro MIDI Map
-
Novation Launchpad X User guide
-
Novation Launch Control XL Mk2 User guide
-
Novation Launchpad Pro Mk3 User guide
-
-
Bytecc T-203BK Datasheet
-
-
Novation Launch Control Owner's manual
-
Novation Launchpad Mini User guide
-