Page is loading ...

User’s Manual
ACCESSORIES
Gold
Prospecting Kits
FOR COMPLETE DETAILS VISIT WWW.DETECTING.COM • 1-800-413-4131
Bounty Hunter
®
Padded Carry Bag
Rugged double stitched construction. Includes handy
exterior pocket for extra batteries or small accessories.
CBAG-W
Bounty Hunter
®
Pouch & Digger Combo –
Pouch with 2 large pockets & 9” heavy duty digging tool.
TP-KIT-W
Pin Pointer
Pinpoints the exact location of buried metal objects. Audio
signal indicator and vibrator. Runs on 1 – 9-Volt Battery.
PIN POINTER-W
Bounty Hunter
®
Sand Scoop
Large scoop with filtering holes. Made of strong plastic.
SAND SCOOPBH
9” Heavy-Duty Digging Tool
Metal blade with comfortable plastic handle and depth
gauge. TROWEL-2
Digging Tool –
Light and practical plastic, wide blade digging tool.
TROWEL-W
Bounty Hunter
®
Baseball Cap –
One size fits all, with Bounty Hunter
®
logo. BHCAP
Bounty Hunter
®
T-Shirt –
100% cotton with Bounty Hunter
®
Logo.
Sizes – S, M, LG, XL & XXL. BHTSHIRT
MJRTID-MEX Rev.1 101416
Use:
(2) AA ALKALINE batteries.
DO NOT USE
• Heavy Duty Batteries.
• Zinc Carbon Batteries
See our YouTube video
for easy step-by-step instructions
https://www.youtube.com/watch?v=fVe7Thf5Ksk

2 11
TREASURE HUNTER’S CODE OF ETHICS:
• Always check Federal, State, County and local laws before searching.
• Respect private property and do not enter private property without the owner’s permission.
• Take care to refill all holes and leave no damage.
• Remove and dispose of any and all trash and litter found.
• Appreciate and protect our inheritance of natural resources, wildlife and private property.
• Act as an ambassador for the hobby; use thoughtfulness, consideration and courtesy at all times.
• Never destroy historical or archaeological treasures.
• All detectorists may be judged by the example you set; always conduct yourself with courtesy
and consideration of others.
Bounty Hunter Metal Detectors are war rant ed against defects in work man -
ship or ma te ri als un der nor mal use for one year from date of pur chase to
the original user. Liability in all events is limited to the pur chase price paid.
Liability under this War ran ty is limited to replacing or repairing, at our
option, any Bounty Hunter De tec tor returned, ship ping cost pre paid, to First
Texas Products, LLC. Damage due to neglect, accidental damage or misuse
of this product is not covered by this warranty.
Proof of purchase is required to make a claim under this warranty.
NOTE TO CUSTOMERS OUTSIDE THE U.S.A.
This warranty may vary in other countries, check with your distributor for details.
Warranty does not cover shipping costs
FIRST TEXAS PRODUCTS, LLC
1-YEAR LIMITED WARRANTY
Copyright© 2016 by First Texas Products, L.L.C.
All rights reserved, including the right to reproduce this book, or parts thereof, in any form.
Published by First Texas Products, L.L.C.
Bounty Hunter
®
and Bounty Hunter Junior are registered trademarks of First Texas Products, L.L.C.
www.detecting.com
According to FCC part 15.21 Changes or Modifications made to this device not expressly approved by the party
responsible for compliance could void the user’s authority to operate this equipment.
This device complies with FCC Part 15 Subpart B Section 15.109 Class B.
First Texas Products, L.L.C.
1465 Henry Brennan Dr., El Paso, TX 79936
(915) 633-8354 • Fax: (915) 633-8529
Assembled in Mexico. Designed in the U.S.A. by First Texas Products
and manufactured from U.S. and imported components to First Texas Products’ Bounty Hunter
®
Specifications.
Register your warranty on-line for a chance to win a FREE DETECTOR.
For details, visit www.detecting.com
Note: This equipment has been tested and found to comply with the limits for a Class B digital device, pursuant to part
15 of the FCC Rules. These limits are designed to provide reasonable protection against harmful interference in a
residential installation. This equipment generates, uses and can radiate radio frequency energy and, if not installed
and used in accordance with the instructions, may cause harmful interference to radio communications. However,
there is no guarantee that interference will not occur in a particular installation. If this equipment does cause harmful
interference to radio or television reception, which can be determined by turning the equipment off and on, the user is
encouraged to try to correct the interference by one or more of the following measures:
- Reorient or relocate the receiving antenna.
- Increase the separation between the equipment and receiver.
- Consult the dealer or an experienced radio/TV technician for help.
CE
The manufacturer declares that the minimum ESD performance criteria is 1) the unit shall not
be permanently damaged and 2) operator intervention is allowed.
This product is RoHS compliant. This product meets the requirements of Industry Canada: CAN ICES-3 B/NMB-3 B.
TERMINOLOGY
The following terms are used throughout this manual and are standard
terminology among detectorists.
RELIC
A relic is an object of interest by reason of its age or its association with the past.
Many relics are made of iron, but can also be made of bronze or precious
metals.
IRON
Iron is a common low-grade metal that is an
undesirable target in certain metal detecting applications.
Examples of undesirable iron objects are old cans, pipes,
bolts and nails. Sometimes, the desired target is
made of iron. Property markers for instance, contain
iron. Valuable relics can also be composed of iron;
cannon balls, old armaments and parts of old
structures and vehicles can also be composed of iron.
FERROUS
Metals which are made of, or contain iron.
ELIMINATION
Reference to a metal being "eliminated" means that the detector will not emit a
tone, nor display a Target-ID icon when a metal object passes through the
searchcoil's detection field.
DISCRIMINATION
When the detector emits different tones for different
types of metals, and when the detector "eliminates"
certain metals, we refer to this as the detector
"discriminating" among different types of metals.
Discrimination is an important feature of
professional metal detectors. Discrimination
allows the user to ignore trash and otherwise
undesirable objects.
PINPOINTING
Pinpointing is the process of finding the exact location of a buried object. Long-
buried metals can appear exactly like the surrounding soil, and can therefore be
very hard to isolate from the soil.
GROUND CANCELATION
Ground Cancelation is the ability of the detector to ignore, or "see through," the
earth's naturally occurring minerals, and only sound a tone when a metal object
is detected. This detector incorporates proprietary circuitry to eliminate false
signals from many mineralized soils.

3
10
To get the most enjoyment from your Metal Detector, we suggest
you do the following:
1. Use two AA ALKALINE batteries only.
• Do not use Heavy Duty batteries.
• Do not use ordinary Zinc-Carbon Batteries.
Rechargeable batteries can also be used. If you use
rechargeables, we recommend using “Nickel Metal
Hydride” rechargeable batteries.
2. Use your detector OUTDOORS only.
• Large metal objects inside the home may interfere
with the detector’s operation. Floors and walls of
most homes contain metal objects such as nails,
pipes, wires, ductwork, etc.
• Electrical appliances inside the home, like
microwave ovens, televisions, and some light
fixtures emit electromagnetic energy which can
interfere with the detector’s operation.
• Do not place coins on the floor of your home and
try to detect.
Try this test outside only.
• If conducting an indoor demonstration, hold the
searchcoil off the floor and wave coins over the
center of the searchcoil.
When pin point ing a tar get, try draw ing an imaginary “X”, as il lus trat ed,
over where the tone is induced.
Pinpointing
Accurate pinpointing takes practice and is best ac com plished by “X-ing” the
sus pect ed target area. A good way to practice this to lay a coin on the ground
(make sure there are no other metal targets nearby) and practice “X-ing” it
while listening to the audio. Note, the loudest signal response occurs when
the center of the searchcoil is directly over the coin.
1. Once a buried target is identified by a good tone re sponse, continue
sweep ing the searchcoil over the target in a narrowing side to side pattern.
2. Take visual note of the place on the ground where the “beep” occurs
as you move the searchcoil slowly from side to side.
3. Stop the searchcoil directly over this spot on the ground.
4. Now move the searchcoil straight for ward and straight back towards
you in a similar fashion.
5. Again make visual note of the spot on the ground at which the “beep”
occurs.
6. This allows you to “zero in” on the exact spot on the ground at which
the “beep” occurs.
REMEMBER: The detector will beep just as the searchcoil passes over the
buried object.
If you have difficulty pinpointing very strong sig nals, try lifting the searchcoil
higher off the ground until a weaker, but more concise, signal is heard. For
very weak signals, try moving the searchcoil in short quick sweeps, closer to
the ground.

4
9
Installing Batteries
Use two AA ALKALINE batteries only!
1. Remove the battery door from the front of the detector.
2. Use two AA ALKALINE batteries.
Do not use Heavy Duty or ordinary Zinc Carbon batteries.
3. Install batteries with polarity marking as shown.
4. Replace the battery door.
lift
latch
to open
door
WARNING
- Never mix old and
new batteries.
- Never mix alkaline,
standard (carbon-zinc) or rechargeable
(nickel-cadmium) batteries.
- Never dispose of batteries in fire, as
they may explode.
- Never attempt to charge non-chargeable batteries.
- Always remove exhausted batteries from metal detector.
- Do not store unit with batteries installed.
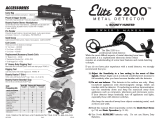
The Basics of Metal Detecting
Make sure the detector tube is adjusted to a comfortable length.
Sweep the searchcoil from side to side in slow, overlapping motions.
Keep the searchcoil parallel and close to the
ground. Overlap each sweep to get the best
possible coverage. The Junior T.I.D.
requires searchcoil motion to
detect buried targets. If the
searchcoil is held
motionless over a target,
the detector will not
detect the target.
Try not to lift the searchcoil at the end of
your sweeps. This may be difficult for
younger children, but the closer the
searchcoil is to the ground throughout the
sweep, the more likely you are to find
buried metal objects.
You may want to adjust your discrimination
during your search, depending on what you
are finding. For instance, if you are
searching with all three target categories
active, you will detect all types of metal
objects. If you find that you are in a trashy
area with a lot of iron objects, press the DISC
button to eliminate the iron category. If you
are in a trashy area with a lot of pull tabs and
bottle caps, press the DISC button again to
eliminate the middle target category.
Be aware that some desirable objects, like nickels and gold, fall into the middle
target category range and will be aliminated from detection along with less
valuable metals. Gold rings have a metallic signature similar to pull-tabs; nickels
have a metallic signature similar to some newer pull tabs. It requires practice
and patience to understand what types of objects are eliminated at each setting.
CORRECT
WRONG
Sweep the searchcoil in a half-circle
movement as illustrated here. Repeat
this motion every step you take to
guarantee that the area is being
covered thoroughly.
BATTERY DISPOSAL & RECYCLING
Alkaline batteries may be disposed of in a normal waste receptacle or recycled. Non-
Alkaline batteries should be recycled. In the state of California all battery types must be
recycled. Please refer to local municipalities for detailed disposal and recycling
requirements.

5
8
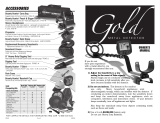
Quick-Start Demo
Try this quick way to demonstrate the basic features of your metal detector:
I. Supplies Needed
a. a nail. b. a nickel.
c. a gold ring. c. a quarter.
II. Keep the searchcoil
away from
floors, walls,
and metal objects.
One person holds the
detector still, so that
another can sweep
coins under the searchcoil.
III.
To turn detector on, press-and-hold
.
LCD will momentarily illuminate all segments.
IV. Detecting All Types of Metals
a. Wave each object under the searchcoil. Wave coins flat, parallel to
the searchcoil. Notice the tone is loudest as the object passes
under the searchcoil center.
Notice the different audio tones for each object.
b. Pass each object at varying distances from the searchcoil.
1.) The sound gets louder as the object moves closer to the
searchcoil.
2.) The graphic DEPTH INDICATOR as you vary the target distance
from the searchcoil.
3.) Beyond a certain distance, the object is no longer detected.
V. Eliminating Some Metals
a. Press once. The left icon is disabled.
b. Wave the nail under the searchcoil and notice it is no longer
detected.
c. Press again. The middle icon is disabled.
d. Wave the nickel and gold ring under the searchcoil and notice that
they are no longer detected.
NOTE: Rings can be composed of a variety of metals. If the ring is
made of gold it will fall into the middle category.
VI. To turn the detector off, briefly press-and-hold .
THREE-TONE AUDIO:
The detector emits a low, medium or high tone, depending on the type of metal
detected.
Low Tone: ferrous metals that illuminate the left target-I.D. category.
Medium Tone: medium conductivity metals that illuminate the middle target-I.D.
category
High Tone: high conductivity metals that illuminate the right target-I.D. category
PROPORTIONAL AUDIO:
The speaker volume indicates target strength. The shallower the target (i.e the
closer to the searchcoil), the louder the tone. As you move farther away from
the target, the volume drops. For the deepest targets on the fringe of detection,
the speaker volume can be very faint. The visual target-I.D. icons will illuminate
regardless of the target depth. The speaker volume, along with visual depth
indicator, help you determine a target’s depth before you dig.
Depth Indicator
Coin-sized objects can be detected up to 6 inches deep. The 3-segment
graphic depth indicator is calibrated to coin-sized objects.
The Junior T.I.D. displays target depth with a 3-segment graphic depth
indicator and it is calibrated to coin sized objects.
1 segment: 2 segments: 3 segments:
0-2 inch target depth 2-4 inch target depth 4 or more inch target depth
Objects other than coins will still register on the depth scale, but the depth indication
will be relative. For example, all 3 segments illuminated could indicate a coin at 4
or more inches deep, but could also be a very large object much deeper.
Low Battery Indicator
When battery power reaches a low condition the Low
Battery icon will illuminate
. When it first appears
there is about an hour of battery life remaining. When
battery power is close to failing, the icon will flash
.
At this point batteries should be replaced.
Overload Warning
If a large metal object or highly magnetic soil is too
close to the searchcoil, the detector will “overload”.
The screen will blank and you will see a blinking
“Lift Coil” message. The detector will also alert
you with a pulsing siren sound. Overload will not
harm the detector, but the detector will not function
under these conditions. If overload occurs, raise
the searchcoil to detect the target from a greater
distance, or move to a different location.

6
Adjusting Length
Loosen the tube clamping nut 1/4 turn
Extend the bottom tube assembly
1. Grasp the top tube with one hand.
2. Grasp the searchcoil with the other hand.
3. Pull the two sections apart to slide the bottom tube out of the top.
tube.
Establish Tube Length
1. Pivot the searchcoil perpendicular to the tube.
2. Place detector in user’s hand,
with arm extended.
3. Adjust tube length so that searchcoil
rests on the ground, close to
the user’s feet.
4. Align the searchcoil so it is
parallel to the ground.
5. Tighten the tube clamping
nut, while holding the
searchcoil in place on
the ground to prevent
twisting of the tube
assembly while
tightening.
Do not
over-tighten.
6. Leave approximately
2” of the lower
tube inside the
upper tube to help
maintain rigidity.
7
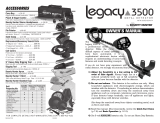
Target Identification and Discrimination
The Bounty Hunter Junior T.I.D. metal detector can both identify buried metals
by category, and eliminate unwanted metals from detection.
“Discrimination” refers to the detector’s ability to both identify targets and
eliminate them from detection. When a Target ID category has been eliminated
from detection, we say it has been “discriminated out.”
Target Identification (T.I.D.)
The Junior T.I.D. can distinguish between three categories of metal targets:
1. Ferrous: this includes many
iron targets such as nails,
screws, bolts and some large
iron objects like horseshoes.
The Junior T.I.D. will respond
with a low-pitch audio tone
and display the icon:
2. Non-ferrous low conductor:
this includes US nickels, many
rings and small jewelry but
also includes many trash
items such as tin foil, pull tabs,
screw caps and bottle caps.
The Junior T.I.D. will respond
with a medium-pitch audio
tone and display the icon:
3. Non-ferrous high conductor:
This includes most copper and
silver coins, as well as modern
clad coins. The Junior T.I.D. will
respond with a high-pitch
audio tone and display the
icon:
Discrimination Settings
When the Junior T.I.D. is turned
on, all three categories are
enabled, meaning it will detect
all metal targets. By pressing
you can eliminate target
categories.
Press once
to eliminate
ferrous (iron)
targets.
Pressing
again will also
eliminate low
conductor non-
ferrous targets.
Pressing a
third time will
return the Junior
T.I.D. to the
default state and
detect all metals.
Probably Trash
Could be something good?
The good stuff!

6
Adjusting Length
Loosen the tube clamping nut 1/4 turn
Extend the bottom tube assembly
1. Grasp the top tube with one hand.
2. Grasp the searchcoil with the other hand.
3. Pull the two sections apart to slide the bottom tube out of the top.
tube.
Establish Tube Length
1. Pivot the searchcoil perpendicular to the tube.
2. Place detector in user’s hand,
with arm extended.
3. Adjust tube length so that searchcoil
rests on the ground, close to
the user’s feet.
4. Align the searchcoil so it is
parallel to the ground.
5. Tighten the tube clamping
nut, while holding the
searchcoil in place on
the ground to prevent
twisting of the tube
assembly while
tightening.
Do not
over-tighten.
6. Leave approximately
2” of the lower
tube inside the
upper tube to help
maintain rigidity.
7
Target Identification and Discrimination
The Bounty Hunter Junior T.I.D. metal detector can both identify buried metals
by category, and eliminate unwanted metals from detection.
“Discrimination” refers to the detector’s ability to both identify targets and
eliminate them from detection. When a Target ID category has been eliminated
from detection, we say it has been “discriminated out.”
Target Identification (T.I.D.)
The Junior T.I.D. can distinguish between three categories of metal targets:
1. Ferrous: this includes many
iron targets such as nails,
screws, bolts and some large
iron objects like horseshoes.
The Junior T.I.D. will respond
with a low-pitch audio tone
and display the icon:
2. Non-ferrous low conductor:
this includes US nickels, many
rings and small jewelry but
also includes many trash
items such as tin foil, pull tabs,
screw caps and bottle caps.
The Junior T.I.D. will respond
with a medium-pitch audio
tone and display the icon:
3. Non-ferrous high conductor:
This includes most copper and
silver coins, as well as modern
clad coins. The Junior T.I.D. will
respond with a high-pitch
audio tone and display the
icon:
Discrimination Settings
When the Junior T.I.D. is turned
on, all three categories are
enabled, meaning it will detect
all metal targets. By pressing
you can eliminate target
categories.
Press once
to eliminate
ferrous (iron)
targets.
Pressing
again will also
eliminate low
conductor non-
ferrous targets.
Pressing a
third time will
return the Junior
T.I.D. to the
default state and
detect all metals.
Probably Trash
Could be something good?
The good stuff!

5
8
Quick-Start Demo
Try this quick way to demonstrate the basic features of your metal detector:
I. Supplies Needed
a. a nail. b. a nickel.
c. a gold ring. c. a quarter.
II. Keep the searchcoil
away from
floors, walls,
and metal objects.
One person holds the
detector still, so that
another can sweep
coins under the searchcoil.
III.
To turn detector on, press-and-hold
.
LCD will momentarily illuminate all segments.
IV. Detecting All Types of Metals
a. Wave each object under the searchcoil. Wave coins flat, parallel to
the searchcoil. Notice the tone is loudest as the object passes
under the searchcoil center.
Notice the different audio tones for each object.
b. Pass each object at varying distances from the searchcoil.
1.) The sound gets louder as the object moves closer to the
searchcoil.
2.) The graphic DEPTH INDICATOR as you vary the target distance
from the searchcoil.
3.) Beyond a certain distance, the object is no longer detected.
V. Eliminating Some Metals
a. Press once. The left icon is disabled.
b. Wave the nail under the searchcoil and notice it is no longer
detected.
c. Press again. The middle icon is disabled.
d. Wave the nickel and gold ring under the searchcoil and notice that
they are no longer detected.
NOTE: Rings can be composed of a variety of metals. If the ring is
made of gold it will fall into the middle category.
VI. To turn the detector off, briefly press-and-hold .
THREE-TONE AUDIO:
The detector emits a low, medium or high tone, depending on the type of metal
detected.
Low Tone: ferrous metals that illuminate the left target-I.D. category.
Medium Tone: medium conductivity metals that illuminate the middle target-I.D.
category
High Tone: high conductivity metals that illuminate the right target-I.D. category
PROPORTIONAL AUDIO:
The speaker volume indicates target strength. The shallower the target (i.e the
closer to the searchcoil), the louder the tone. As you move farther away from
the target, the volume drops. For the deepest targets on the fringe of detection,
the speaker volume can be very faint. The visual target-I.D. icons will illuminate
regardless of the target depth. The speaker volume, along with visual depth
indicator, help you determine a target’s depth before you dig.
Depth Indicator
Coin-sized objects can be detected up to 6 inches deep. The 3-segment
graphic depth indicator is calibrated to coin-sized objects.
The Junior T.I.D. displays target depth with a 3-segment graphic depth
indicator and it is calibrated to coin sized objects.
1 segment: 2 segments: 3 segments:
0-2 inch target depth 2-4 inch target depth 4 or more inch target depth
Objects other than coins will still register on the depth scale, but the depth indication
will be relative. For example, all 3 segments illuminated could indicate a coin at 4
or more inches deep, but could also be a very large object much deeper.
Low Battery Indicator
When battery power reaches a low condition the Low
Battery icon will illuminate
. When it first appears
there is about an hour of battery life remaining. When
battery power is close to failing, the icon will flash
.
At this point batteries should be replaced.
Overload Warning
If a large metal object or highly magnetic soil is too
close to the searchcoil, the detector will “overload”.
The screen will blank and you will see a blinking
“Lift Coil” message. The detector will also alert
you with a pulsing siren sound. Overload will not
harm the detector, but the detector will not function
under these conditions. If overload occurs, raise
the searchcoil to detect the target from a greater
distance, or move to a different location.

4
9
Installing Batteries
Use two AA ALKALINE batteries only!
1. Remove the battery door from the front of the detector.
2. Use two AA ALKALINE batteries.
Do not use Heavy Duty or ordinary Zinc Carbon batteries.
3. Install batteries with polarity marking as shown.
4. Replace the battery door.
lift
latch
to open
door
WARNING
- Never mix old and
new batteries.
- Never mix alkaline,
standard (carbon-zinc) or rechargeable
(nickel-cadmium) batteries.
- Never dispose of batteries in fire, as
they may explode.
- Never attempt to charge non-chargeable batteries.
- Always remove exhausted batteries from metal detector.
- Do not store unit with batteries installed.
The Basics of Metal Detecting
Make sure the detector tube is adjusted to a comfortable length.
Sweep the searchcoil from side to side in slow, overlapping motions.
Keep the searchcoil parallel and close to the
ground. Overlap each sweep to get the best
possible coverage. The Junior T.I.D.
requires searchcoil motion to
detect buried targets. If the
searchcoil is held
motionless over a target,
the detector will not
detect the target.
Try not to lift the searchcoil at the end of
your sweeps. This may be difficult for
younger children, but the closer the
searchcoil is to the ground throughout the
sweep, the more likely you are to find
buried metal objects.
You may want to adjust your discrimination
during your search, depending on what you
are finding. For instance, if you are
searching with all three target categories
active, you will detect all types of metal
objects. If you find that you are in a trashy
area with a lot of iron objects, press the DISC
button to eliminate the iron category. If you
are in a trashy area with a lot of pull tabs and
bottle caps, press the DISC button again to
eliminate the middle target category.
Be aware that some desirable objects, like nickels and gold, fall into the middle
target category range and will be aliminated from detection along with less
valuable metals. Gold rings have a metallic signature similar to pull-tabs; nickels
have a metallic signature similar to some newer pull tabs. It requires practice
and patience to understand what types of objects are eliminated at each setting.
CORRECT
WRONG
Sweep the searchcoil in a half-circle
movement as illustrated here. Repeat
this motion every step you take to
guarantee that the area is being
covered thoroughly.
BATTERY DISPOSAL & RECYCLING
Alkaline batteries may be disposed of in a normal waste receptacle or recycled. Non-
Alkaline batteries should be recycled. In the state of California all battery types must be
recycled. Please refer to local municipalities for detailed disposal and recycling
requirements.

3
10
To get the most enjoyment from your Metal Detector, we suggest
you do the following:
1. Use two AA ALKALINE batteries only.
• Do not use Heavy Duty batteries.
• Do not use ordinary Zinc-Carbon Batteries.
Rechargeable batteries can also be used. If you use
rechargeables, we recommend using “Nickel Metal
Hydride” rechargeable batteries.
2. Use your detector OUTDOORS only.
• Large metal objects inside the home may interfere
with the detector’s operation. Floors and walls of
most homes contain metal objects such as nails,
pipes, wires, ductwork, etc.
• Electrical appliances inside the home, like
microwave ovens, televisions, and some light
fixtures emit electromagnetic energy which can
interfere with the detector’s operation.
• Do not place coins on the floor of your home and
try to detect.
Try this test outside only.
• If conducting an indoor demonstration, hold the
searchcoil off the floor and wave coins over the
center of the searchcoil.
When pin point ing a tar get, try draw ing an imaginary “X”, as il lus trat ed,
over where the tone is induced.
Pinpointing
Accurate pinpointing takes practice and is best ac com plished by “X-ing” the
sus pect ed target area. A good way to practice this to lay a coin on the ground
(make sure there are no other metal targets nearby) and practice “X-ing” it
while listening to the audio. Note, the loudest signal response occurs when
the center of the searchcoil is directly over the coin.
1. Once a buried target is identified by a good tone re sponse, continue
sweep ing the searchcoil over the target in a narrowing side to side pattern.
2. Take visual note of the place on the ground where the “beep” occurs
as you move the searchcoil slowly from side to side.
3. Stop the searchcoil directly over this spot on the ground.
4. Now move the searchcoil straight for ward and straight back towards
you in a similar fashion.
5. Again make visual note of the spot on the ground at which the “beep”
occurs.
6. This allows you to “zero in” on the exact spot on the ground at which
the “beep” occurs.
REMEMBER: The detector will beep just as the searchcoil passes over the
buried object.
If you have difficulty pinpointing very strong sig nals, try lifting the searchcoil
higher off the ground until a weaker, but more concise, signal is heard. For
very weak signals, try moving the searchcoil in short quick sweeps, closer to
the ground.

2 11
TREASURE HUNTER’S CODE OF ETHICS:
• Always check Federal, State, County and local laws before searching.
• Respect private property and do not enter private property without the owner’s permission.
• Take care to refill all holes and leave no damage.
• Remove and dispose of any and all trash and litter found.
• Appreciate and protect our inheritance of natural resources, wildlife and private property.
• Act as an ambassador for the hobby; use thoughtfulness, consideration and courtesy at all times.
• Never destroy historical or archaeological treasures.
• All detectorists may be judged by the example you set; always conduct yourself with courtesy
and consideration of others.
Bounty Hunter Metal Detectors are war rant ed against defects in work man -
ship or ma te ri als un der nor mal use for one year from date of pur chase to
the original user. Liability in all events is limited to the pur chase price paid.
Liability under this War ran ty is limited to replacing or repairing, at our
option, any Bounty Hunter De tec tor returned, ship ping cost pre paid, to First
Texas Products, LLC. Damage due to neglect, accidental damage or misuse
of this product is not covered by this warranty.
Proof of purchase is required to make a claim under this warranty.
NOTE TO CUSTOMERS OUTSIDE THE U.S.A.
This warranty may vary in other countries, check with your distributor for details.
Warranty does not cover shipping costs
FIRST TEXAS PRODUCTS, LLC
1-YEAR LIMITED WARRANTY
Copyright© 2016 by First Texas Products, L.L.C.
All rights reserved, including the right to reproduce this book, or parts thereof, in any form.
Published by First Texas Products, L.L.C.
Bounty Hunter
®
and Bounty Hunter Junior are registered trademarks of First Texas Products, L.L.C.
www.detecting.com
According to FCC part 15.21 Changes or Modifications made to this device not expressly approved by the party
responsible for compliance could void the user’s authority to operate this equipment.
This device complies with FCC Part 15 Subpart B Section 15.109 Class B.
First Texas Products, L.L.C.
1465 Henry Brennan Dr., El Paso, TX 79936
(915) 633-8354 • Fax: (915) 633-8529
Assembled in Mexico. Designed in the U.S.A. by First Texas Products
and manufactured from U.S. and imported components to First Texas Products’ Bounty Hunter
®
Specifications.
Register your warranty on-line for a chance to win a FREE DETECTOR.
For details, visit www.detecting.com
Note: This equipment has been tested and found to comply with the limits for a Class B digital device, pursuant to part
15 of the FCC Rules. These limits are designed to provide reasonable protection against harmful interference in a
residential installation. This equipment generates, uses and can radiate radio frequency energy and, if not installed
and used in accordance with the instructions, may cause harmful interference to radio communications. However,
there is no guarantee that interference will not occur in a particular installation. If this equipment does cause harmful
interference to radio or television reception, which can be determined by turning the equipment off and on, the user is
encouraged to try to correct the interference by one or more of the following measures:
- Reorient or relocate the receiving antenna.
- Increase the separation between the equipment and receiver.
- Consult the dealer or an experienced radio/TV technician for help.
CE
The manufacturer declares that the minimum ESD performance criteria is 1) the unit shall not
be permanently damaged and 2) operator intervention is allowed.
This product is RoHS compliant. This product meets the requirements of Industry Canada: CAN ICES-3 B/NMB-3 B.
TERMINOLOGY
The following terms are used throughout this manual and are standard
terminology among detectorists.
RELIC
A relic is an object of interest by reason of its age or its association with the past.
Many relics are made of iron, but can also be made of bronze or precious
metals.
IRON
Iron is a common low-grade metal that is an
undesirable target in certain metal detecting applications.
Examples of undesirable iron objects are old cans, pipes,
bolts and nails. Sometimes, the desired target is
made of iron. Property markers for instance, contain
iron. Valuable relics can also be composed of iron;
cannon balls, old armaments and parts of old
structures and vehicles can also be composed of iron.
FERROUS
Metals which are made of, or contain iron.
ELIMINATION
Reference to a metal being "eliminated" means that the detector will not emit a
tone, nor display a Target-ID icon when a metal object passes through the
searchcoil's detection field.
DISCRIMINATION
When the detector emits different tones for different
types of metals, and when the detector "eliminates"
certain metals, we refer to this as the detector
"discriminating" among different types of metals.
Discrimination is an important feature of
professional metal detectors. Discrimination
allows the user to ignore trash and otherwise
undesirable objects.
PINPOINTING
Pinpointing is the process of finding the exact location of a buried object. Long-
buried metals can appear exactly like the surrounding soil, and can therefore be
very hard to isolate from the soil.
GROUND CANCELATION
Ground Cancelation is the ability of the detector to ignore, or "see through," the
earth's naturally occurring minerals, and only sound a tone when a metal object
is detected. This detector incorporates proprietary circuitry to eliminate false
signals from many mineralized soils.

User’s Manual
ACCESSORIES
Gold
Prospecting Kits
FOR COMPLETE DETAILS VISIT WWW.DETECTING.COM • 1-800-413-4131
Bounty Hunter
®
Padded Carry Bag
Rugged double stitched construction. Includes handy
exterior pocket for extra batteries or small accessories.
CBAG-W
Bounty Hunter
®
Pouch & Digger Combo –
Pouch with 2 large pockets & 9” heavy duty digging tool.
TP-KIT-W
Pin Pointer
Pinpoints the exact location of buried metal objects. Audio
signal indicator and vibrator. Runs on 1 – 9-Volt Battery.
PIN POINTER-W
Bounty Hunter
®
Sand Scoop
Large scoop with filtering holes. Made of strong plastic.
SAND SCOOPBH
9” Heavy-Duty Digging Tool
Metal blade with comfortable plastic handle and depth
gauge. TROWEL-2
Digging Tool –
Light and practical plastic, wide blade digging tool.
TROWEL-W
Bounty Hunter
®
Baseball Cap –
One size fits all, with Bounty Hunter
®
logo. BHCAP
Bounty Hunter
®
T-Shirt –
100% cotton with Bounty Hunter
®
Logo.
Sizes – S, M, LG, XL & XXL. BHTSHIRT
MJRTID-MEX Rev.1 101416
Use:
(2) AA ALKALINE batteries.
DO NOT USE
• Heavy Duty Batteries.
• Zinc Carbon Batteries
See our YouTube video
for easy step-by-step instructions
https://www.youtube.com/watch?v=fVe7Thf5Ksk
/