Page is loading ...

EC Titanium
TM
Motor
Installation and Maintenance
NEMA Frames 140 - 210
OVERVIEW
This manual contains general procedures that apply to Baldor EC Titanium Motor product and is not intended to include a comprehensive listing of all details for all procedures
required for installation, operation and maintenance. Be sure to read and understand the Safety Notice statements in this manual. For your protection, do not install, operate or
attempt to perform maintenance procedures until you understand the Warning and Caution statements. A Warning statement indicates a possible unsafe condition that can cause
harm to personnel. A Caution statement indicates a condition that can cause damage to equipment.
The EC Titanium are IE5 efcient motor specically designed for operation on adjustable speed permanent magnet ac drive controls and is not designed for across the line
operation. Information required for proper control and setup of the separate drive is provided on the nameplate of the motor. Detailed information can be found in the EC Titanium
Installation Manual MN451 available for download at http://www.baldor.com/support/product_manuals.asp. Be sure to read and understand all of the Safety Notice statements
in MN451 EC Titanium Manual for your motor. The basic design includes Class F insulation, Class B temperature rise, 1.5 service factor motor only (1.0 SF integrated motor drive
designs), 40°C ambient, continuous duty. Standard enclosures are totally enclosed fan cooled foot mounting. It is important that motors be installed in locations that are compatible
with motor enclosure and ambient conditions. Improper selection of the motor enclosure and ambient conditions can lead to reduced operating life of the motor. Proper ventilation
for the motor must be provided. Obstructed airow can lead to reduction of motor life.
RECEIVING AND INSPECTION
The EC Titanium is thoroughly tested at the factory and carefully packaged for
shipment. When you receive your motor or the integrated motor and drive, there are
several things you should do immediately.
1. Carefully Unpack the EC Titanium and check for any signs of damage. Notify the
shipper immediately if any exist.
2. Check the motor and / or motor and drive rating label to ensure it is of the correct
type and power requirements for the application.
3. If the motor is to be stored for several weeks before use, be sure that it is stored in
a clean and dry environment and within a temperature range of –40°C to +60°C.
4. After storage or after unpacking and inspection to see that all parts are in good
condition, rotate the motor shaft by hand to be sure there are no obstructions
to free rotation. Motor leads must be isolated before the shaft will turn freely on
permanent magnet motors.
On motors received from the factory with the shaft blocked, remove blocking before
operating the motor. If motor is to be reshipped alone or installed to another piece of
equipment, the shaft block must be installed to prevent axial movement and prevent
brinelling of the bearings during shipment.
SAFETY
This equipment contains high voltage! Electrical shock can cause serious or fatal
injury. Only qualied personnel should attempt installation, operation and maintenance
of electrical equipment. Unsafe installation or use can cause conditions that lead to
serious or fatal injury. Only qualied personnel should attempt the installation, operation
and maintenance of this equipment. Be sure that you are completely familiar with safety
standards for selection, installation and use of electric motors and generators and local
codes and practices. Become familiar with the following:
• NEMA Publication MG-2, Safety Standard for Construction and guide for Selection,
Installation and Use of Electric Motors and Generators
• IEC 60034−1 Electrical and IEC60072−1 Mechanical specications
• NFPA 70® National Electrical Code (NEC) and local codes and practices
INSTALLATION OUTSIDE THE USA:
Refer to MN408 and MN1383 for Compliance with European Directives. Copies are
available at: http://www.baldor.com/support/product_manuals.asp
MOTOR ENCLOSURE
TEFC, totally enclosed motors are intended for use where moisture, dirt and/or corrosive
materials are present. The EC Titanium motor only is rated for in indoor and outdoor
locations. Integrated drive motor units with plastic covers are indoor use and not rated
for direct sunlight or outdoor use.
GENERAL
The user must select a ac drive suitable for permanent magnet motor control. The
ABB ACH580 is suggested and designed to automatically ID run the EC Titanium
motor. For all other ac drive controls, ensure the drive is capable of permanent magnet
motor control. Values identied on the motor nameplate must be available to enter into
drive parameters. These are shown in the previous section of this guide and include
Motor Rated Amps, Motor Back EMF Voltage, Rs (motor stator resistance), Ld (d-axis
inductance), Lq (q-axis inductance) and motor rated frequency. Ensure the drive is sized
properly for the current rating of the motor and set appropriate overcurrent protection
suitable for this motor and its application.
Speed Range
EC Titanium Motors are rated for a 10:1 Constant Torque Speed range below base
speed. 140 and 180 Frame motors may be operated to a maximum safe speed of 4000
RPM and 210 Frame motors 3000 RPM.
TESTING
If the motor has been in storage for an extensive period or has been subjected to
adverse moisture conditions, check the motor insulation resistance with a meg ohm
meter. Depending on storage conditions it may be necessary to rotate or change rusted
bearings. Contact your local sales ofce if resistance is less than 5 meg ohms.
WARNING: Do not touch electrical connections before you first ensure that power
has been disconnected. Electrical shock can cause serious or fatal injury.
WARNING: Be sure the system is properly grounded before applying power.
Electrical shock can cause serious or fatal injury.
ELECTRICAL INSTALLATION
This motor must be installed in accordance with National Electric Code, NEMA MG-2,
IEC standards or local codes.
WARNING: EC Titanium permanent magnet motors can induce voltage and
current in the motor leads by rotating the motor shaft. Electrical shock can cause
serious or fatal injury. Therefore, do not couple the load to the motor shaft until
all motor connections have been made. During any maintenance inspections, be
sure the motor shaft will not rotate.
WIRING
Connect the motor as shown in the connection diagrams. If this motor is installed as
part of a motor control drive system, connect and protect the motor according to the
control manufacturers diagrams. Refer to MN408 for additional details on lead marking.
The wiring, fusing and grounding must comply with the National Electrical Code or
IEC and local codes. When the motor is connected to the load for proper direction of
rotation and started, it should start quickly and run smoothly. If not, stop the motor
immediately and determine the cause. Possible causes are: low voltage at the motor,
motor connections are not correct or the load is too heavy. Check the motor current
after a few minutes of operation and compare the measured current with the nameplate
rating.
GROUNDING
Ground the motor according to NEC and local codes. In the USA consult the National
Electrical Code, Article 430 for information on grounding of motors and generators, and
Article 250 for general information on grounding. In making the ground connection, the
installer should make certain that there is a solid and permanent metallic connection
between the ground point, the motor or generator terminal housing, and the motor or
generator frame. In non-USA locations consult the appropriate national or local code
applicable.
Noise
For specic sound power or pressure level information, contact your local sales ofce.
VIBRATION
This motor is balanced to NEMA MG1, Part 7 standard.
WARNING: Guards must be installed for rotating parts such as couplings, pulleys,
external fans, and unused shaft extensions, should be permanently guarded to
prevent accidental contact by personnel. Accidental contact with body parts or
clothing can cause serious or fatal injury.
DRAIN PLUGS
One or more condensation drain ttings are provided on each endplate for various
motor mounting congurations. The ttings allow drainage and prevent insertion of
a 1mm wire probe per the IP54 rating requirements. To avoid condensation inside
the motor, do not unpack until the motor has reached room temperature. (Room
temperature is the temperature of the room in which it will be installed). The packing
provides insulation from temperature changes during transportation.
MOUNTING
Mount the motor on a foundation sufciently rigid to prevent excessive vibration.
Standard stock EC Titanium motors are provided with feet for mounting at any angle.
Mounting provisions may also be provided on custom design motors to allow for direct
coupled (c-face) or ange mounting at any angle. After careful alignment, bolt motor
securely in place. For foot mounted motors, use shim to ll any unevenness in the
foundation. Motor feet should sit solidly on the foundation before mounting bolts are
tightened.
EC Titanium Stock Motors are designed to be mounted by the “Mounting Feet”. Use
appropriate hardware (not furnished). The motor should be installed in a location
compatible with the motor enclosure and specic ambient. The motor must be securely
installed to a rigid foundation or mounting surface to minimize vibration and maintain
alignment between the motor and shaft load. Failure to provide a proper mounting
surface may cause vibration, misalignment and bearing damage. All hold down bolts
must be the correct grade for the type of mounting and must be torqued to their
recommended value. The standard motor base is designed for horizontal or vertical
mounting.

Belted Drive
Motor slide bases or rails, when used, must be securely anchored to the foundation with
the proper bolts. The motor shaft and the load shaft must be parallel and the sheaves
aligned. For V-belt drive, mount the sheave pulley close to the motor housing. Allow
clearance for end to end movement of the motor shaft. Do not overtighten belts as this
may cause premature bearing failure or shaft breakage.
Coupled Drive
Machines should be carefully aligned and the shaft should rotate freely without binding.
Standard EC Titanium Motors will operate successfully mounted on the oor, wall or
ceiling, and with the shaft at any angle from horizontal to vertical. Special mountings
may have duty or thrust demands that may require a different bearing system.
Flange Mount
Machines should be properly seated and aligned. Note: If improper rotation direction is
detrimental to the load, check rotation direction prior to coupling the load to the motor
shaft.
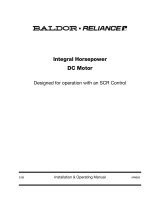
LIFTING PROVISIONS
The EC Titanium motors provided in 180 and 210 frames are provided with lifting
provisions. Always lift the motor by the lifting bolt eye or lugs provided. 140 Frame
Motors do not require lifting provisions and can be set in place manually. (2) Lifting Lugs
are provided on Top Drive Units that are offset to balance the motor weight.
Caution: Do not lift the motor and its driven load by the motor lifting hardware.
The motor lifting hardware is adequate for lifting only the motor. Disconnect the
driven load from the motor shaft before lifting the motor.
Caution: Do not lift the motor by the shaft. The motor is designed to drive a load
but it is not intended to have lifting forces and stresses applied to the motor
shaft. Damage to the motor may result
Caution: If eye bolts are used for lifting a motor, be sure they are securely
tightened. The lifting direction should not exceed a 20° angle from the shank of
the eye bolt or lifting lug. Excessive lifting angles can cause damage.
Single Lifting Bolt Dual Offset Lifting Bolts
180, 210 Frames EC
Motors
20” maximum angle
180, 210 Frames EC Motor & Axial Units
IP (Ingress Protection)
IP designations include two numerals, the rst characteristic numeral is for ingress
solid bodies and from dust. The second for ingress protection from liquid - water. EC
Titanium Motors are marked IP54 for general protection from dust and splashing water
when mounted horizontally. Other orientations such as shaft up or down may require
additionally sealing, contact the local ABB District Ofce to review non-horizontal
mounting requirements and ingress protection.
GUARDING
After motor installation is complete, a guard of suitable dimensions must be constructed
and installed around the motor/gearmotor. This guard must prevent personnel from
coming in contact with any moving parts of the motor or drive assembly but must allow
sufcient cooling air to pass over the motor. If a motor mounted brake is installed,
provide proper safeguards for personnel in case of brake failure. Brush inspection
plates and electrical connection cover plates or lids, must be installed before operating
the motor.
STARTING
Before starting motor remove all unused shaft keys and loose rotating parts to prevent
them from ying off. Check direction of rotation before coupling motor to load.
The motor should start quickly and run smoothly and with little noise. If the motor
should fail to start the load may be too great for the motor, the voltage is low or the
motor has been miss-wired. In any case immediately shut motor off and investigate the
cause.
ROTATION
To reverse the direction of rotation, disconnect and lockout power and interchange
any two of the three AC power leads for three phase motors. For two-phase four wire,
disconnect and lockout power and interchange the AC line leads on any one phase. For
two phase three wire, disconnect and lockout power and interchange phase one and
phase two AC line leads.
Lubrication Information
EC Titanium Motors use double-shielded sealed bearings and do not require re-
lubrication. Non−regreaseable motors when not in normal operation, should have
the motor shaft rotated 15 times to redistribute the grease within the bearing every 3
months or more often.
ELECTRICAL INSTALLATION
Flying Leads
Motors with ying lead construction must be properly terminated, connected with bolt,
lock washer and nut and wrapped with two full layers of electrical grade tape or heat
shrink tubing.
Bypass Mode
All EC Titanium AC motors are inverter duty motors using optimum pole design. They
are not intended to be used in bypass mode (across the line). Consult your ABB District
Ofce to determine suitability of motor for specic applications in bypass mode.
Permanent magnet motors cannot be run in bypass mode.
WARNING: Do not touch electrical connections before you first ensure that power
has been disconnected. Electrical shock can cause serious or fatal injury. Only
qualified personnel should attempt the installation, operation and maintenance of
this equipment.
WARNING: Surface temperatures of motor enclosures may reach temperatures
which can cause discomfort or injury to personnel accidentally coming into
contact with hot surfaces. Protection should be provided by the user to protect
against accidental contact with hot surfaces. Failure to observe this precaution
could result in bodily injury.
WARNING: The Adjustable Speed Controller may apply hazardous voltages to
the motor leads after power to the controller has been turned off. Verify that the
controller is incapable of delivering hazardous voltages and that the voltage at
the motor leads is zero before proceeding. Failure to observe this precaution may
result in severe bodily injury or death.
Caution: Use only a shielded motor power cable with a complete circumferential
braided or copper film/tape ground jacket around the power leads. This ground
should be secured to the motor frame from within the motor terminal box and
must return without interruption to the drive ground. In addition, if the motor and
coupled equipment are not on a single common metal base plate, it is important
to equalize the equipment ground potentials by bonding the motor frame to the
coupled equipment using a high frequency conductor such as a braided strap.
Note: Main power leads for CE Marked Motors may be marked U, V, W – for
standard configurations, please consult connection diagrams.
1. Single Voltage/Three Lead Motors. Connect leads marked U/T1, V/T2 and W/T3 to
the appropriate control output terminals (refer to the Controller Instruction Manual).
See Figure 1-1.
2. Dual Voltage Motors
Be sure the motor leads are connected properly for “Low” or “High” voltage connection,
see Figure 1-1.
Connect leads marked U/T1, V/T2 and W/T3 to the appropriate control output terminals
(refer to the Controller Instruction Manual).
For motors supplied with temperature protection, leads P1 & P2 are thermostat leads.
They are to be connected in series with the holding coil of the motor controller, which
uses a manual momentary start switch. These are not standard with stock EC Titanium
motors.
Figure 1-1 Connection Diagram

EC Titanium
TM
Quick Start Guide
Input Power & Control Connections
Supply Voltage:
- Single phase 115 or 230V
- Three phase 230, 415, 460V
- 50 / 60Hz
- Use inputs L (L1) & N (L2)
for single phase
Motor Connection:
Factory wired do not disconnect
U V W
Fuse or MCB
check drive rating
for cable sizing
AC Supply Voltage
Earth
L1 L2 L3
Status LEDs
A1: Red = Trip
Green = Healthy
A2: Yellow = Alarm
A2 A1
RJ45 Port
Remote Keypad & PC Interface
Control Terminals
Terminals 1 to 11
Factory defaults settings:
1. Connect a START/STOP switch to Terminal 1 2
Close the contact START (enable) the drive
Open the contact STOP (disable) the drive
2. Connect 10k potentiometer on terminals 5, 6, & 7
Vary the speed from 0 to max speed
1 2
5 6 7
Speed R eference
Command Input
&
Remote Keypad ECS100L
NAVIGATE
Used to display real-time information,
to access and exit parameter edit
mode and to store parameter changes.
UP
Increase speed in real-time mode or
scroll through values in parameter edit
mode.
DOWN
Decrease speed in real-time mode or
scroll through values in parameter edit
mode.
STOP
In normal application, when in Keypad
mode, this button is used to stop a
running drive. If in trip mode, the key is
used to reset the drive.
START
When in keypad mode, the button is
used to start a stopped drive or to
reverse the direction of rotation.
NOTE: For keypad control set parameter 1103=1 and 9902 to
the desired I/O conguration.
Quick Startup Guide
When delivered, the EC Titanium™ is pre-programmed to run from remote inputs wired to the terminal
strip. This default digital input conguration provides a general purpose I/O setup with a hard wired start /
stop enable, forward / reverse input and a selection between an analog speed reference or preset speed
input.
Parameter 1103 = 0 denes control from the terminal strip (for Keypad Control 1103 =1) and Parameter
9902 = 0 sets up the conguration for the inputs and outputs as shown below.
Step 1 Connect a control switch between the control terminals 1 and 2 and ensure that the contact
is open (drive disabled). Connect a potentiometer (1kΩ min to 10 kΩ max) between terminals
5 and 7 with the wiper to terminal 6 of the control terminal. With the potentiometer set to
zero, switch on the supply to the drive.
Step 2
The status LED is slow ashing green and a connected EC100L Keypad will display STOP.
Close the control switch, terminals 1-2, the drive is now ‘enabled’ and the output frequency
speed are controlled by the potentiometer. The status LED will change to constant on green.
Step 3
The display shows zero speed in Hertz as H 0.0. with the potentiometer turned to minimum.
If the display is not showing H, change it with the navigate key. Adjust the speed using the
potentiometer, the motor will accelerate to the speed set by the potentiometer up to the
value set in parameter 2008 (maximum frequency limit.)
Step 4 Stop the motor, disable the drive by opening the control switch (terminal 1-2).
Terminal Mode (1103=0)
Digital Input Function (9902=0)
2-Wire Forward Reverse
Active input across terminal 1 & 2 will cause
the drive to run.
When terminal 3 is open the drive will
operate in the forward direction.
Closing input 3 reverses the commanded
direction.
Closing terminal 4 will force operation at
preset speed 1 (parameter 1202) or function
as a jog command.
1 +24V User Input
2 Digital Input 1
4 Digital Input 3
3 Digital Inpu 2
5 +10 Volts
6 Analog Input
7 0 Volts
Stop - Run
Forward - Reverse
Analog - Preset 1
Speed Reference Input Connection Example
Potentiometer
1-10K Ohm Potentiometer
Recommended (2 Watt Min.)
5 +10V O/P
6 Analog Input
7 0V
Analog Input
Analog Input Format (parameter 1300)
selects Voltage or Current Source.
Voltage 0-10 or 10-0 Vdc
Current 0-20, 4-20 or 20-4 mA
6 Analog Input
7 0V
0-10V
4-20mA
Common
Keypad Operation
Setting parameter 1103 to a value of 1 enables keypad mode with
forward direction only, while a value of 2 enables keypad mode with
forward and reverse rotation.
Set parameter 1100 to 1 or 3 to enable the drive to start from the set
keypad reference speed.
While the drive is stopped, press the STOP key. The value of the
digital potentiometer will be displayed, indicating the target speed.
Use the UP and DOWN keys to select the required target speed.
Press the STOP key to return to the real time display showing
STOP or the START key to start the drive ramping up to the target
speed. To reverse direction, press the START key again.
Keypad Display Screens
Prior to operation the keypad will show STOP, pressing the STOP
key allows setting the preset speed on the display (H x.x) While
in operation the following displays can be accessed by briey
pressing the Navigate Key.
STOP
Drive power applied and
no Enable or Run signal
Drive Running
H 0.0.
Output
Frequency (Hz)
Press Navigate to
select display
Press again to cycle
display
A 0.0.
Motor Current
(Amps)
P 0.0.
Motor Power
(kW)
Drive Running, Speed Reference = 0
Stn dby
Enable / disable switch open drive will
decelerate to stop and display shows
STOP
A zero reference and enable/disable closed
the display with show H 0.0 (0.0Hz)
>60 seconds at zero speed drive standby
mode Stn d by waiting for a speed
reference

—
ABB Motors and Mechanical Inc.
5711 R. S. Boreham Jr. Street
Fort Smith, AR 72901
Ph: 1.479.646.4711
Mechanical Power Transmission Support
Ph: 1.864.297.4800
new.abb.com/mechanical-power-transmission
baldor.com
© ABB Motors and Mechanical Inc.
MN451
All Rights Reserved. Printed in USA.
02/2020
Note! The manufacturer of these products, Baldor Electric Company, became
ABB Motors and Mechanical Inc. on March 1, 2018. Nameplates, Declaration of
Conformity and other collateral material may contain the company name of Baldor
Electric Company and the brand names of Baldor-Dodge and Baldor-Reliance until
such time as all materials have been updated to reflect our new corporate identity.
Control Terminals
1
2
3
4
5
6
7
8
9
10
11
V
Control
Terminal
Signal
1 +24V User Output, 100mA
2 Digital Input 1
3 Digital Input 2
4 Digital Input 3 /
Analog Input 2
5 +10VDC (10mA) 1kΩ
minimum Reference for
Potentiometer
6 Analog Input 1 /
Digital Input 4
7 0V common, internally
connected to terminal 9
8 Analog Output (0 to 10V)
Digital Output (0 to 24V)
20mA maximum
9 0V
10 Modbus RTU -
11 Modbus RTU +
RL1-A Relay Common
RL1-B Relay NO Contact
250Vac, 6A / 30Vdc, 5A
Additional Connection Examples
3-Wire Start/Stop with Forward/Reverse Terminal Control Mode (1103 = 0)
Digital input conguration when the drive is controlled using momentary push-buttons. It provides a general
purpose I/O setup with a momentary input for start, forward / reverse, stop interlock and an analog speed
reference.
9902 = 11 3-Wire Forward Reverse
A momentary input on terminal 2 will
start the drive in the forward direction
with a closed input on terminal 3.
A momentary open input to I/O
terminal 3 will stop the drive as
specied in 2101 (Stop Mode).
A momentary input on terminal 4 will
reverse the drive direction.
1 +24V User Input
2 Digital Input 1
4 Digital Input 3
3 Digital Inpu 2
5 +10 Volts
6 Analog Input
7 0 Volts
Start
Stop
Direction
Customizing your Application
Factory settings may give satisfactory performance however certain
adjustment.
Parameter
Name
Parameter Adjustment
Minimum Frequency
Limit
2007 Minimum output frequency
Maximum
Frequency Limit
2008 Maximum output frequency ①
Primary Command
Source
1103 Selects the reference input for
the drive.
Digital Input
Function Select
9902 Denes the function of the digital
inputs
Stop Mode 2102 Select method of stopping
required when drive is disabled.
Acceleration Ramp 2202 Adjust as need for your
application. Short Acceleration
or Deceleration times may cause
excess motor current and may
result in it tripping or the motor
stalling.
Deceleration Ramp 2203
Analog Input Format 1300 Set as required by the application
(0-10V, 10-0V, 4-20mA)
Voltage Boost 2603 Any hard to start load will benet
from voltage boost. Permits a
boost of up to 25% of full motor
voltage to be applied.
① NOTE: The Analog Input Value scales with the maximum output
frequency setting in 2008.
Example: The motor will run at 1800 RPM with a 10V DC reference
and when parameter 2008 = 60 HZ.
Accessing Parameters and Program
Navigation
The parameters are arranged in Groups according the to the following structure.
Short Parameter
Group
Basic Setup Parameters
Long Parameter
Group
Sequential List all Parameters
Access to Display Group
Advanced Group
Advanced Motor Control
Read Only Display
Group
Parameter 0000 Par L Group
Parameter Navigation
• Press and hold the NAVIGATE key for more than 1 second when the drive is displaying STOP.
The display changes to PAr 5, indicating the short (S) parameters group. Use the (UP) and
(DOWN) keys to select between the S, L or A parameter groups.
• To enter a parameter group, press and release the (Navigate) key while the group letter is
ashing. Use the (UP) and (DOWN) keys to change to the desired parameter number.
• To change parameter values, press and hold the (Navigate) key then use the (UP) and
(DOWN) keys to change to the required value. Press and release the (Navigate) key
once more to store the change.
• Press and hold the (Navigate) key for more than 1 second to return to real-time mode. The
display shows STOP if the drive is stopped or the real-time information (e.g. speed, current or
power) if the drive is running.
• To access Read Only Parameters, navigate to PAr L Group and scroll to Parameter 0000, then
press and release the navigate key.
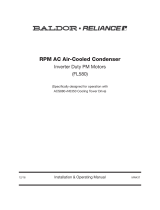
Motor Nameplate Information
The EC Titanium Motor nameplate is located on the side of the motor and includes NEMA rating, appropriate marking, a type designation and a serial number, which allow
identication of each unit. The motor nameplate contains electrical information necessary for proper setup of a drive control.
SYNCHRONOUS RELUCTANCE MOTOR
FOR INVERTER USE ONLY
READ INSTRUCTIONS BEFORE INSTALLING.
PERMANENT MAGNET MOTOR. WHEN SHAFT IS
ROTATED, VOLTAGE WILL BE GENERATED AT
THE MOTOR TERMINALS.
LIRE LES INSTRUCTIONS AVANT L’INSTALLATION,
MOTEUR Á AIMANT PERMANENT. LORSQUE
L'ARBRE TOURNE, UNE TENSION SERA GÉNÉRÉE
AUX BORNES DU MOTEUR.
BALDOR- RELIANCE
ELECTRONICALLY PROTECTED MOTOR
FOR INDUSTRIAL USE
SHAFT GROUNDING BRUSH INSTALLED
NP3968A01C01
ABB MOTOR AND MECHANICAL INC., FORT SMITH, AR. MFG. IN U.S.A.
WARNING/AVERTISSEMENT
EC-Titanium
TM
BEARING
RATING
VOLTS
R.P.M.
SPEC.
ENCL.
CAT. NO.
CT TO HZ
FRAME
Ld (mH)
IP
DE ODE
VPWM TOCHP HZ
VT
MATCHED INV
FLA
RPM MAX
PH. CLASSHZ
BEMF VOLTS
SER.F.
NEMA NOM. EFF
INV TYP
Lq (mH)
SER#
TO HZ
PF
Rs OHM
HP
35E5247Z715G1 -
2
145T TEFC
54
460 2.2
1800
60
1.0
4000
3 F
12.95
246
91.4%
40C AMB - CONT
109.6 505.5
60
6 1
ECI14A2P2
6205 6205
133
60 60
EN/IEC60034-1;-5
LISTED
E46145
1
ECS100A4H2140FF4
2
3
5
6
9
10
8
11
7
ECI4A2P2
4
12 14
13
FERRITE ASSISTED
Region Description Factory Set Parameters ②
1 Catalog Number
2 General Motor Information
3 Motor Rated Amps 9906
4 BEMF (Back EMF) Voltage 9905
5 Motor Stator Resistance (Rs) 11201
6 Ld (mH) Motor Inductance (Lsd) 11203
7 Lq (mH) Motor q-axis Inductance (Lsq) 11206
8 Motor Rated Frequency 9907 (Rated Speed)
Motor Maximum Frequency 2208 (Max Speed)
9 Matched Inverter Model Number
10 PM Motor Warning Information
11 Shaft Ground Provision Marking
12 QR Code for motor information
13 CE Marking
14 UL Agency Listing
Additional Factory Preset Parameters
Start Stop Mode 1 = Coast to Stop 2102 = 1 Coast to stop
Minimum Speed 2007 = 15 HZ
Control Mode 9903 = 2 PM Control
Motor values shown on the nameplate are utilized for proper control and setup of a drive used to run the EC Titanium motor.
② NOTE: Integrated units are factory programmed and parameters do not need to be adjusted unless a software reset was implemented.
/