5
BANK MSB and BANK LSB – Sets the MSB (Most Significant Byte) and LSB (Least Significant Byte), respectively.
Note: These will not be sent until you enter a Program number then press the Enter key.
PROGRAM – Sets the MIDI Program Change
number.
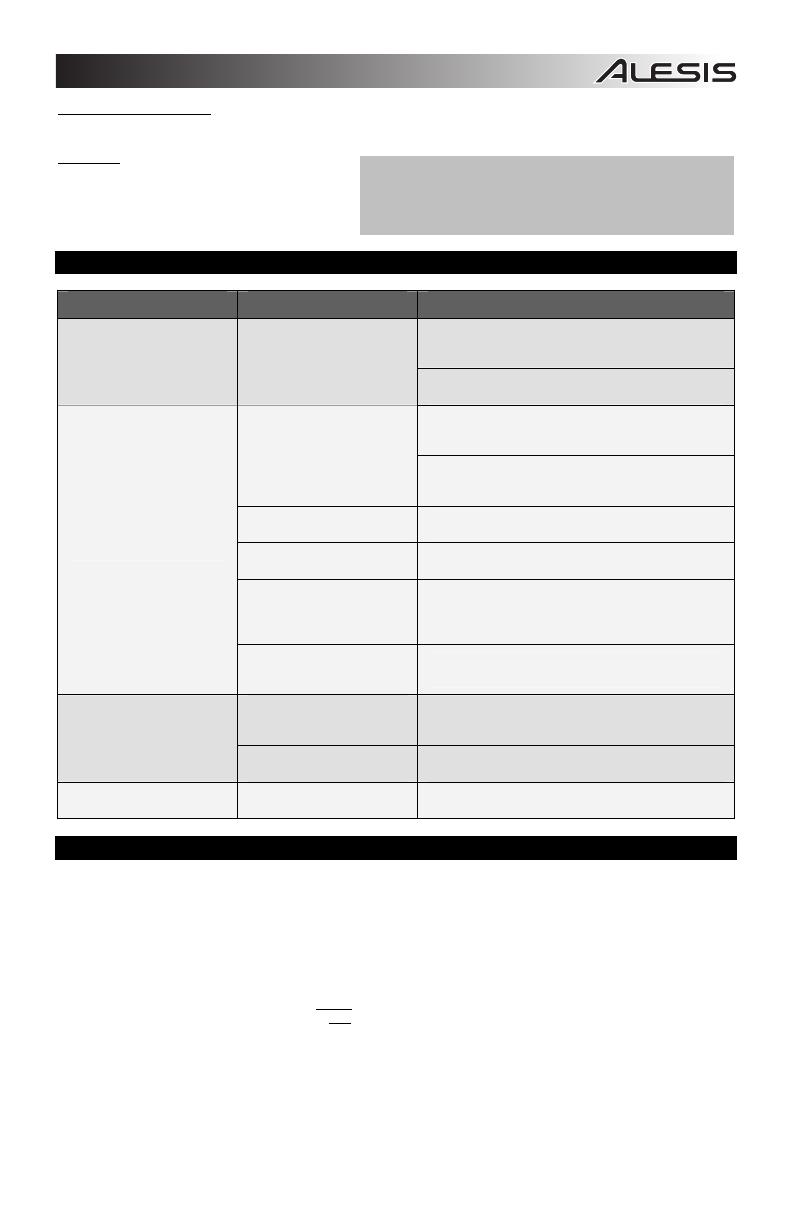
TROUBLESHOOTING
PROBLEM CAUSE SOLUTION
Please make sure that the Q49 is connected to your
computer and that the computer is powered on.
The display does not light up. No power.
If using a power adapter, please make sure that the
adapter is plugged into a live power outlet.
Check your computer's USB connection to confirm that
the Q49 is recognized. If necessary, replug the
connection and restart your computer.
Q49 not properly connected.
If controlling an external hardware module, make sure
that the MIDI cable is connected from the Q49 to the
device's MIDI IN port.
Q49 connected after software
application has started.
Restart the software application with the controller
plugged in.
Problem is caused by use of
a USB hub.
Unplug the Q49 from the USB hub and connect directly
to the computer.
Software application not set
to receive MIDI data from the
Q49.
Ensure that the Q49 or USB MIDI device is listed as an
active MIDI source in your application. Usually, the
MIDI settings can be accessed through the
application's Preferences menu.
No sound from target device.
Q49's MIDI channel not the
same as application's
incoming MIDI chanel.
Make sure that the Q49 is sending MIDI information on
the channel that the target device expects.
Sustain pedal was plugged in
after the Q49 was powered
on.
Turn the unit's power off, wait a moment and then turn
it on again.
Notes sustain continuously.
Stuck notes due to
incomplete MIDI data.
Turn the unit's power off, wait a moment and then turn
it on again.
Sustain pedal works in
reverse.
Sustain pedal was plugged in
after power was turned on.
With the pedal plugged in, turn the unit's power off, wait
a moment, and turn it on again.
SPECIFICATIONS
POWER: USB, 9V DC, 500mA, center-positive (not included)
KEYBOARD: 49 keys
ACCESSORIES: Quickstart Guide, USB cable
MIDI OUTPUTS: 1 5-pin jack
USB: 1 slave connector (MIDI over USB)
EMAIL
TEL
: 401.658.5760 (U.S)
Note: After you enter a CC#, the number will be remembered by the
Q49. However, if you want to send a CC or Program Change
message, you must enter the value using the numbered keys on the
KEYBOARD each time (even if the desired value is shown in the
LCD) before pressing Enter.


