13
Operating the DJ-202
Using the Sequencer
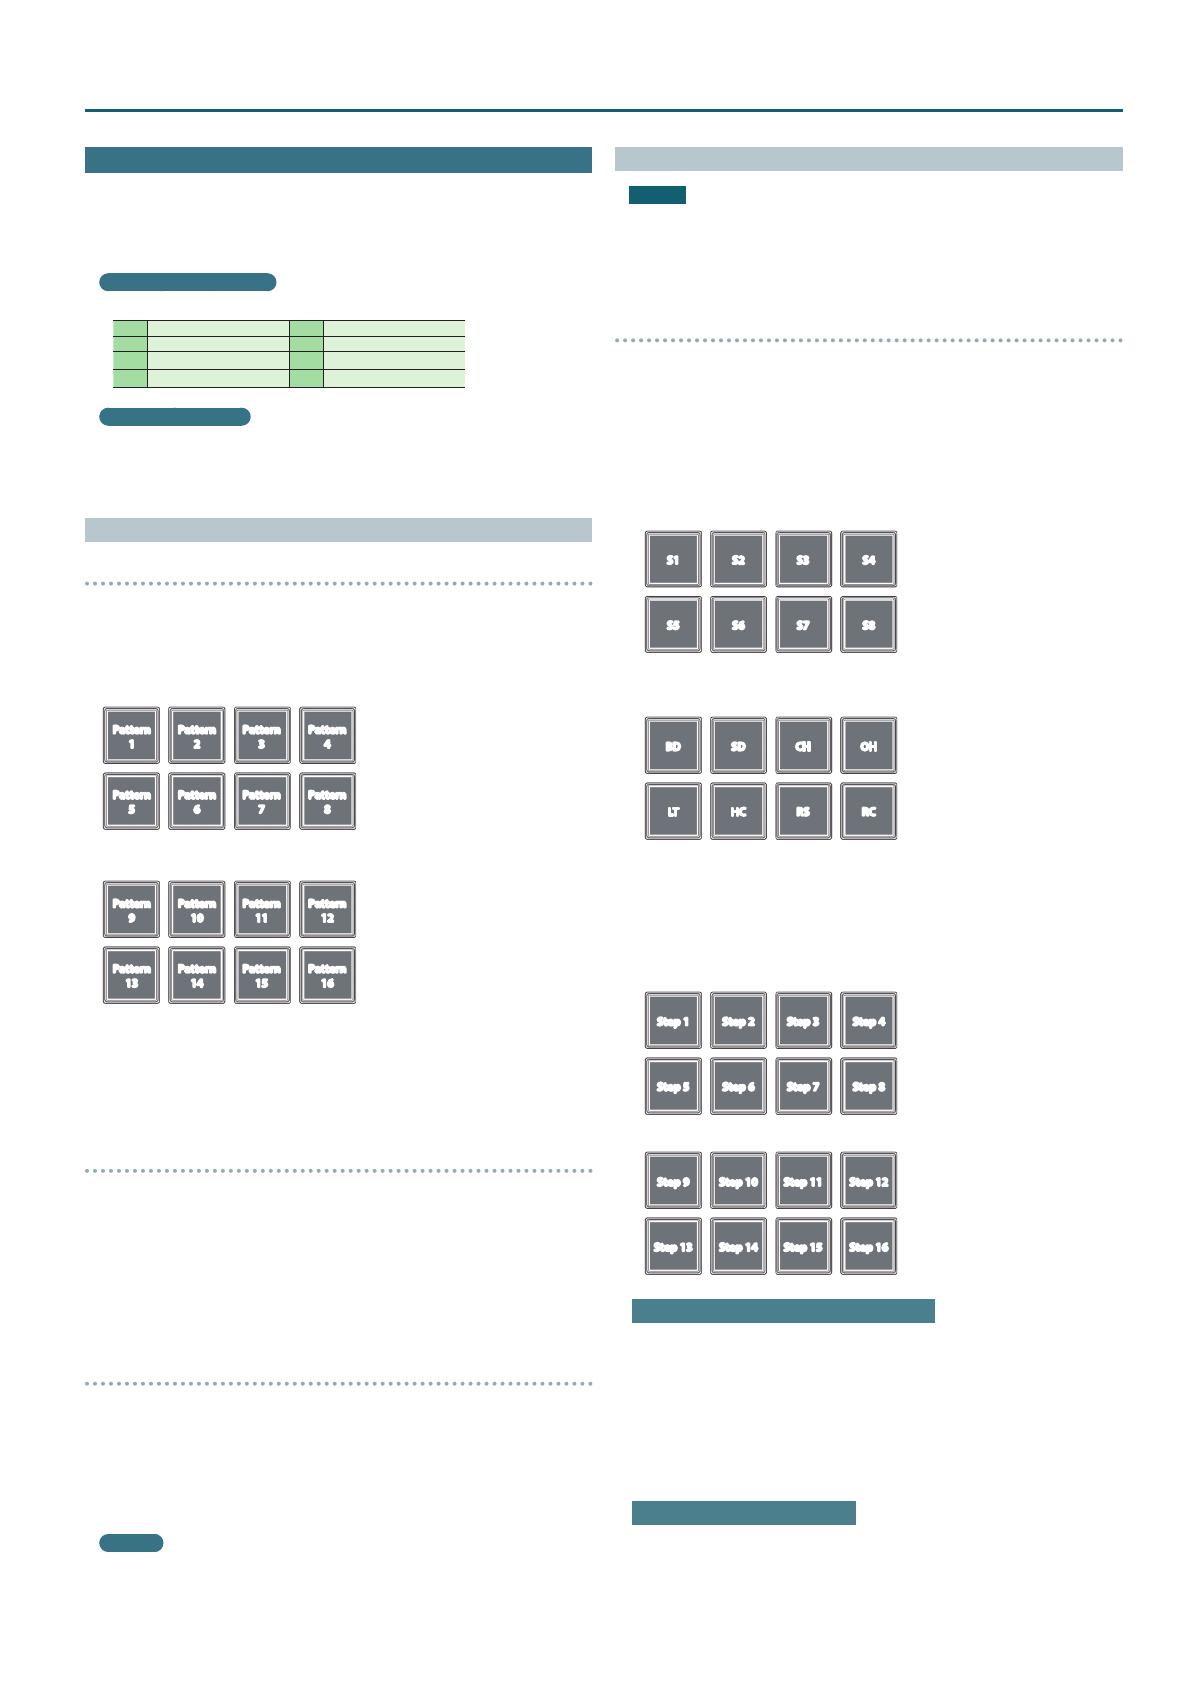
Using the sequencer, “patterns” created using drum sounds (instruments)
of a Roland TR-909, TR-808, TR-707, or TR-606 rhythm machine, or samples
of Serato Sampler, can be edited in step recording (sequencer mode) or
realtime recording (INST REC mode).
What are instruments?
These are drum sounds handled by the sequencer.
BD bass Drum SD snare drum
CH closed Hi-hat OH open hi-hat
LT low tom HC hand clap
RS rim shot RC ride cymbal
What are patterns?
“Patterns” contain performance data for instruments and samples in
step recording or realtime recording.
You can create and save 16 patterns.
Selecting, Playing, Copying, or Deleting Patterns
Selecting and playing patterns
1. Hold down the [SHIFT] button and press the [SEQUENCER]
button to access pattern mode.
In pattern mode, the button blinks slowly.
2. Press a performance button to select a pattern.
Patterns are assigned to performance pads as follows.
Pattern
1
Pattern
2
Pattern
3
Pattern
4
Pattern
5
Pattern
6
Pattern
7
Pattern
8
By holding down the [SHIFT] button and pressing a performance pad, you
can select patterns 9–16.
Pattern
9
Pattern
10
Pattern
11
Pattern
12
Pattern
13
Pattern
14
Pattern
15
Pattern
16
3. To play the selected pattern, press the SEQUENCER section’s
[START/STOP] button.
When you press the button once again, the pattern playback stops.
5 By holding down a performance pad and pressing the performance
pad of the pattern that you want to play next, you can play back
patterns in succession.
Copying a pattern
1. Hold down the PARAM [+] button and press the performance
pad of the copy-source pattern.
The PARAM [+] button blinks.
5 To select a pattern 9–16, hold down the [SHIFT] button and press a
performance pad.
2. Press the copy-destination performance pad.
The pattern is copied.
Deleting a pattern
1. Hold down the PARAM [−] button and press the performance
pad of the pattern that you want to delete.
5 To select a pattern 9–16, hold down the [SHIFT] button and press a
performance pad.
The pattern is deleted.
MEMO
If you copy/delete while a pattern is playing, the copy-destination
pattern or the deleted pattern is played.
Editing a Pattern
NOTE
When you edit a pattern, the pattern is updated immediately, so you
won’t be able to return the pattern to its state prior to editing.
If you have favorite patterns that you want to keep, you should copy
them or back them up before you edit (p. 16).
Step recording (Sequencer mode)
1. Press the [SEQUENCER] button to make the button light.
You’re now in sequencer mode.
2. Hold down the [SHIFT] button and press a performance pad to
select the instrument that you want to record.
You can hold down the [SHIFT] button and use the PARAM [–] [+] buttons
to switch instruments and Serato Sampler’s samples.
5 PARAM [−] button is lit
You can select Serato Sampler’s samples.
S1 S2 S3 S4
S5 S6 S7 S8
* S5–8 can be selected
when using Serato DJ
5 PARAM [+] button is lit
You can select instruments.
BD SD CH OH
LT HC RS RC
3. Press a performance pad to select the step that you want to
record.
The performance pad you press is lit.
You can use the PARAM [−] [+] buttons to switch the step that will be
recorded.
5 PARAM [−] button is lit
Step 1 Step 2 Step 3 Step 4
Step 5 Step 6 Step 7 Step 8
5 PARAM [+] button is lit
Step 9 Step 10 Step 11 Step 12
Step 13 Step 14 Step 15 Step 16
Clearing a recorded instrument (sample)
Press a lit performance pad to make it go dark.
4. Repeat steps 2–3.
* If you press the PARAM [−] [+] buttons simultaneously while a pattern
is playing, the performance pad corresponding to the currently-playing
step (indicating pads 1–8 if 1–8 are playing, or pads 9–16 if 9–16 are
playing) is lit, allowing you to edit (record or delete) the currently-
playing step.
Switching the instrument kit
In INST PLAY mode you can switch kits. For details, refer to “INST PLAY
Operations” (p. 11).


