Page is loading ...

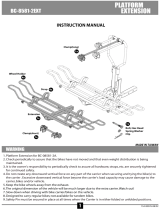
■ Thank you for purchasing OVERDRIVE Bike Rack, please check all
parts are included in the package. If there is anything missing or defective,
please contact us at [email protected]
D x2
E x2
x1 x1
B x4
C
( R x4 L x4 )
L
L
R
R
A x1
# 6
x2 x2 x2
3-a
Tighten!
Loosen!
L
R
R
L
■ Loosen the knobs of wheel holders and slide them to the wheel
tubes in sequence.
5-a
■ Press the push button as the base, and rotate the main square post upright.
6-a
■ Loosen the knobs of wheel holders and slide them to the
wheel
tubes in sequence.
L
R
R
L
Tighten!
Loosen!
# 4
M10 x4
M10 x4
M10 x4
# 2
M10 x4
M10 x4
M10 x4
# 5
M6 x2
M6 x2
# 1
x1
x1x1
x1
F x1
# 3
M6 x2
M6 x2
5-b
■ Install the lateral tubes (B) by tighten the kit #4 (Flat Washer,
Carriage Bolt and Nut) with extension.
#4
M10 Carriage bolts x4
M10 flat washers x4
M10 nuts x4
2
#2
M10 Carriage bolts x4
M10 flat washers x4
M10 nuts x4
■ Install the lateral tubes (B) by using the kit #2 (Flat Washer,
Carriage Bolt and Nut) with hitch tube. Ensure that the holes for
kit #3 (as shown in step 3-b) at the end of the lateral tubes
are facing the ground.
4
D
E
Short hook
Long hook
D
E
Short hook
Long hook
■ Loosen the knobs of frame hooks and slide them onto the main
post. Please Be Noted the long hook must be install first and hook
points to the car, and then install the short one on the top with
lockable knob. So that when you lock the outer bike with the
lockable knob, the inner bike can’t be removed.
■ Slide the hitch tube (A) into 2” hitch receiver and secure it with Safety
Threaded Bolt and kit #1 ( External Tooth Lock Washer, Flat Washer and
Lock) and lock it.
1
■ Please Be Noted!
Use wrench to tighten the safety threaded bolt from RIGHT side as the
photo shown. The Anti-wobble mechanism is functioning when the
safety threaded bolt is tightened.
x1
x1x1
x1
x1
#1#G
US PATENT No.
9,663,040 B1
3-b
■ Screw the kit #3 (Screw and Washer) on the end of the lateral
tube to prevent the wheel holders to be slid out.
M6 x2
M6 x2
#3
NO. pcs
#1.1
Flat washer 1
#1.2
Key 1
#1.3
Lock 1
#1.4
Lock washer 1
#2.1
M10 Carriage bolts 4
#2.2
M10 flat washers 4
#2.3
M10 nuts 4
#3.1
M6 screws 2
#3.2
M6 washers 2
NO. pcs
#4.1
M10 Carriage bols 4
#4.2
M10 flat washers 4
#4.3
M10 nuts 4
#5.1
M6 screws 2
#5.2
M6 washers 2
#6.1
Carriage bolts 2
#6.2
Flat washers 2
#6.3
Nuts 2
NO. pcs
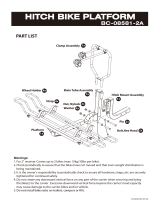
#A Hitch tube 1
#B Lateral tubes 4
#C.1 Wheel holders - R 4
#C.2 Wheel holders - L 4
#D Long hooks 2
#E Short hooks 2
#F Extension 1
#G
Hitch pins 2
#C.2
#B
#B
#A
#1
#G
#5
#5
#C.1
#C.2
#C.1
#C.1
#C.1
#4
#6
#F
#C.2
#C.2
#3
#3
#E
#E
#D
#D
#2
Instruction
Hitch Platform Bike Carrier
Model: KR-BRQDBK ( 4 Bikes Capacity )
G x2
(1 spare part)
# 7
x1

■ Tilting Function: Pull the tilting device which is on the front-end of the base with
reflector on it, the carrier can be easily tilted down for rear access.
10
■ Finally use the kit #7 ( Safety Strap) to wrap around bikes to
TRAILBLAZER 4. Then tighten the strap against metal buckle.
The rest of strap can be organized by integrated Velcro strap.
■ Fold Function: Pull up the handle to fold up when not carring bikes.
Caution ! The handle needs to be placed back to secure the rack.
9
Only the short frame hook knob can be lockable.
■ Adjust the wheel holders in position, and put the bikes on the rack.
Make sure the padded hooks are pressing the bike frames, so that
bikes are held tightly. In the end, secure wheels with Velcro straps.
8
■ Insert extension to hitch tube, using kit #6 to fasten.
# 6
x2 x2 x2
■ Warning!
It is not recommended to tilt down the carrier when it carries bikes.
■ The post can fold down laterally by releasing the push buttons.
D
E
Short hook
Long hook
7
D
E
Short hook
Long hook
■ Loosen the knobs of frame hooks and slide them onto the main
post. Please Be Noted the long hook must be install first and hook
points to the car, and then install the short one on the top with
lockable knob. So that when you lock the outer bike with the
lockable knob, the inner bike can’t be removed.
■ Installation complete.
11
6-b
■ Screw the kit # 5 (Screw and Washer) on the end of the lateral
tube to prevent the wheel holders to be slided out.
M6 x2
M6 x2
#5
English
General Notes for Rear Bike Carrier
• Every month, new cars are brought to market for new design and body.
Although OVERDRIVE Bike Rack design team strive to make most of products universal to cars in
the market. It is impossible for one single bikes carrier to fit all models of cars available on the
market. Before you purchase the bike carrier, please check if the bike carrier fits your specific
vehicle with OVERDRIVE Bike Rack authorized dealer or distributor.
• Before installation, please read the instruction first then install the bike carrier according to the
manual enclosed. Make sure all parts are preset and in working condition prior to installation.
Any missing or broken parts, please contact your OVERDRIVE Bike Rack authorized dealer
or distributor.
• Always keep this manual for future reference.
Warning during Fitting of the Bike Carrier
1. When vehicles are equipped with power tailgate it is necessary to turn off the power when you
install rear bike carrier. If this option is not available, do not use rear bike carrier.
2. Prior to installation, please clean the receiver hitch thoroughly.
3. It is necessary to change the installation method of bike carrier when the vehicle is equipped
with spoiler or similar items. Please check with OVERDRIVE Bike Rack authorized
dealer or distributor if this occurs.
4. Please obey the local traffic law when you drive with bike carrier.
5. Please remove the bike carrier if you do not use and before car wash.
6. If the operation of rear wiper interferes with the bike carrier, stop using rear or disable the
power of rear wiper.
Warning during Mounting of the Bikes
1. When you mount the bikes, please make sure that bikes do not contact the vehicle, especially
the pedal. Use of protective foam pads may help.
2. Before mounting bicycles, please remove all loose items. Ex., water bottles.
3. Tires of bicycles have to be kept away from vehicle exhaust.
4. Always obey the weight limit of each e-bicycle (Max. 30 kg/ 66 lbs per bike) and capacity of
bicycles according to manufactures’ recommendation. Please do not recumbent and electric bikes.
5. Vehicles install with bike carrier/ bikes have different road behavior. Drive extreme cautiously
during strong wind, sharp turns, and rough road. Drive slowly over the speed bump with the speed
less than 10 km/h (6/ miles/h).
6. Vehicles equipped with bike carrier/ bikes have extra width and length. In addition, please make
sure the bikes are mounted in the center to avoid excessive protrusion.
7. Some bikes like lady bikes require bike beam to mount.
8. When vehicle is equipped with bike carrier, please check the installation of bike carrier and
mounting of bikes for every 100 km during the journey. It is responsibility of the driver to ensure the
safety of passengers and others!
Important Notices Regarding to Warranty and Liability
1. Please study the enclosed warranty policy
2. OVERDRIVE Bike Rack disclaims any liability in respect to any damages (to vehicles,
cargo, and/or persons) in connection with purchase, use or handling of this product when the
damage was caused by a wrong installation use of this product or its accessories. If you have
further questions about our Limited Lifetime Warranty or need any support, you can start a
conversation with us at [email protected]
■ Remove the reflector from the hitch tube before insert extension, re-fix
reflector to extension.
/