Page is loading ...


2
Introduction
Thank you for your purchase. GAMA SONIC® solar charged accent lighting eliminates the
problems associated with most solar lighting available today. GAMA SONIC® solar charged lights
are brighter and last all night with a typical solar charge. Unique design, superior light output and
numerous installation options confirm the outstanding value of our products.
GAMA SONIC® has been recognized as a worldwide leader in the lighting industry for over 20
years. The company also offers unique multipurpose rechargeable products that range from party
lights to emergency lighting products.
For technical assistance and more information, call our Toll-Free number:
1-800-835-4113 (only within the U.S.) or visit our website at:
www.gamasonic.com.
Please read the instruction manual carefully to obtain the best results from your purchase.
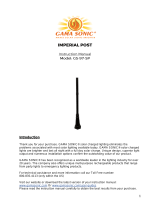
1. What's Inside?
Open your package and remove the contents. Check to make sure all the pieces are present
and accounted for.
• You will need to follow these two steps to disassemble the unit completely.
Step 1
Step 2

3
2. Solar Light Location
For optimum light duration throughout the night, it is very important to place your solar lamp in a
spot where it will receive the maximum amount of direct sunlight throughout the day.
NOTE: For best results, the solar lamp post must be charged for two sunny days in the “ON”
position.

4
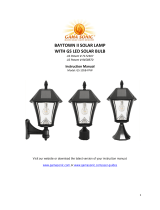
3. Assembly Instructions:
GS-105F:
Note: If you are replacing an existing gas/electric post light, you must consult a certified
technician to disconnect them before installation.
1. Attach the fixture (D) to the base (H) with the four supplied
screws, as shown (Fig.1).
GS-105P
Note: There are specific types of screws for specific surfaces. If you’re unsure of the
appropriate type of screw to use on your desired surface, please consult a professional.
1. Use a drill to make two holes in the desired surface.
2. Place the screw anchors into the holes and place the
lamp in line with the holes and secure it with the
provided screws.
3. Detach Part (H) from Part (E)
4. Attach the base (H) to the pier mount (G) with the nut
(Fig.2).
5. Attach the fixture (D) to the base (H) with the four
supplied screws, as shown in (Fig.3).
GS-105W
Note: Installing the light on a wall may limit the solar panel for sun exposure.
Make sure the lamp is mounted so direct sun exposure is available.
1. Use a drill to make two holes in the desired surface.
2. Place the screw anchors into the holes and place the lamp in line with the
holes and secure it with the provided screws.
3. Detach Part (H) from Part (E)
4. Attach the base (H) to the wall bracket (F) with the nut (Fig.4).
5. Attach the fixture (D) to the base (H) with the four supplied screws, as shown
in (Fig.5).
Fig.2
Fig.3
Fig.4
Fig.5
D
H
D
H
E
H
G
H
H
F
D
Fig.1

5
After assembling your specific bracket, follow these steps to finish the installation of the
unit. These steps apply to ALL three brackets:
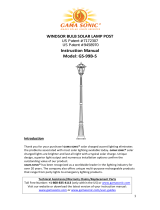
4. Operation Instructions
Remove the top (B) by unscrewing the two screw caps. Turn the
operation switch to the Summer or Winter position. The solar lamp
will automatically operate at dusk.
1. Reattach the top (B) and secure it with the two screw caps.
5. Batteries
Read carefully the next section. Here you will learn how to add a secondary battery (optional),
and how to replace your existing battery once it exceeds its life span.
a. Secondary Battery (Optional)
Our GS-105 model features two (2) battery compartments (Fig.6). This light comes with one (1)
pre-installed battery (included), and you have the OPTION to add a second battery. This is a
unique feature designed to give you more choices to prolong the duration of your solar light.
1. Place the window frame (C) into the fixture
(D).
2. Turn on the switch to desired setting.
3. Attach the top (B) to the fixture (D)
with the two supplied screw caps.
4. Screw on the top of the light
fixture (B) the finial (A).
D
C
B
D
B
A

6
Use this option if your light is exposed to the sun for more than 4 hours a day. Shorter exposure
will NOT charge the second battery and therefore it is not necessary.
b. Adding Secondary Battery
(This solar light allows you to add a secondary battery. Follow the below instructions to install it.)
1. Unscrew the two screw caps and detach the top (B). Make sure the ON/OFF
switch is in the OFF (O) position.
2. Unscrew the battery compartments screws located on the silver reflector and
remove the compartment’s door to locate the empty compartment (Fig.7).
3. Make sure the battery is a Gama Sonic - 3.2V/1,500mAh, Li-ion Rechargeable
Battery with a connector.
4. Clip on the new additional battery and install it into the battery compartment. Screw back
battery compartment screw. Reattach the top and secure it with the two screw caps.
Fig.6
Fig.7
Battery
Compartment 1
Battery
Compartment 2
Battery
Compartment
(Provided)
Battery
Compartment
(Optional)

7
c. Replacing the Battery
(After several years of use, the battery may need replacing.)
1. Unscrew the two screw caps and detach the top (B). Make sure the ON/OFF
switch is in the OFF (O) position.
2. Unscrew the battery compartment (Fig.6) screw located on
the silver reflector and remove the compartment door.
3. Unclip the connector and remove the old battery (Fig.8).
Make sure the new battery is a Gama Sonic -
3.2V/1,500mAh, Li-ion Rechargeable Battery with a
connector.
4. Clip on the new battery and install it into the battery
compartment. Screw back battery compartment screw.
5. Reattach the top and secure it with the two screw caps.
** Batteries are available at www.gamasonic.com
You can purchase it directly at: https://gamasonic.com/product-category/parts-and-accessories/
. Make sure the new battery is a Gama Sonic - 3.2V/1,500mAh, Li-ion Rechargeable Battery
with a connector.
WARNING: Do not dispose of Li-Ion battery in the regular trash, municipal waste stream or by
fire as batteries may leak or explode. Do not open, short circuit or mutilate batteries as injury
may occur. Preserve our environment by recycling Li-Ion batteries or disposing of them in
accordance with local, state and federal regulations. Do not mix old and new batteries.
MAINTENANCE: Clean the solar panels regularly with a damp towel to guarantee optimum
performance. Do not use any type of solvent for cleaning and be careful not to put too much
pressure on the solar panels while cleaning.
TROUBLE SHOOTING: If your solar charged light does not come on at dusk despite
observance of all the instructions, please try the following steps:
1. Make sure that the solar lamp is not being affected by any other light source.
2. Ensure the solar lamp is not positioned in the shade during the day.
3. Make sure the switch on the lamp head is in either the Summer or Winter
position.
4. Check that the batteries are installed correctly.
NOTE: The performance of the solar lamp will vary with the time of year. It will deliver more light
when it has had a full day in the sun rather than a day in overcast weather.
WINTERTIME TIPS: For optimal performance, be sure to remove any snow or debris
accumulation from solar panel(s). Solar panels free of debris will charge the batteries much
more efficiently.
WARNING: Please keep out of reach of children.
Fig.8
/