KALORIK PPG 36584 User manual
- Category
- Pepper/salt grinders
- Type
- User manual
This manual is also suitable for
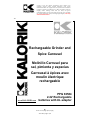
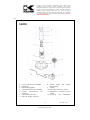
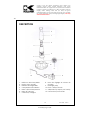
The KALORIK PPG 36584 is a rechargeable electric grinder and spice carousel that lets you grind salt, peppercorns, or other spices with just the touch of a button. Featuring a stainless steel housing, 2 rechargeable batteries, and a charging base, this device offers cordless convenience and precise seasoning control. With adjustable grind settings, a transparent spice container for easy monitoring, and an LED light for visibility, you can effortlessly season your meals to perfection.
The KALORIK PPG 36584 is a rechargeable electric grinder and spice carousel that lets you grind salt, peppercorns, or other spices with just the touch of a button. Featuring a stainless steel housing, 2 rechargeable batteries, and a charging base, this device offers cordless convenience and precise seasoning control. With adjustable grind settings, a transparent spice container for easy monitoring, and an LED light for visibility, you can effortlessly season your meals to perfection.


-
 1
1
-
 2
2
-
 3
3
-
 4
4
-
 5
5
-
 6
6
-
 7
7
-
 8
8
-
 9
9
-
 10
10
-
 11
11
-
 12
12
-
 13
13
-
 14
14
-
 15
15
-
 16
16
-
 17
17
-
 18
18
-
 19
19
-
 20
20
-
 21
21
-
 22
22
-
 23
23
-
 24
24
-
 25
25
-
 26
26


KALORIK PPG 36584 User manual
- Category
- Pepper/salt grinders
- Type
- User manual
- This manual is also suitable for
The KALORIK PPG 36584 is a rechargeable electric grinder and spice carousel that lets you grind salt, peppercorns, or other spices with just the touch of a button. Featuring a stainless steel housing, 2 rechargeable batteries, and a charging base, this device offers cordless convenience and precise seasoning control. With adjustable grind settings, a transparent spice container for easy monitoring, and an LED light for visibility, you can effortlessly season your meals to perfection.
Ask a question and I''ll find the answer in the document
Finding information in a document is now easier with AI
in other languages
- français: KALORIK PPG 36584 Manuel utilisateur
- español: KALORIK PPG 36584 Manual de usuario
Related papers
-
KALORIK PPG 37241 User manual
-
-
-
KALORIK PPG 26914 User manual
-
-
-
-
-
-
Other documents
-
Uncanny Brands Star Wars Lightsaber User guide
-
Sharper Image Electric Salt & Pepper Mill User manual
-
Silvercrest 352770 Owner's manual
-
-
-
-
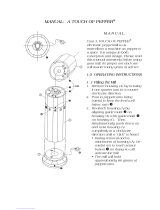 Selimex A TOUCH OF PEPPER User manual
-
 Epare EPSPM007 Installation guide
-
-

