Behringer Eurosound Megaphone XT Operating instructions
- Category
- Soundbar speakers
- Type
- Operating instructions
This manual is also suitable for

EUROSOUND MEGAPHONE XT
40-Watt Megaphone with Microphone and Rechargeable Battery
Quick Start Guide (Check out behringer.com for more information)

2 3Quick Start GuideEUROSOUND MEGAPHONE XT
Please read this Quick Start
Guidecarefully
Please take the time to read these
instructions carefully. These instructions
will help you set up and operate your
system properly and enjoy its advanced
features. Please save these instructions
for future reference.
WARNINGS
•
To reduce the risk of re or electrical
shock, do not expose the product to
rain or moisture.
•
To prevent electric shock, match
the wide blade of the line cord plug
to the wide slot of the AC (mains)
receptacle. Insert fully.
•
Do not expose this apparatus to
dripping or splashing, and do not
place objects lled with liquids,
such as vases, on or near the
apparatus. As with any electronic
product, use care not to spill
liquids into any part of the system.
Liquids can cause a failure and/or a
rehazard.
•
Do not place any ame sources,
such as lighted candles, on or near
the apparatus.
•
Keep the remote control battery
away from children. It may cause a
re or chemical burn if mishandled.
Do not recharge, disassemble,
heatabove 100°C (212°F),
orincinerate. Dispose of used
batteries promptly. Replace only
with a battery of the correct type
and model number.
•
Danger of explosion if battery is
incorrectly replaced.
•
Contains small parts that may be
a choking hazard. Not suitable for
children under age 3.
•
Please dispose of
used batteries
properly, following
any local regulations.
Do not incinerate.
Service and repair should be carried out
only by quali ed service personnel only.
To reduce the risk of electric shock do not
perform any servicing other than that
contained in the operation instructions.
Repairs must be performed by quali ed
service personnel only.
This symbol, wherever it
appears, alerts you to the
presence of uninsulated
dangerous voltage inside the
enclosure—voltage that may be
su cient to constitute a risk of shock.
This symbol alerts the user
to the presence of important
operating and maintenance
instructions in this Quick Start Guide.
Notes
•
The product label is located on the
back of the product.
•
Where the mains plug or appliance
coupler is used as the disconnect
device, such disconnect device shall
remain readily operable.
•
This product must be used indoors.
It is neither designed nor tested for
use outdoors, in recreation vehicles,
or on boats.
•
Make no modi cations to the
system or accessories. Unauthorized
alterations may compromise safety,
regulatory compliance, and system
performance.
IMPORTANT SAFETY
INSTRUCTIONS
1. Read these instructions for all
components before using this product.
2. Keep these instructions for
futurereference.
3. Heed all warnings on the product
and in the documentation.
4. Follow all instructions.
5. Do not use this apparatus near water
or moisture. Do not use this product
near a bathtub, washbowl, kitchen sink,
laundry tub, in a wet basement, near a
swimming pool, or anywhere else that
water is present.
6. Clean only with a dry cloth and
as directed by MUSIC Group. Unplug
this product from the wall outlet
beforecleaning.
7. Do not block any ventilation
openings. Install in accordance with the
manufacturer’s instructions. Toensure
reliable operation of the product and
to protect it from overheating, put
the product in a position and location
that will not interfere with its proper
ventilation. For example, do not place
the product on a bed, sofa, or similar
surface that may block the ventilation
openings. Do not put it in a built-in
system, such as a bookcase or a cabinet
that may keep air from owing through
its ventilationopenings.
8. Do not install near any heat sources,
such as radiators, heat registers, stoves,
or other apparatus (including ampli ers)
that produce heat.
9. Only use attachments/accessories
speci ed by the manufacturer.
10. Protect the power cord from being
walked on or pinched, particularly at
plugs, convenience receptacles, and the
point where they exit from theapparatus.
11. Unplug this apparatus during
lightning storms or when unused for long
periods of time – to prevent damage to
this product.
12. Refer all servicing to quali ed
service personnel. Servicing is required
when the apparatus has been damaged
in any way: such as power supply cord or
plug is damaged; liquid has been spilled
or objects have fallen into the apparatus;
the apparatus has been exposed to rain
or moisture, does not operate normally,
or has been dropped. Do not attempt to
service this product yourself. Openingor
removing covers may expose you to
dangerous voltages or other hazards.
Please call MUSIC Group (BEHRINGER)
to be referred to an authorized service
center near you.
13. To prevent risk of re or electric
shock, avoid overloading wall
outlets, extension cords, or integral
conveniencereceptacles.
14. Do not let objects or liquids enter
the product as they may touch dangerous
voltage points or short-out parts that
could result in a re or electric shock.
15. See product enclosure for safety
related markings.
16. Use proper power sources.
Plugthe product into a proper power
source, asdescribed in the operating
instructions or as marked on the product.
Beforeplugging the unit into a power
socket, please make sure you are using
the correct mains voltage for your
particular model. Faulty fuses must be
replaced with fuses of the same type and
rating without exception.
TECHNICAL SPECIFICATIONS AND
APPEARANCES ARE SUBJECT TO CHANGE
WITHOUT NOTICE AND ACCURACY IS NOT
GUARANTEED. BEHRINGER IS PART OF
THE MUSIC GROUP MUSICGROUP.COM.
ALL TRADEMARKS ARE THE PROPERTY
OF THEIR RESPECTIVE OWNERS.
MUSICGROUP ACCEPTS NO LIABILITY
FOR ANY LOSS WHICH MAY BE
SUFFERED BY ANY PERSON WHO RELIES
EITHER WHOLLY OR IN PART UPON
ANY DESCRIPTION, PHOTOGRAPH
OR STATEMENT CONTAINED HEREIN.
COLORS AND SPECIFICATIONS MAY
VARY FROM ACTUAL PRODUCT.
MUSIC GROUP PRODUCTS ARE SOLD
THROUGH AUTHORIZED FULLFILLERS
AND RESELLERS ONLY. FULLFILLERS
AND RESELLERS ARE NOT AGENTS OF
MUSIC GROUP AND HAVE ABSOLUTELY
NO AUTHORITY TO BIND MUSIC
GROUP BY ANY EXPRESS OR IMPLIED
UNDERTAKING OR REPRESENTATION.
THIS MANUAL IS COPYRIGHTED.
NO PART OF THIS MANUAL MAY BE
REPRODUCED OR TRANSMITTED IN ANY
FORM OR BY ANY MEANS, ELECTRONIC
OR MECHANICAL, INCLUDING
PHOTOCOPYING AND RECORDING
OF ANY KIND, FOR ANY PURPOSE,
WITHOUTTHE EXPRESS WRITTEN
PERMISSION OF MUSIC GROUP IP LTD.
ALL RIGHTS RESERVED.
© 2012 MUSIC Group IP Ltd.
Trident Chambers, Wickhams Cay,
P.O. Box 146, Road Town, Tortola,
British Virgin Islands
§ 1 Limited Warranty
(1)
Your Eurosound product is covered
by a limited warranty for a period
of ninety (90) days from the date
of purchase from a Eurosound
reseller authorized by MUSIC Group.
ThisLimited Warranty is valid only
if you purchased the product from a
MUSIC Group authorized Reseller.
(2)
MUSIC Group warrants the
mechanical and electronic
components of this product to
be free of defects in material and
workmanship if used under normal
operating conditions. ThisLimited
Warranty is applicable for ninety
(90) days from the original date
of retail purchase, unless your
country requires a longer statutory
warranty, inwhich case the
statutory warranty shall apply.
If the product displays any defects
within the speci ed warranty period
and that defect is not excluded
under clause 4, your product will be
replaced using new or reconditioned
product or parts. In the event
that the product is replaced,
thisLimited Warranty shall apply
to the replacement product for the
remaining initial warranty period
from the date of purchase of the
original product only.
(3)
Warranty claims other than
those indicated above are
expresslyexcluded.
IMPORTANT
We ask that you please retain your
purchase receipt. This is your proof of
purchase and your Limited Warranty
will commence from this date. If you do
not retain your purchase receipt then
this Limited Warranty will be void. In
the unlikely event that you require to
exercise this Limited Warranty, the
retailer will need you to provide a copy
of this purchase receipt. Without this
receipt, the retailer will unfortunately
not be able to process your request for
warrantyrepair.
§ 2 Online Registration
Please do remember to register
your new MUSIC Group equipment.
Thiscan quickly be completed by
visiting www.music-group.com or its
relatedbrands.
§ 3 Warranty Service;
ReturnAuthorization
Number
(1)
The initial stage of our warranty
service, and the quickest means of
achieving a solution, is to check if
the problem can be resolved by our
Online Service. If you are not able to
resolve your issue through this route
and you need to request warranty
service, please return the product
with its original packing and sales
receipt to the retailer where the
product was purchased.
(2)
No returns can be accepted without
a valid sales receipt.
(3)
It should be noted that shipments
into MUSIC Grou
p
or one of our
LEGAL DISCLAIMER
LIMITED WARRANTY
Safety Information

4 5Quick Start GuideEUROSOUND MEGAPHONE XT
authorized Service Centers for
warranty repair cannot be accepted.
§ 4 Warranty Limitations
and Exclusions
(1)
This Limited Warranty does
not cover consumable parts.
Theseinclude, but are not limited to;
fuses, batteries, cables, illuminants,
guitar strings, etc.
(2)
This Limited Warranty does not
cover the product if it has been
electronically or mechanically
modi ed in any way. If the product
needs to be modi ed or adapted
in order to comply with applicable
local technical or safety standards
in any country which is not the
country for which the product
was originally developed and
manufactured, this modi cation /
adaptation shall not be considered a
defect in materials or workmanship.
This Limited Warranty does not
cover any such modi cation /
adaptation, regardless of whether
it was carried out professionally
or not. Under the terms of this
Limited Warranty, MUSIC Group
shall not be held responsible for
any cost resulting from such a
modi cation / adaptation.
(3)
This Limited Warranty covers only
the product hardware. It does
not cover technical assistance
for hardware or software usage.
In addition it does not cover any
software products whether or
not contained in the purchased
product package. Any software is
provided only in the condition and
format contained with the product,
unless expressly provided for in any
enclosed software limited warranty.
(4)
This Limited Warranty is completely
invalid if the factory applied
serial number has been altered or
removed from the product.
(5)
Free inspections and maintenance /
repair work are expressly excluded
from this Limited Warranty. If
an inspection of the product by
MUSICGroup shows that the defect
in question is not covered by the
Limited Warranty, the inspection
costs are payable by the customer.
(6)
Product damage or defects caused
by the following conditions are not
covered by this Limited Warranty:
•
improper handling, neglect or
failure to operate the unit in
compliance with the instructions
given in MUSIC Group user or
servicemanuals
•
connection or operation of the
unit in any way that does not
comply with the technical or safety
regulations applicable in the
country where the product is used
•
any Act of God or Nature
(suchaccident, re, ood, etc.)
orany other condition that is
beyond the control of MUSIC Group.
(7)
Any repair or opening of the
unit carried out by unauthorized
personnel (including the
user) will void the Limited
Warrantycompletely.
(8)
Products which do not meet the
terms of this Limited Warranty
will be repaired exclusively at the
buyer's expense.
(9)
Authorized MUSIC Group Resellers
donotsell new products directly in
online auctions. Purchasesmade
through an online auction are
on a “buyer beware” basis.
Onlineauction con rmations or
sales receipts are not accepted
for warranty veri cation and
MUSICGroup will not repair or
replace any product purchased
through an online auction.
§ 5 Warranty Transferability
This Limited Warranty is extended
exclusively to the original buyer
(customer of authorized Reseller) and
is not transferable to anyone who may
subsequently purchase this product.
No other person (distributor, dealer,
ful ller, retailer etc.) shall be entitled to
give any warranty promise on behalf of
MUSICGroup.
§ 6 Claim for Damage
Subject only to the operation of statutory
applicable local laws, MUSIC Group shall
have no liability to the buyer under this
Limited Warranty for any consequential
or indirect loss or damage of any
kind. Inno event shall the liability of
MUSICGroup under this Limited Warranty
exceed the invoiced value of the product.
§ 7 Limitation of Liability
This Limited Warranty is the complete
and exclusive warranty between you
and MUSIC Group. It supersedes all other
written or oral communications related
to this product. MUSIC Group provides no
other warranties for this product.
§ 8 Other Warranty Rights
and National Law
(1)
This Limited Warranty does
not exclude or limit the buyer's
statutory rights as a consumer in
any way.
(2)
The Limited Warranty regulations
mentioned herein are applicable
unless they constitute an
infringement of applicable statutory
local laws, in which case the
warranty shall be deemed modi ed
to the extent necessary to comply
with local law.
(3)
This Limited Warranty does not
detract from any statutory seller's
obligations in regard to any lack of
conformity of the product and any
hidden defect.
§ 9 Amendment
Warranty service conditions are subject
to change without notice. Pleaserefer
regularly to the latest warranty
terms and conditions, and additional
information regarding MUSIC Group's
Limited Warranty, atwww.music-group.
comor its related brands / products.
Customer Care
Register online. Please register
your new MUSIC Group equipment
right after you purchase it by visiting
www.music-group.com.
Proof of purchase. We ask that you
please retain your purchase receipt.
Thisis your proof of purchase and your
Limited Warranty will commence
from this date. If you do not retain
your purchase receipt then the Limited
Warranty will be void.
If your product fails. In the unlikely
event that your product fails or does not
perform as expected, please return the
product to the retailer where you made
the purchase. Please make sure that you
present them with a copy of the original
sales receipt for an exchange or refund.
Questions? For further questions,
contact your local MUSIC Group
(BEHRINGER) dealer. To contact
MUSIC Group directly, see the contact
information included in the carton.
Lea cuidadosamente este
Manual de arranque rápido
Dedique un rato a leer cuidadosa y
completamente estas instrucciones.
Estasinstrucciones le ayudarán a
con gurar y usar correctamente este
aparato y a disfrutar de sus avanzadas
funciones. Conserve estas instrucciones
para cualquier referencia que tenga que
hacer a ellas en el futuro.
ADVERTENCIAS
•
Para reducir el riesgo de incendios
o descargas eléctricas, no permita
que este aparato quede expuesto a
la lluvia o la humedad.
•
Para evitar el riesgo de
descargas eléctricas, introduzca
completamente todos los bornes
del enchufe de alimentación en la
salida de corriente alterna.
•
No permita que este aparato
quede expuesto a salpicaduras
de líquidos, y no coloque objetos
que los contengan, como jarrones,
cerca de este aparato. Al igual
que ocurre con cualquier otro
aparato electrónico, tenga cuidado
de no derramar ningún líquido
en ninguna parte del sistema.
Loslíquidos pueden dar lugar a una
avería y al riesgo de un incendioue
ocurre con cualquier otro apaer.
Loslengan, comojarrones, cerca de
este aparato. Al igual que ocurre con
cualquier otro apa.
•
No coloque ninguna fuente de
llama, como puede ser una vela o
candelabro, cerca de este aparato.
•
Mantenga las pilas del control
remoto fuera del alcance de
los niños. Existe el riesgo de un
incendio o quemadura química en
caso de un manejo inadecuado de
las mismas. No trate de recargar,
desmontar, incinerar o calentar por
encima de los 100° C estas pilas.
Deshágase de las pilas usadas lo
antes posible, siguiendo siempre
las normas de retirada o reciclaje
establecidas en su país o región.
Sustituya esta pila únicamente por
otra de idéntico tipo y referencia.
•
Existe el riesgo de explosión
si la pila es sustituida de
formaincorrecta.
•
Este aparato contiene piezas de
pequeño tamaño que pueden
suponer un riesgo de ahogamiento.
No permita que lo utilicen niños de
edad inferior a los 3 años.
•
Deshágase de las
pilas de la forma
adecuada, siguiendo
todas las indicaciones
relativas al reciclaje o
retirada establecidas en su país o
ciudad. No las incinere.
Cualquier mantenimiento y reparación
deberá ser realizado únicamente por
un servicio técnico o cial. Para reducir
el riesgo de una descarta eléctrica,
norealice ningún tipo de mantenimiento
a excepción del que venga detallado en
este manual de instrucciones.
Siempre que aparezca este
símbolo, servirá como
advertencia de la presencia
de voltajes peligrosos no aislados dentro
de la carcasa—voltajes que pueden ser
de magnitud su ciente como para
constituir un riesgo de descarga eléctrica.
Este símbolo pretende
advertir al usuario de la
presencia de instrucciones
de uso y mantenimiento importantes en
este Manual de arranque rápido.
Notas
•
La etiqueta de este aparato
está ubicada en la parte trasera
delmismo.
•
En los casos en los que el cable de
alimentación se use como sistema
de desconexión, coloque la unidad
de forma que pueda acceder
fácilmente a dicho cable o sistema.
•
Este aparato ha sido diseñado para
ser usado en interiores. No ha sido
veri cado que pueda funcionar en
exteriores, en vehículos recreativos
o en barcos.
•
No realice ningún tipo de
modi cación en este sistema ni
en ninguno de sus accesorios.
Cualquier modi cación no
autorizada sobre los mismos
Información de
seguridad
Page is loading ...
Page is loading ...
Page is loading ...
Page is loading ...

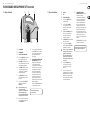
(EN) Step: Controls (ES) Paso: Controles
EUROSOUND MEGAPHONE XT Controls
(8)(1)
(3) (2) (3)
(5)(4) (9) (7) (6)(10)
(11)
(1) LOUDSPEAKER.
(2) CARRY HANDLE.
(3) HOLES FOR SHOULDER STRAP.
(4) The rotary MIC LEVEL control allows
you to adjust the volume level.
(5) The POWER switch turns the device
on and o . When turned on, the LED
of the POWER switch lights up.
(6) The CHARGE LED ashes yellow as
long as the rechargeable battery
is charging. It goes out when the
battery is fully charged.
(7) The LOW BAT LED indicates that
the rechargeable battery needs to
becharged.
(8) Connect the supplied BEHRINGER
XM1800S microphone to the
MICINinput.
◊ Never hold the microphone
directly in front of the
loudspeaker. Feedback hazard!
When operating the device,
keep the microphone behind the
loudspeaker to avoid feedback.
(9) You can connect an external sound
source (CD player, MP3 player, etc.)
tothe LINE IN input.
(10) Connect to the power supply via the
polarized DC IN connector. Atting
power adapter is supplied. Usethe
device only with the included
powersupply.
(11) COMPARTMENT FOR BATTERY AND
SHOULDER STRAP. To insert the
battery, open the compartment’s
cover. The bottom half of the
compartment is used for the battery.
Open the latch to access the battery
compartment. Insert the battery
as follows: The terminals must
face the device with the positive
terminal (red) on the side of the
control panel (to the left, as seen
from the rear panel). Insert the
battery and close the latch. Close the
batterycompartment.
The device’s SERIAL NUMBER is found
on the bottom side of the unit.
Check out behringer.com for
more information
(1) ALTAVOZ.
(2) ASA.
(3) OJALES PARA CORREA.
(4) Use el control MIC LEVEL para
regular el volumen.
(5) Con el interruptor POWER se
enciende el aparato. Al estar
encendido se ilumina el LED
delinterruptor.
(6) El LED amarillo CHARGE parpadea
mientras se carga la batería y se
apaga cuando la batería se ha
cargado en su totalidad.
(7) El LED LOW BAT indica que la batería
debe volver a cargarse.
(8) Conecte en la entrada MIC IN el
micrófono XM1800S de BEHRINGER
suministrado con el aparato.
◊ Nunca se coloque con el micrófono
delante del altavoz, pues existe
¡peligro de realimentación!
Para evitar realimentaciones al
utilizar el aparato, permanezca
detrás del altavoz siempre que use
el micrófono.
(9) En la entrada LINE IN puede
conectar una fuente de sonido
externa (reproductor de CDs,
MP3,etc.).
(10) La conexión a la red eléctrica se
realiza mediante el conector bipolar
DC IN. En el suministro se incluye un
adaptador de corriente adecuado.
Utilice exclusivamente el adaptador
de corriente suministrado.
(11) COMPARTIMIENTO PARA
BATAERÍA Y CORREA: Paracolocar
la batería abra la tapa del
compartimiento. La batería debe
colocarse en la parte inferior del
compartimiento. Desbloquee el
seguro del compartimiento de la
batería. Coloque la batería de la
siguiente manera: los polos de la
batería deben estar orientados hacia
el aparato. El polo positivo (rojo)
debe quedar del lado del panel de
control (el lado izquierdo, visto desde
atrás). Metala batería y cierre el
seguro. Cierre el compartimiento de
la batería.
El NÚMERO DE SERIE se encuentra en
la parte inferior del aparato.
Para más información no deje de visitar
nuestra página web behringer.com
14 EUROSOUND MEGAPHONE XT 15Quick Start Guide

(1) HAUT-PARLEUR.
(2) POIGNEE DE TRANSPORT.
(3) OEILLET POUR SANGLE
DETRANSPORT.
(4) Tournez le bouton MIC LEVEL pour
régler le volume sonore.
(5) Appuyez sur le commutateur POWER
pour mettre l’appareil sous tension.
La LED du commutateur POWER
s’allume pour indiquer que l’appareil
est en marche.
(6) La LED CHARGE clignote en jaune
pendant le chargement de l’accu.
Elles’éteint dès que l’accu est
totalement chargé.
(7) La LED LOW BAT signale que l’accu
intégré doit être rechargé.
(8) Reliez le micro BEHRINGER XM1800S
fourni à l’entrée MIC IN.
◊ Ne tenez jamais le micro devant
le haut-parleur. Risque de larsen !
Pendant l’utilisation de l’appareil,
placez-vous toujours avec le micro
derrière l’appareil afin d’éviter
l’apparition de larsens.
(9) Vous pouvez relier l’entrée LINE
IN à une source sonore externe
(lecteurCD, lecteur MP3, etc.).
(10) On e ectue la liaison avec la tension
secteur grâce à l’embase bipolaire
DC IN. Le cordon d’alimentation
correspondant est fourni.
Utilisezl’appareil uniquement avec
le bloc d’alimentation fourni.
(11) COMPARTIMENT POUR L’ACCU
ET LA SANGLE DE TRANSPORT.
Ouvrezle couvercle du compartiment
pour installer l’accu dans l’appareil.
L’accu doit être installé dans la
moitié inférieure du compartiment.
Pour accéder au logement de l’accu,
ouvrez son système de verrouillage.
Installation de l’accu : les contacts
de l’accu doivent être dirigés vers
l’appareil, le pôle positif (rouge)
ducôté du panneau de commande
(sur la gauche quand on regarde
l’arrière de l’appareil). Introduisez
l’accu puis fermez le système de
verrouillage. Fermez le logement
de l’accu.
Le NUMERO DE SERIE de l’appareil
est situé sur la base de l’appareil.
Consultez le site behringer.com pour
de plus amples informations
(FR) Étape : Réglages
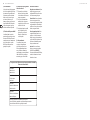
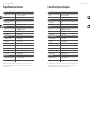
EUROSOUND MEGAPHONE XT Controls Specications
Inputs
Mic in ¼" TRS jack, unbalanced
Line in ⁄" jack, unbalanced
Output
Output power 40 W
Loudspeaker 5" full-range speaker
Microphone
Type BEHRINGER XM1800S, dynamic
Pickup pattern Hyper-cardioid
Cable length 3' spiral cable
System Data
Power supply with built-in rechargeable battery
Rechargeable battery type 12 V DC / 2600 mAh
Charging time approx. 4 h
Battery operating time up to 8 h
External recharger type 18 V DC / 3 A
Mains voltage 100 - 240 V~, 50/60 Hz, 1.5 A (Switching mode adaptor)
Mains connector Standard IEC receptacle
Physical/Weight
Dimensions (H x W x D) approx. 8.5 x 7.1 x 11.2" / 217 x 180 x 284 mm
Weight approx. 7.0 lbs / 3.2 kg (without power supply)
BEHRINGER is constantly striving to maintain the highest professional standards. As a result of these efforts, modifications may be made
from time to time to existing products without prior notice. Specifications and appearance may differ from those listed or illustrated.
16 EUROSOUND MEGAPHONE XT 17Quick Start Guide
Page is loading ...

We Hear You
-
 1
1
-
 2
2
-
 3
3
-
 4
4
-
 5
5
-
 6
6
-
 7
7
-
 8
8
-
 9
9
-
 10
10
-
 11
11


Behringer Eurosound Megaphone XT Operating instructions
- Category
- Soundbar speakers
- Type
- Operating instructions
- This manual is also suitable for
Ask a question and I''ll find the answer in the document
Finding information in a document is now easier with AI
in other languages
Related papers
-
Behringer V-Amp3 User manual
-
-
-
Behringer Eurolive VS1520 Quick start guide
-
-
Behringer 1002B User manual
-
-
Behringer Miniamp AMP800 Quick start guide
-
-
