No-Mar Cycle Hill HD Assembly Instructions
- Category
- Motorcycle Accessories
- Type
- Assembly Instructions
No-Mar Cycle Hill HD is a professional-grade motorcycle tire changer designed for both home and shop use. It features a heavy-duty frame and stand assembly, making it capable of handling even the most challenging tire changes. The Cycle Hill HD also comes with a variety of attachments and accessories, making it a versatile tool for any motorcycle enthusiast.
Here are some of the key features and capabilities of the No-Mar Cycle Hill HD:
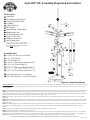
- Heavy-duty frame and stand assembly for durability and stability
- Versatile design allows for use on a variety of motorcycle wheels
- Bead breaker arm and "tee" for easy tire removal
No-Mar Cycle Hill HD is a professional-grade motorcycle tire changer designed for both home and shop use. It features a heavy-duty frame and stand assembly, making it capable of handling even the most challenging tire changes. The Cycle Hill HD also comes with a variety of attachments and accessories, making it a versatile tool for any motorcycle enthusiast.
Here are some of the key features and capabilities of the No-Mar Cycle Hill HD:
- Heavy-duty frame and stand assembly for durability and stability
- Versatile design allows for use on a variety of motorcycle wheels
- Bead breaker arm and "tee" for easy tire removal


-
 1
1
-
 2
2
-
 3
3
-
 4
4


No-Mar Cycle Hill HD Assembly Instructions
- Category
- Motorcycle Accessories
- Type
- Assembly Instructions
No-Mar Cycle Hill HD is a professional-grade motorcycle tire changer designed for both home and shop use. It features a heavy-duty frame and stand assembly, making it capable of handling even the most challenging tire changes. The Cycle Hill HD also comes with a variety of attachments and accessories, making it a versatile tool for any motorcycle enthusiast.
Here are some of the key features and capabilities of the No-Mar Cycle Hill HD:
- Heavy-duty frame and stand assembly for durability and stability
- Versatile design allows for use on a variety of motorcycle wheels
- Bead breaker arm and "tee" for easy tire removal
Ask a question and I''ll find the answer in the document
Finding information in a document is now easier with AI
Related papers

Other documents
-
Kolpin 20200 Owner's manual
-
Ranger R980XR Owner's manual
-
-
-
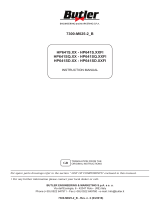
 Ammco Coats RC-50M User manual
-
TUXEDO Distributors TC-950 Tire Changer Installation guide
-
Butler HP441SQ.22 Owner's manual
-
Snap-On EEWH311B Operation Instructions Manual
-
 Butler HP641SD.24 Pro Owner's manual
-
 Merida Sport User manual


