Page is loading ...

S200 Position Node Installation Guide
Hardware Installation Manual
M-SS-S2A-11
Revision A Sept 25, 2007
Revision B Nov 13, 2007
Revision C Apr 30, 2010
Revision D Apr 13, 2012
Keep all product manuals as a product component during the life span of the servo amplifier.
Pass all product manuals to future users/owners of the servo amplifier.

Record of Revisions
Date Issue Description
9/14/07 A Separated Installation and Operation into separate manuals
10/13/07 B Reversed Polarity of DINP10 on Schematics
4/30/10 C Corrected J11 Labels section 6.1. Updated Branding, general grammar and
clarity
4/13/12 D Update Branding
©2006 2007 Kollmorgen - All rights reserved. Printed in the USA.
NOTICE:
Kollmorgen
®
is a registered trademark of the Danaher Corporation. Kollmorgen makes every attempt to ensure
accuracy and reliability of the specifications in this publication. Specifications are subject to change without notice.
Kollmorgen provides this information "AS IS" and disclaims all warranties, express or implied, including, but not
limited to, implied warranties of merchantability and fitness for a particular purpose. It is the responsibility of the
product user to determine the suitability of this product for a specific application.
Safety Symbols
WARNING
Warnings alert users to potential physical danger or harm. Failure to follow
warning notices could result in personal injury or death.
CAUTION
Cautions direct attention to general precautions that, if not followed, could
result in personal injury and/or equipment damage.
NOTE
Notes highlight information critical to your understanding or use of the
product.
Safety
WARNING
READ these instructions before connecting power. Damage can result from
MISWIRING at the power terminals.
DANGEROUS voltages are present on power input and motor output terminals.
Only qualified personnel are permitted to transport, assemble, commission, and maintain this equipment. Properly
qualified personnel are persons who are familiar with the transport, assembly, installation, commissioning and
operation of motors, and who have the appropriate qualifications for their jobs.
Read all available documentation before assembling and using. Incorrect handling of products described in this
manual can result in injury and damage to people and/or machinery. Strictly adhere to the technical information
regarding installation requirements.
Keep all covers and cabinet doors shut during operation.
Be aware that during operation, the product has electrically charged components and hot surfaces. Control
and power cables can carry a high voltage, even when the motor is not rotating.
Never disconnect or connect the product while the power source is energized.
After removing the power source from the equipment, wait at least 5 minutes before touching or
disconnecting sections of the equipment that normally carry electrical charges (e.g., capacitors, contacts,
screw connections). To be safe, measure the electrical contact points to each other and to electrical safety
earth with a meter before touching the equipment.

Kollmorgen 4/13/2012 Table of Contents
S200 Position Node Installation Guide i
Table of Contents
1.0 Product Documentation .......................................................................................................3
2.0 Product Overview ......................................................................................................................4
2.1 Model Number Scheme .................................................................................................5
2.2 Valid Drive Model Numbers for the S200 Position Node.............................................6
3.0 Specifications.............................................................................................................................7
3.1 Drive Family Power.......................................................................................................7
3.2 Input Power Specifications............................................................................................9
3.3 DC Input Drives - Control and Power .........................................................................10
3.4 Control Loop Performance ..........................................................................................10
3.5 Mechanical Specifications...........................................................................................12
3.6 I/O Specifications.........................................................................................................12
3.7 Environmental Specifications......................................................................................14
3.8 Smart Feedback Device (SFD) ....................................................................................14
4.0 accessories................................................................................................................................15
4.1 Cables...........................................................................................................................15
4.1.1 Motor and feedback cables.....................................................................................................15
4.1.2 Serial Communications Cable................................................................................................15
4.2 Connector Kits.............................................................................................................16
4.2.1 Base Unit Connector Kits.......................................................................................................16
4.2.2 Position Node Connector Kits................................................................................................19
4.3 Din Rail Terminal Break Outs.....................................................................................20
4.4 Operator Interface Terminals.......................................................................................20
4.5 Systems Capabilities....................................................................................................20
5.0 Installation................................................................................................................................21
5.1 Unpacking and Inspecting............................................................................................21
5.2 Mounting......................................................................................................................21
5.3 Dimensions ..................................................................................................................22
5.4 Mounting Outline.........................................................................................................23
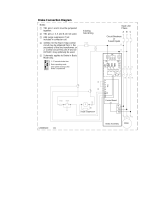
6.0 Wiring Diagrams......................................................................................................................24
6.1 Low Power AC Drive Wiring Diagram.......................................................................24
6.2 High Power AC Wiring Diagram ................................................................................25
6.3 DC Models Drive Wiring Diagram..............................................................................26
7.0 Connector Pinout and Discriptions..........................................................................................27
7.1 PE All Drive Models....................................................................................................27
7.2 J1 – Low Power AC Input Power Models Drive Power..............................................28
7.3 J1 – AC Input Control Power High Power AC Models...............................................30
7.4 TB1: High Power AC Power Connections ..................................................................31
7.5 J1 – DC Input Power Models Drive Power Connector................................................33
7.6 J2 – Motor Power Connector.......................................................................................34
7.7 J3 – SFD Feedback Connector.....................................................................................34
7.8 J4 – Command I/O Connector .....................................................................................35
7.9 J5: Serial Port Connections..........................................................................................36
7.10 J11 CAN bus Connections.........................................................................................36
7.11 J12 Connector ............................................................................................................37
7.12 J13 Encoder Feedback Connector..............................................................................38
8.0 DC Input Power Model Power Supply Requirements.............................................................39
8.1 Control Voltage............................................................................................................40
8.2 Grounding....................................................................................................................40
8.3 Bus Capacitance...........................................................................................................40
8.4 Bus Switching and Fusing ...........................................................................................41
9.0 Detailed Wiring Information....................................................................................................42

Product Overview 4/13/2012 Kollmorgen
ii S200 Position Node Installation Guide
9.1 Definitions Discussion.................................................................................................42
9.2 PE Earth Ground Connections.....................................................................................42
9.3 Serial port Wiring ........................................................................................................42
9.4 Wiring Discrete Digital Inputs.....................................................................................43
9.4.1 Typical wiring with sinking switches: ...................................................................................43
9.4.2 Typical Wiring with Sourcing Switches ................................................................................44
9.4.3 Wiring DINP5 and DINP10...................................................................................................44
9.5 Wiring Discrete Digital Outputs..................................................................................45
9.6 Using the DAC Monitors.............................................................................................46
9.7 Wiring Encoder Output Signals...................................................................................46
9.8 Motor Wiring...............................................................................................................46
9.9 Regen Resistor Wiring.................................................................................................47
9.10 Step and Direction or Electronic Gearing Wiring......................................................47
9.11 Encoder Motor Feedback...........................................................................................48
10.0 System Startup.......................................................................................................................52
10.1 Wiring Checks ...........................................................................................................52
10.2 Switch Settings ..........................................................................................................52
10.3 Apply control Power..................................................................................................52
10.4 Control Wiring Checks..............................................................................................53
10.5 Additional Safety Checks ..........................................................................................53
10.6 Applying Bus Power..................................................................................................53
10.7 Motor Motion Checks................................................................................................54
10.8 System Tuning...........................................................................................................54
Appendix A - Cables......................................................................................................................55
A.1 Long Cables ................................................................................................................55
A.2 Custom Composite Cables..........................................................................................55
Appendix B - Regulatory Information...........................................................................................57
B.1 Conformance Requirements...................................................................................57
B.2 CE Approval ..........................................................................................................57
B.3 CE EMC Compliance ............................................................................................57
B.3.1. CE Test Setup...................................................................................................................57
B.3.2 CE Test Setup....................................................................................................................58
B.3.3 Declaration of Conformity.................................................................................................58
B.4 Installation and Commissioning ............................................................................60
B.5 Safety requirements ...............................................................................................60
B.6 European Compliance............................................................................................60
B.7 UL and cUL Conformance.....................................................................................62
B.8 Additional Safety Precautions................................................................................62
B.9 EMC Compliance with EN61800-3.......................................................................63
B.10 AC Mains Conducted Emissions...........................................................................64
B.11 Regen Resistor.......................................................................................................66
B.12 Additional EMC Information Sources...................................................................66
Sales and Service......................................................................................................67

Kollmorgen 4/13/2012 Product Documentation
S200 Position Node Installation Guide 3
1.0 PRODUCT DOCUMENTATION
The S200 Position node system documentation contains information broken into several manuals and documents.
Not all documents are required but no document stands alone. The documents are:
Hardware Installation Manual
This document includes all aspects of product specifications and installation procedures. Wiring diagrams,
mounting dimensions and recommendations, and physical properties can be found here. It is required to properly
mount and wire the S200 Position Node product.
User’s Operation Manual
This document provides all information required to get an S200 Position Node product set up and configured for
operation in the application. It includes functional descriptions, interface details, and troubleshooting information.
Information regarding serial communications using Modbus is also provided in this document.
S200 Position Node with CANopen Reference Manual
This document provides reference material and examples for communicating to the S200 Position Node over the
CANopen field bus protocol.
S200 Position Node with DeviceNet Reference Manual
This document provides reference material and examples for communicating to the S200 Position Node over the
DeviceNet field bus protocol.
Support materials
There may be a number of supporting documents located at our web site. Please check for the latest information.
Locating Support Materials
All support materials are posted on the Kollmorgen website at www.Kollmorgen.com
. These files can be found
under Drives \ AC Servo Drives \ S200.
Firmware and Software Updates
A good general practice remains: If it’s not broken, don’t fix it. There are times when firmware and software
upgrade is required. These files can also be found at www.Kollmorgen.com
. Procedures can be found in the
companion S200 Position Node User’s Guide.
Abbreviations and Definitions
Some common abbreviations used in this document are defined at the first use but the reader may note the
following:
S200 PN
: Short hand notation for the S200 Position Node product.
‘x
’ : A lower case x may be used to signify a ‘don’t care’ character in a string, number, or model number.
GUI
: Graphical User Interface also called S200 OC Tools.
Home
: A reference position to which other positioning motion is referenced.
PE
: Protective Earth Ground
REGEN
: Regenerated energy from a back-driven motor pumping energy back into the drive.
REGEN Resistor
: An external power resistor attached to the drive that allows the drive to burn off
excessive REGEN energy.
Hall Channel
: A term used for a motor feedback signal that provides coarse absolute positioning
information. Three channels provide 1-part-in-6 resolution per motor electrical cycle.
Bus
: Short for Main Internal DC Bus Power Supply that is the DC voltage source for motor power.
OIT
: Operator Interface Terminal; Same as HMI
HMI: Human Interface Terminal; Same as OIT

Kollmorgen 4/13/2012 Product Overview
S200 Position Node Installation Guide 4
2.0 PRODUCT OVERVIEW
The S200 Position Node with CANopen/DeviceNet
TM
brings greater flexibility to the S200 drive platform
by adding profile generation and field bus capabilities. It also brings added I/O, Digital Oscilloscope
emulation, and the ability to use incremental encoder with commutation tracks (ComCoder) for motor
feedback.
The S200 Position Node brushless position node servo drives with CANopen push high performance
servo technology into lower power applications than was previously possible without having to
compromise on reliability or package size. Couple a S200 position node drive with an AKM servo motor
for a complete servo control solution designed to excel in applications such as semiconductor fabrication,
electronic assembly, packaging, medical, and woodworking equipment.
The S200 position node servo drives with CANopen communication are the first all digital industrial drives
with a velocity loop bandwidth up to 400 Hz offering unmatched system throughput and simplified tuning.
High resolution (24 bit) feedback and high performance 3-5 kHz current loop bandwidth provide smooth
motion and rapid start and stop action to optimize machine performance. Smart feedback and industry
leading high bandwidth deliver fast and accurate commissioning by eliminating the need for servo loop
tuning in most applications.
A separate "keep alive" power input allows rapid recovery from emergency stop conditions. Optically
isolated inputs/outputs, positive locking connectors and full fault protection promise long machine life and
immunity to accidental damage. A single motor power/feedback cable simplifies connectivity. All
connectors and LED status indicators are easily accessible from the front of the drive.
HIGHLIGHTS
DC or AC input voltage:
DC type: 20 V ... 90 V
AC type: 110 V ... 240 V, 1Ø or 3Ø, 50/60 Hz
Highest performance all digital servo in the industry
Operation and Setup via a PC using the S200 OC Tools setup software
Easy set up and tuning with Smart Feedback Device
Optimized performance with Kollmorgen AKM motors
Rugged optically isolated I/O
UL508C recognition, CE (EN50178, EN61800-3)
Very compact footprint
Full fault protection
Velocity, Position, and Electronic Gearing, Step and Direction control
Indexing - 180 unique motion tasks can be defined and initiated via the serial port, Can
Port, or discrete inputs
Jogs, Relative, Absolute, Simple Registration, and Home motion tasks can be easily
setup and executed
Individual motion tasks can be linked or blended with each other
Digital Oscilloscope Functions
Built-in CANopen / DeviceNet Communication bus
Incremental Encoder Input port allows ComCoder motor feedback for position loop
control.

Product Overview 4/13/2012 Kollmorgen
5 S200 Position Node Installation Guide
INCREASED MACHINE THROUGHPUT & LONGER LIFE
Servo system performance is synonymous with machine throughput. The S200 POSITION NODE
family takes servo performance to new heights.
Industry-leading current loop bandwidth up to 5 kHz and velocity loop bandwidth up to
400 Hz means machine throughput can be increased by as much as 2 to 3 times.
Robust design including full fault protection, locking connectors and optical isolation
promise greater machine “up-time”.
Smooth motion, a benefit of sinusoidal current control and high resolution (24 bit)
feedback minimizes harsh torque disturbances that can cut short the life of mechanical
components.
Both the AC and the DC input drives are equipped with separate control power input to
speed recovery from “E-Stop” conditions.
CANopen Field Bus or DeviceNet communications
REDUCED ENGINEERING & SUPPORT TIME
Simplified tuning, friendly Graphical User Interface and shared components with Stepper
products.
Windows-based Graphical User Interface models the tree format found in Explorer so
learning is quick and easy.
Digital Oscilloscope emulator for easier setup.
Easy to debug with full fault diagnostics reduce engineering support time.
Field bus connectivity.
CE- / UL- CONFORMITY
The S200 position node with CANopen meets all relevant standards:
EMC Directive 89/336/EWG, standard used ENG61800-3
Low Voltage Directive 73/23/EWG, standard used 50178
UL / cUL 508C recognized
2.1 MODEL NUMBER SCHEME
S2 03 3 0 CN S - 002
Family
S2
- S200 Servo Family
Current Rating
02
- 1.5 A
RMS
continuous,
4.5 A
RMS
peak
03
- 3 A
RMS
continuous,
9 A
RMS
peak
06
- 6 A
RMS
continuous,
18 A
RMS
peak
Voltage
3
- 20-90 VDC
5
- 120 VAC doubler/240 VAC 1-phase
6
- 120/240 VAC
Customization - omit for standard drives
000 - 019 Reserved for factory use only
020 - 999
Reserved for customers only
Feedback Support
S - SFD/Halls - Base Unit
SFD/Comcoder - CAN option card
Smart Feedback Device (SFD) - SynqNet Option Card
Sine encoder - SynqNet Option Card
EnDat 2.1 - SynqNet Option Card
Functionality
VT - Velocity/Torque modes
CN -
Position Node w/CANOpen Interface
SD - SynqNet option card w/ micro-D connectors
SR - SynqNet option card w/ standard RJ connectors
Electrical Option
0
- No Electrical Option
DN - Position Node w/DeviceNet Interface

Product Overview 4/13/2012 Kollmorgen
6 S200 Position Node Installation Guide
2.2 VALID DRIVE MODEL NUMBERS FOR THE S200 POSITION
NODE
DC Input Power Drive Models
S20330-CNS: 90 V
DC
, 3/9 A
RMS
Base Unit, Profile Node with CanOpen
S20330-DNS: 90 V
DC
, 3/9 A
RMS
Base Unit, Profile Node with DeviceNet
S20630-CNS: 90 V
DC
, 6/18 A
RMS
Base Unit, Profile Node with CanOpen
S20630-DNS: 90 V
DC
, 6/18 A
RMS
Base Unit, Profile Node with DeviceNet
AC Input Power Drive Models
S20250-CNS: 120VAC doubler/240VAC, 1 phase, 1.5/4.5 ARMS Base Unit, Profile Node with CanOpen
S20250-DNS: 120VAC doubler/240VAC, 1 phase, 1.5/4.5 ARMS Base Unit, Profile Node with DeviceNet
S20260-CNS: 120/240 VAC, 1/3-phase, 1.5/4.5 ARMS Base Unit, Profile Node with CanOpen
S20260-DNS: 120/240 VAC, 1/3-phase, 1.5/4.5 ARMS Base Unit, Profile Node with DeviceNet
S20350-CNS: 120VAC doubler/240VAC, 1 phase, 3/9 ARMS Base Unit, Profile Node with CanOpen
S20350-DNS: 120VAC doubler/240VAC, 1 phase, 3/9 ARMS Base Unit, Profile Node with DeviceNet
S20360-CNS: 120/240 VAC, 1/3-phase, 3/9 ARMS Base Unit, Profile Node with CanOpen
S20360-DNS: 120/240 VAC, 1/3-phase, 3/9 ARMS Base Unit, Profile Node with DeviceNet
S20650-CNS: 120VAC doubler/240VAC, 6/18 ARMS Base Unit, Profile Node with CanOpen
S20650-DNS: 120VAC doubler/240VAC, 6/18 ARMS Base Unit, Profile Node with DeviceNet
S20660-CNS: 120/240 VAC, 1/3-phase 6/18 ARMS Base Unit, Profile Node with CanOpen
S20660-DNS: 120/240 VAC, 1/3-phase 6/18 ARMS Base Unit, Profile Node with DeviceNet
S21260-CNS: 120/240 VAC, 1/3-phase 6/18 ARMS Base Unit, Profile Node with CanOpen
S21260-DNS: 120/240 VAC, 1/3-phase 6/18 ARMS Base Unit, Profile Node with DeviceNet

Kollmorgen 4/13/2012 Specifications
S200 Position Node Installation Guide 7
3.0 SPECIFICATIONS
NOTE
Unless otherwise specified, the specifications are worst case
limits and apply over the specified operating ambient
temperature and over the specified operating line voltage.
3.1 DRIVE FAMILY POWER
AC Input DC Input
Drive Model Number S20260 S20360 S20660 S212660 S20330 S20630
Peak Output Current (A
RMS
)
1
(0 to 40°C) Ambient (A
RMS
) 4.5 9 18 30 9 18
Minimum Peak Current Time
(Starting from 0 amps) seconds 3 3 3 3 3 3
Continuous Output Current (A
RMS
)
2
0 to 30°C ambient (A
RMS
) 2.3 4.5 9 15 4.5 7.5
40° C ambient (A
RMS
) 1.5 3 6 12 3 6
50° C ambient (A
RMS
) 1 2 4 8 2 4
Peak Output Power
240 VAC (VA), 3 phase 1500 3000 6000 10000 - -
120 VAC (VA), 1 phase 750 1500 2400 - - -
75 VDC (VA) - - - - 750 1500
Drive Continuous Output Power
240 VAC, 3 Phase (watts) 600 1100 2000 4000 - -
240 VAC, 1 Phase (watts) 500 900 1500 2500 - -
120 VAC, 1 Phase (watts) 250 450 - - - -
75 VDC (watts) - - - - 250 500
Continuous Motor Shaft Power at 3000 RPM (Nominal Bus – 10%)
0 to 30°C ambient (watts) 3-ph 300 750 1500 2500 - -
0 to 30°C ambient (watts) 1-ph 300 750 1300 2200 180 315
40° C ambient (watts) 200 500 1000 2000 125 250
RMS Line Current at Continuous Output Power
240 VAC 3 Phase (A
RMS
) 2.7 5 9 16 - -
240 VAC 1 Phase (A
RMS
) 3.4 6.5
12
(Note 3)
18 (Note 3) - -
120 VAC 1 Phase (A
RMS
) 3.4 6.5 12 (Note 3) - - -
+BUS Current – 75 VDC at Continuous Output Power
3
Average (A
DC
) - - - - 3 6.7
Instantaneous Peak (A
PEAK
) - - - - 12.7 25.5
Power Dissipation at 40°C
P
CONT
(watts)
17 29 60 110 8 12

Specifications 4/13/2012 Kollmorgen
8 S200 Position Node Installation Guide
AC Input DC Input
Drive Model Number: S20260 S20360 S20660 S212660 S20330 S20630
Shunt Regulator
Peak Power kW (500 ms) 4.4 at 36 6.4 at 25 10 at 15 10 at 15 - -
Cont. Power watts 440 at 36 640 at 25 1000 at
15
1500 at
15
- -
Maximum Regen Duty Cycle (%) 10 at 36 10 at 25 10 at 15 15 at 15 - -
Regen Value () 25 – 50 25 – 50 12 – 50 8 – 50 - -
Bus Capacitance Energy Absorption (joules)
340 VDC Nominal BUS 15.5 15.5 20 45 - -
75 VDC BUS with 4,000 µf -
(5 volt increase to 80 VDC)
- - -
1.5 1.5
Output Current Ripple Freq f
S
(kHz)
20 20 20 >16 31.2 31.2
Minimum Motor Inductance l-l
(mH)
5 2.5 1.25 0.9 - -
At 75 VDC - - - - 0.4 0.2
Maximum Motor Inductance l-l
(mH)
300 150 75 45 30 15
Maximum Motor Power Cable Length
4
18 AWG cable (m) 50 50 25 - 50 25
14 AWG Cable (m) 50 50 50 50 50 50
Peak Output Current listed is for sine mode. In six-step mode, the peak output currents
are scaled to give the same output torque as in sine mode with a pure sinusoidal Back
EMF motor.
To convert A
RMS
to A(0-pk), multiply A
RMS
* 1.414.
For Operation above 40
o
C ambient: Derate linearly to 67% at 50
o
C .
At higher ambient temperatures (above 30
o
C) the S20360 drive needs to be mounted on
a thermally conductive surface to limit the heatsink temperature to less than 75
o
C.
Single phase operation of the S20660 requires derating of continuous output power to
avoid excessive AC line front-end currents.
See Appendix – Cables for voltage loss vs cable length.
1
2
3
4

Specifications 4/13/2012 Kollmorgen
9 S200 Position Node Installation Guide
3.2 INPUT POWER SPECIFICATIONS
AC Motor Power Supply
Input Voltage Range (RMS) VAC 90 to 265
Phases 1 or 3
Transformer Suggested KVA 2 to 3
Maximum AC Line KVA
1
100
1
Maximum AC Line is specified to limit the mains surges to the drive.
AC Bus Voltage and Faults
240 VAC Input Nominal Bus Voltage 320 VDC
120 VAC Input Nominal Bus Voltage 155 VDC
BUS Under voltage Fault Factory Default is None
BUS Over voltage (BusOV) Fault 407 VDC + 5%
BUS Regen Voltage = 0.974*BusOV = 397 VDC Nominal
AC Inrush Current & Fusing
Worse Case Inrush Peak Current at 240 VAC 140 A 0-p
Inrush pulse width 1.5 ms
Recommended Fusing Line Inputs
Type – 250 VAC Time Delay Fuse
S20260 S20360 S20660 S21260
240 VAC 3 Phase
(A
RMS
)
FRN-R-5 FRN-R-8 FRNR-15 FRN-R-25
240 VAC 1 Phase
(A
RMS
)
FRN-R-5 FRN-R-10 FRN-R-20 FRN-R-30
120 VAC 1 Phase
(A
RMS
)
FRN-R-5 FRN-R-10 FRN-R-20
-
AC Power on Delay
Control Power Applied to Drive Operational 1.25 seconds
AC Control Power Supply
85 VAC to 265 VAC single phase
47 to 63 Hz
Input Voltage Range (RMS)
120 VDC to 375 VDC
85 VAC 60 Hz > 0.78 60 Hz cycles
120 VAC 60 Hz > 3.3 60 Hz cycles
Ride Through Time for AC Line Drop
240 VAC 60 Hz >18.5 60 Hz cycles

Specifications 4/13/2012 Kollmorgen
10 S200 Position Node Installation Guide
3.3 DC INPUT DRIVES - CONTROL AND POWER
DC Control Power
Control Voltage Range (VDC)
(J1-1 to J1-2)
+10 to +90
Control Input power (watts)
1
2 to 8
1
(20 watt min supply recommended) Refer to the DC Power Supply Section for detailed
application information and requirements.
DC BUS Voltage and Faults
+BUS Voltage Range (VDC)
(J1-3 to J1-2)
+20 to +90
+BUS Under voltage Fault +17 VDC nominal
+BUS Overvoltage Fault +91 VDC nominal
DC Power On Delay
Control Power Applied to Drive
Operational
1.5 seconds
3.4 CONTROL LOOP PERFORMANCE
Motor Current Control
Motor Phase Current Waveform Pure sinusoidal or six-step, depending on
feedback device
(In Sine or six-step mode output torque = Motor K
T
*Drive I
FB
)
Motor Shaft Torque (Ignoring motor magnetic saturation)
Peak K
T
(N-m/A
RMS
)*Drive Ipeak (A
RMS
)
Instantaneous K
T
(N-m/A
RMS
)*IFB (A
RMS
)

Specifications 4/13/2012 Kollmorgen
11 S200 Position Node Installation Guide
Velocity Loop Performance
Maximum Stable Bandwidth (Hz with SFD) 400
Update Period (µs) 0.8
Range (rpm) 0 to 18,300
< 0.001 rpm analog
Command Resolution
0.558 rpm serial
Velocity Loop Compensation
KVP Range (Depends on Ipeak) 0.00044 to 0.106 (Ipeak)(1/rad/sec)
KVP Resolution (%) 10
KVI Range (Hz) 0 to > 22
KVI Resolution (%) 10
ARF0
1
Range (Hz) 24.3 to > 46627
ARF1
1
Range (Hz) 24.3 to > 46627
1
Values for ARF0, ARF1; from 3012 to 24873 Hz cannot be set.
Current Loop Specifications
- 3 dB Bandwidth (Hz) > 2000
- 45° Phase Lag (Hz) > 1000
Current Loop Bandwidth
Maximum Bandwidth
AC Input Drive (kHz) 3
DC Input Drive (kHz) 5
Recommended Bandwidth
AC Input Drive (kHz) 2
DC Input Drive (kHz) 3
SFD Auto Set (kHz) AC &
DC
2
Bandwidth Variation For
Fixed Motor L
(% regulated independent of
bus volt)
± 2.5
Update Period (µs) 0.8
Recommended Max Motor Electrical Frequency (Hz)
AC Input Drive (Hz) 600
DC Input Drive (Hz) 900

Specifications 4/13/2012 Kollmorgen
12 S200 Position Node Installation Guide
General Performance
Max Tracking Rate (rpm) > 48600
Max Recommended Rate (rpm) 25000
Max Tracking Acceleration (rpm/sec) > 16x10
6
Maximum Feedback Cable Length 50 m (164 ft)
3.5 MECHANICAL SPECIFICATIONS
Physical Dimensions and Specifications
S20330-CNS
S20330-DNS
S20630-CNS
S20630-DNS
S20250-CNS
S20250-DNS
S20260-CNS
S20260-DNS
S20350-CNS
S20350-DNS
S20360-CNS
S20360-DNS
S20650-CNS
S20650-DNS
S20660-CNS
S20660-DNS
S21260-CNS
S21260-DNS
Drive Height (A)
152.4 mm 152.4 mm 175.0 mm 175.0 mm 177.0 mm
6.00 in 6.00 in 6.9 in 6.90 in 6.97 in
Drive Width (B)
28.7 mm 48.3 mm 54.8 mm 54.8 mm 76.2 mm
1.90 in 1.90 in 2.16 in 2.16 in 3.0 in
Drive Depth
1
(C)
100.8 mm 100.8 mm 131.6 mm 131.6 mm 152 mm
3.97 in 3.97 in 5.18 in 5.18 in 5.98 in
Mounting Hardware
M4 or #8 M4 or #8
M4 or #8
M4 or #8 M4 or #8
Drive Weight
0.40 kg 0.5 kg 0.77 kg 0.82 kg 1.5 kg
Nominal
1.00lb 1.10 lb 1.69 lb 1.80 lb 3.2 lb
1
Depth measurement is for drive only. Add approximately 50.8 mm (2 in) to depth given in the table
to accommodate mating connectors and wire bend radius.
3.6 I/O SPECIFICATIONS
Note: Analog command is not allowed in this product. Digital Velocity and Motion Task position
loop control is the only possibilities.
Analog Output (DacMon)
DACMON1, DACMON 2 (J4 14,15)
Maximum Range (volts) 0.5 – 4.5
Full Scale Tolerance (%)
Typical (Worse Case) +/- 1 (± 5)
Linearity (% Full Scale) <0.1
Monotonic to < 2
-16
Full Scale
Offset (mV) < 100
Offset Drift (µV/°C typ.) 250

Specifications 4/13/2012 Kollmorgen
13 S200 Position Node Installation Guide
Quadrature Input
Quadrature Input CHA (J12-12, 13) CHB (J12-14,15)
Type RS-422/RS-485, TTL, Open Collector
compatible
Input Voltage +/- 200mV Differential
Input Termination Please see diagrams in manual
Maximum Line Frequency 625 kHz (corresponds to 2.5 MHz
quadrature pulse rate)
General Purpose Digital Inputs
DINP1-4, DINP6-9 (J4 2-5 and J12 2-5)
Input Voltage ± ( 4.0 - 30.0) volts
Referenced to DINPCOM (J4-5)
Input Current 0.65 - 6.7 mA
Response Time 1.0 ms
DINP5/DINP10 (J4-10 & 11, J12-8 & 9)
Input Voltage 3.0 – 6.0 volts
Input Current 9.0 – 24.0 mA
General Purpose Outputs
DOUT1, DOUT2, DOUT3 (J4-6,7,8,9 J12-6,7)
Maximum Output Voltage - 0.30 to 30.0 volts
Clamp Voltage 33 volt ± 6%
Maximum Output Current 50 mA
On voltage 1.0 volts at 10 mA
1.2 volts at 50 mA
Response Time 1.0 ms
Quadrature Outputs
Quadrature Output (CHA- J4-19, 20 CHB- J4-21,22 CHZ- J4-17,18)
Type RS-422/RS-485
Output Voltage 5.0 V Differential Output - Unloaded
Hysteresis 1/2 Quadrature Count corresponding to
1/8 Encoder Line Count
Resolution
(With SFD)
125, 128, 500, 512, 1000, 1024, 2000,
2048, 2500, 4096, 5000, 8192, 10000,
16384, 20000, 32768
Maximum Output Frequency 2.5 MHz
Marker Pulse Width Approximately 120 degrees

Specifications 4/13/2012 Kollmorgen
14 S200 Position Node Installation Guide
3.7 ENVIRONMENTAL SPECIFICATIONS
Environmental Specifications
Operating Temperature (° C) – Full
Rating
0 to 40
Operating Temperature (° C) – Derated
Linearly Derate Continuous Current to
67% of 40
o
C Rating
40 – 50
Pollution Degree 2
Storage Temperature (° C) -20 to 70
Humidity (% non-condensing) 10 to 90
Altitude <1500 m (5000 feet)
3.8 SMART FEEDBACK DEVICE (SFD)
SFD (Smart Feedback Device)
Resolution/Rev (arc min) 24 bits = 0.0013
Repeatability (arc min RMS) < ± 2
-19
Rev = ± 0.04
Noise
No Filtering (arc min RMS) < 2
-17
Rev RMS = 0.16
150 Hz Single Pole Filtered (arc min
RMS)
< 2
-18
Rev RMS = 0.08
10 Hz Single Pole Filtered (arc min
RMS)
< 2
-19
Rev RMS = 0.02
DC Offset Temperature Drift < 2
-18
Rev/° C = 0.08 arc min/° C
Absolute Accuracy
AKM1 (arc min) ± 2
-10.3
Rev = ±17
AKM2 or 3, 4 (arc min) ± 2
-11.1
Rev = ±10
Communications Update Period (µs) 51.2

Kollmorgen 4/13/2012 Accessories
S200 Position Node Installation Guide 15
4.0 ACCESSORIES
4.1 CABLES
Kollmorgen offers pre-made high quality cables for help in installation.
4.1.1 Motor and feedback cables
Motor and Feedback cable selections are covered in our Motioneering package to help select the correct sets
based on motor and drive size selection.
4.1.2 Serial Communications Cable
Kollmorgen offers a 6 ft serial communications cable designed to connect directly between the S200 Position
Node and standard PC 9 Pin communications port. Order Part Number P7S2-232-D.

Accessories 4/13/2012 Kollmorgen
16 S200 Position Node Installation Guide
4.2 CONNECTOR KITS
Kollmorgen offers several connector kit options to help interface drive connections. Please note that there are
connector kits that are designed to interface to just the base unit drive and connector kits designed for the
auxiliary S200 Position Node auxiliary features. More than one connector kit may be required.
4.2.1 Base Unit Connector Kits
CK-S200-MF connector kit includes motor
and feedback connectors for all low power
base unit models. (JJ2 and J4).
This connector kit is useful in applications
and customers not using Kollmorgen Cables
Sets.
Applicable Drive Models:
S202x0-xNS, S20350-xNS, S20360-xNS,
S20660-xNS.
CK-S200-MP-AC connector kit includes
motor and power connectors for all low power
AC Input base unit models. (J1 and J2).
This connector kit is useful in applications
and customers not using Kollmorgen
Armature cables.
Applicable Drive Models:
S20250-xNS, S20260-xNS, S20350-xNS,
S20360-xNS, S20660-xNS.

Accessories 4/13/2012 Kollmorgen
17 S200 Position Node Installation Guide
CK-S200-IP-DC connector kit includes power
and signal connectors for the S200 Base Unit
models. (J1 and J4).
This connector kit provides the auxiliary
connectors required when purchasing
Kollmorgen Cable sets.
Applicable Drive Models:
S20330-xNS, S20630-xNS
CK-S200-IP-DC-TB connector kit includes the
power connector and signal connector with
terminal block break out for the DC S200
Base Unit models. (J1 and J4).
This connector kit provides the auxiliary
connectors required when purchasing
Kollmorgen Cable sets when screw terminals
are preferred over soldering of J4.
Applicable Drive Models:
S20330-xNS, S20630-xNS
CK-S200-IN-AC connector kit includes both
the command signal connector, J4, and the
AC power connector, J1, for the low power
S200 Base Unit models. Solder cup
connector.
This connector kit provides the auxiliary
connectors required when purchasing
Kollmorgen Cable sets.
Applicable Drive Models:
S20250-xNS, S20260-xNS, S20350-xNS,
S20360-xNS, x20660-xNS.

Accessories 4/13/2012 Kollmorgen
18 S200 Position Node Installation Guide
CK-S200-IN-AC-TB connector kit includes
both the command signal connector, J4, and
the AC power connector, J1, for the low
power S200 Base Unit models. Cage Clamp
connector kit.
This connector kit provides the auxiliary
connectors required when purchasing
Kollmorgen Cable sets where terminal screws
are preferred over soldering of J4.
Applicable Drive Models:
S20250-xNS, S20260-xNS, S20350-xNS,
S20360-xNS, x20660-xNS.
CK-S200-IN-AC connector kit includes
command signal connector, J4, for the S200
Base Unit models. Solder cup connector.
Applicable Drive Models:
All models
CK-S200-IN-AC-TB connector kit
includes command signal connector, J4,
for the S200 Base Unit models. Cage
clamp screw terminal connector.
Applicable Drive Models:
All models
/